Table of Contents
Advertisement
Advertisement
Table of Contents

Subscribe to Our Youtube Channel
Related Manuals for Canon High Capacity Stacker-H1


Summary of Contents for Canon High Capacity Stacker-H1
- Page 1 Operation guide High Capacity Stacker-H1...
- Page 2 No part of this publication may be reproduced, transmitted, transcribed, stored in a retrieval system, or translated into any language or computer language in any form or by any means, electronic, mechanical, magnetic, optical, chemical, manual, or otherwise, without the prior written permission of Canon Inc. Edition 2015-07...
-
Page 3: Table Of Contents
Clear a paper jam in the paper path (B1)......................37 Clear a paper jam in the horizontal paper path (B2-B5)................Clear a paper jam at the flip wheel (C1)....................... Chapter 6 Options..........................Use the EasyLift to unload the stacker......................Appendix A Specifications........................Specifications..............................48 Index...........................49 Canon High Capacity Stacker-H1... - Page 4 Contents Canon High Capacity Stacker-H1...
-
Page 5: Chapter 1 Preface
Chapter 1 Preface... -
Page 6: Disclaimers
Disclaimers The information in this document is subject to change without notice. CANON INC. MAKES NO WARRANTY OF ANY KIND WITH REGARD TO THIS MATERIAL, EITHER EXPRESS OR IMPLIED, EXCEPT AS PROVIDED HEREIN, INCLUDING WITHOUT LIMITATION, THEREOF, WARRANTIES AS TO MARKETABILITY, MERCHANTABILITY, FITNESS FOR A PARTICULAR PURPOSE OF USE OR NON-INFRINGEMENT. -
Page 7: Notes For The Reader
Notes for the reader Notes for the reader Introduction This manual helps you to use the High Capacity Stacker-H1 . The manual contains a description of the product and guidelines to use and operate the High Capacity Stacker-H1 . Definition Attention Getters Parts of this manual require your special attention. - Page 8 Notes for the reader Chapter 1 - Preface Canon High Capacity Stacker-H1...
-
Page 9: Parts And Their Function
Chapter 2 Parts and their function... -
Page 10: Description Of The Main Parts
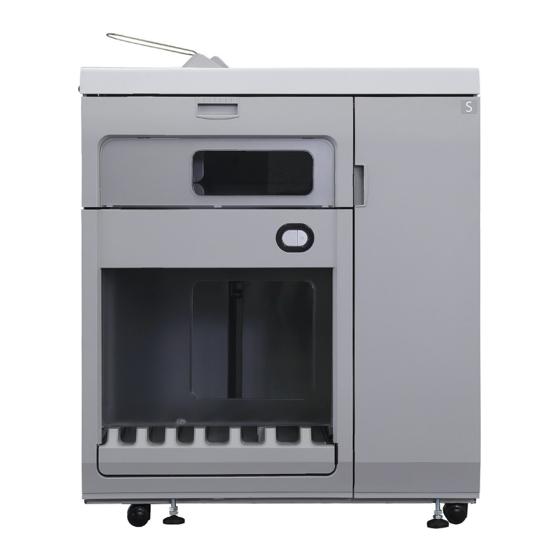
Description of the main parts Description of the main parts Illustration [1] The main parts of High Capacity Stacker-H1 Main parts Part Description Front door The front door gives access to the registration unit and the error locations A1-A7. Front cover The front cover gives access to the flip rings and error location C1 (flip wheel). - Page 11 The top tray is an output location for small jobs, proof prints, error prints and unused cyclic media. Related information Description of the stacker control panel on page 12 Chapter 2 - Parts and their function Canon High Capacity Stacker-H1...
-
Page 12: Description Of The Stacker Control Panel
Status LEDs Status Description No stack height indicator is lit. The stack tray is empty. When the machine is off or in low power mode, the LEDs are off. Chapter 2 - Parts and their function Canon High Capacity Stacker-H1... - Page 13 An error or paper jam has occurred at the posi- tion indicated in red. In this example, the paper jam has occurred at the flip wheel (C1). Related information Description of the main parts on page 10 Chapter 2 - Parts and their function Canon High Capacity Stacker-H1...
- Page 14 Description of the stacker control panel Chapter 2 - Parts and their function Canon High Capacity Stacker-H1...
-
Page 15: Chapter 3 Basic Instructions
Chapter 3 Basic instructions... -
Page 16: Turn The Stacker On
Confirm that the power plug is plugged securely into a power outlet. Open the power switch cover. Press the ON side (I) of the power switch to turn the stacker on. Close the power switch cover. Chapter 3 - Basic instructions Canon High Capacity Stacker-H1... -
Page 17: Turn The Stacker Off
Press the OFF side (O) of the power switch to turn the stacker off. Close the power switch cover. If required, disconnect the power plug to cut off the power supply to the stacker completely. Chapter 3 - Basic instructions Canon High Capacity Stacker-H1... -
Page 18: Eject A Stack Manually
Then the filling of the stacker continues. blinks fast (green). Therefore, the stack can contain incomplete sets. NOTE To stop a job competely, you must use the Stop button on the printer control panel. Chapter 3 - Basic instructions Canon High Capacity Stacker-H1... -
Page 19: Chapter 4 Use The Stacker
Chapter 4 Use the stacker... -
Page 20: Filling Scenarios
This setting is used to keep sets In the Settings Editor: [Preferences] - together. > [Print job defaults] -> [Stacker] -> See the section 'Set the mini- [Minimum filling level]. mum filling level'. Chapter 4 - Use the stacker Canon High Capacity Stacker-H1... -
Page 21: Change The Default Stacker Settings
The sheets will be stacked without offset. Factory default value: 15 mm (0.6"). [Minimum filling level] See the section 'Set the minimum filling level'. Chapter 4 - Use the stacker Canon High Capacity Stacker-H1... - Page 22 Access the Settings Editor on the PRISMAsync controller. Click [Preferences] - [Print job defaults]. Scroll down to the [Stacker] section. Click the setting you want to change. Change the value. Click [OK]. Chapter 4 - Use the stacker Canon High Capacity Stacker-H1...
-
Page 23: Set The Maximum Stack Height
Click [Maximum stack height]. Enter the desired stack height. You can enter a value from 10 mm to 355 mm (0.4" to 14.0"). The factory default value is 302 mm (11.9"). Click [OK]. Chapter 4 - Use the stacker Canon High Capacity Stacker-H1... -
Page 24: Set The Minimum Filling Level
You can define a percentage from 1% - 100% in steps of 1%. The factory default value is 80%. This value makes sure that, in most cases, sets are kept together. Click [OK]. Chapter 4 - Use the stacker Canon High Capacity Stacker-H1... -
Page 25: Examples Of Using The Maximum Stack Height And The Minimum Filling Level Settings
• Fills the stack tray up to the specified height of 250 mm (9.8"). • Ejects the stack. • Puts the rest of the job on the next output tray available. Chapter 4 - Use the stacker Canon High Capacity Stacker-H1... - Page 26 The jobs are stacked. At the end of each job, the controller calculates whether the next job will fit. When the next job will not fit, the job is delivered to the next output tray available. Chapter 4 - Use the stacker Canon High Capacity Stacker-H1...
- Page 27 302 mm / 11.9” 302 mm / 11.9” 302 mm / 11.9” Related information Set the maximum stack height on page 23 Set the minimum filling level on page 24 Chapter 4 - Use the stacker Canon High Capacity Stacker-H1...
- Page 28 Examples of using the [Maximum stack height] and the [Minimum filling level] settings Chapter 4 - Use the stacker Canon High Capacity Stacker-H1...
-
Page 29: Chapter 5 Troubleshooting
Chapter 5 Troubleshooting... -
Page 30: Error Location Labels
Open the front door. B1-B5 Paper path Open the top cover. Flip wheel Open the front cover. No label, only in- Stack area Press the eject button. dicated on the stacker control panel Chapter 5 - Troubleshooting Canon High Capacity Stacker-H1... - Page 31 Error location labels Chapter 5 - Troubleshooting Canon High Capacity Stacker-H1...
-
Page 32: Remove An Error Sheet From The Internal Error Tray (A1)
[6] Indication at the stacker control panel Remove an error sheet from A1 Step Action Illustration Open the front door. Remove the sheets from the internal error tray (A1). Close the front door. Chapter 5 - Troubleshooting Canon High Capacity Stacker-H1... -
Page 33: Clear A Paper Jam In The Input Paper Path (A2-A5)
Turn A7 to remove jammed paper. CAUTION When you turn the knob, be careful not to get your fingers caught. Open A2, A3, A4 and A5 to remove the jam- med paper. Chapter 5 - Troubleshooting Canon High Capacity Stacker-H1... - Page 34 Clear a paper jam in the input paper path (A2-A5) Step Action Illustration Close the front door. Chapter 5 - Troubleshooting Canon High Capacity Stacker-H1...
-
Page 35: Clear A Paper Jam In The Input Paper Path Of The Registration Unit (A6-A7)
Clear a paper jam at A6-A7 Step Action Illustration Open the front door. Turn A7 to remove the jammed paper. CAUTION When you turn the knob, be careful not to get your fingers caught. Chapter 5 - Troubleshooting Canon High Capacity Stacker-H1... - Page 36 If the lower input paper path of the registration unit also con‐ tains jammed paper, only au‐ thorised and trained persons are allowed to remove the jam‐ med paper. Close the front door. Chapter 5 - Troubleshooting Canon High Capacity Stacker-H1...
-
Page 37: Clear A Paper Jam In The Paper Path (B1)
A red LED lights up at the stacker control panel. Illustration [9] Indication at the stacker control panel Clear a paper jam at B1 Step Action Illustration Open the top cover. Open B1 and remove the jammed paper. Chapter 5 - Troubleshooting Canon High Capacity Stacker-H1... - Page 38 Clear a paper jam in the paper path (B1) Step Action Illustration Close the top cover. CAUTION When you close the top cover, be careful not to get your fin‐ gers caught. Chapter 5 - Troubleshooting Canon High Capacity Stacker-H1...
-
Page 39: Clear A Paper Jam In The Horizontal Paper Path (B2-B5)
Illustration [10] Indication at the stacker control panel Clear a paper jam at B2-B5 Step Action Illustration Open the top cover. Open B2, B3, B4 and B5 to remove the jammed paper. Chapter 5 - Troubleshooting Canon High Capacity Stacker-H1... - Page 40 Clear a paper jam in the horizontal paper path (B2-B5) Step Action Illustration Close the top cover. CAUTION When you close the top cover, be careful not to get your fin‐ gers caught. Chapter 5 - Troubleshooting Canon High Capacity Stacker-H1...
-
Page 41: Clear A Paper Jam At The Flip Wheel (C1)
[11] Indication at the stacker control panel Clear a paper jam at C1 Step Action Illustration Open the front cover. Open C1 and remove the jammed paper from the flip wheel. Close the front cover. Chapter 5 - Troubleshooting Canon High Capacity Stacker-H1... - Page 42 Clear a paper jam at the flip wheel (C1) Chapter 5 - Troubleshooting Canon High Capacity Stacker-H1...
-
Page 43: Chapter 6 Options
Chapter 6 Options... -
Page 44: Use The Easylift To Unload The Stacker
[13] The weight of stacks of 100, 500, 1,000 and 2,000 sheets - Examples for US media Use the EasyLift Step Action Illustration Slide the forks of the EasyLift under the paper. Chapter 6 - Options Canon High Capacity Stacker-H1... - Page 45 Please observe the national health and safety regulations in your country. Lift the EasyLift to remove the paper from the eject tray. Make sure to place the EasyLift on a level surface. Chapter 6 - Options Canon High Capacity Stacker-H1...
- Page 46 Use the EasyLift to unload the stacker Chapter 6 - Options Canon High Capacity Stacker-H1...
-
Page 47: Appendix A Specifications
Appendix A Specifications... -
Page 48: Specifications
1,040 mm x 899 mm x 1,250 mm (40.9" x 35.4" x 49.2") (when eject tray is ejected) Weight 120 kg (264.6 lb) * Paper weight differs depending on the connected host machine. Appendix A - Specifications Canon High Capacity Stacker-H1... -
Page 49: Index
Slide door............Status..............Stack tray............Straightest stacks possible........Stacker control panel........Top cover............tray.............10 Maximum stack height...........23 Turn the stacker off..........Examples............Turn the stacker on..........16 Minimum filling level Examples............Optionals EasyLift..............44 Paper jam A2-A5..............33 A6-A7..............35 B1...............37 Canon High Capacity Stacker-H1... - Page 50 Index Canon High Capacity Stacker-H1...
- Page 52 Canon Inc. www.canon.com Canon U.S.A., Inc. www.usa.canon.com Canon Canada Inc. www.canon.ca Canon Europa Inc. www.canon-europe.com Canon Latin America Inc. www.cla.canon.com Canon Australia PTY. Ltd www.canon.com.au Canon China Co., Ltd www.canon.com.cn Canon Singapore PTE. Ltd www.canon.com.sg Canon Hongkong Co., Ltd www.canon.com.hk USRM2-5628-01 ©...
Need help?
Do you have a question about the High Capacity Stacker-H1 and is the answer not in the manual?
Questions and answers