Rockwell Automation Allen-Bradley ASEM 6300B User Manual
Machine mount box pc
Hide thumbs
Also See for Allen-Bradley ASEM 6300B:
- User manual (70 pages) ,
- Installation instructions manual (10 pages) ,
- Installation instructions manual (6 pages)
Table of Contents
Advertisement
Quick Links
Advertisement
Table of Contents

Subscribe to Our Youtube Channel
Related Manuals for Rockwell Automation Allen-Bradley ASEM 6300B


Summary of Contents for Rockwell Automation Allen-Bradley ASEM 6300B
- Page 1 Machine Mount Box PC Bulletin Number 6300B-MM User Manual Original Instructions...
- Page 2 If this equipment is used in a manner not specified by the manufacturer, the protection provided by the equipment may be impaired. In no event will Rockwell Automation, Inc. be responsible or liable for indirect or consequential damages resulting from the use or application of this equipment.
-
Page 3: Table Of Contents
Shut Down ............. . . 22 Rockwell Automation Publication 6300B-UM003A-EN-P - December 2022... - Page 4 Add an HDD/SSD Card............36 Rockwell Automation Publication 6300B-UM003A-EN-P - December 2022...
-
Page 5: Preface
Provides an overview of American motor circuit design based on methods that are Design, IC-AT001 outlined in the NEC. CIP Security™ with Rockwell Automation Products Application Technique, Provides information on CIP Security, including which Rockwell Automation products SECURE-AT001 support CIP Security. EtherNet/IP™ Network Devices User Manual, ENET-UM006 Describes how to configure and use EtherNet/IP devices to communicate on the EtherNet/IP network. - Page 6 Notes: Rockwell Automation Publication 6300B-UM003A-EN-P - December 2022...
-
Page 7: Overview
The following figure provides important dimensions to plan the installation of your box PC. Figure 1 - Approximate Dimensions [mm (in.)], No Brackets Side View Front View 430.0 438.0 (16.93) (17.24) 305.0 (0.31) (12.00) Bottom View 175.0 (6.89) Rockwell Automation Publication 6300B-UM003A-EN-P - December 2022... -
Page 8: Peripheral Connections
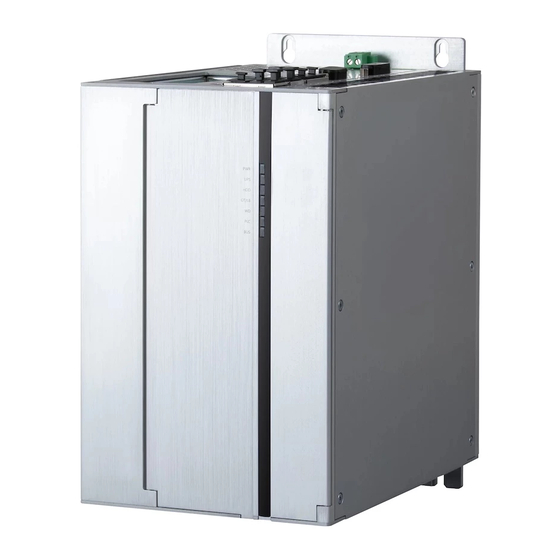
Front Panel (shown with access door open) Power ON button Reset button Power ON LED HDD activity LED 2 x USB 3.0 ports 2 x USB 2.0 ports 2 x external access SSD Rockwell Automation Publication 6300B-UM003A-EN-P - December 2022... -
Page 9: Prepare For Installation
• Industrial Automation Wiring and Grounding Guidelines, publication 1770-4.1, for more installation requirements • UL 50, CSA C22.2 No. 94.1, and IEC 60529, as applicable, for explanations of the degrees of protection provided by enclosures Rockwell Automation Publication 6300B-UM003A-EN-P - December 2022... -
Page 10: Ul/Cul Mark Compliance
(such as a shelf or against a wall), - holes are provided on both sides of the box PC for side mounting installation and on the bottom for an upright installation • use the supplied mounting kit, and Rockwell Automation Publication 6300B-UM003A-EN-P - December 2022... -
Page 11: Power Connection Guidelines
• M6 or four M3 screws, quantity of 4 • Internal toothed washers, quantity of 4 For Shelf-mount or • Carpenter Square Wall-mount Installation • Level • Drill motor and drill bits • Pencil Rockwell Automation Publication 6300B-UM003A-EN-P - December 2022... - Page 12 Chapter 2 Prepare for Installation Notes: Rockwell Automation Publication 6300B-UM003A-EN-P - December 2022...
-
Page 13: Installation
(0.73) 260.0 31.0 Front View (10.24) (1.22) Ø 6.5 Front View (0.26) 448.0 392.0 (17.64) 430.0 (15.43) (16.93) 11.0 (0.43) (0.09) (0.28) (0.09) 305.0 (12.01) Bottom View 205.0 (8.07) 175.0 (6.89) 217.0 (8.54) Rockwell Automation Publication 6300B-UM003A-EN-P - December 2022... - Page 14 N•m (4-40) • Shock and vibration are environmental elements lb•in (10.62 4 Qty • For all wall mounting applications 4x Ø4 4x 20 4x Ø4 (0.16) (0.79) (0.16) Ø8 4x Ø7 (0.31) (0.28) Rockwell Automation Publication 6300B-UM003A-EN-P - December 2022...
-
Page 15: Secure Your Box Pc
Secure the L-shaped mounting brackets to the wall with four internal toothed washers (not supplied) and four screws (not supplied). h. Tighten the screws the suggested torque to the value shown in Table 3 on page Step a …b Step c…h Rockwell Automation Publication 6300B-UM003A-EN-P - December 2022... -
Page 16: For Shelf-Mount Installation
Insert four shock absorbers (supplied) through the drilled mounting holes in the shelf. b. Secure each shock absorber with a self-locking hexagonal nut (supplied). c. Tighten the self-locking hexagonal nuts to a torque of 2 N•m (17.71 lb•in).. Rockwell Automation Publication 6300B-UM003A-EN-P - December 2022... -
Page 17: Connect The Box Pc
IMPORTANT To comply with EN61326-1, all I/O cables must be shielded and rated for indoor use only. USB cables must be less than 9.84 ft (3 m) in length. See Grounding and Bonding for guidance. Rockwell Automation Publication 6300B-UM003A-EN-P - December 2022... -
Page 18: Grounding And Bonding
Use ground wire with an insulation color that is approved by your local inspection authority. 4. Install the ground wire to the ground screw in the following sequence. Sequence No. Description Toothed washer Eyelet terminal Washer Lock washer Ground screw 5. Tighten the ground screw. Rockwell Automation Publication 6300B-UM003A-EN-P - December 2022... -
Page 19: Connect To The Power Source
PC to minimize performance degradation and OS failures. For box PCs with another OS: the default universal extensible firmware interface (UEFI) setting automatically starts the box PC after it is plugged into a power source. Rockwell Automation Publication 6300B-UM003A-EN-P - December 2022... - Page 20 Chapter 3 Installation Notes: Rockwell Automation Publication 6300B-UM003A-EN-P - December 2022...
-
Page 21: Operate
3. Be sure that the external power supply is connected to your box PC and the wall outlet. 4. Press the system reset power button on your box PC. Peripheral Connections on page 8 for the power on button location. Rockwell Automation Publication 6300B-UM003A-EN-P - December 2022... -
Page 22: Restart
- Method 2: Press ‘Ctrl+Alt+Delete’ on an attached keyboard and select ‘Shut Down.’ IMPORTANT If your box PC does not shut down using this method, see Shut Down with the AC Power Switch. IMPORTANT Do not reapply power until the shut down process is complete. Rockwell Automation Publication 6300B-UM003A-EN-P - December 2022... -
Page 23: Shut Down With The Ac Power Switch
1. Press the AC power switch located on back of your box PC. Peripheral Connections on page 8 to identify the location of the AC power switch. IMPORTANT Do not reapply power until the shut down process is complete. Rockwell Automation Publication 6300B-UM003A-EN-P - December 2022... - Page 24 Chapter 4 Operate Notes: Rockwell Automation Publication 6300B-UM003A-EN-P - December 2022...
-
Page 25: Configure, Restore, And Update System Settings
3. Press ‘F2’ to access the setup utility from the POST. 4. Use the numeric keypad on your connected keyboard to modify the setup utility. See Table 4 to navigate to the applicable menu. Rockwell Automation Publication 6300B-UM003A-EN-P - December 2022... -
Page 26: Back Up Or Restore The Os Image
• Step 3: Create a Bootable USB Flash Drive Step 1 — Download the Accessory Files You must be registered with the Rockwell Automation PCDC website and accept the User Agreement before you can download files. 1. Navigate to rok.auto/pcdc. -
Page 27: Back Up The Os Image
10. Select ‘Disk or ISO image (please select)’ from the Boot selection pull-down menu [A]. 11. Click the ‘SELECT’ button [B]. Your File Explorer window appears. 12. Select the ISO file downloaded from the Rockwell Automation PCDC site in Step 1 —... -
Page 28: Restore The Os Image
- Method 1: Restart the box PC: type “exit”, then press the ‘Enter’ key or - Method 2: Shut down the box PC: type “wpeutil shutdown” then press the ‘Enter’ key. The OS image has been restored successfully to your box PC storage drive. Rockwell Automation Publication 6300B-UM003A-EN-P - December 2022... -
Page 29: Update The Uefi
The USB flash drive file format to FAT32 is complete. Step 2 — Download the Updated UEFI You must be registered with the Rockwell Automation PCDC website and accept the User Agreement before you can download files. To download the updated UEFI, perform the following steps. -
Page 30: Step 3 - Update The Uefi
WARNING: Your box PC can become inoperable if it is disconnected from the power source or restarted during this update. 1. Verify that all of the UEFI files have been downloaded to your USB flash drive. Rockwell Automation Publication 6300B-UM003A-EN-P - December 2022... -
Page 31: Restore Factory Defaults Through A Dip Switch
8. Press the ‘F2’ key to enter the UEFI setup utility. 9. Shut down your box PC from the UEFI setup utility. 10. Remove the cover from your box PC. See Remove/Reinstall the Cover on page Rockwell Automation Publication 6300B-UM003A-EN-P - December 2022... - Page 32 18. Perform one of the following actions: a. Toggle down to ‘Restore RealTime Defaults’ or b. press ‘F9’ to select ‘Optimized Defaults’. 19. Select the preferred UEFI setting. 20. Press ‘F10’ to save and exit the UEFI setup utility. Rockwell Automation Publication 6300B-UM003A-EN-P - December 2022...
-
Page 33: Maintenance And Service
3. Reconnect the peripheral cables and AC power cord. See Peripheral Connections on page 8 for I/O port locations. 4. Follow the steps provided in Manual Start on page 21 Restart on page 22 to properly restart your box PC. Rockwell Automation Publication 6300B-UM003A-EN-P - December 2022... -
Page 34: Remove/Reinstall The Cover
Remove the Cover on page 34) and set it aside. The internal USB ports on the motherboard are now accessible. 2. Carefully cut the factory-installed cable tie. 3. Connect your external device to the internal USB port. Rockwell Automation Publication 6300B-UM003A-EN-P - December 2022... -
Page 35: Remove/Add Ram Modules
Your box PC lets you add up to seven PCI/PCIe cards. Follow these instructions to install one or more components (not supplied). 1. Remove the cover from your box PC (see Remove the Cover on page 34) and set it aside. The expansion slots on the motherboard are now accessible. Rockwell Automation Publication 6300B-UM003A-EN-P - December 2022... -
Page 36: Replace The Internal Battery Backup
SDD protective film. IMPORTANT IMPORTANT If a 63.50 mm (2.50 in.) SSD drive will be added: To avoid an electrical short, a height adapter (not supplied) must be used while applying the SSD protective film. Rockwell Automation Publication 6300B-UM003A-EN-P - December 2022... - Page 37 2. Align the tip of the extraction key (provided) to either the HDD1 or HDD2 slot. 3. Turn the extraction key to unlock the slot. 4. Properly seat your HDD/SSD drive into the unlocked slot. Rockwell Automation Publication 6300B-UM003A-EN-P - December 2022...
- Page 38 Chapter 6 Maintenance and Service Notes: Rockwell Automation Publication 6300B-UM003A-EN-P - December 2022...
- Page 39 Machine Mount Box PC User Manual Notes: Rockwell Automation Publication 6300B-UM003A-EN-P - November 2022...
- Page 40 At the end of life, this equipment should be collected separately from any unsorted municipal waste. Rockwell Automation maintains current product environmental compliance information on its website at rok.auto/pec. Allen-Bradley, expanding human possibility, and Rockwell Automation are trademarks of Rockwell Automation, Inc.
Need help?
Do you have a question about the Allen-Bradley ASEM 6300B and is the answer not in the manual?
Questions and answers