Table of Contents
Advertisement
Advertisement
Table of Contents

Related Manuals for Topcom BUTLER 4012 USB VOIP


Summary of Contents for Topcom BUTLER 4012 USB VOIP
- Page 1 BUTLER 4012 USB VOIP USER GUIDE...
- Page 2 This product is in compliance with the essential requirements and other relevant provisions of the R&TTE directive 1999/5/EC. The Declaration of conformity can be found on : http://www.topcom.net/support/cedeclarations.php To be connected to the public analogue telephone network. The CE symbol indicates that the unit complies with the essential requirements of the R&TTE directive.
-
Page 3: Table Of Contents
Topcom Butler 4012 USB VoIP Installation Base Charger (only in Twin, triple or quattro pack) Handset Keys/LED Display (LCD) Handset operation Setting the language Making PSTN Calls Receiving a PSTN Call Activate/deactivate handsfree function Transferring a call to another handset... - Page 4 Topcom Butler 4012 USB VoIP USB PC interface operation Installing the software General PC call settings Skype interface SJ-Phone/Net2Phone interface MSN Messenger interface Trouble shooting Technical characteristics Topcom warranty 10.1 Warranty period 10.2 Warranty handling 10.3 Warranty exclusions Topcom Butler 4012 USB VoIP...
- Page 5 Topcom Butler 4012 USB VoIP Safety Instructions • Only use the charger plug supplied. Do not use other chargers, as this may damage the battery cells. • Only insert rechargeable batteries of the same type. Never use ordinary, non-rechargeable batteries. Insert rechargeable batteries so they connect to the right poles (indicated in the battery compartment of the handset).
-
Page 6: Installation
Topcom Butler 4012 USB VoIP Installation Before you use the telephone for the first time, you must first make sure the battery is charged for 20 hours. If you do not do this, the telephone will not work optimally. Base For installation, do the following: •... -
Page 7: Keys/Led
Topcom Butler 4012 USB VoIP Battery indicator: • The battery is fully charged. • The battery is half drained (50%) • The battery is low. When the battery is low, you will hear warning signals and the battery symbol on the display will blink. -
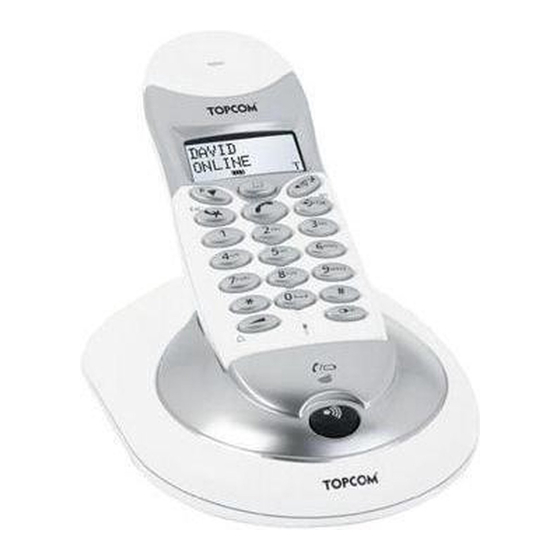
Page 8: Display (Lcd)
Topcom Butler 4012 USB VoIP CHARGER Charge indicator Display (LCD) 13 12 11 6 14 5 Number of calls received. Date (day/month) of calls received. Time (hour:minutes) of calls received. Call information. Symbol display ( ): – this symbol means that the handset is located within the range of the base unit. -
Page 9: Handset Operation
Topcom Butler 4012 USB VoIP Symbol display ( ): – this symbol is the battery indicator. Symbol display ( ): – this symbol means you are in the menu. Symbol display ( ): – this symbol appears when you browse the numbers in the Phone Book. -
Page 10: Making Pstn Calls
Topcom Butler 4012 USB VoIP Making PSTN Calls When making external calls through the handset, base telephone operation is not possible! 4.2.1 External Call • Press the Line key • The Line/Charge indicator (LED) on the base unit will blink. ‘EXT’ and the Call symbol appear on the display. -
Page 11: Receiving A Pstn Call
Topcom Butler 4012 USB VoIP • Press the Line key • The number shown on the display, is dialled automatically. • After finishing your call, press the Line key to hang up. 4.2.6 An internal call: calling another handset This function only works if multiple handsets are subscribed to the base unit ! •... -
Page 12: Activate/Deactivate Handsfree Function
Topcom Butler 4012 USB VoIP Activate/deactivate handsfree function This function allows you to communicate without having to pick up the handset. When you are talking, press the Up/Handsfree key to activate the handsfree function. Press the same button to deactivate the handsfree function. -
Page 13: Call Duration Indicator On The Display
Topcom Butler 4012 USB VoIP The Speaker volume for normal calls and PC-calls are independent. Call Duration Indicator on the display As soon as you press the Line key the call duration appears on the display (minutes- seconds). E.g. “ 01:20 “ for 1 minute and 20 seconds. -
Page 14: Using The Alphanumeric Handset Keypad
Topcom Butler 4012 USB VoIP 4.13 Using the alphanumeric handset keypad Use the alphanumeric keypad to type text. To select a letter, press the corresponding key. E.g. if you press the alphanumeric key ’5’, the first character (j) appears on the display. Press it repeatedly to select other characters from this key. -
Page 15: Switch The Handset On/Off
Topcom Butler 4012 USB VoIP 4.14.3 Changing a name or number in the Phone Book • Press the Programming key • Press the Up or Down key repeatedly until ‘PHONE BOOK’ appears on the display. • Press the Programming key •... -
Page 16: Setting The Ring Volume Level On The Handset
Topcom Butler 4012 USB VoIP 4.15.2 Switch the handset on The handset is turned off. • Press the Programming key . The telephone turns itself on. 4.16 Setting the ring volume level on the handset You can change the ring volume of an incoming call. You have 10 levels. You can set the ring volume of internal and external calls separately so you can hear a difference. -
Page 17: Setting The Ring Volume And Melody Of The Base
Topcom Butler 4012 USB VoIP • ‘EXTERNAL‘ appears on the display. • Press the Programming key • ‘MELODIES‘ appears on the display. • Press the Programming key • The currently set ringer melody appears on the display. • Enter a number between 1 and 9 to select he desired ringer melody. Use the number keypad to do this. -
Page 18: Locking The Key Pad
Topcom Butler 4012 USB VoIP • Press the Up or Down key repeatedly until ‘VOLUME’ appears on the display. • Press the Programming key • The current volume level used appears on the display. • Enter a number between 0 and 9 to select the desired ringer volume. Use the number keypad to do this. -
Page 19: Changing The Pin Code
Topcom Butler 4012 USB VoIP 300ms. This is set to 100ms by default! However, if your system requires a longer flash time, do the following: • Press the Programming key • Press the Up or Down key repeatedly until ‘SETTING’ appears on the display •... -
Page 20: Subscribing Butler 4012 Handset On Another Base (Other Brand/Model)
Topcom Butler 4012 USB VoIP Keep the Paging key on the base unit pressed for 10 seconds until The Line/Charge indicator on the base unit begins to blink rapidly. The Line/Charge indicator will blink rapidly for one minute. During this minute, the base unit is in subscribing mode and you must do the following to subscribe the handset: •... -
Page 21: Removing Subscription Of A Handset To A Base Unit
Topcom Butler 4012 USB VoIP 4.25 Removing subscription of a handset to a base unit It is possible to cancel subscription of a handset to a base unit. You would do this if a handset is damaged and has to be replaced by a new one. -
Page 22: Barring Outgoing Calls
Topcom Butler 4012 USB VoIP 4.26.2 Manual selection If you set the handset to ‘manual selection’, the handset will only choose the base unit you have set. • Press the Programming key • Press the Up or Down key repeatedly until ‘SETTING’ appears on the display. -
Page 23: Direct Call
Topcom Butler 4012 USB VoIP 4.28 Direct Call By setting a Direct Call number, the phone will automatically take the line and dial out this number. This function is useful to use the phone as a emergency phone. 4.28.1 To program the Direct Call number •... -
Page 24: Complete Reinitialisation Of The Telephone
Topcom Butler 4012 USB VoIP 4.30 Complete reinitialisation of the telephone This function allows you to completely reinitialise the telephone without requiring your PIN code. This will delete all Phone Book memory entries, all handsets will be removed, all default settings will be restored and the default PIN code will be restored to ‘0000’. -
Page 25: Setting The Date And Time
Topcom Butler 4012 USB VoIP replace the oldest calls in the memory. The symbol on the display blinks if the call is not read or not answered. If the Call List is empty and you press the Up key , three beep tones will sound. -
Page 26: Calling A Number From The Call List
Topcom Butler 4012 USB VoIP • If neither the Up or Down key is pressed for 15 seconds, the telephone will return to standby mode. • After a call is received, the number of the caller remains on the display for 15 seconds after the last ring. -
Page 27: Voice Mail Indicator
Topcom Butler 4012 USB VoIP Voice mail indicator This function only works if you have the voice mail or phone mail service and if the network sends this indication along with the caller ID (CLIP) information! When you receive a new message in your voice mail system, the icon will appear on the display. -
Page 28: General Pc Call Settings
Topcom Butler 4012 USB VoIP – Plug the USB plug of the phone to the PC after your PC has been started up again. – Windows will install the proper USB driver for the phone – Select the appropriate interface for Skype, MSN Messenger, SJ-phone or Net2Phone at the Butler 4012 software program –... -
Page 29: Skype Interface
Topcom Butler 4012 USB VoIP 7.2.2 PC TIME Settings When the PC time setting is On the Call log will use the PC clock to store the date and time of incoming calls: • Press the Programming key • Press the Up or Down key repeatedly until ‘SETTINGS’... - Page 30 Topcom Butler 4012 USB VoIP Making a Skype call from the online buddy list: The buddy list is your personal Skype contact list. • Press the VoIP-key VoIP • The Skype nickname is show on the display. • Press the Up or Down key repeatedly to scroll through the on-line buddy list.
- Page 31 Topcom Butler 4012 USB VoIP 7.3.3 Interworking Skype calls and normal PSTN calls This section describe the interworking between normal PSTN calls and Skype calls. When you receive two calls at the same time (PSTN and PC call) the first call will be showed on the display.
- Page 32 Topcom Butler 4012 USB VoIP • If neither the Up or Down key is pressed for 15 seconds, the telephone will return to standby mode. • After a call is received, the number of the caller remains on the display for 15 seconds after the last ring.
-
Page 33: Sj-Phone/Net2Phone Interface
Topcom Butler 4012 USB VoIP You can also enter the voicemail menu directly by pressing and holding the ‘1’ or -key. Send a voicemail message directly • Press the Programming key • Press the Up or Down key repeatedly until ‘VOICE MAIL’ appears on the display. -
Page 34: Msn Messenger Interface
Topcom Butler 4012 USB VoIP MSN Messenger interface This section describes the operation under MSN Messenger ! MAKE SURE YOU HAVE SELECTED ‘MSN Messenger’ in the Butler 4012 program: The interworking between MSN messenger and the telephone only works if MSN messenger is opened and minimized in the application tray: 7.5.1 Incoming call... -
Page 35: Trouble Shooting
Topcom Butler 4012 USB VoIP Trouble shooting Symptom Possible cause Solution No display Batteries uncharged Check the position of the batteries Recharge the batteries Handset turned OFF Turn ON the handset No tone Telephone cord badly Check the telephone connected... -
Page 36: Technical Characteristics
10 Topcom warranty 10.1 Warranty period The Topcom units have a 24-month warranty period. The warranty period starts on the day the new unit is purchased. The warranty on batteries is limited to 6 months after purchase. Consumables or defects causing a negligible effect on operation or value of the equipment are not covered. -
Page 37: Warranty Exclusions
Damage or defects caused by incorrect treatment or operation and damage resulting from use of non- original parts or accessories not recommended by Topcom are not covered by the warranty. Topcom cordless phones are designed to work with rechargeable batteries only. The damage caused by the use of non-rechargeable batteries is not covered under warranty. - Page 40 U8006500/UK...
Need help?
Do you have a question about the BUTLER 4012 USB VOIP and is the answer not in the manual?
Questions and answers