L.B. White I-17 Assembly And Installation Instructions
Gas conversion kit individual/zone controlled radiant brooders
Hide thumbs
Also See for I-17:
- Owner's manual and instructions (79 pages) ,
- Owner's manual and installation instructions (28 pages) ,
- Owner's manual and instructions (60 pages)
Advertisement
ASSEMBLY and INSTALLATION INSTRUCTIONS
View these instructions online at www.lbwhite.com
Qualifications for installation:
•
You must be able to read and understand these instructions.
•
You must have suffi cient training and experience to install the kit.
•
You must be able to test the brooder for proper operation.
Discussion:
These instructions are specifi c to radiant brooders models I-17 with D design sequence level in the model number (example:
I17P11000D). Refer to the brooder's clearance and data plate disk.
Initial Preparation:
1.
Ensure 5 PSIG is supplied to all brooders. Appropriate regulators must be installed if necessary.
2.
Close the fuel supply valve and allow all heaters to cool.
3.
Remove the brooder's fi lter.
4.
Disconnect the brooder's gas hose.
5.
Clean the brooder and its fi lter. Refer to the brooder's owner's manual for instructions.
Conversion:
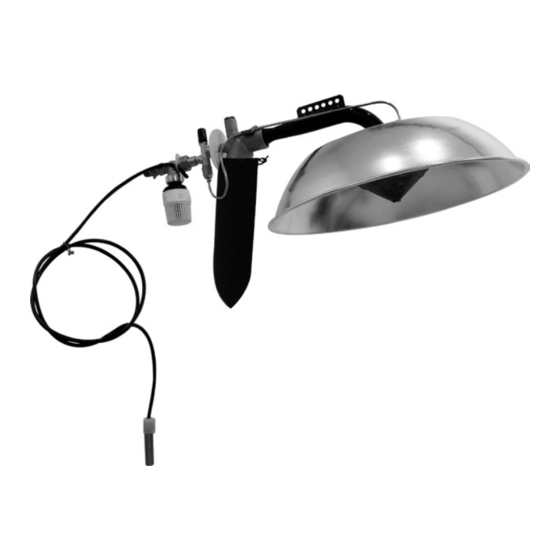
1. Disassemble the brooder as shown in Fig. 1 (Individual controlled brooder) or Fig. 2 (Zone controlled brooder)
FIG. 1 (Individual Controlled)
MODULATING
VALVE BODY
LOOSEN
NUT
SOFT FLAME
THERMOCOUPLE
Gas Conversion Kit
BYPASS
CLEARANCE
ORIFICE
AND DATA
PLATE DISK
DISCONNECT
Individual / Zone Controlled
Tools required:
Phillips- head screwdriver
Adjustable wrench
Hand held butane torch
REMOVE SCREW
AND RETAINER
CLIP
AIR HOUSING
Radiant Brooders
Advertisement
Table of Contents

Subscribe to Our Youtube Channel
Related Manuals for L.B. White I-17


Summary of Contents for L.B. White I-17
- Page 1 You must be able to test the brooder for proper operation. Hand held butane torch Discussion: These instructions are specifi c to radiant brooders models I-17 with D design sequence level in the model number (example: I17P11000D). Refer to the brooder’s clearance and data plate disk. Initial Preparation: Ensure 5 PSIG is supplied to all brooders.
- Page 2 Gas Conversion Kit FIG. 2 (Zone Controlled) REMOVE CLEARANCE AND JAM NUT DATA PLATE DISK REMOVE SCREW AND RETAINER CLIP AIR HOUSING APPLY SOFT FLAME DISCONNECT THERMOCOUPLE 2. Back the jam nut half - way down the threads of the original air housing assembly. 3.
- Page 3 Gas Conversion Kit Conversion: 1. Reconnect the gas hose to the brooder, tightening it securely. 2. Ensure proper hanging confi guration. See the back of this instruction sheet. 3. Open the fuel supply valve and leak check using approved leak detectors. 4.
- Page 4 Service Contact your local L.B. White dealer for replacement parts and service. You may also call the L.B. White Co., Inc. at U.S. & Canada: 1-800-345-7200, Overseas: 001-608-783-5691 assistance, or email us at customerservice@lbwhite.com. Be sure that you have your heater model number and confi...
Need help?
Do you have a question about the I-17 and is the answer not in the manual?
Questions and answers