Advertisement
Quick Links
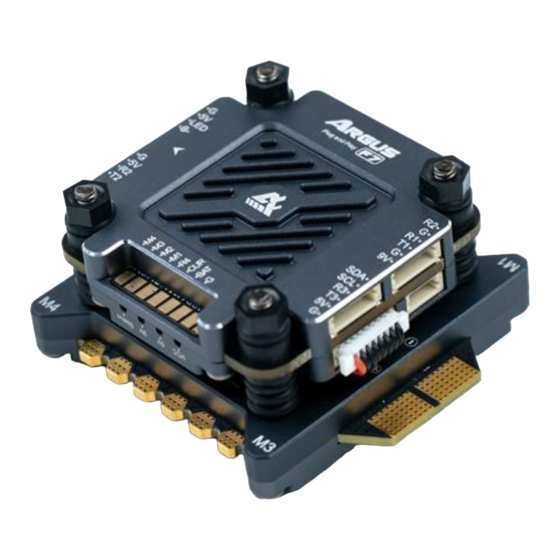
Argus F7Pro/65A Stack
Description of product characteristics:
Both the FC and the ESC are designed with CNC full aluminum cover wrapped, which has excellent protection and efficient heat
dissipation, it protects internal electronics from grass juice and dirt. The aluminum casing significantly enlarge the radiating
surface to quickly dissipates the internal heat for stable performance.
The FC adopts a plug-and-play design, and common peripherals such as DJI O3 air unit, GPS, etc. Can be directly connected
and used, which is simple and fast.
The FC supports up to 8 motor outputs, making it easy to build an X8 drone. In addition, it also integrates 5V/9V dual BEC, and
the 9V BEC can provide independent power supply for VTX to ensure stable operation.
The FC has 4 LED status indicators, which respectively display the working status in different states. Others such as the F722
main control chip, onboard OSD chip, onboard barometer, and onboard black box chip are also readily available.
The ESC adopts large-size MOSFETs with low internal resistance and low heat generation. The high-performance main control
chip G071 has a main frequency of up to 64MHz and supports up to 16-96k PWM frequency adjustment. The combination of
software and hardware brings a silky flight experience.
Advertisement

Related Manuals for Axis ArgusF7Pro/65AStack


Summary of Contents for Axis ArgusF7Pro/65AStack
- Page 1 Argus F7Pro/65A Stack Description of product characteristics: Both the FC and the ESC are designed with CNC full aluminum cover wrapped, which has excellent protection and efficient heat dissipation, it protects internal electronics from grass juice and dirt. The aluminum casing significantly enlarge the radiating surface to quickly dissipates the internal heat for stable performance.
- Page 3 FC Specification Master Control:STM32F722RET6 Gyro:BMI270 Barometer:support OSD:support BEC:9V/2A、5V/2A UART Ports:6 Black box:support(16M Flash Memory) Number of supported motors:M1-M8 Firmware name:AXISFLYINGF7PRO (Betaflight,INAV Not supported yet) Input Voltage:3-6S Lipo(12-50V MAX) Installing Hole:30.5 x 30.5mm/M3 Weight:F7Pro 19.6g/F7( Regular version)8.4g...
- Page 4 ESC Specification Rated current:55A /65A Instantaneous peak current:65A /75A(<10s) Input Voltage:3-6S Lipo(12-30V MAX) ESC Target:BLHeli_32 (ST_G0_04) Current proportion value:Scale=400 PWM frequency range:16-96khz Telemetry:support Ammeter:support BEC:Nothing Installing Hole:30.5 x 30.5mm/M3 Weight:65A/55APro 4IN1 ESC 32g 65A/55A 4IN1 ESC 16.2g...
- Page 5 Interface Definition Peripheral Connection Diagram *Safety tips: Please remove all propellers when connecting to the Betaflight DJI Air unit configuration software! Betaflight is an open source software, flashing the firmware by yourself may cause the product to work unstable. SBUS DJI O3 Air Unit Direct DJI Air Unit...
- Page 6 Analog VTX Video VOUT Analog VTX DCIN...
- Page 7 Analog Camera Video Analog Camera...
- Page 8 Receiver Receiver Note: Use TBS Nano receiver, ELRS receiver...
- Page 9 Note: Use Axisflying M80Q GPS...
- Page 10 Beeper LED、LED Light belt LED Light belt Beeper LED...
- Page 11 ESC: Note: It is recommended to pay attention to the positive and negative poles when soldering the capacitors included in the installation package.
- Page 12 FC:...
- Page 14 Betaflight Instruction about setting About FC 1.Factory default port settings (will be reset after reflashing the firmware) 1.Uart1 MSP 2.Uart2 Receiver 3.Uart3 GPS 4.Uart4 ESC 5.Uart5 Default 6.Uart6 Default...
- Page 15 2.If you change the default installation direction of the FC (the default is that the arrow is facing forward), for example, if the arrow is facing backward, you need to change the default yaw from 0° to 180° on the "Flight Control and Sensor Orientation"...
- Page 16 4.The factory default motor rotation direction has been set to "reverse motor rotation", which is Motor No. 1: Rotate counterclockwise Motor No. 2: Clockwise rotation Please pay attention to the direction and front and back when installing the propeller. Incorrect installation will cause the drone to fail to take off.
- Page 17 5.Steps for X8 FC parameter setting Step 1: On the "Motor" page, change the default QUAD X to OCTO X8, and then click Save and restart. Step 2: After step 1 is completed, eight motors will appear on the right side of the motor page. Please adjust and verify the rotation direction of the eight motors according to the arrow on the left schematic diagram.
- Page 18 About ESC 2.When installed face up, the default motor sequence has been changed if the XT60 power lead are in the front of 1.Recommended keep right the drone. At this time, you need to re-adjust the motor side up when installed ESC sequence and motor steering according to the wizard in the "Motor"...
- Page 19 3.Current Proportion Scale=400 (Click this parameter to obtain relatively accurate real-time osd current data)
- Page 20 FC Shipping List:...
- Page 21 ESC Shipping List:...
- Page 22 Stack Shipping List:...
Need help?
Do you have a question about the ArgusF7Pro/65AStack and is the answer not in the manual?
Questions and answers