Advertisement
Overview
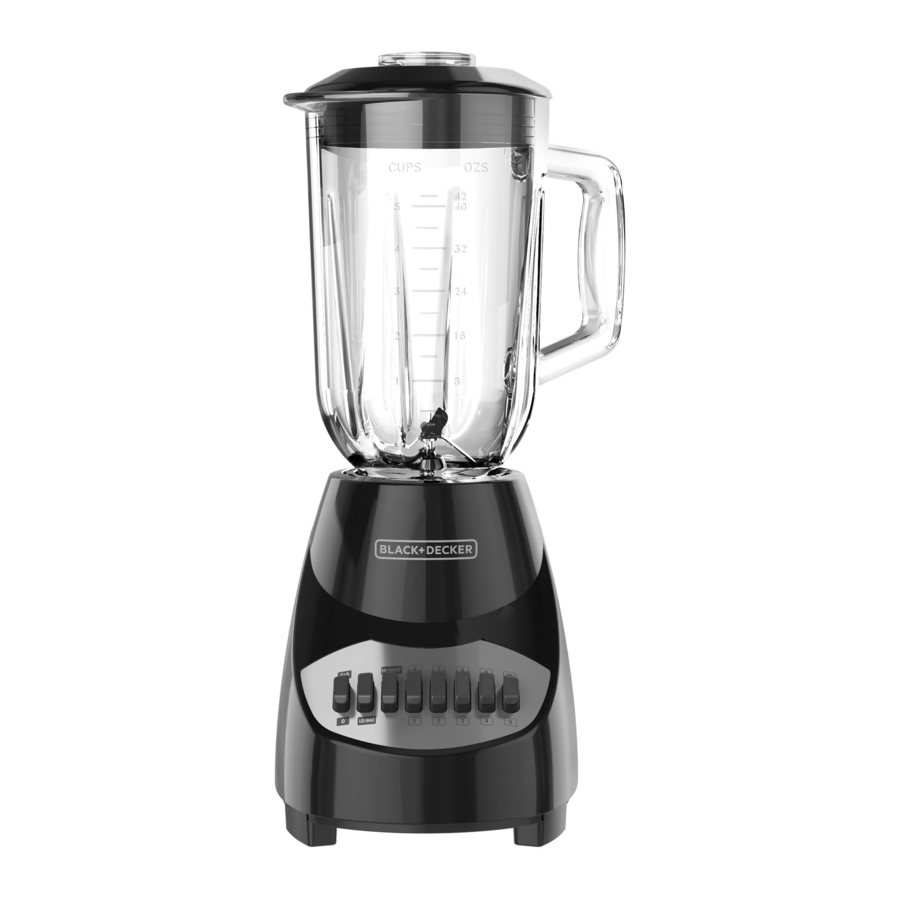
Product may vary slightly from what is illustrated.

- Measuring cup lid insert (Part # BL2010WG-01)†
- Lid†
White BL2010WGC (Part # BL2010WG-02) Black BL2010BGC (Part # BL2010BG-02) - Blending jar: †
BL2010WG: Glass, 42 oz. / 5 cups (Part # Bl2010WG-03) - Handle
- Blender base
- Control panel
- Jar base (not shown)†
White BL2010WGC (Part # BL2010WG-08) Black BL2010BGC (Part # BL2010BG-08) - Gasket (Part # BL2010WG-05) (not shown)†
- Blade assembly (Part # BL2010WG-07) (not shown)†
Note: † indicates consumer replaceable/removable parts
How to Use
This product is for household use only.
GETTING STARTED
- Wash all removable parts as instructed in CARe AND CLeANING section of this manual.
- Wipe outside of appliance with a damp cloth; dry thoroughly.
BLENDER JAR ASSEMBLY
- Turn blending jar upside down and place flat on countertop or work surface.
- Put gasket on top of blade assembly. Place blade assembly with gasket into bottom opening of the jar with blades facing down.
- Place jar base onto jar and rotate clockwise until it is tight.
- Turn assembled jar right side up.
- Place lid with lid cap onto blending jar.
- Uncoil power cord from storage area under the base. Note: Do not plug in the cord.
- Place jar assembly on base, making sure it is press firmly into place. (Jar base should not extend more than ¹/8-inch above the rim at the top of the base.
- Blender is now ready for use.
USING YOUR BLENDER
- Make sure appliance is off.
- Place foods to be blended into jar, liquid first.
- Place lid on jar; make sure measuring cup lid insert is in place.
- Place the jar on the base of the blender.
- Plug power cord into outlet.
Note: When in use, do not leave blender unattended. When using hard foods, such as ice, cheese, nuts and coffee beans, keep one hand on the lid to keep blender in place. - Press the high (HI) or low (LO) button; then select the speed that best suits your desired task. To switch speeds, press the high (HI) or low (LO) button and the new speed desired (see SPEED CHART).
- When blending thick mixtures, such as smoothies, power drinks and milkshakes press the pulse (P) button several times to begin the blending process. Press the pulse (P) button for no more than 5 seconds at a time. This helps break up the ice and distribute the ingredients.
- open the lid cap to add ingredients while the blender is running and drop ingredients through the opening.
![]()
Do not remove the lid while the blender is running. - When finished, press the pulse/off (P/0) button. Make sure blades have completely stopped before attempting to remove the blending jar from the base.
- To remove the jar, grasp the handle and lift straight up. do not twist the jar.
- Remove lid to pour.
- Always unplug the appliance when not in use.
 When blending hot liquids always let them cool at least 5 minutes before blending. Before beginning to blend, remove the measuring cup lid insert and put it back with the opened side tilted away from you. Cover lid with a cloth to avoid splattering and only use lowest speed (1). do not blend more than 2½ to 3 cups at a time.
| SPEED CHART |
| Pulse/Off (P/0): Use for thick mixtures |
| Fast Clean (1): Combine drop of dishwashing liquid and hot water to clean blender |
Stir (2): Liquefy frozen juices, drink mixes and condensed soups
|
Blend (3): Prepare sauces
|
Grate (4): Grate hard cheeses and coconut
|
| Beat (5): Beat eggs for omelets and custards |
Puree (6): Blend protein drinks
|
| Crumb (7): Make cookie, cereal and bread crumbs |
Chop (8): Chop fruits and vegetables
|
| Liquefy (9): Liquefy frozen drinks |
Smoothies/Ice Crush(10): Crush ice
|
DO NOT place any of the following in the blender: large pieces of frozen foods; tough foods such as raw turnips, sweet potatoes and potatoes; bones; hard salami, pepperoni and hard sausages; boiling liquids (cool for 5 minutes before placing in blending jar)
DO NOT:
Operate blender without the lid on the blending jar. Store foods in the blending jar. Overfill the blender. (The blender is more efficient with less rather than more.) Use pulse (P) for more than 5 seconds at a time. Release the pulse (P) button; allow the blender to rest briefly, then continue. Run blender for longer than 30 seconds when using dry foods and 2 minutes when blending liquids. Scrape down sides on blending jar, if necessary and continue blending. Use if blender jar is chipped or cracked.
Tasks not recommended for the blender: Whipping cream; beating egg whites; mixing dough; mashing potatoes; grinding meats; extracting juice from fruits and vegetables
Care and Cleaning
This product contains no user serviceable parts. Refer service to qualified service personnel.
CLEANING
- Before cleaning, turn off (0) and unplug appliance.
- Lift blending jar by handle off power base.
- Remove jar base by turning counterclockwise until loose.
- Remove gasket and blade assembly.
![]()
Blades are sharp, handle carefully. - Remove lid and measuring cup lid insert.
- Wash removable parts by hand or in your dishwasher. Place jar on bottom rack and rest of parts on top-rack only.


- Do not place jar parts in boiling liquids.
- Do not immerse base in liquid. Wipe base with damp cloth and dry thoroughly.
- Remove stubborn spots by rubbing with damp cloth and nonabrasive cleaner.
Note: If liquids spill onto base, wipe with damp cloth and dry thoroughly. do not use rough scouring pads or cleansers on parts or finish.
QUICK CLEANING
For quick cleanup, combine 1 cup hot water and a drop of liquid dish soap in the blending jar. Cover and clean on (5) for about 30 seconds. discard liquid and rinse jar thoroughly.
STORAGE
For convenient storage, wrap the cord around the supports on the bottom of the blender base.

Documents / ResourcesDownload manual
Here you can download full pdf version of manual, it may contain additional safety instructions, warranty information, FCC rules, etc.
Download Black & Decker BL2010BGC, BL2010WGC - Blender Manual
Advertisement


Need help?
Do you have a question about the BL2010BGC and is the answer not in the manual?
Questions and answers