Gevi GECME403-U - Espresso Machine Manual
- Instruction manual (9 pages) ,
- Instruction manual (13 pages) ,
- Instruction manual (14 pages)
Advertisement
- 1 WELCOME
- 2 DESCRIPTION OF THE APPLIANCE
- 3 IMPORTANT SAFEGUARDS
- 4 CORD & PLUG INSTRUCTION
- 5 MAIN OPERATION FUNCTION INSTRUCTION
- 6 CLEANING AND MAINTENANCE
- 7 TIPS FOR PERFECT BARISTA
- 8 TROUBLESHOOTING
- 9 Documents / Resources
WELCOME
Gevi has focused on creati- ng perfect home appliances for our customers. In the past few years, it took us time to do lots of research and many prototypes to achieve our goal. We would like to give you a different user experience. If you want FAQs and more information, please feel free to contact us.
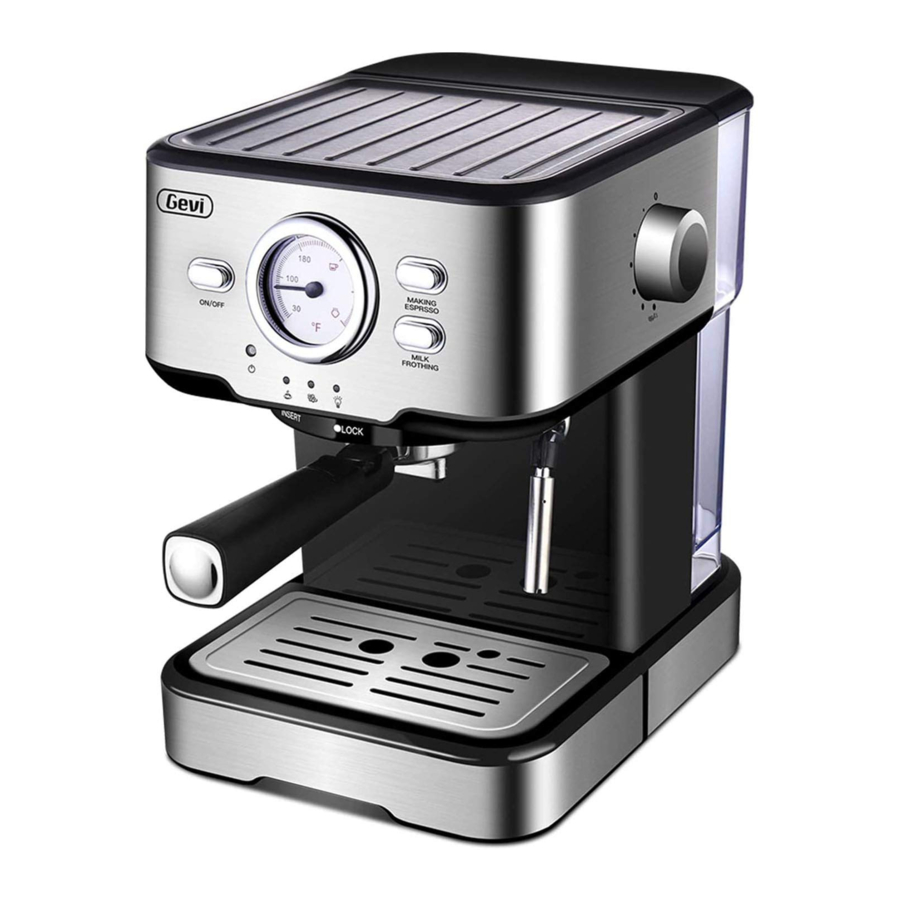
DESCRIPTION OF THE APPLIANCE
MODEL: GECME403-U
Electrical parameters: 120V~ 60Hz 1100W

| Re. | Description | Re. | Description | Re. | Description |
| 1 | ON/OFF button | 8 | Thermometer | 15 | Tank cover |
| 2 | BREWING ESPRESSO button | 9 | Double-cup filter | 16 | Water tank |
| 3 | MILK FROTHING button | 10 | Portafilter | 17 | Steam control knob |
| 4 | Power indicator | 11 | Filter holder | 18 | Steam valve |
| 5 | Espresso function indicator | 12 | Removable cup shelf | 19 | Steam wand |
| 6 | Steam function indicator | 13 | Drip tray | 20 | Spoon & Tamper |
| 7 | Making espresso indicator | 14 | Cup warming plate |
IMPORTANT SAFEGUARDS
Read these instructions carefully and keep it for future use. If this ap- pliance is passed to a third party, then these instructions must be included.
Before using the electrical appliance, some basic precautions should always be followed including the following:
- Read all instructions.
- Before using, check the output voltage of the wall outlet should be correspond to the rated voltage marked on the appliance'srating plate.
- To protect against fire, electric shock and injury, please do not immerse cord and plug into water or other liquid.
- Unplug from wall outlet before cleaning and when it is not in use. Allow the appliance to cool down completely before taking off, attac- hing components or cleaning.
- Do not operate the appliance with damaged power cord or plug after the equipment malfunctions, falls or operates the equipment in any way causing damage. Return it to the nearest authorized service for inspection, repair and electrical or mechanical adjustment.
- Using accessories not recommended by the manufacturer may result in fire, electric shock or injury.
- Place the appliance on flat surface or table, do not hang power cord over the edge of table or counter.
- Ensure the power cord not touch any hot surface of the appliance.
- Do not place the coffee maker on hot surface or beside fire in order to avoid damage.
- To disconnect, turn off all control buttons, then unplug from wall outlet. When unplug the appliance, always hold the plug and do not pull the cord directly.
- Do not use the device for other purposes than its intended uses and place it in a dry area.
- Close supervision is necessary when your appliance is being used by or near children.
- Be careful not to get burned by the steam.
- Do not touch the hot surface of the steam wand
![]() and filter holder
and filter holder ![]() when boiling directly. Use handle or knobs.
when boiling directly. Use handle or knobs. - Connect plug to wall outlet before using and turn all buttons off before the plug being removed from wall outlet.
- Relieve pressure through steam wand
![]() before removing por- tafilter
before removing por- tafilter ![]() .
. - This appliance is not intended for being used by persons (including children) with reduced physical, sensory or mental capabilities, or lack of experience and knowledge, unless they have been given supervision or instruction concerning use of the appliance by a person responsible for their safety.
- Children should be supervised to ensure that they do not play with the appliance.
- This appliance is intended to be used in household and similar applications such as:
 when boiling directly. Use handle or knobs.
- staff kitchen areas in shops, offices and other working environments;
- farm houses;
- bed and breakfast type environments.
- Do not use outdoors.
- Do not place on or near a hot gas or electric burner, or in a heated oven.
SAVE THESE INSTRUCTIONS
THIS PRODUCT IS FOR HOUSEHOLD USE ONLY
CORD & PLUG INSTRUCTION
SPECIAL NOTES ON PLUG
This appliance has a polarized plug (one blade is wider than the other). To reduce the risk of electric shock, this plug is intended to fit into a polarized outlet in only one way. If the plug does not fit fully into the outlet, reverse the plug. If it still does not fit, contact a qualified ele- ctrician. Do not attempt to modify the plug in any way.
SHORT CORD INSTRUCTION
- A short power-supply cord (or detachable power-supply cord) is provided to reduce the risk of entanglement or tripping over a long cord.
- Longer detachable power-supply cords or extension cords are available and may be used if care is exercised in their use.
- If a longer detachable power-supply cord or extension cord is used:
- The marked electrical rating of the cord set or extension cord should be at least as large as the electrical rating of the appliance;
- The power cord should be arranged so that it will not dangle on the countertop or desktop, so as not to be pulled by children or trip over accidentally;
MAIN OPERATION FUNCTION INSTRUCTION
BEFORE FIRST USE OR A LONG TIME NOT USE
For a better taste and good for your health, we suggest you to rinse the machine and release the water out.
- Remove the tape on the water tank
![]() valve.
valve.


- Fill the water tank
![]() with clean, room temperature water. NOT exceed the"MAX" line.
with clean, room temperature water. NOT exceed the"MAX" line.


- Close the tank cover
![]() , and put the water tank
, and put the water tank ![]() on the back of coffee maker.
on the back of coffee maker.

![warning]() Note: Set up the water tank
Note: Set up the water tank ![]() vertically and align the buckles to the hole on the back of the machine, and press it down to be parallel to the top of the machine.
vertically and align the buckles to the hole on the back of the machine, and press it down to be parallel to the top of the machine.

- Fix filter into portafilter
![]() (no coffee pow- der in portafilter
(no coffee pow- der in portafilter ![]() ). Insert the portafilter
). Insert the portafilter ![]() into the appliance in the flat position and turn from the"INSERT"position to"LOCK"position.
into the appliance in the flat position and turn from the"INSERT"position to"LOCK"position.
![]()

- Place a cup on cup shelf
![]() .
.
Note: The appliance is not equipped with any jug, please use your jug or coffee cup.
![]()
- Make sure the steam control knob
![]() is in START/STOP position.
is in START/STOP position.
![]()
- Plug in.
![]()


- Press the ON/OFF button
![]() . The power indicator
. The power indicator ![]() is illuminated red. Other indica- tors do not light up. The appliance will start heating.
is illuminated red. Other indica- tors do not light up. The appliance will start heating.

- When the appliance finished heating, espresso function indicator
![]() illuminated green and the appliance pass to ready condition
illuminated green and the appliance pass to ready condition

- Press the BREWING ESPRESSO button
![]() , the making espresso indicator
, the making espresso indicator ![]() will be illuminated green. Wait for a moment, the water will flow out. Press the BREWING ESPRESSO button
will be illuminated green. Wait for a moment, the water will flow out. Press the BREWING ESPRESSO button ![]() again to stop.
again to stop.

- Press MILK FROTHING button
![]() . Wait until the steam function indicator
. Wait until the steam function indicator![]() is illuminated green.
is illuminated green.

- Move the cup under the steam wand
![]() . Turn on the steam control knob
. Turn on the steam control knob ![]() to the steam icon for 10 seconds, there will be water coming out from the steam wand
to the steam icon for 10 seconds, there will be water coming out from the steam wand ![]() .
.
Be careful of the hot steam. Then turn the steam control knob![]() back to the"START/STOP"position and and reset MILK FROTHING button
back to the"START/STOP"position and and reset MILK FROTHING button ![]() . Pour away the water on the cup.
. Pour away the water on the cup.
![]()


 Note:There may be noise when pumping the water on the first time, it is normal, the appliance is releasing the air inside. After about 20s, the noise will disappear. We recommend to release some water before brewing coffee at the first time or when you don' t use the appliance for a long time.
HOW TO MAKE ESPRESSO
To make a good Espresso, we recommend that you use cup warming plate ![]() to preheat all the parts, like portafilter
to preheat all the parts, like portafilter  , double-cup filter
 ![]() and your cup, so you can bet er enjoy the taste flavour of your coffee.
and your cup, so you can bet er enjoy the taste flavour of your coffee.
- Fill the water tank
![]() with clean, room temperature water in the coffee maker. NOT exceed the"MAX"line. (If you had operated the machine just now, skip this step)
with clean, room temperature water in the coffee maker. NOT exceed the"MAX"line. (If you had operated the machine just now, skip this step)

- Fix double-cup filter
![]() into portafilter
into portafilter ![]() , make sure the dot on the filter aligns with groove in the portafilter Ⓓ, and add coffee powder to double-cup filter
, make sure the dot on the filter aligns with groove in the portafilter Ⓓ, and add coffee powder to double-cup filter ![]() with the spoon & tamper
with the spoon & tamper ![]() .
.
![]()
![warning]() Note: A spoon of flat coffee powder is approximately equal to 7g. Collect the coffee powder with the spoon and shake it gently to make the surface flat, the amount of coffee powder is around 7g. One spoon coffee powder (7g) can make one cup of topgrade coffee, while two spoons (14g) is two cups of top-grade coffee. Tamp the coffee powder gently below the the MAX line of portafilter
Note: A spoon of flat coffee powder is approximately equal to 7g. Collect the coffee powder with the spoon and shake it gently to make the surface flat, the amount of coffee powder is around 7g. One spoon coffee powder (7g) can make one cup of topgrade coffee, while two spoons (14g) is two cups of top-grade coffee. Tamp the coffee powder gently below the the MAX line of portafilter ![]() . Don' t tamp the coffee powder too firmly.
. Don' t tamp the coffee powder too firmly.
![]()

 into portafilter
  .
.

- Insert the portafilter
![]() into the appliance in the flat position and turn from the"INSERT" position to"LOCK"position.
into the appliance in the flat position and turn from the"INSERT" position to"LOCK"position.
![]()

- Place espresso cup on cup shelf
![]() .
.
![warning]() Note: The appliance is not equipped with any jug, please use your jug or coffee cup.
Note: The appliance is not equipped with any jug, please use your jug or coffee cup.
![]()
- Make sure the steam control knob
![]() is in START/STOP position.
is in START/STOP position.
![]()
- Plug in.
![]()
 .
.


- Press the ON/OFF button
![]() . The power indicator
. The power indicator ![]() is illuminated red. Other indica- tors do not light up. The appliance will start heating.
is illuminated red. Other indica- tors do not light up. The appliance will start heating.

 . The power indicator
- When the appliance finished heating, espresso function indicator
![]() illuminated green and the appliance pass to ready condition.
illuminated green and the appliance pass to ready condition.

- Press the BREWING ESPRESSO button
![]() , the making espresso indicator
, the making espresso indicator ![]() will be illuminated green. After a while, coffee will flow out.
will be illuminated green. After a while, coffee will flow out.

- After your desired amount of espresso is reached, press BREWING ESPRESSO button
![]() again to stop brewing. Take away the cup, and your Espresso is ready now.
again to stop brewing. Take away the cup, and your Espresso is ready now.


 will be illuminated green. After a while, coffee will flow out.

TROUBLESHOOTING DURING THE BREWING
- When the machine starts to work, there will be some noise comes out from the machine as it is pumping the water with a high pressure.
- While during operation, if there is suddenly a loud noise from the machine, which may due to not enough water in the water tank
![]() for pumping.
for pumping.
- To achieve a full flavor, each one cup of espresso should be not more than 30mL, while two cups of espresso is 60mL.
- During brewing, when you find the the coffee leaks out from outer side of portafilter
![]() or doesn't flow smoothly, it have several reasons as below and you should stop the operation by resetting the BREWING ESPRESSO button
or doesn't flow smoothly, it have several reasons as below and you should stop the operation by resetting the BREWING ESPRESSO button ![]() . Remove the portafilter
. Remove the portafilter![]() and clean the coffee powder and don't use the inside coffee powder again.
and clean the coffee powder and don't use the inside coffee powder again.
 or doesn't flow smoothly, it have several reasons as below and you should stop the operation by resetting the BREWING ESPRESSO button
 | Possible Cause | Solution |
| Clean coffee powder on the edge of the portafilter . |
| Re-install the portafilter correctly. |
| Do not use coffee powder that is too fine. |
| Press the coffee powder lightly to the max line. |
| Remove the filter and clean the two outlet holes under the portafilter . |
| Soak the filter in clean water for about half an hour, then clean it with a brush.. |
Safety advise: If during the coffee brew, you rotate the steam control knob  to steam icon, the appliance will stop to brew but from the steam icon, the appliance will stop to brew but from the steam wand
  will flow hot water. Must remember not to do this because the hot water can burn you or people around you.

HOW TO CLEAN THE SEAL RING
Note:(Please mind the hot water and operate carefully) As the seal ring of the water outlet is designed to prevent from leaking, once there is too much coffee powder left, the seal ring will be blocked. If the seal ring is blocked, it will lead to the espresso leakage or splash when brewing espresso. For this reason and for healthier, we suggest you to clean it immediately with hot water from the brewing function. If it is not cleaned in time, it will produce a bad smell.
- Uninstall the portafilter
![]() in parallel from the coffee outlet from the direction of "Lock" to "Insert", then put it down. Pour away the coffee powder.
in parallel from the coffee outlet from the direction of "Lock" to "Insert", then put it down. Pour away the coffee powder.
![]()
 in parallel from the coffee outlet from the direction of "Lock" to "Insert", then put it down. Pour away the coffee powder.
- Press the BREWING ESPRESSO button
![]() , the making espresso indicator
, the making espresso indicator ![]() will be illu- minated. The water will come out and flush out the coffee powder inside.
will be illu- minated. The water will come out and flush out the coffee powder inside.


- Press BREWING ESPRESSO button
![]() again to stop brewing. Then rinse the seal ring of the water outlet with cloth.
again to stop brewing. Then rinse the seal ring of the water outlet with cloth.
![]()

FROTH MILK AFTER BREWING ESPRESSO
(FOR CAPPUCCINO)
After making the espresso through the steps above (HOW TO MAKE ESPRESSO), you can continue to froth milk, please refer to the following steps (HOW TO MAKE MILK FOAM).
HOW TO MAKE MILK FOAM
For a better taste and good for your health, we suggest you to rinse the pitcher and release some water out from the steam wand .
- Press MILK FROTHING button
![]() from the ready mode. When the steam function indicator is illuminated green, it means the heating for steam is finished.
from the ready mode. When the steam function indicator is illuminated green, it means the heating for steam is finished.
(Never skip to next step before steam function indicator![]() is illuminated green.)
is illuminated green.)

- Prepare a pitcher with about 100mL of milk. We recommend to use whole milk about 42-45℉.
![]()


- Place a cup on cup shelf
![]() . Turn on the steam control knob
. Turn on the steam control knob ![]() to the steam icon for 10 seconds, there will be water coming out from the steam wand
to the steam icon for 10 seconds, there will be water coming out from the steam wand ![]() . Be careful of the hot steam. Then pour away the water of the cup.
. Be careful of the hot steam. Then pour away the water of the cup.
![]()
- Take the pitcher with milk and insert the steam wand
![]() into milk about 1-2cm. Turn the steam control knob
into milk about 1-2cm. Turn the steam control knob ![]() to the steam icon fully, steam will come out from the steam wand
to the steam icon fully, steam will come out from the steam wand![]() .
.
![]()
- Froth milk by moving vessel round from up to down.
![]()
- After the milk increase in volume by 2 times or your required purpose is reached. Turn the steam control knob
![]() back to the "START/STOP"position to stop.
back to the "START/STOP"position to stop.
![]()


- Take away the pitcher, and your milk foam is ready now.
![]()

Note: During the milk frothing, if there is suddenly a noise from the pump or the steam become weak, please check if there is enough water in the water tank  . If the tank
 is out of water, reset the MILK FROTHING Button
  and turn the steam control knob back to the "START/STOP" position. Press the BREWING ESPRESSO button
  to pump the water to the boiler from the tank
HOW TO CLEAN THE STEAM NOZZLE
Note: (Please mind the hot water and operate carefully)
- To avoid blocking the steam wand
![]() , we suggest to clean the steam wand
, we suggest to clean the steam wand ![]() immediately after finish frothing milk. Press the MILK FROTHING button
immediately after finish frothing milk. Press the MILK FROTHING button ![]() and wait until steam function indicator
and wait until steam function indicator ![]() is illuminated.
is illuminated.
![]()
- Slowly turn on steam control knob
![]() . If the steam is weak, check whether the hole of the steam wand
. If the steam is weak, check whether the hole of the steam wand ![]() is blocked. If it is not cleaned in time, it will produce a bad smell. You can use a cleaning pin to clean and unblock the steam pipeline.
is blocked. If it is not cleaned in time, it will produce a bad smell. You can use a cleaning pin to clean and unblock the steam pipeline.
![]()
- Press and hold the steam wand
![]() , pull out the steam wand
, pull out the steam wand ![]() . Clean the steam wand
. Clean the steam wand ![]() with wet sponge.
with wet sponge.
![]()


TIPS FOR HOW TO CONTINUE FROTHING
- After you have frothed milk about 2-3 times, you have turned the steam control knob
![]() back to the "START/STOP" position. Maybe you will find the appliance' s steam function indicator don' t light up and the power indicator keep red light.
back to the "START/STOP" position. Maybe you will find the appliance' s steam function indicator don' t light up and the power indicator keep red light.

Because the temperature is too low for the steam function, we need to wait until steam function indicator![]() is illumanited again, then continue to froth milk.
is illumanited again, then continue to froth milk.
(Please refer to the HOW TO MAKE MILK FOAM.)

- After you have frothed milk about 3-4 times, the steam will become weaker because the boiler is run out of water and there is not enough water for the steam function. So you need to pump the water into the boiler.
Firstly, to reset the MILK FROTHING Button![]() .
.

Secondly, press the BREWING ESPRESSO button![]() . The appliance will begin to pump water. Place a cup on cup shelf
. The appliance will begin to pump water. Place a cup on cup shelf ![]() . There will 30 some water flow out.
. There will 30 some water flow out.
![]()
Thirdly, place a cup under the steam wand![]() . Turn on the steam control knob
. Turn on the steam control knob ![]() to the steam icon for better pump the water from the boiler quickly.
to the steam icon for better pump the water from the boiler quickly.
![]()
Fourthly, the steam wand![]() begin to flow water out continuously, it means the boiler in the coffee maker have enough water to continue making milk foam. Then, turn the knob
begin to flow water out continuously, it means the boiler in the coffee maker have enough water to continue making milk foam. Then, turn the knob ![]() back to "START/STOP" to stop and reset the BREWING ES- PRESSO button
back to "START/STOP" to stop and reset the BREWING ES- PRESSO button ![]() . Now you can froth milk again. (Please refer to the HOW TO MAKE MILK FOAM.)
. Now you can froth milk again. (Please refer to the HOW TO MAKE MILK FOAM.)
![]()


BREW ESPRESSO AFTER MILK FROTHING (FOR LATTE)
After making the froth milk through the steps above (HOW TO MAKE MILK FOAM ), the appliance' s power indicator  light keep red fixed, other indicator' s light don' t light up. Because the temperature is too high to brew coffee after milk frothing. It is necessary to cool down the machine firstly. Then we could continue to brew espresso. You can refer to the following steps.
- Reset the MILK FROTHING button
![]() . The appliance's espresso function indicator
. The appliance's espresso function indicator ![]() light will green.
light will green.
 - Step 1")
- Place a cup on cup shelf
![]() . Press the BREWING ESPRESSO button
. Press the BREWING ESPRESSO button ![]() to pump the water into the boiler, which will cool down the water temperature. At this time, the espresso function indicator
to pump the water into the boiler, which will cool down the water temperature. At this time, the espresso function indicator ![]() and making espresso indicator
and making espresso indicator ![]() start to flash green light slowly.
start to flash green light slowly.
 - Step 2")
- Wait until the steam function indicator
![]() be extinguished and remains the espresso function indicator
be extinguished and remains the espresso function indicator ![]() keep green light fixed.
keep green light fixed.
 - Step 3")
- After that, you can continue to brew espresso refer to"HOW TO MAKE ESPRESSO "steps 2-3-4-5-6-7-8-9-10.
 - Step 1")
 - Step 2")
 - Step 3")
CLEANING AND MAINTENANCE
DAILY TIPS FOR CLEANING AND MAINTENANCE

Be sure to unplug this appliance before cleaning and let the appliance cool down completely. To protect against electrical shock, do not immerse cord, plug or unit in water or liquid.
- A clean coffee maker is essential for making great-taste coffee. Clean all the accessories each time and clean the coffee maker's water scale regularly as specified in the"REMOVING MINERAL DEPOSITS"section.
- Clean the seal ring of the filter holder
![]() each time immediately with hot water using the brewing function after making coffee.
each time immediately with hot water using the brewing function after making coffee.
Note: Do not use detergent or stainless steel scrubber/ brush to clean the portafilter , because the surface of the portafilter is coated, and the detergent/brush will accelerate the oxidation of the portafilter surface. Therefore, we recommend cleaning the portafilter with rag.
REMOVING MINERAL DEPOSITS
To make sure your appliance operate efficiently, and internal piping clean and the peak flavor of the coffee, you should clean away the mineral deposits left every 2-3 months.
- Pour a 50/50 mixture of white vinegar and cold tap water into the water tank
![]() .
.


- Insert the portafilter
![]() into the appliance in the flat position and turn from the"INSERT" position to"LOCK"position. (without coffee powder in it) and put the jug in place.
into the appliance in the flat position and turn from the"INSERT" position to"LOCK"position. (without coffee powder in it) and put the jug in place.
![]()
- Press the ON/OFF button
![]() . The power indicator
. The power indicator ![]() is illuminated red. Other indicators do not light up. The appliance will start heating.
is illuminated red. Other indicators do not light up. The appliance will start heating.


- When the appliance finished heating, espresso function indicator
![]() illuminated green and the appliance pass to ready condition.
illuminated green and the appliance pass to ready condition.


- Place a cup on cup shelf
![]() and make sure that the steam control knob
and make sure that the steam control knob ![]() is in the"start/ stop"position.
is in the"start/ stop"position.
![]()

- Press BREWING ESPRESSO button
![]() , the espresso function indicator
, the espresso function indicator ![]() is illuminated green, the appliance will make two cups of citric acid mix (about 2Oz). Reset BREWING ESPRESSO button
is illuminated green, the appliance will make two cups of citric acid mix (about 2Oz). Reset BREWING ESPRESSO button ![]() to stop pumping, making espresso indicator
to stop pumping, making espresso indicator ![]() is extinguished.
is extinguished.

- Press MILK FROTHING button
![]() , espresso function indicator
, espresso function indicator ![]() will be extinguished, wait until steam function indicator
will be extinguished, wait until steam function indicator ![]() is illuminated.
is illuminated.

- Move a cup under the steam wand
![]() . Turn the steam control knob
. Turn the steam control knob ![]() to the steam icon to release citric acid mix. At that moment, the steam wand
to the steam icon to release citric acid mix. At that moment, the steam wand ![]() will flow out citric acid until you turn the steam control knob
will flow out citric acid until you turn the steam control knob ![]() to the"START/STOP"position to 2s1top.
to the"START/STOP"position to 2s1top.
![]()
- Left the citric acid stay in the appliance at least 15 minutes at the first time. Repeat the step from 3-10 for three times then the descaling is finished. After finish that, clean the parts (water tank
![]() , steam wand
, steam wand ![]() , seal ring of the filter holder
, seal ring of the filter holder ![]() ). Brew with clean water in the MAX level, repeat steps 3-10 for 3 times, then brew until no water is left in water tank
). Brew with clean water in the MAX level, repeat steps 3-10 for 3 times, then brew until no water is left in water tank ![]() before making coffee.
before making coffee.


TIPS FOR PERFECT BARISTA
- Always use clean, room temperature water in the coffee maker.
- For an optimum coffee taste, buy whole coffee beans and finely grind them just before brewing.
- Grind the bean every time before brew espresso in case you ever used coffee powder. You must keep the unused coffee powder in a cool, dry place.
- Do not reuse coffee powder since this will greatly reduce the coffee's flavor. Reheating coffee is not recommended as coffee is at its peak flavor immediately after brewing.
TROUBLESHOOTING
| Problem | Picture | Possible Cause | Solution |
The coffee maker cannot work | / | The power outlet is not plugged well. | Plug the power cord into a wall outlet correctly, if the appliance still does not work, please contact with the authorized service facility for assistance. |
Water leaks from the bottom of | / |
| Please clean the drip tray  . . |
| As the water outlet at the bottom of the water tank is a movable part and it is Not leaking. | ||
| Please contact with the authorized service facility for assistance. | ||
| Please contact with the authorized service facility for assistance. | ||
Acid (vinegar) taste exists in Espresso coffee | / |
| Clean the coffee maker per the instructions " BEFORE THE FIRST USE" for several times. |
| Keep the unused co- ffee powder in a cool, dry place. After opening a package of coffee powder, reseal it tightly and store it in a refrigerator to maintain its freshness. | ||
Can't make milk froth | / |
| Only after the steam function indicator is illuminated, the steam can be used to froth. |
| The milk temperature is about 41- 45℉. | ||
| Use whole milk or semi-skimmed milk | ||
| Clean the Steam wand immediately after use every time with wet sponge. | ||
Espresso function indicator  and steam function indicator blink light. and steam function indicator blink light. | / | The temperature inside the machine is too high, because making coffee immediately after making steam. |
|
| The metal parts in the tank have rust. | / | Descaler is not recommended type. It may corrode the metal parts in the tank. | Use the descaler recommended by manufacturer. |
Do not take apart the appliance by yourself if the cause of failure is not found, it's better to contact certified serving center.

Documents / ResourcesDownload manual
Here you can download full pdf version of manual, it may contain additional safety instructions, warranty information, FCC rules, etc.
Advertisement


Need help?
Do you have a question about the GECME403-U and is the answer not in the manual?
Questions and answers