Gevi GECME003D-U Instruction Booklet
2-in-1 smart espresso coffee machine
Hide thumbs
Also See for GECME003D-U:
- Instruction manual (10 pages) ,
- Instruction manual (13 pages) ,
- Instruction manual (12 pages)

Subscribe to Our Youtube Channel
Related Manuals for Gevi GECME003D-U


Summary of Contents for Gevi GECME003D-U
- Page 1 2-in-1 Smart Espresso Coffee Machine Brewer | Frother INSTRUCTION BOOKLET GECME003D-U Please read all the owner’s instruction booklet before use.
-
Page 2: Table Of Contents
Table of Contents 1. Important Safeguards ......... 01 . -
Page 3: Important Safeguards
1. Important Safeguards 1. Important Safeguards When using electrical machines, basic safety precautions should 10. The use of an accessory not recommended by the machine always be followed to reduce the risk of fire, electric shock, and/ manufacturer for use with this machine may result in fire, electric or injury to persons including the following: shock or injury to persons. - Page 4 For electronic instruction manual, please contact Gevi support team. Do not pull, twist or otherwise abuse the power cord. North American models with grounded plugs: PRODUCT NOTICES 1.
-
Page 5: Know Your Machine
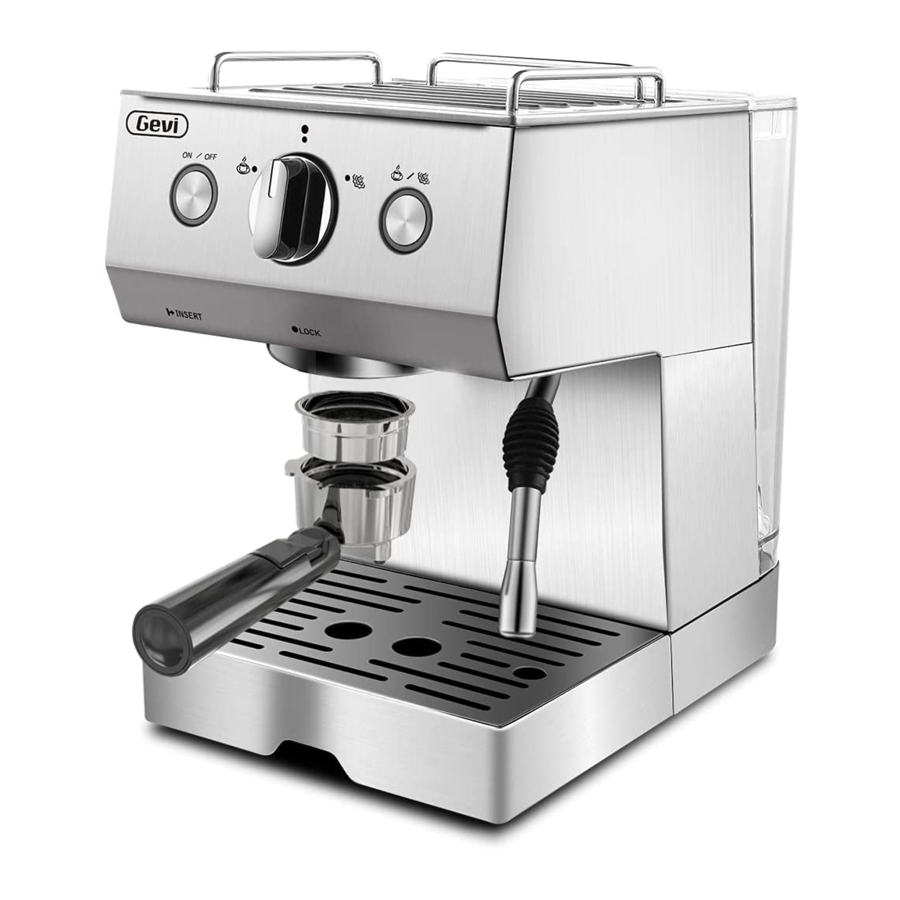
2. Know Your Machine 2. Know Your Machine Model: GECME003D-U Description Specification Electrical Parameters: 120V~ 60Hz 1050W Preheats cups and glasses to help retain essential ❶ Cup Warming Plate characteristics of true espresso aroma for a rich, ❶ sweet taste. -
Page 6: More Details
3. More Details 3. More Details Thermoblock Fast Heating 15 BAR Pump System The thermoblock works in conjunction with the - The thermoblock heats the water so that the espr- pump to deliver the correct water temperature esso extracts at 198°F (just below boiling point) for at the correct pressure for complete extraction optimum extraction of oils from the coffee grinds. -
Page 7: Before First Use
4. Before First Use 4. Before First Use 4.1 Remove Packaging Step 4 - Set up the water tank vertically and align the buckles to the hole on the back of the machine, and then press it Ensure all packaging has been removed. down to be parallel to the top of the machine. -
Page 8: Espresso Making Guide
4. Before First Use 5. Espresso Making Guide 5.2 Tips for Making the Perfect Espresso • Cleaning Clean the Group Head 1 - Coffee Beans/Grinds Step 1 - Put a container under the Group Head. 1 - All of the flavor comes from the beans, choose different kinds of roasts and Step 2 - Turn the knob to the “... - Page 9 5. Espresso Making Guide 5. Espresso Making Guide CASE 2- High Temperature grinds with the provided spoon and shake the coffee grinds gently to make The suitable temperature for brewing coffee is around 92 degrees Celsius(198 the surface flat. degrees Fahrenheit). If you accidentally press the MILK FROTHING button or 2 - You may need to experiment with how much coffee is put into the filter or how long your grinder needs to run to achieve the correct dose.
- Page 10 5. Espresso Making Guide 5. Espresso Making Guide Step 2 - Turn the knob back to “ ” icon to stop the brewing when the desired NOTE volume of espresso has been extracted. Ensure coffee beans or pre-ground grinds are fresh, as old coffee beans no TIPS matter the Grind Setting will have a low flavor and bad taste.
- Page 11 5. Espresso Making Guide 5. Espresso Making Guide 5.4 Operation INSERT 1-2 Min Heat Up CENTRE Evenly tamp(press) the grinds to Wipe away any excess grinds to Place the portafilter underneath the level indicated. clear the edges of the portafilter. the group head so that the han- Fill water into the water tank Set up the water tank vertically Insert the power plug.
- Page 12 5. Espresso Making Guide 5. Espresso Making Guide INSERT CENTRE Wait 20 seconds to let the ma- Discard the coffee puck in the Align the marking dot on the Remove the drip tray and pour Rinse the drip tray and its cover Wipe the Drip Tray with a clean chine relieve the pressure then portafilter.
-
Page 13: Milk Frothing Guide
6. Milk Frothing Guide 6. Milk Frothing Guide 6.1 Brief Introduction 6 - Water temperature Press the MILK FROTHING button when preheating before steam foaming and wait for the white light of the MILK FROTHING button to illuminate solid and it Milk frothing is the steaming of milk. - Page 14 6. Milk Frothing Guide 6. Milk Frothing Guide 6.3 Operation 12 O CLOCK 1-2 Min Heat Up 3 O CLOCK The steam wand arm is at 12 The position of the left hand is Frothing makes a smooth hiss- 12 3 o'clock. The froth nozzle is at 3 fixed, and the right hand turns ing sound.
-
Page 15: Other Functions
6. Milk Frothing Guide 7. Other Functions TIPS If you want to make espresso in a quick way, turn the knob to the “ ” icon to release hot steam so as to reduce the temperature. After the MAKING Release steam for 60 seconds to Pause steam by returning the Turn the knob to the "... -
Page 16: Cleaning & Maintenance
8. Cleaning & Maintenance 8. Cleaning & Maintenance a. One espresso machine descaling tablet.(Espresso Machine Cleaning Tablets Before Use are available for purchase online or through major retailers.) 1 - Please make sure that the rubber plug of the water outlet of the water tank is removed. - Page 17 8. Cleaning & Maintenance 8. Cleaning & Maintenance Put a container under the group Turn the knob to the " "icon After 30 seconds turn the knob to Put a container under the group Turn the knob to the " "icon Wait until running out of all the head.
- Page 18 8. Cleaning & Maintenance 8. Cleaning & Maintenance 8.2 Descaling & Maintenance - Frother Descaling Cycle Before Use 1 - Please make sure that the rubber plug of the water outlet of the water tank is removed. 2 - It is recommended to use pure water. 3 - Please prepare enough water in advance but not exceed the MAX line of Turn off...
- Page 19 8. Cleaning & Maintenance 8. Cleaning & Maintenance Whenever the Steam Output of the Machine is Less Than Usual Return knob to " Return knob to " " icon. " icon. Take out the container, pour Take out the water tank and fill away the water, and place it it with water but do not exceed under the steam wand.
- Page 20 8. Cleaning & Maintenance 8. Cleaning & Maintenance SCREW Repeat Step 14-18 with clean wate Return knob to " Return knob to " " icon. " icon. Take out the container, pour aw- Place that container with that Repeat the previous steps 14-18 Take the froth nozzle out from Take out the container and pour Let the descaling solution soak...
- Page 21 8. Cleaning & Maintenance 8. Cleaning & Maintenance 8.3 Deep Cleaning - Accessories Brush the 2 water outlets of the Use a clean cloth to wipe off the Install the filter to the portafilter, portafilter with a brush. water on the filter and portafilter. twist and fix the filter.
-
Page 22: Troubleshooting
9. Troubleshooting 9. Troubleshooting 9.1 Troubleshooting Guide - Brewer Problem Possible Cause What To Do Method 2: Problem Possible Cause What To Do 1- Fill the water tank with water, plug it Change to medium- or dark-roasted coffee in, press the ON/OFF button to the “ — ” Inappropriate coffee beans beans and if you use light-roasted coffee position to turn on the machine,... - Page 23 9. Troubleshooting 9. Troubleshooting Problem Possible Cause What To Do Problem Possible Cause What To Do A deep descaling is needed for your ma- No coffee The filter may be blocked A deep cleaning is needed for your The group head may be chine, refer to "Descaling Cycle "...
- Page 24 9. Troubleshooting 9. Troubleshooting 9.2 Troubleshooting Guide - Frother Problem Possible Cause What To Do the machine, let the machine sit for 1 day. Problem Possible Cause What To Do 3-Repeat the “1” step to start the machine again and release the remaining descaling Continuous release of Refill the boiler with water before releas- liquid from the water tank through the...
-
Page 25: Warranty
Fill the water tube with Upon receipt of your claim, Gevi will seek to resolve your difficulties. Should a syringe. If water comes out of the steam pipe, the machine can go back to normal. -
Page 26: Coffees To Try
10. Warranty 11. Coffees To Try Espresso (Short Black) - servicing or modification of the product other than by Gevi or an authorized Gevi service center; Espresso is a concentrated, full bodied coffee with a stable layer of crema on top. An espresso is the foundation of all - use of the product with other accessories, attachments, product supplies, cafe coffee. - Page 27 11. Coffees To Try Flat White An espresso with frothed milk & a thin layer of foam milk on top. The wider cup will create the slim layer of foam, the signature of the flat white. • Wide cup (6 oz). •...
Need help?
Do you have a question about the GECME003D-U and is the answer not in the manual?
Questions and answers