
Related Manuals for BH FITNESS M090


Summary of Contents for BH FITNESS M090
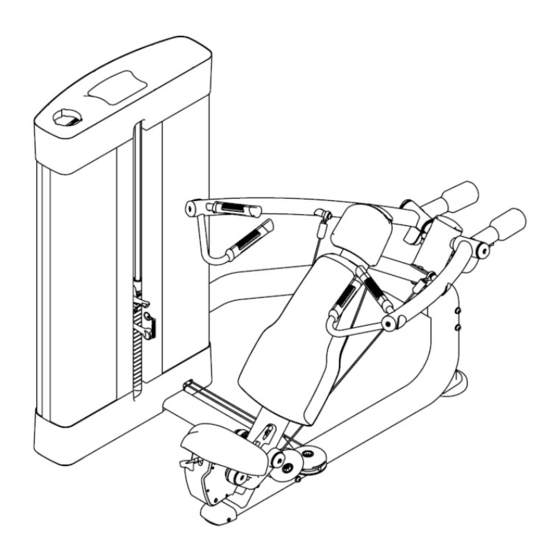
- Page 1 M090 Instrucciones de montaje y utilización Instructions for assembly and use Instructions de montage et d’utilisation Hinweise zur Montage und Benutzung Инструкция по сборке и эксплуатации...
- Page 2 M090 INSTRUCCIONES DE SEGURIDAD.- Rogamos leer estas instrucciones atentamente, antes del montaje y del primer uso. Obtendrá importantes informaciones para su seguridad, así como para el uso y para el mantenimiento del aparato de ejercicio. Guardar cuidadosamente las instrucciones para su información, así como para los trabajos de mantenimiento o los pedidos de piezas de repuesto.
- Page 3 SAFETY INSTRUCTIONS Please read these instructions carefully before assembling and using the equipment. They contain important information for your safety and for the use and maintenance of the exercise equipment. Keep the instructions safe for future reference and maintenance tasks as well as for ordering spare parts.
- Page 4 INSTRUCTIONS DE SÉCURITÉ - Nous recommandons de lire attentivement ces instructions avant de procéder au montage et d’utiliser l'appareil pour la première fois. Ce manuel contient des informations importantes relatives à la sécurité, à l’usage et à l’entretien de la machine d’exercice. Conserver soigneusement ces instructions à...
- Page 5 SICHERHEITSHINWEISE.- Bitte lesen Sie diese Hinweise vor der Montage und ersten Benutzung des Geräts aufmerksam. Hier finden Sie wichtige Informationen zu Ihrer Sicherheit, zur Benutzung und zur Wartung Ihres Trainingsgeräts. Bewahren Sie diese Hinweise sorgfältig auf, um sie jederzeit zum Nachschlagen oder für erforderliche Informationen zur Wartung oder Bestellung von Ersatzteilen zur Hand zu haben.
-
Page 6: Указания По Технике Безопасности
УКАЗАНИЯ ПО ТЕХНИКЕ БЕЗОПАСНОСТИ Перед сборкой и эксплуатацией тренажера внимательно ознакомьтесь с настоящей инструкцией. В ней содержится важная информация о технике безопасности и правилах эксплуатации и технического обслуживания данного оборудования. Сохраните настоящую инструкцию, чтобы обращаться к ней в будущем при проведении технического... - Page 7 Fig.0 Saque la unidad de la caja, compruebe e identifique las piezas con respecto al listado de la Fig.A y Fig.B, para asegurarse de que no falta ninguna pieza para el montaje del equipo. Take the unit out of its box, check and identify the parts against the list in Fig. A and Fig. B to ensure that there are no missing parts for the assembly of the equipment.
- Page 8 Fig.A Nº Nº...
- Page 11 Fig.B Nº M10*45 M10*65 M8*30 M8*45 M8*25 M6*16...
-
Page 12: Инструкции По Сборке
M12*180 M12*50 M12*105 M10*65 M10*25 INSTRUCCIONES DE MONTAJE.- NOTA: La descripción de las piezas con respecto a las figuras, corresponden siempre a la posición de la persona en el equipo para la realización del ejercicio. INSTRUCTIONS FOR ASSEMBLY.- The description of the parts with respect to the figures always corresponds to the position the person NOTE: adopts on the equipment when exercising. - Page 13 Fig.1 Apoye en el suelo la estructura torre de pesas (1). Sitúe el tubo (17) en la posición indicada y coloque los tornillos (63) junto con las arandelas (54) y las tuercas (58). A continuación, coloque la estructura (16) y atorníllela al tubo (17) colocando la pieza (22) y usando los tornillos (62) y arandelas (54).
- Page 14 Fig.2 Coloque el soporte de brazos (21) en la estructura (16) usando los tornillos (65), las arandelas (67), (68) y las tuercas (69). Posicione el brazo izquierdo (19) en el eje del soporte. Coloque el anillo (61) junto con el tapón (60) y apriete el tornillo (66).
- Page 15 Fig.3 Sitúe el tope de pesas (13) (o el tope de pesas (13) con el casquillo (102), dependiendo de la configuración de pesas) en la torre de pesas. Introduzca las barras de pesas (5). NOTA: El tope de pesas depende de la configuración de pesas. Si el modelo dispone de un total de 16 pesas, es necesario colocar dos casquillos adicionales, dejando vacíos los 4 orificios inferiores de la barra selectora.
- Page 16 Setzen Sie den Puffer (13) (oder der Gewichtsanschlag (13) mit der Buchse (102), abhängig von der Gewichtskonfiguration) in den Gewichtsturm und setzen Sie die dann die Gleitstangen (5) ein. HINWEIS: Die Höhe der Gewichte hängt von der Gewichtskonfiguration ab. Bei Modellen mit 16 Gewichten müssen zwei zusätzliche Buchsen angebracht werden, wobei die 4 unteren Löcher der Auswahlstange leer bleiben.
- Page 17 Fig.4 Coloque la tapa inferior (26) de la torre de pesas haciéndola pasar desde la parte superior de la torre, coloque los tornillos (52). Atornille el tubo de conexión (18) colocando las piezas (30), (22) con los tornillos (64), (62) y arandelas (54).
- Page 18 Fig.5 Sitúe el soporte de barra (3) en la torre, coloque el tope (12) y la barra (4). Coloque el muelle (41) y el casquillo (40). Coloque el set de peso intermedio (10) en la pesa superior (9) y atorníllelo usando los tornillos (51), las arandelas (57) y (56).
- Page 19 Fig.6 Coloque la polea (15) en el soporte (14) y atorníllela usando el tornillo (47), las arandelas (55) y la tuerca (59). Atornille el extremo de la correa (7) en la pesa de guía usando el tornillo (48), las arandelas (55) y la tuerca (59), coja el otro extremo de la correa (7) y páselo por las poleas superiores y la polea inferior, Fig.6, I., atornille con la tuerca (58) y arandela (54).
- Page 20 Positionnez la poulie (15) dans le support (14) et vissez en utilisant le vis (47), les rondelles (55) et l’écrou (59). Fixez l’extrémité de la courroie (7) dans le bloc de poids guide en utilisant le vis (48), les rondelles (55) et l’écrou (59).
- Page 21 Fig.7 Inserte las piezas de unión en la tapa inferior, Fig.7, I. Coloque las tapas frontales izquierda (27) y derecha (28) y las tapas traseras (29) en la torre haciéndolas coincidir con las piezas de unión. Inserte y deslice hacia abajo las tapas laterales de aluminio (33), las tapas frontales de aluminio (32) y la tapa trasera de aluminio (31), Fig.7, II.
- Page 22 Insérez les pièces d’union sur le couvercle inférieur, Fig.7, I. Positionnez les couvercles frontaux gauches (27) et droits (28) et les couvercles postérieurs (29) sur la structure en s’assurant qu’elle coïncide avec la pièce d’union. Insérez et faites glisser les couvercles latéraux d’aluminium (33), les couvercles frontaux (32) et les couvercles postérieurs (31), Fig.7, II.
- Page 23 Fig.8 Posicione el reposacabezas (36) y el respaldo (35) sobre el apoyo, atorníllelos con los tornillos (65) junto con las arandelas planas (67). A continuación, posicione el asiento (34) en el soporte (16), atorníllelo con los tornillos (66) junto con las arandelas planas (67).
- Page 24 MUY IMPORTANTE: Una vez realizado el montaje, compruebe que todos los tornillos que han sido montados en esta maquina, están fuertemente apretados. VERY IMPORTANT: After assembling the unit, check that all of the screws have been fitted to the machine and that they are tightened securely.
- Page 25 M090...
- Page 26 1. Рама весового стека в сборе 1.1 Рама весового стекла в предварительной сборке 7. Ремень в сборе...
- Page 27 8. Кабель в сборе 9. Верхняя пластина в сборе 11. Противовес 5 фунтов в сборе 10. Осевой противовес в сборе 14. Рама подвижного блока в сборе...
- Page 28 16. Основной корпус в сборе 16.1 Основной корпус в предварительной сборке 36. Подголовник в сборе...
- Page 29 16.2 Рама сиденья в сборе 16.2.1 Рама ручки регулировки сиденья в сборе 17. Нижняя соединительная рама в сборе 19. Рама правого рычага в сборе 20. Рама левого рычага в сборе 21. Верхняя соединительная рама в сборе...
- Page 30 24. Крышка в сборе 35. Обивка спинки в сборе 32. Передний 33. Боковой 31. Задний алюминиевый алюминиевый алюминиевый регулятор в сборе регулятор в сборе регулятор в сборе...
- Page 31 Para pedido de repuesto: Indicar el código de la pieza y la cantidad To order replacement parts: State the part code and Quantity Pour commander des pièces de rechange : Indiquer le code de la pièce de rechange et la quantité désirée. Bei der Bestellung von Ersatzteilen: Bitte Teile-Code und Menge angeben.
- Page 32 10.5 Top plate Верхняя пластина A-FE97193700 10.6 Guide Frame Направляющая рама A-FE97193800 Короткая промежуточная вставка D45xD26x7.5 10.7 Short Spacer D45xD26x7.5 A-FE97193900 Стопорная муфта 10.8 Stop collar A-FE97194000 Верхняя пластиковая крышка 10.9 Top plastic cover A-FE97194100V1 10.10 Base plastic cover Основная пластиковая крышка A-FE97194200PBC 10.11 Steel ball support base...
- Page 33 16.1.22.3 Flat Washer D4.5xD12x0.8 Плоская шайба D4.5xD12x0.8 A-DQ4DS2 16.1.23 Adjustable Foot Plate ASSY Регулируемый упор для ступней в сборе A-SD1000B3000ASSY Рама сиденья в сборе 16.2 Seat Frame ASSY A-BH970113ASSY Рама ручки регулировки сиденья в сборе 16.2.1 Seat Adjust. Handle Frame ASSY A-BH970128ASSY Рама...
- Page 34 19.8 Joint Bearing Подшипник скольжения A-FE97211900PBC 19.9 Bearing 6006-2RSC3NBK Подшипник 6006-2RSC3NBK A-GB2766006-2RSC3NBK Винт с внутренним шестигранником M12x30 19.10 Socket Head Cap Screw M12x30 A-GB70BTM12x30DN18 Винт с внутренним шестигранником M10x20 19.11 Socket Head Cap Screw M10x20 A-GB70BTM10x20DN18NL Винты M5x6 19.12 Screw M5x6 A-GB77M5x6DY19 19.13 Screw M5x10...
- Page 35 35.3 Button Head Cap Screw M6x25 Стяжной винт с полукруглой головкой M6x25 A-PNLM6x25x25N19 35.4 Screw ST3.5x25 Винт ST3.5x25 A-GB846ST3.5x25DN Плоская шайба D6.6xD12x1.6 35.5 Flat Washer D6.6xD12x1.6 A-GB956DN2 Подголовник в сборе Head Pad ASSY A-FE971233V1ASSY Подголовник 36.1 Head Pad A-FE97123300V1 36.2 Head Pad Cover Крышка...
- Page 36 BH FITNESS SPAIN BH FITNESS FRANCE BH FITNESS MEXICO EXERCYCLE,S.L. (Manufacturer) BH Exercycle de México S.A. P.O.BOX 195 SAV FRANCE de CV 01080 VITORIA (SPAIN) Tel : +33 559 423 419 Eje 132 / 136 Tel.: +34 945 29 02 58 savfrance@bhfitness.com...
Need help?
Do you have a question about the M090 and is the answer not in the manual?
Questions and answers