
Related Manuals for KERN OPO-1


Summary of Contents for KERN OPO-1
- Page 1 KERN & Sohn GmbH Ziegelei 1 Tel: +49-[0]7433- 9933-0 D-72336 Balingen Fax: +49-[0]7433-9933-149 Email: info@kern-sohn.com Internet: www.kern-sohn.com Operating instructions Polarizing microscope KERN OPO-1 OPO 185 Version 1.1 01/2021 OPO-1-BA-en-2111...
- Page 3 KERN OPO-1 Version 1.1 01/2021 Operating instructions Polarizing microscope Table of Contents Before use ..................3 General notes ..........................3 Notes on the electrical system ....................3 Storage ............................4 Maintenance and cleaning ....................... 5 Nomenclature ................6 Technical data / Equipment ............9 Assembly ..................
- Page 4 If the original fuse blows, replace it only with a suitable fuse. Suitable replacement fuses are included in the scope of delivery. All handling of the equipment that involves contact with the electrical system, such as changing lamps or fuses, may only be carried out when the power supply is disconnected. OPO-1-BA-en-2111...
- Page 5 Dust or dirt inside the optics of a microscope can in many cases cause irreversible malfunctions or damage. Accessories consisting of optical elements, such as eyepieces and objectives, are preferably stored in a drying box with desiccant. OPO-1-BA-en-2111...
- Page 6 • Special cleaner for optical lenses • Special optical cleaning cloths • Bellows • Brush With proper handling and regular inspection, the microscope will operate smoothly for many years. However, if a repair is necessary, contact your KERN dealer or our Technical Service. OPO-1-BA-en-2111...
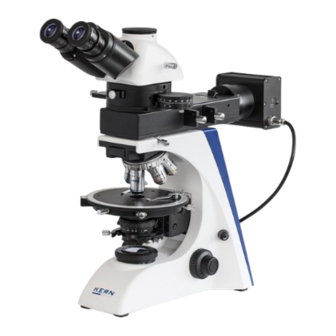
- Page 7 Eyepieces Microscope head / tube Objective nosepiece LED incident light unit Lens Object table Locking screw Microscope head Condenser with aperture adjustment and swing-out lens Dimmer Centering screw Condenser Coarse and fine drive Field lens with field diaphragm OPO-1-BA-en-2111...
- Page 8 Rear view Carrying LED incident light unit handle Power cable for incident Coarse and fine drive Main switch Mains connection Fuse OPO-1-BA-en-2111...
- Page 9 Analyzer unit / Reflected light unit Analyzer Bertrand lens Lambda / Quartz Wedge Shifter Insert for diffuser Aperture diaphragm Lamp housing Luminous field diaphragm Color filter Polarizer OPO-1-BA-en-2111...
- Page 10 3 Technical data / equipment Dimensions Product: 500x200x500 mm Dimensions Packing: 520x470x430 mm Net weight: 13 kg Gross weight: 16 kg Input voltage: AC 100-240V, 50-60Hz Output voltage: DC 1.2-6V Fuse: 2A 5x20mm OPO-1-BA-en-2111...
- Page 11 OPO-1-BA-en-2111...
- Page 12 4 Assembly OPO-1-BA-en-2111...
- Page 13 Care should be taken not to touch the lenses with bare fingers and not to allow dust to enter the apertures. OPO-1-BA-en-2111...
- Page 14 This object must be appropriately prepared so that it is suitable for the use of polarized transmitted and/or reflected light. The slide can be fixed on the stage using the specimen holders. The specimen must be placed so that it lies in the beam path and can be observed. OPO-1-BA-en-2111...
- Page 15 Important To avoid damage to the focusing system, never turn the left and right dials of the coarse and fine focus knobs in opposite directions at the same time. OPO-1-BA-en-2111...
- Page 16 3. Now look through the left eyepiece with the left eye and focus the image using the left diopter compensation ring. To do this, turn the ring in both directions (see illustration) to find out at which position the image appears sharpest. OPO-1-BA-en-2111...
- Page 17 For optimal results, the center of the rotation axis of the stage must be aligned with the center of the optical path. The microscopes of the OPO-1 series are correctly adjusted at the factory. However, it is recommended to check the centering of the microscope stage before first use and regularly thereafter.
- Page 18 9. Operate the two centering screws so that the center of the crosshairs and the center of the eyepiece scale are now aligned again. 10. Repeat steps 6 - 9. OPO-1-BA-en-2111...
- Page 19 If you have focused the object of observation for a certain magnification, the focus can easily get out of focus when selecting the objective with the next higher magnification. In this case, the focus must be restored by slightly adjusting the fine adjustment knob. OPO-1-BA-en-2111...
- Page 20 They are also identified by an additional "H" in the article description (example: HSWF 10x Ø 23 mm). With the OPO-1 series, the eyecups are already attached to the eyepiece. To use them, simply unfold the folded rubber parts.
- Page 21 The other two apertures each contain a lambda filter (¼ λ and λ). They can be used to adjust the interference colors caused by the polarized light on the sample, as required. OPO-1-BA-en-2111...
- Page 22 When looking into the microscope, a blurred image of the aperture appears. If the microscopic image becomes completely dark, the image of the field diaphragm is outside the field of view and must be brought into the field of view by the centering screws of the condenser. OPO-1-BA-en-2111...
- Page 23 5. Open the field diaphragm until it just disappears from the field of view. If necessary, re-center slightly with the centering screws of the condenser carrier. OPO-1-BA-en-2111...
- Page 24 If a different magnification is subsequently selected, the Köhler illumination does not have to be completely reset from the beginning, but only the aperture and field diaphragm adjusted accordingly. In the course of this, you can also always check whether the condenser needs to be re-centered. OPO-1-BA-en-2111...
- Page 25 Directly behind the lever of the aperture diaphragm is a small insertion point for the diffuser. It is integrated in a round opening of a small black slider. This slider can be inserted to let the light of the LED diffuse evenly. OPO-1-BA-en-2111...
- Page 26 6 Lamp replacement The devices of the OPO-1 series are equipped with LEDs. Due to the long service life of LED illumination, regular lamp replacement will not be necessary with these microscopes. Problems with the lighting would therefore in most cases have defects in the electrical system as the cause.
- Page 27 With C-mount adapters that have an integrated lens, the image displayed by a camera attached to the device can often have a different degree of sharpness than the image produced at the eyepiece. In order to be able to focus both images nevertheless, such adapters are focusable. OPO-1-BA-en-2111...
- Page 28 The diopter adjustment has not been made correctly The field of vision of one eye does not Different eyepieces are used on the right and match that of the other eye left The eyes are not used to microscopy OPO-1-BA-en-2111...
- Page 29 The table is held by a Solid blocked. The table moves down by itself The rotational resistance brake is too little The fine drive adjusts itself tightened Touching the table blurs the image The table was not mounted correctly OPO-1-BA-en-2111...
- Page 30 The device may only be opened by trained service technicians authorised by KERN. 11 Disposal The packaging is made of environmentally friendly materials that you can dispose of at local recycling points.
- Page 31 Notes OPO-1-BA-en-2111...
Need help?
Do you have a question about the OPO-1 and is the answer not in the manual?
Questions and answers