Table of Contents
Advertisement
Quick Links
Advertisement
Table of Contents

Related Manuals for KERN OZG 497


Summary of Contents for KERN OZG 497
- Page 1 KERN & Sohn GmbH Ziegelei 1 Tel: +49-[0]7433- 9933-0 D-72336 Balingen Fax: +49-[0]7433-9933-149 E-mail: info@kern-sohn.com Internet: www.kern-sohn.com User instructions Jewellery microscope (stereo zoom) KERN OZG 497 Version 1.0 01/2015 OZG_497-BA-e-1510...
-
Page 3: Table Of Contents
KERN OZG 497 Version 1.0 01/2015 User instructions Jewellery microscope (stereo zoom) Table of contents Before use ..................3 General notes ..........................3 Notes on the electrical system ....................3 Storage ............................4 Maintenance and cleaning ....................... 5 Nomenclature ................6 Basic data .................. -
Page 4: Before Use
1 Before use 1.1 General notes You must open the packaging carefully, to make sure that none of the accessories in the packaging fall on the floor and get broken. In general, microscopes should always be handled carefully because they are sensitive precision instruments. -
Page 5: Storage
1.3 Storage You should ensure that the device is not exposed to direct sunlight, temperatures which are too high or too low, vibrations, dust or a high level of humidity. The ideal temperature range is between 0 and 40°C and a relative humidity of 85% should not be exceeded. -
Page 6: Maintenance And Cleaning
Special cleaner for optical lenses Special optical cleaning cloths Bellows Brush When handled correctly and checked regularly, the microscope should give many years of efficient service. Should repairs still be necessary, please contact your KERN dealer or our Technical Department. OZG_497-BA-e-1510... -
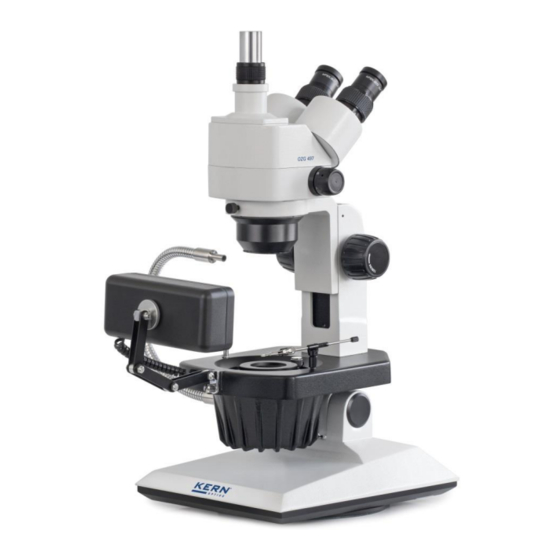
Page 7: Nomenclature
2 Nomenclature OZG_497-BA-e-1510... - Page 8 Rear view OZG_497-BA-e-1510...
-
Page 9: Basic Data
Standard configuration Model Tube Eyepiece Field of Objective Stand Illumination view KERN Zoom 12V / 10W Halogen (transmitted+incident light) Ø 33 – 5.1 0.75x – 5.0x OZG 497 Trinocular HWF 10x Ø 23 mm curved 10W Fluorescent lighting (front light) OZG_497-BA-e-1510... -
Page 10: Assembly
4 Assembly The first step is to position the microscope stand on a firm, level surface. The holder is firmly attached to the pillar of the stand. You can then fit the microscope head to the holder, by passing the objective through the holder ring until the rest of the head is above the ring. - Page 11 Additional optional attachments: The eye cups supplied with the microscopes can be fitted to the eyepieces. (see section 5.6). You can fit a C-mount adapter to the appropriate connection point on the top of the microscope head. This enables you to fit and use digital cameras. (remove protective cap first) (see section 5.9).
-
Page 12: Operation And Functionality
As soon as the lefthand and righthand visual fields exactly overlap each other, this is the correct interpupillary distance. 5.3 Adjusting the magnification As the KERN OZG 497 series covers stereo zoom microscopes, then you adjust the magnification using the two zoom adjustment wheels on the lefthand and righthand side of the microscope head. -
Page 13: Dioptre Adjustment And Focussing
5.4 Dioptre adjustment and focussing A special feature of stereo microscopes is that they are fitted with an optical unit which has a relatively high depth of field. In order to be able get the most benefit from this feature, each user must synchronise the focussing mechanisms for themselves. The steps to do this are described in the following section. -
Page 14: Adjusting The Stand
For tilting the microscope you have to push or pull strongly along the tilt direction on the column of the stand (see figure below). Due to the sluggishness of the hinge an additional fixation is not needed. Tilt function OZG 497 OZG_497-BA-e-1510... -
Page 15: Using Eye Cups / High Eye Point Eyepieces
5.6 Using eye cups / High Eye Point eyepieces The eye cups supplied with the microscope can basically be used at all times, as they screen out intrusive light, which is reflected from light sources from the environment onto the eyepiece, and the result is better image quality. But primarily, if eyepieces with a high eye point (particularly suitable for those who wear glasses) are used, then it may also be useful for users who don’t wear glasses, to fit the eye cups to the eyepieces. -
Page 16: Lighting Control
5.7 Lighting control A main switches fitted on the left rear of the stand basis ensures that the device will be supplied with power when the plug is connected. As far as the goose neck is attached, the light source, originally intended for the transmitted lighting, provides also the incident lighting. -
Page 17: Fitting And Adjusting A Camera
5.8 Fitting and adjusting a camera You can connect special microscope cameras to the devices in the OZG 497 series, so that you can digitally record images or sequences of objects being observed. The connection for this is on the top side of the microscope head. -
Page 18: Changing The Bulb
5.9 Changing the bulb Halogen Before changing the halogen bulb, you must always switch off the device and unplug it from the mains. You must also make sure that the bulb and housing have cooled down, so that you avoid any risk of possible burn injuries. To change the bulb, the whole lamp housing, fitted underneath the working stage, has to be removed. -
Page 19: Optical Data
6 Optical data 7 Features Model outfit Kern model Order number OZG 497 HWF 5x / Ø 23,2 mm ○○ OZB-A4112 HSWF 10x / Ø 23 mm ●● OZB-A4118 Eyepieces HWWF 15x / Ø 15 mm ○○ OZB-A4119 HSWF 20x / Ø 14,5 mm ○○... -
Page 20: Trouble Shooting
8 Trouble shooting Electrical system Problem Possible causes The lighting unit (if fitted) cannot be The power cable is either not connected or switched on not connected correctly The bulb is not fitted The bulb has blown The fuse has blown The brightness control is set to the lowest level The bulb has blown... -
Page 21: Service
The device may only be opened by trained service engineers who have been authorised by KERN. 10 Disposal The packaging is made of environmentally-friendly materials, which you can dispose of at your local recycling centre.
Need help?
Do you have a question about the OZG 497 and is the answer not in the manual?
Questions and answers