REVELL I20 Owner's Manual
Revel i20: user guide
Hide thumbs
Also See for I20:
- Installation instructions manual (12 pages) ,
- Brochure & specs (4 pages)
Table of Contents
Advertisement
Quick Links
®
Revel I20/I30 In-Wall Loudspeaker
Owner's Manual
3 Oak Park, Bedford, MA, 01730-1413 USA | Telephone: 781-280-0300 | Fax: 781-280-0490 | www.revelspeakers.com
Customer Support: Telephone: 781-280-0300 | Sales Fax: 781-280-0495 | Service Fax: 781-280-0499
Please contact Customer Support for information about product shipments.
Part No. 351814-002 | Rev A | 03/06
"Revel," and the Revel logo are registered trademarks of Harman International Industries. U.S. patent numbers and other worldwide
patents issued and pending.
©2006 Harman Specialty Group. All rights reserved.
This document should not be construed as a commitment on the part of Harman Specialty Group.The information it contains is subject
to change without notice. Harman Specialty Group assumes no responsibility for errors that may appear within this document.
Advertisement
Table of Contents

Related Manuals for REVELL I20


Summary of Contents for REVELL I20
- Page 1 Please contact Customer Support for information about product shipments. Part No. 351814-002 | Rev A | 03/06 “Revel,” and the Revel logo are registered trademarks of Harman International Industries. U.S. patent numbers and other worldwide patents issued and pending. ©2006 Harman Specialty Group. All rights reserved.
-
Page 2: Table Of Contents
Documentation Conventions ..... .3 About the I20/I30 .......4 Highlights •... -
Page 3: Documentation Conventions
Note Calls attention to information that is essential to highlight. This owner’s manual assumes that two I20/I30s are included in the loudspeaker setup. REVEL I20/I30 In-wall Owner’s Manual... -
Page 4: About The I20/I30
The I20 has a high-order filter at 2.8kHz. In the I30, high-order filters at 300Hz and 2kHz optimize loudspeaker on and off-axis response, helping to ensure smooth octave- to-octave balance and timbral accuracy. -
Page 5: Product Registration
Optional Rough-in Bracket for stud mounting prior to drywall installation (not included) PRODUCT REGISTRATION Please register the I20/I30 within 15 days of purchase. To do so, register online at www.revelspeakers.com or complete and return the included product registration card. The product registration card serves no warranty purposes. - Page 6 REVEL I20/I30 In-wall Owner’s Manual 6. Invert speaker so it is in the upright position. 7. When the I20/I30 is in the upright posi- tion, remove the top pad. 8. Leave the loudspeaker upright in the bottom pad until ready to install.
-
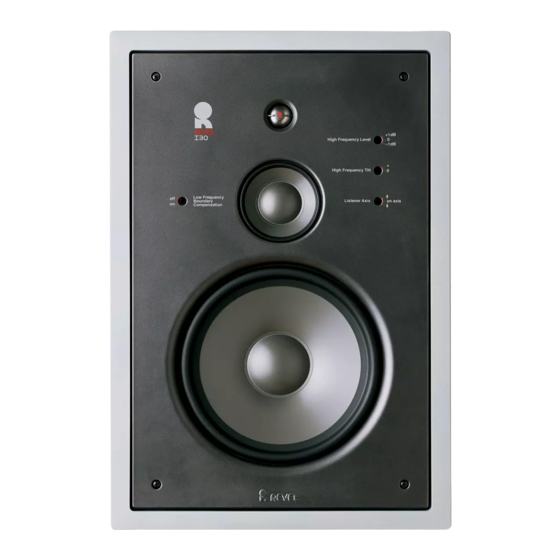
Page 7: Loudspeaker Overview
LOUDSPEAKER OVERVIEW Figure 3: I20 Speaker (Front View) The numbers in Figure 3 (above) correspond with the numbered items in the Driver Complement section that begins in the next column. DRIVER COMPLEMENT I20/I30 The numbers in Figure 3 (left) correspond with the numbered items in this section. - Page 8 This switch will be active in the network transition regions between the woofer and tweeter (in the I20) and the REVEL I20/I30 In-wall Owner’s Manual midrange and tweeter (in the I30).
-
Page 9: Filter Network
FILTER NETWORK Optimizes loudspeaker on and off-axis response with a high-order filter at 2.8kHz for the I20, and high-order filters at 300Hz and 2kHz for the I30, helping to ensure smooth octave-to-octave balance and timbral accuracy. Gold-plated binding posts accommodate heavy speaker cables,... -
Page 10: Loudspeaker Placement
However, proper placement and listening room acoustics have a significant impact on the I20/I30’s performance. Caution • The I20/I30 should be installed by a professional. • Installers must adhere to local build- ing codes to ensure a proper installa- tion. -
Page 11: Loudspeaker Placement
Installation Considerations LOUDSPEAKER PLACEMENT The I20 and I30 are designed to offer excel- lent performance in any listening room or home theater system. Abide by the follow- ing placement suggestions for optimal results. 2-Channel or Front Left and Front Right in a Home Theater System... -
Page 12: Installation Instructions
Figure 8 (above). INSTALLATION INSTRUCTIONS For installations in new construction proj- ects, use the Revel I20/I30 In-Wall Rough- in bracket which should be installed by a professional. Refer to the Revel I20/I30 In- Wall Rough-in Bracket Installation Instructions for more information. - Page 13 (Be sure to comply with local wiring codes). • The measurements of the opening(s) required to mount the Revel in-wall frames are listed below: • Revel I20 Width: 10.5-inch (266.7mm) Height: 14.875-inch (377.8mm) •...
- Page 14 Figure 14 (next column). Loosen all clamp screws until the clamps are fully extended. 5. Snap the mounting frame into the cutout. 6. Be sure to run the speaker wire in through the rear opening. REVEL I20/I30 In-wall Owner’s Manual Figure 13: Clamp Closeup...
- Page 15 12. Make speaker wire connections. Refer to the Making Connections section on page 16 for instructions. 13. Slide the baffle into place into the mounting frame. Continued on next page Allen Head Baffle Assembly REVEL I20/I30 In-wall Owner’s Manual Screws...
-
Page 16: Making Connections
15. Use the included 5/32-inch allen key to tighten until snug as shown in Figure 17 (above). MAKING CONNECTIONS The I20/I30 features gold-plated binding posts that allow for two methods of connecting the speaker wires. CAUTION Never make or break connections unless all system components are powered off. - Page 17 • If desired, contact an authorized Revel dealer for information about the suit- ability of power amplifier/receiver compo- nents before connecting the I20/I30 to the associated power amplifier/receiver. • Review the owner’s manuals for associ- ated audio components to determine their connection procedures.
-
Page 18: Optimizing Performance
Experiment with settings and carefully listen to ensure that the proper adjustments have been made. To optimize the I20/I30 for best perform- ance: 1. Refer to the Loudspeaker Placement section that begins on page 10 for information about loudspeaker instal- lation. -
Page 19: Painting The Frame
5. Listen from the primary listening position, increasing volume to a comfortable level. 6. Adjust the High Frequency Level control on each I20/I30 to change high-frequency balance and timbre. 7. Adjust the Listener Axis control depending on the position of the primary listening location. - Page 20 Use a varied spraying angle when spraying to ensure paint is applied to the inside edges of the grille perfora- tions. REVEL I20/I30 In-wall Owner’s Manual After the paint is dried, install the replace- ment scrim cloth if desired. To attach the replacement scrim cloth: 1.
-
Page 21: Grille Removal
“out-of- band” frequencies. Combined with careful- ly selected transducers and filter network components, this approach helps the I20/I30 to maintain its performance under extreme operating conditions. However, all loudspeakers have limits when it comes to continuous playback. To extend these limits, avoid playback at volume levels that distort or strain sound. -
Page 22: Specifications
Crossover Frequency Width Height Depth Wall Cutout Width Wall Cutout Height Specifications are subject to change without notice. REVEL I20/I30 In-wall Owner’s Manual 7.5-inch (190.5mm) 9-inch (228.6mm) 3.5-inch (88.9mm) 1-inch (25.4mm) 1-inch (25.4mm) 40Hz - 20kHz 32Hz - 20kHz 87dB... -
Page 23: Obtaining Service
(RMA) number. No products will be accept- ed without an RMA number issued from Harman Specialty Group. If a Revel product must be returned for repair, Harman Specialty Group will assume no responsibility for the product during shipment from the customer to... - Page 24 NOTES REVEL I20/I30 In-wall Owner’s Manual...
- Page 25 NOTES REVEL I20/I30 In-wall Owner’s Manual...
-
Page 26: Index
Index 2-channel installations, 11 5-channel installations, 11 About the, I20/I30, 4 Highlights,5 Product Registration, 5 Unpacking, 5 allen key, 16, 21 Aluminum ring, 7 Amplifier Power Range, Recommended, 22 baffle assembly, 13, 14, 15, 16 baffle, centering of, 16 banana plugs, 18... - Page 27 13 wall studs, 12 wall template, 12 Warning, 3 Warranty, 5, 23 website, 23 Width, 13, 22 wire connections, 15 wiring codes, 13, 16 Woofer, 13, 22 woofer height, 13 Woofers, 4, 5, 7 REVEL I20/I30 In-wall Owner’s Manual...
- Page 28 3 Oak Park, Bedford, MA, 01730-1413 USA | Telephone: 781-280-0300 | Fax: 781-280-0490 | www.revelspeakers.com Customer Support: Telephone: 781-280-0300 | Sales Fax: 781-280-0495 | Service Fax: 781-280-0499 Please contact Customer Support for information about product shipments. Part No. 351814-002 | Rev A | 03/06...
Need help?
Do you have a question about the I20 and is the answer not in the manual?
Questions and answers