mr. steam CT 9E Installation, Operation & Maintenance Manual
Club therapy steambath generator systems
Hide thumbs
Also See for CT 9E:
- Installation, operation & maintenance manual (20 pages) ,
- Installation operation & maintenance (27 pages) ,
- Instructions (2 pages)

Related Manuals for mr. steam CT 9E


Summary of Contents for mr. steam CT 9E
- Page 1 Club Therapy Steambath Generator Systems Installation, Operation & Maintenance Manual Models CT 6E, CT 9E, CT 12E, CT 15E...
-
Page 2: Table Of Contents
Club Therapy Steambath Generator Systems ® INSTALLATION, OPERATION & MAINTENANCE MANUAL TABLE OF CONTENTS Read Me First! & Warning Sticker ..... 1 Select Your Club Therapy Model . - Page 3 Club Therapy Steambath Generator Systems ® MODEL _______________________ INSTALLATION, OPERATION & MAINTENANCE MANUAL SERIAL NO._____________________ MODELS: CT6E, CT9E, CT12E When installing and using this electrical equipment, basic safety precautions R E A D M E F I R S T ! should always be followed, including the following: IMPORTANT NOTE: As you follow these IMPORTANT SAFETY INSTRUCTIONS...
- Page 4 steam club therapy ® ® Installation, Operation & Maintenance Manual ______________________________________________________________________________ SELECT YOUR MR.STEAM® IMPORTANT: The guidelines for selecting the steambath generator is a recommendation only. Because of variables M M a a t t e e r r i i a a l l s s o o f f c c o o n n s s t t r r u u c c t t i i o o n n , , r r o o o o m m s s i i z z e e a a n n d d s s p p e e c c i i a a l l d d e e s s i i g g n n in construction, these sizing instructions and specifica- f f e e a a t t u u r r e e s s s s u u c c h h a a s s l l a a r r g g e e g g l l a a s s s s a a r r e e a a s s , , a a l l l l a a f f f f e e c c t t t t h h e e s s t t e e a a m m g g e e n n e e r r a a t t o o r r m m o o d d e e l l s s e e l l e e c c t t i i o o n n .
-
Page 5: Before Installing
Installation • Verify that the model and accessories are correct, including or service by unqualified persons or failure to use Mr. Steam parts incoming line voltage. may void the warranty. -
Page 6: Locating The Steam Generator Unit
steam club therapy ® ® Installation, Operation & Maintenance Manual ______________________________________________________________________________ LOCATING THE STEAM GENERATOR UNIT Select a location as near as practical to the steam room. Typical locations include: closet, vanity cabinet, heated attic or basement. NOTE: THE LENGTH OF THE CABLE FOR CONNECTING THE MSTS TO THE STEAM GENERATOR IS 30 FEET. ITEMS 1-7) WA R N I N G 1. - Page 7 DO NOT connect a shut off valve or any construction in steam supply pipe. Drain Pan Mr. Steam strongly recommends the use of a drain pan in the unlikely event of a plumbing leak. Check local plumbing codes for receptor, trap and vent requirements. Drain pans drain by gravity. The drain pan is equipped with an integral 3 / 4 "...
-
Page 8: Steam Head Installation
steam club therapy ® ® Installation, Operation & Maintenance Manual ______________________________________________________________________________ INSTALLING THE AROMASTEAM STEAMHEAD 1/8" minimum clearance ( 1 ⁄2" NPT) Steam Head Installation required when Acrylic Use Teflon or Shield is used. See installa- equal sealant on tion instructions provided pipe threads IMPORTANT: Do not disassemble steamhead. -
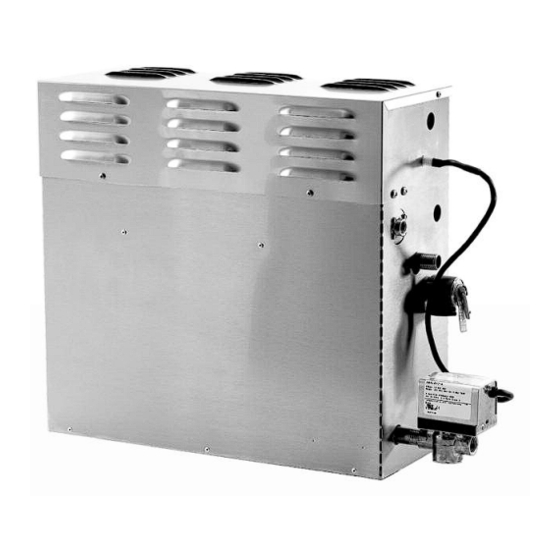
Page 9: Generator Dimensions
steam club therapy ® ® Installation, Operation & Maintenance Manual ______________________________________________________________________________ GENERATOR DIMENSIONS " (45) " (466) Water Inlet Control & Accessory " Connections (310) Steam Outlet Safety Valve " (251) AutoFlush " (184) Manual Drain Valve " (35) " 17"... - Page 10 steam club therapy ® ® Installation, Operation & Maintenance Manual ______________________________________________________________________________ CHART ELECTRICAL ___________________________________________________________ MODEL MAX ROOM VOLTS WIRE SIZE WIRE SIZE All electrical wiring to be installed by a qualified licensed electrician VOL (CU. FT.*) 1 PH † PHASE AMPS (AWG) for 40˚C (AWG) for 45˚C Ambient Ambient...
-
Page 11: Wiring Diagrams
steam club therapy ® ® Installation, Operation & Maintenance Manual ______________________________________________________________________________ with eTempo/Plus Controls SINGLE PHASE WIRING DIAGRAMS ® POWER INPUT L E G E N D TRANSFORMER (All Diagrams) FIELD WIRING FACTORY WIRING EXPRESS STEAM WATER FEED SOLENOID GROUND VALVE THERMOSTAT CONTACTOR... - Page 12 steam club therapy ® ® Installation, Operation & Maintenance Manual ______________________________________________________________________________ with eTempo/Plus Controls THREE PHASE WIRING DIAGRAMS ® MODEL CT6E, CT9E & CT12E POWER INPUT TRANSFORMER L E G E N D (All Diagrams) FIELD WIRING EXPRESS FACTORY STEAM WIRING WATER FEED...
- Page 13 steam club therapy ® ® Installation, Operation & Maintenance Manual ______________________________________________________________________________ TROUBLESHOOTING Contactor Step 1 Check your main incoming power Transformer to the unit. Water Feed Solenoid Step 2 Verify the transformer is receiving Power Supply 208/240 VAC. Knock-Out Step 3 Verify that you have 24VAC coming Water Feed Thermostat out of the transformer, WHT &...
- Page 14 club therapy steam ® ® Installation, Operation & Maintenance Manual ______________________________________________________________________________ ® AUTOFLUSH 3 Pin Connector for AutoFlush Box Contents • AutoFlush Valve with Cord • Installation instructions. Operation AutoFlush Cord The optional AutoFlush System feature automatically Connector drains the CT system following each use. A time delay allows the water to cool down (about two hours) before it drains by gravity for a safe and AutoFlush Cord...
-
Page 15: Drain Pan
Installation, Operation & Maintenance Manual ______________________________________________________________________________ DRAIN PAN Mr. Steam provides a drain pan in the unlikely event of a plumbing leak. Locate the drain pan on a solid level surface and place the steam generator inside the drain pan. Insure the steam generator is level (see page 4 for locating the steam generator). - Page 16 steam steam club therapy club therapy ® ® ® ® Installation, Operation & Maintenance Manual Installation, Operation & Maintenance Manual ______________________________________________________________________________ ______________________________________________________________________________ MODELS CT6E & CT9E shown with cover removed Liquid Level Control Board (103975) Contactor Water Feed Solenoid (100479) Power Supply Transformer Knock-Out...
-
Page 17: Replacement Parts List
steam club therapy ® ® Installation, Operation & Maintenance Manual ______________________________________________________________________________ REPLACEMENT PARTS LIST _______________________________________________________________________ Part No. Description Product _______________________________________________________________________ 99178CT Drain Valve All models 99297 Safety Valve 15PSI All models 100479 Water Feed Solenoid Valve w/filter All models 10477-3 Transformer 24VAC All models 103975... - Page 18 steam club therapy ® ® eTempo Controls ______________________________________________________________________________ ETEMPO® CONTROLS Dimensional Information for eTempo/Plus ® BOX CONTENTS: • eTEMPO/PLUS Control • Tube of Silicone Sealant • Control Cable (30 ft.) • Owner’s Manual • Steam head Before Installing Turn power to the steam generator OFF before connecting the control to the WA R N I N G Do not route eTEMPO/Plus or CT-STEAMSTOP con- generator.
- Page 19 steam club therapy ® ® eTempo Controls ______________________________________________________________________________ ETEMPO/PLUS® CONTROLS DIAGRAM 1 Installation Instructions for eTempo/Plus ® Step 1 Determine the desired installation location of the control. The eTEMPO/Plus controls are designed to be installed outside the steam room in a location only accessible by the faculty operator. The control cable length is 30 feet.
- Page 20 steam club therapy ® ® eTempo Controls ______________________________________________________________________________ CT-STEAMSTOP ™ On/Off Switch for eTempo/Plus ® DIMENSIONAL INFORMATION Box Contents: • CT-S Control TEAM • Owner’s Manual • Control Cable PLUG & PLAY SWITCH CONNECTOR INSTALLING THE CT-STEAM STOP ™ CONTROL 30' CABLE The CT-STEAMSTOP has a 30 foot cable with a Plug &...
- Page 21 steam club therapy ® ® eTempo Controls ______________________________________________________________________________ INSTALLING THE REMOTE TEMPERATURE PROBE for eTEMPO/Plus Controls ® (PN: MSTS) C A U T I O N The Remote Temperature Probe (MSTS-60) is for use with eTEMPO/PLUS Controls only. Do not use any other controls.
- Page 22 steam club therapy ® ® eTempo Controls ______________________________________________________________________________ INSTALLING THE REMOTE TEMPERATURE PROBE (cont.) 5. Route the end of the temperature probe cable with the temperature probe through the wall into the steam room as shown in Diagram 3. IMPORTANT NOTE: Do not strain, staple, pinch or otherwise damage the probe cable.
- Page 23 steam club therapy ® ® eTempo Controls ______________________________________________________________________________ ETEMPO/PLUS ® OPERATING INSTRUCTIONS The eTEMPO/Plus Control features programmable digital temperature control, programmable time duration, clock, Aromasteam , ChromaSteam , ON/OFF ™ ™ and two personal settings. WA R N I N G Set the steambathing temperature according to personal DIAGRAM preference, however it is highly recommended to begin steambathing at a low...
-
Page 24: Etempo/Plus
Note: If an error code is detected by the system the LED indicator will flash. Refer to the eTempo/Plus display for error code or LED indicator will light up call a Mr. Steam’s service technician. when the generator is ON. - Page 25 club therapy steam ® ® Installation, Operation & Maintenance Manual ______________________________________________________________________________ USING MR.STEAM® ESSENTIAL OILS Enjoy AromaSteam essential oils by placing a drop or two into an unheated AromaSteam steam- head as shown in the illustration. Only use Mr.Steam AromaSteam essential oils in the Mr.Steam AromaSteam steamhead.
- Page 26 steam club therapy ® ® Installation, Operation & Maintenance Manual ______________________________________________________________________________ CARE TIPS FOR ALL CONTROLS AND STEAMHEADS 1. Use only mild soap and water on a soft cloth to clean the control. 2. Do not use abrasive cleansers 3. If the decorative cover is damaged on the eTEMPO/PLUS call Mr.Steam ®...
- Page 27 ® 2012 © Sussman-Automatic Corporation Sussman-Automatic MR. STEAM and des., AROMAFLO, AUTOFLUSH, BUTLER PACKAGE, CLEAN STEAM...EVERY TIME, CLUB THERAPY, DIGITAL 1, iTEMPO, 9410 S. La Cienega Blvd. 43-20 34th Street iTEMPO/PLUS, EXPRESS STEAM, FROM BATHROOM TO SPA, iSIZING, MAKING WELLNESS a WAY of LIFE, MUSICTHERAPY, SPA PACKAGE, Corporation®...
Need help?
Do you have a question about the CT 9E and is the answer not in the manual?
Questions and answers