Advertisement
Quick Links
Caring for Your Fleur-De-Lys Arch
This powder-coated steel garden structure is resistant to the effects of sun,
rain, frost, and snow. It may be left outdoors year-round.To clean, simply wipe
with a damp cloth. If the powder-coat finish should chip or scratch, it may be
touched up with rust-proof enamel (not included).
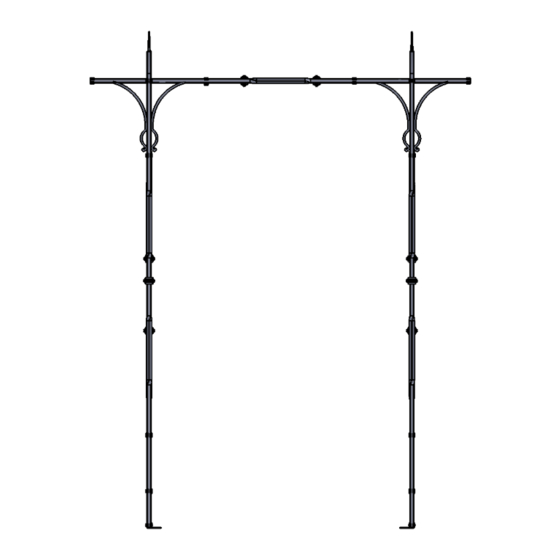
Fleur-De-Lys Arch
Thank you for purchasing this Fleur-De-Lys Arch.
Made of steel protected from moisture with a powder coat finish, this arch
will survive the natural elements for many seasons to come.
NOTE: BEFORE ASSEMBLY, MAKE SURE YOU HAVE
ALL PARTS LISTED BELOW.
Included Parts & Hardware
Unpack the arch on a protected, level surface and identify the
following components:
Arch parts:
A. Top Panel (1)
B. Side Flaps (2)
C. Support Arches (8)
D. Side Panels (2)
E. Stakes (4)
Tools Required for Assembly
Allen wrench (included). Crescent wrench or adjustable wrench. Rubber
mallet is necessary if you plan to anchor the arch in the soil. Power drill with
bits (½" masonry bit for installing on stone or cement, or ¼" standard bit for
installing into wood). You will also need crescent or socked wrench.
Hardware
F. Hexagonal Head Screws
with Nuts and Washers (4)
G. Allen Head Screws (16)
H. Lag Screws and Shields (4)
– not shown
Advertisement

Related Manuals for Restoration Hardware Fleur-De-Lys Arch


Summary of Contents for Restoration Hardware Fleur-De-Lys Arch
- Page 1 If the powder-coat finish should chip or scratch, it may be touched up with rust-proof enamel (not included). Fleur-De-Lys Arch Thank you for purchasing this Fleur-De-Lys Arch. Made of steel protected from moisture with a powder coat finish, this arch will survive the natural elements for many seasons to come.
- Page 2 How to Assemble Your Arch F. Hexagonal Head Screws We recommend that 2 people be on hand during assembly of this piece. with Nuts and Washers 1. Lay the Top Panel (A), Side Panel (D) and Side Flaps (B) on a level surface and align the pieces so that the uppermost parts nearly touch each other.
Need help?
Do you have a question about the Fleur-De-Lys Arch and is the answer not in the manual?
Questions and answers