Advertisement
Quick Links
WARNING: Read all
instructions before assembling this
product. KEEP INSTRUCTIONS
FOR FUTURE USE.
CUSTOMER SERVICE
If you are missing parts or have any questions about this product, contact us first. You can also order parts by writing to the
address above. Include the product model number, color, and a brief description of the part. Call 1-800-762-1751.
CARE AND CLEANING
DO NOT scratch or chip the finish. DO NOT use abrasive chemicals for cleaning. Dust often using a clean, soft, dry cloth.
Blot spills immediately and wipe with a clean damp cloth. If the bunk bed is to be stored, store in a cool dry place and carefully package all original
hardware to protect from loss.
TOOLS AND INSTALLATION
Tools Necessary: Allen Key (included)
NOTE: It may be easier to assemble product with two people.
NOTE: When inserting bolts, turn clockwise until tight. Then loosen
tighten. Use wax or soap on all bolts to facilitate assembly
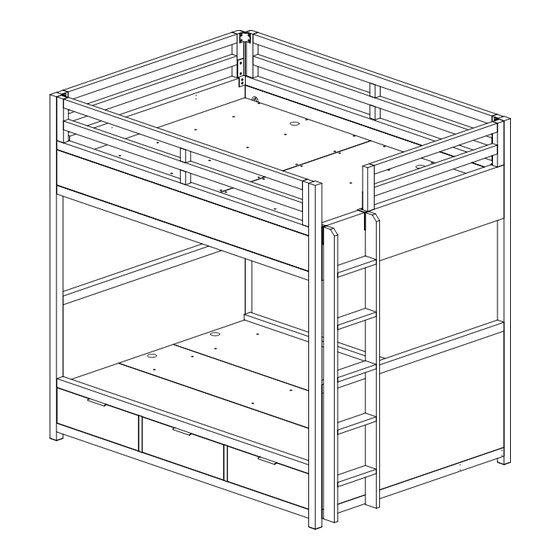
L A G U N A F U L L O V E R F U L L B U N K B E D I N S T R U C T I O N S
All Restoration Hardware Bunk Beds are designed to meet the highest safety
standards and comply with all U.S. and Canadian Bunk Beds regulations.
1
3
-
of a turn. After bunk bed is completely assembled, return to each bolt and
2
4
Page
1
Advertisement

Related Manuals for Restoration Hardware RH Teen Laguna


Summary of Contents for Restoration Hardware RH Teen Laguna
- Page 1 L A G U N A F U L L O V E R F U L L B U N K B E D I N S T R U C T I O N S All Restoration Hardware Bunk Beds are designed to meet the highest safety standards and comply with all U.S.
- Page 2 8. Always use the ladder for entering and leaving the upper bunk. Prohibit more than one person on upper bunk. Use ladder for entering and leaving upper bunk. 9. Do not use substitute parts. Contact Restoration Hardware for replacement parts. STRANGULATION HAZARD - Never attach or hang 10.Use of a night light may provide added safety precaution for a child using...
-
Page 3: Parts Included
L A G U N A F U L L O V E R F U L L B U N K B E D I N S T R U C T I O N S COMPONENT IDENTIFICATION AND HARDWARE PARTS INCLUDED ITEM DESCRIPTION... - Page 4 L A G U N A F U L L O V E R F U L L B U N K B E D I N S T R U C T I O N S IMPORTANT These bed parts can be cumbersome and heavy, therefore the assistance of two or more people is recommended in order to prevent personal injury and ensure the bed parts are not damaged during the assembly process.
- Page 5 L A G U N A F U L L O V E R F U L L B U N K B E D I N S T R U C T I O N S Fully remove all the drawers out of the storage (C). Attach the storage to the headboard (A/B1), as per illustration in FIGURE 4, FIGURE 5. Attach the lower side rail (D) to the headboard as per illustration in FIGURE 6.
- Page 6 L A G U N A F U L L O V E R F U L L B U N K B E D I N S T R U C T I O N S Align the threaded rods on the footboard (A/B2) to the corresponding holes at the end of the storage (C), lower side rail (D) and upper side rails (E).
- Page 7 L A G U N A F U L L O V E R F U L L B U N K B E D I N S T R U C T I O N S 10. Attach the Metal bracket (11) into the side rails and guardrails. Insert screw (10) provided to pass through hole on metal bracket (11) to the pre-drill hole on side rails and guardrails.
- Page 8 L A G U N A F U L L O V E R F U L L B U N K B E D I N S T R U C T I O N S 11. Set the bed slats (F1, F2) on the upper bunk and lower bunk. Secure each slat by using screws (9) provided. See FIGURE 9. 12.
- Page 9 L A G U N A F U L L O V E R F U L L B U N K B E D I N S T R U C T I O N S 13. Hook the ladder (I) on the footboard simultaneously align the metal concealed bracket male on the ladder with the female bracket on the footboard, Use screw (10) provided to fix the top of ladder with footboard.
Need help?
Do you have a question about the RH Teen Laguna and is the answer not in the manual?
Questions and answers