Table of Contents
Advertisement
Quick Links
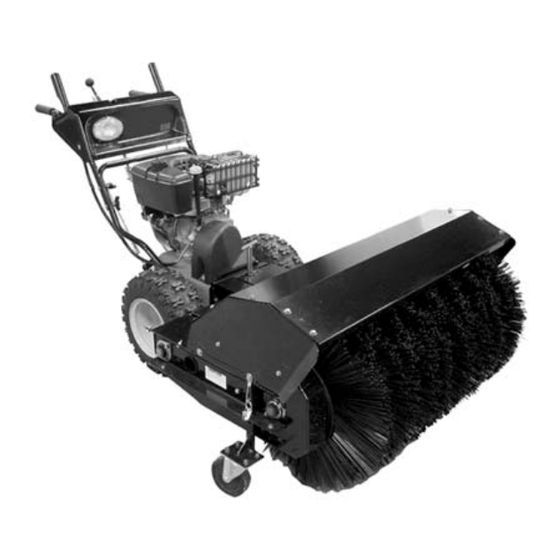
All Seasons Power Brush
Owner/Operator Manual
Models
924518 - PB936
Transfer
model &
serial number
label from
product
registration
here.
Coller l'autocollant du
modèle et du numéro de
série dans cet encadré.
Transferir aquí la etiqueta
del modelo y número de
serie del registro del
producto.
ENGLISH
FRANÇAIS
ESPAÑOL
00294900 5/04
Printed in USA
Advertisement
Table of Contents

Related Manuals for Ariens PB936


Summary of Contents for Ariens PB936
- Page 1 All Seasons Power Brush Owner/Operator Manual Models 924518 - PB936 ENGLISH FRANÇAIS ESPAÑOL Transfer Coller l’autocollant du model & modèle et du numéro de serial number série dans cet encadré. label from Transferir aquí la etiqueta product del modelo y número de...
- Page 2 Facsimile PRODUCENTA – (920) 756-2407 We the undersigned, ARIENS COMPANY, certify that: Nous, soussignés ARIENS COMPANY, certifions que : Der Unterzeichnete, ARIENS COMPANY, bescheinigt, dass: La sottoscritta società ARIENS COMPANY certifica che: Nosotros, los abajo firmantes, ARIENS COMPANY, certificamos que: Undertegnede, ARIENS COMPANY, bekrefter at: Undertecknad, ARIENS COMPANY, intygar att: Allekirjoittanut, ARIENS COMPANY, vakuuttaa, että: My, niźej podpisani, ARIENS COMPANY,...
- Page 3 Quality and Conformance Manager (Keeper of Technical Date Date Datum File) Responsable de la qualité et de la conformité des Data Fecha Dato Ariens Company produits (Dépositaire de la fiche technique) Manager Datum Päiväys Qualitätssicherung und Konformität (Archivar der Data Brillion, WI 54110-0157 USA technischen Akte) Responsabile della qualità...
-
Page 4: Table Of Contents
Customer Note: If Dealer does not register travel. your product, please fill out, sign and return the product registration card to Ariens or go to MODEL AND SERIAL NUMBERS www.ariens.com. When ordering replacement parts or making... -
Page 5: Safety
Dealer for assistance. Make sure all manual. assembly has been properly completed. 4. Review recommended lubrication, NOTE: To locate your nearest Ariens Dealer, maintenance and adjustments. call 1-800-678-5443 or go to www.ariens.com 5. Review Limited Warranty Policy. on the internet. - Page 6 Wear appropriate hearing protection. OL4690 CAUTION! Engage traction drive clutch before attachment clutch. 2. CAUTION! • Read the Owner’s Manual. • Adjust brush height before operating. • Engage traction drive clutch before attachment clutch. • Operating on irregular terrain could cause the brush to dig in and drive the machine rearward.
- Page 7 Falling snow, fog, etc. can reduce vision and Read, understand, and follow all instructions in the manual and on the machine before cause an accident. Operate unit only when there is good visibility and light. starting. Only trained adults may operate unit. Understand: •...
- Page 8 DO NOT operate on steep slopes. DO NOT If fuel is spilled on clothing, change clothing immediately. clear snow across the face of slopes. Keep all movement on slopes slow and gradual. DO Before tipping unit up onto housing, remove NOT make sudden changes in speed or fuel so no spills will occur.
-
Page 9: Assembly
ASSEMBLY WARNING: AVOID INJURY. Read and understand the entire Safety section before proceeding. Tools Required: • Open-End Wrenches: 3/8, 7/16, 1/2, 9/16" and/or Adjustable Wrench • Tire Gauge • 5/32" Hex Driver Unpacking Unit WARNING: Dropping or tipping over boxed unit could result in personal injury or damage to unit. -
Page 10: Controls & Features
Fill Engine Fuel Tank Run in Attachment Belt Refer to Engine Manual for proper type and 1. Start unit in a well-ventilated area according to Starting and Shut-Off in capacity. Operation. Check Function of all Controls 2. Engage attachment clutch lever and run Ensure unit runs and performs properly. -
Page 11: Operation
OPERATION Dual Handle Interlock WARNING: AVOID INJURY. Read When Attachment Clutch and then Traction and understand the entire Safety Drive Clutch are engaged, the Attachment section before proceeding. Clutch will remain engaged (lever down) if released. To stop brush, release Traction Drive Clutch and both clutches will disengage. - Page 12 Speed Selector Lever 2. Loosen the T-nut on top of the adapter frame and turn the brush as needed. See Forward: Figure 5. (6) Fastest 3. Retighten the T-nut. (1) Slow Reverse: (1) Slow (2) Fast IMPORTANT: Forward speed can be changed without declutching.
- Page 13 7. Reinstall the adjustment pins at the new 7. ALWAYS clean up any spilled fuel. position. PRE-START 8. Repeat steps 1- 7 until proper adjustment is attained. 1. Check Engine Air Cleaner Position (Climate Guard) IMPORTANT: See Engine Manual for correct orientation of air cleaner cover prior to starting engine.
- Page 14 6. Check Engine Fuel and Crankcase USING THE BRUSH After proper Pre-Start and Starting: 1. Select speed control position and WARNING: AVOID INJURY. Read direction. and understand the entire Safety IMPORTANT: DO NOT overload unit capacity section before proceeding. by sweeping at too fast a rate. 2.
-
Page 15: Storage
(run dry). Refer to Engine Manual. tightened and know unit is in safe working condition. MAINTENANCE Ariens Dealers will provide any service or adjustments which may be required to keep CAUTION: Always support unit frame and brush attachment when your unit operating at peak efficiency. Should... - Page 16 MAINTENANCE SCHEDULE CHECK ENGINE OIL The chart below shows the recommended The engine crankcase oil should be checked maintenance schedule that should be every 5 hours of operation. Oil level MUST be performed on a regular basis. More frequent maintained in safe operating range on dipstick service may be required due to working at all times or engine damage will result (see conditions (heavy loads, high ambient...
-
Page 17: Service & Adjustments
Drive IMPORTANT: Wipe each lube fitting clean before and after lubrication. DO NOT allow grease or oil to get on the friction disc, drive disc or belts. NOTE: Apply Stens Mix Hi-Temp Grease or equivalent to the lube fittings (Figure 8). 1.Shift Arm 4.Sprocket/Pinion Assembly... - Page 18 b.Slide pulley and key to desired 7/16–11/16 in position. (11.1-17.5 mm) c. Tighten set screws. 3. Reinstall belt cover. 4. Adjust cable slack. IMPORTANT: The belt cover must be installed and the clutch cable must be slack when the lever is disengaged. a.With clutch lever disengaged, loosen jam nut on cable adjuster.
- Page 19 2. Loosen nut on idler hex-shaft and adjust in slot as necessary. Torque the nut to 70- 146 lbf-in (7.9-16.5 N•m). ATTACHMENT DRIVE BELT REPLACEMENT Remove old attachment drive belt: 1. Follow the instructions for removing the brush attachment from the unit frame under Service Position.
-
Page 20: Troubleshooting
1.Cap Screw 4.Shift Arm 2.Cotter Pin 5.Chain 3.Friction Disc 6.Idler Hex Shaft Figure 12 OS0612 TROUBLESHOOTING PROBLEM PROBABLE CAUSE CORRECTION Engine will not 1. Fuel tank is empty. 1. Fill fuel tank. crank/start. 2. Fuel shut-off valve 2. Open fuel shut-off valve. closed. -
Page 21: Specifications
SPECIFICATIONS ACCESSORIES Model Number 924518 See your authorized Ariens dealer to add these optional accessories to your unit. Engine-Tecumseh OH318EA-222719D Part No. Description 9 (6.7) Max-HP (kw/min 72403600 120V Electric Starter Fast Idle Speed-RPM 3600±150 Electric Start Optional SERVICE PARTS... -
Page 22: Warranty
Ariens Company warrants to the original purchaser that consumer products manufactured by Ariens Company will be free from defects in material and workmanship for a period of two (2) years after the date of purchase, and will repair any defect in material or... - Page 23 Ariens Company 655 West Ryan Street P.O. Box 157 Brillion, WI 54110-0157 920-756-2141 Fax 920-756-2407 www.ariens.com...
Need help?
Do you have a question about the PB936 and is the answer not in the manual?
Questions and answers