Table of Contents
Advertisement
Quick Links
Advertisement
Table of Contents

Related Manuals for Qstarz SOLAR Travel Recorder BT-QI 200 Ultra


Summary of Contents for Qstarz SOLAR Travel Recorder BT-QI 200 Ultra
- Page 1 ...
-
Page 2: Table Of Contents
Table of Contents 1. OVERVIEW.........................1 2. PRODUCT NOTICE ......................1 3. FEATURES ..........................2 4. PRODUCT SPECIFICATION ....................3 5. HARDWARE INTRODUCTION....................4 5‐1........................4 PPEARANCE 5‐2......................4 ARDWARE UNCTION 5‐3......................5 ATTERY INSTALLATION 5‐4......................7 HARGING ATTERY 5‐5.........................7 NDICATORS 5‐6. ‐O ) ..............8 ... -
Page 3: Overview
® BT‐Q1200 Ultra Super 51‐CH GPS Travel Recorder ................................................ 1. Overview Thank you for choosing Qstarz Super 51‐CH BT‐Q1200Ultra – Bluetooth® Solar GPS Travel Recorder, built‐in new generation GPS chipset MTK with 51 channels performance for your navigation and travel log, and also, provides stand‐alone logging up to 200,000 records with 48 hrs recording under sufficient sunlight, and supports Smart Power control for power saving to extend usage time even more. Besides, BT‐Q1200Ultra software utility supports multi‐condition setting which allows you to customize and personal travel record by 3‐level detail adjustment and provides download, save, and split to arrange tracking record; moreover, you can display travel path directly on Google Earth and combine geography information with photos by Geotagging. 2. Product Notice Please take out the battery and store it in dry/cool places when not use for a long period. If BT‐Q1200Ultra isn’t used in temperature between ‐10℃ ~ 60℃, its battery charging capability will decrease. Leave the BT‐Q1200Ultra far from heat or high temperature environment. And also, do not expose your BT‐Q1200Ultra in temperature higher than 140℉/60℃ to prevent the battery inside BT‐Q1200Ultra from overheating, exploding or burning itself. The Lithium battery inside the BT‐Q1200Ultra should be recycled. It is recommended to turn BT‐Q1200Ultra off in the hospital. Wireless GPS receiver may interfere with the medical equipments which use radio frequency. The manufacturer assumes no responsibility for any damages and loss resulting from the use of this manual, or from deletion of data as a result of malfunction, dead battery, or from misuse of the product in any way. Please clean the unit with a dry and clean soft close. Do not use harsh cleaning solvents, chemicals, alcohol, or strong detergents. Do not attempt to open BT‐Q1200Ultra by yourself. Unauthorized hacking may damage the unit, and void your warranty. Beyond Navigation ... -
Page 4: Features
® BT‐Q1200 Ultra Super 51‐CH GPS Travel Recorder ................................................ 3. Features Super 51‐CH performance Bluetooth® Solar GPS Travel Recorder with 48hrs navigation time (*1) Adopt MTK chipset with high sensitivity ‐158dBm with fast TTFF The innovative GPS Travel Recorder to adopt solar panel with the slim type designed Dual Power Supply ‐ Built in rechargeable Li‐Ion battery & Solar power Support “One Touch” to turn On/Off LOG mode Stand‐Alone travel recorder to log up to 200,000 records (*2) Provide PC utility with friendly UI and Multi‐Language Support Multi‐Mode setting to record data Vehicle, Bicycle, Jog) Draw your navigation path immediately on Google Earth as default Support GeoTagging function for digit photo and generate KMZ file easily Active NMEA protocol VTG / GLL manually via Qstarz setup tool Save the travel records as GPX / PLT / CSV / NMEA / Google Earth file format Support WAAS+EGNOS+MSAS Auto On‐Off function for smart power control Personal/Portable Navigation (PDA, Smartphone, PC, etc.) *1 BT‐Q1200Ultra can be extended up to 48 hours usage under enough sunlight (24 days usage with 2 hours navi per day) *2 The waypoints would be decreased when the more options of Log Format are selected Beyond Navigation ... -
Page 5: Product Specification
® BT‐Q1200 Ultra Super 51‐CH GPS Travel Recorder ................................................ 4. Product Specification General GPS Chip MTK GPS Module Frequency L1, 1575.42MHz C/A Code 1.023MHz chip rate Channels 51‐CH Performance Antenna (Internal) Built‐in patch antenna with LNA Sensitivity Tracking ‐158dBm Datum WGS84 Performance Characteristic Position Without aid: 3.0m 2D‐RMS <3m CEP(50%) without SA (horizontal) Accuracy DGPS (WAAS, ENGOS, MSAS): 2.5m Velocity Without aid: 0.1m/s, DGPS (WAAS, ENGOS, MSAS): 0.05m/s Time 50 ns RMS Cold/Warm/Hot Start 36/33/1 sec, average Dynamic Condition Altitude <18,000m Velocity <515m/sec Acceleration <4g Protocol NMEA 0183 (V3.01) ‐GGA, GSA, GSV, RMC (Default) GPS Output Data ... -
Page 6: Hardware Introduction
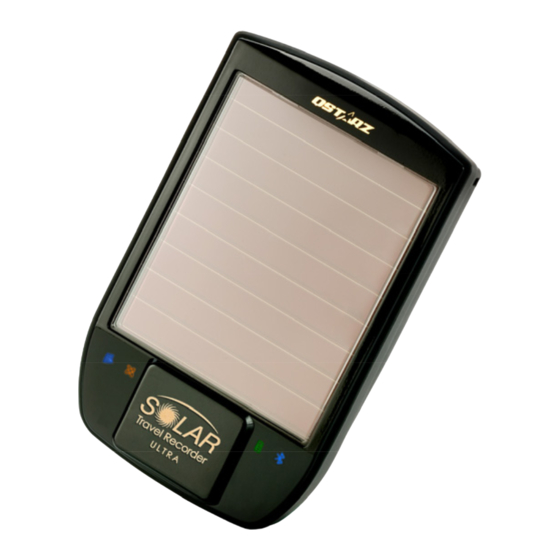
® BT‐Q1200 Ultra Super 51‐CH GPS Travel Recorder ................................................ 5. Hardware Introduction 5‐1. Appearance 1. Power jack (mini USB type) 2. Power Button (ON/OFF/Enable LOG mode/Disable LOG mode) 3. Battery status LED (Red/Green) 4. Bluetooth status LED (Blue) 5. GPS status LED (Orange) 6. LOG status LED (Blue) 7. Internal antenna 8. Solar panel (Auxiliary power source) ... -
Page 7: Battery Installation
® BT‐Q1200 Ultra Super 51‐CH GPS Travel Recorder ................................................ 5‐3. Battery installation ‐ Put Battery in place: 1. Press the PUSH button on the bottom side of the unit 2. Pull out the battery cover. Insert battery in the unit 3. Put battery cover on to the cabinet. Then push down and force it forward to fit firmly ... - Page 8 ® BT‐Q1200 Ultra Super 51‐CH GPS Travel Recorder ................................................ ‐ Take Battery out: 1. Press the PUSH button on the bottom side of the unit 2. Pull out the battery cover and take out the battery from the unit. Beyond Navigation ...
-
Page 9: Charging Battery
® BT‐Q1200 Ultra Super 51‐CH GPS Travel Recorder ................................................ 5‐4. Charging Battery For the first time using the BT‐Q1200Ultra, ... -
Page 10: Function Of Auto O N -Off (Power Saving Mode )
® BT‐Q1200 Ultra Super 51‐CH GPS Travel Recorder ................................................ 5‐6. Function of Auto On‐Off (Power saving mode) BT‐Q1200Ultra supports Auto On‐Off (Power saving mode). It can automatically enter sleeping mode after the Bluetooth connectivity is turned off, so the Blue LED will turn to flash every 5 seconds. Thus you can always power it on with very low power consumption. Under power saving mode, when detecting Bluetooth is being connected, BT‐Q1200Ultra will auto wake up itself and the blue LED will turn to flash every 2 seconds and GPS Orange LED will be also On. Note: Power saving mode would not function when log is enabled. 6. Setup BT‐Q1200Ultra 6‐1. Install the driver and software utility for BT‐Q1200Ultra System Requirement (Only compatible with Microsoft Windows XP / Vista) Minimum System Requirement Recommended System Requirement ‐ Windows XP or Vista ‐ Windows XP ‐ Pentium 3, 500Mhz ‐ Pentium 4 2.4GHz+ or AMD 2400xp+ ‐ 128M RAM ‐ 512M RAM ‐ 128MB disk space ‐ 2 GB of free disk space ‐ Network speed: 128Kbits/sec ‐ Network speed: 768 Kbits/sec or ‐ 3D‐capable video card with better (DSL/Cable) 16Mbytes of VRAM ‐ 3D‐capable video card with 32 MB of ‐ 800x600, "16‐bit High Color" screen VRAM or greater ‐ 1280x1024, "32‐bit True Color" screen ... - Page 11 ® BT‐Q1200 Ultra Super 51‐CH GPS Travel Recorder ................................................ 1. Please insert the Driver CD to your computer, and find the folder “Utility\PC Utility V4\”. Double click “TravelRecorderV4_installer.exe” to install the software utility package. This software package contains USB driver and PC Utility V4 software inside. 2. System would pop up the utility installation dialog. Please click <Next> for the next step. Beyond Navigation ...
- Page 12 ® BT‐Q1200 Ultra Super 51‐CH GPS Travel Recorder ................................................ 3. Please select “Travel Recorder PC Utility V4” and “GPS Data Log Device Driver”, and then click <Next> to the next step. If you already installed USB driver, please unselect “GPS Data Log Device Driver.” 4. Click <Next> if you want to install the program in default target folder or you can click <Explore> to change the install folder. Beyond Navigation ...
- Page 13 ® BT‐Q1200 Ultra Super 51‐CH GPS Travel Recorder ................................................ 5. Give a folder’s name for quick links in start menu and click <Install> to install the program. 6. When the utility installation is completed, please click <Finish> to reboot. Or you can also reboot later by selecting “No, I want to reboot later by myself.” Beyond Navigation ...
-
Page 14: Install Google Earth
® BT‐Q1200 Ultra Super 51‐CH GPS Travel Recorder ................................................ 6‐2. Install Google Earth BT‐Q1200Ultra supports showing your travel path directly on Google Earth. Please go to http://earth.google.com for the free download of Google Earth, and then install it to your computer. For the operation procedure of Google Earth, please refer to http://earth.google.com/support/ 7. Start to use 7‐1. Fully charge the battery when using at the first time A fully charged battery with solar power can last up to 48 hours continuously operation (under optimum conditions). 7‐2. Connect BT‐Q1200Ultra with your PC 1. Please connect BT‐Q1200Ultra with your PC by mini USB cable. 2. Power on BT‐Q1200Ultra and switch it to Start Logging NOTE: Please make sure turn BT‐Q1200Ultra to Log mode or it will enter sleep mode automatically in few minutes under NAV mode. 7‐3. Start the software utility NOTE 1: Before starting the software utility, please make sure that the USB ... - Page 15 ® BT‐Q1200 Ultra Super 51‐CH GPS Travel Recorder ................................................ NOTE 3: Qstarz Travel Recorder PC Utility V4 can’t be opened with Qstarz Travel Recorder PC Utility V3 simultaneously. Please execute either one of both or the program may experience unstable status. 1. Click from <Start> \ <All Programs> \ <Qstarz Travel Recorder V4> \ Travel Recorder PC Utility V4. 2. <File> \ <Read Log> Download the log data from BT‐Q1200Ultra. 2.1 Click <File> \ <Read Log> or the quick link icon. The product 2.2 Users have to input product key at the first time of use. key is located on the envelop of the driver CD. 2.3 PC Utility will automatically detect the com port and baud rate and load in the GPS tracks. Beyond Navigation ...
- Page 16 ® BT‐Q1200 Ultra Super 51‐CH GPS Travel Recorder ................................................ If download proccess doesn’t work well, please pull USB port out of Travel Recorder, turn off‐on, and plug it in again to make connection. You may also try to manually select com port to get more stable connection. Please refer to “4.1 Connection Setting.” 2.4 A track list window will be popped up. Select the tracks to import. 2.5 Tracks will be shown on the Google Map window. Beyond Navigation ...
- Page 17 ® BT‐Q1200 Ultra Super 51‐CH GPS Travel Recorder ................................................ 3. <File> \ <Clear Log> Clear the data stored in the Travel Recorder. 4. <File> \ <Config GPS> Configure the recording method of the flash memory of Travel Recorder. Beyond Navigation ...
- Page 18 ® BT‐Q1200 Ultra Super 51‐CH GPS Travel Recorder ................................................ 4.1 Connection Setting I. Auto Scan GPS Module (Recommended) The program will automatically detect the com port. It is recommended to set to auto scan. II. Manual Setting Users can also manually set the port. Although it can speed up the initial connect time, but it is not recommended unless users understand the valid port. To find the valid com port, please go to <Device Manager> and expand the <Ports (COM & LPT)> and check “CP210x USB to UART Bridge Controller” to see which COM port is assigned to Travel Recorder. (COM4 is for example) Beyond Navigation ...
- Page 19 ® BT‐Q1200 Ultra Super 51‐CH GPS Travel Recorder ................................................ 4.2 GPS Log Setting There are 4 log modes: General mode, vehicle mode, cycling mode, and hiking mode. Users can also change the default setting of these 4 modes. Log every () seconds: If the criterion is checked, Travel Recorder will not log if difference between current time and last logged time is less than the specified time. Log every () meters: If the criterion is checked, Travel Recorder will not log if the distance of current position and last logged position is less than the specified distances. Log over () km/h: If the criterion is checked, Travel Recorder will not log if the speed is under the setting. 4.3 Data Log Memory A bar show how many percentage of memory is used in the Travel Recorder. Overwrite: When the memory is full, Travel Recorder will keep logging by overwriting the memory from the earliest point. Stop Log: ...
- Page 20 ® BT‐Q1200 Ultra Super 51‐CH GPS Travel Recorder ................................................ <Photo List> window. Under <Photo View> window, Users can click on the “next photo” and “prev photo” buttons to browse photos, add comment to each photo, and rotate, delete photos. PC Utility will automatically match photos and GPS logged waypoints by time. Synchronized 5.3 <Photo List> window will show the properties of photos. The information includes “file name”, “date”, “place mark”, “latitude”, “longitude”, and “Geotagged flag”. Beyond Navigation ...
- Page 21 ® BT‐Q1200 Ultra Super 51‐CH GPS Travel Recorder ................................................ Click right mouse button on a column. You can choose Column Type, Column Size, Sort or Group data. 5.4 <Media List> window will show the properties of media files, including sound and video. The program will also find matched locations on map for media files based on time. You can Preview and even extend screen to full screen by Full Screen button. Beyond Navigation ...
- Page 22 ® BT‐Q1200 Ultra Super 51‐CH GPS Travel Recorder ................................................ 6. <Photo> \ <Shift Photo Time> will invoke the shift photo time window. All photos will be added (or subtracted) the specified time. The dates are saved in the Exif parts of Jpeg or Tiff file. After the shift, PC Utility will automatically match the photo and track waypoints again. Users can put more than 365 in days. Beyond Navigation ...
- Page 23 ® BT‐Q1200 Ultra Super 51‐CH GPS Travel Recorder ................................................ 7. <Photo> \ <Write GPS Info into Photos> will save the latitude, longitude, and altitude information into photo. A progress window will show the writing progress. 8. <Photo> \ <Upload Photos to Flickr> will invoke upload wizard. Users can set “Title”, “description”, “Tag”, “Public or Private”, and “Upload photo size”. Beyond Navigation ...
- Page 24 ® BT‐Q1200 Ultra Super 51‐CH GPS Travel Recorder ................................................ If you want to upload geotagged photos directly on Flickr web site: You have to turn on the following option. "Your Account">"Privacy & Permissions">"Import EXIF location data: Yes" After the option is turned on, the uploaded photo will be put on map. Go to Flickr > “You” > “Your map”, you can browse your photos on the map. 9. <File> \ <View in Google Earth> will invoke Google Earth to view the tracks and photos. Please install Google Earth previously in order to activate this feature. 10. <File> \ <Export as KMZ> Save the tracks and photos in kmz file. Users can use Google Earth to load in such file format. The picture size packed in the kmz file can be set in the options dialog. <Tools> \ <Options> \ <Google Earth> \ <Photo size in KMZ> Beyond Navigation ...
- Page 25 ® BT‐Q1200 Ultra Super 51‐CH GPS Travel Recorder ................................................ 11. <Display Time Zone> <Photo Time Zone> There are two time zone settings in “Travel Recorder PC Utility”. One is “Photo time zone”, the other is “Display time zone”. “Photo time zone” is set to the same time zone of your digital camera. The “Display time zone” is set for displaying purpose. For example, if you live in England and you travel to United State, the “Photo time zone” should be set to “England” because your digital camera time zone is in England, and the display time zone should be set to “United State”. The “Photo time zone” by default is set to the PC default value. In most of the case the default value is correct. <Tools> \ <Options> will invoke the options dialog. You can set <Photo Time Zone> in the dialog. The <display time zone> setting is in the status bar. Beyond Navigation ...
- Page 26 ® BT‐Q1200 Ultra Super 51‐CH GPS Travel Recorder ................................................ 12. <Google Map> Google Map is a free map service that you view in the PC Utility V4. Click and drag maps to view adjacent sections immediately. View satellite image with or without map data of your desired location that you can zoom and pan. Beyond Navigation ...
- Page 27 ® BT‐Q1200 Ultra Super 51‐CH GPS Travel Recorder ................................................ 12.1 Navigation Control Arrows: Click the appropriate arrow buttons to move the view north, south, east or west. Zoom: Click + to zoom in on the center of the map. Click to zoom out. Zoom slider: Drag the zoom slider up or down to zoom in or out incrementally. 12.2 Info Window Info windows appear when you click a marker and display additional information about the location, such as photo and start point. Show Location: will show the zoomed in location of a waypoint. Beyond Navigation ...
- Page 28 ® BT‐Q1200 Ultra Super 51‐CH GPS Travel Recorder ................................................ Edit: Allow you to edit detail information of a waypoint. You can also add photos in or delete photos from single waypoint. 12.3 Track Display tracks recorded by Travel Recorder. You can move cursor to a track and hold a while to show the info of a waypoint. Beyond Navigation ...
- Page 29 ® BT‐Q1200 Ultra Super 51‐CH GPS Travel Recorder ................................................ 12.4 Views Click these to display different views, including aerial images and street level imagery. 12.5 Special Functions Slide Show: Click to activate photo slide show. Beyond Navigation ...
- Page 30 ® BT‐Q1200 Ultra Super 51‐CH GPS Travel Recorder ................................................ Place Mark: Click to add a place mark on map. then the “Place Mark Property” dialog will pop up for editing. Beyond Navigation ...
- Page 31 ® BT‐Q1200 Ultra Super 51‐CH GPS Travel Recorder ................................................ 12.6 Search Bar Allow you to search any location on map. 12.7 Start Point The start point of a track with a small flag. 12.8 Camera To signify the locations of your photos. 12.9 Point of Interest (Push to Log) To signify the locations when you press POI button. 12.10 Place Mark To signify the locations when you manually add place marks. 12.11 Overview map This view shows the location of current map view. The overview map appears in the bottom right corner of the map. It helps orient you by showing the location of current map view in the context of a larger geographical area. The area currently displayed in the map is show as a purple box in the overview map. At any time, click to hide the overview map or click ...
- Page 32 ® BT‐Q1200 Ultra Super 51‐CH GPS Travel Recorder ................................................ 13. <Track Editor> Switch to folder “Track Editor” on the left window. Move the cursor on the track will show the preselected waypoint time. Click on track to select the whole track. Undo erases the last change done and reverts it to an older state. Redo reverses the undo or advances the buffer to a more current state. Area Selection allows you to select multi‐waypoint by clicking and holding mouse left button until an area being selected. Beyond Navigation ...
- Page 33 ® BT‐Q1200 Ultra Super 51‐CH GPS Travel Recorder ................................................ Delete a waypoint or a whole track. Property shows the “Place Mark Property” dialog for editing. Drag a waypoint when it drift to a improper location. Right click mouse button: Split Track will split the track into two tracks. Delete this point will delete the selected waypoint. Delete Selected Object will delete the selected track. You can also select multi‐waypoint by the windows common selecting function: Shift Select, and Ctrl Select. 14. <Track List> Switch to <Track List> window will show all the tracks and its properties loaded from Travel Recorder. Select any one of tracks and the center of map will move to the location of start point of that track. You can Rename, Delete, change Color and Line Width of tracks. Changes will be synchronized immediately on map. ...
- Page 34 ® BT‐Q1200 Ultra Super 51‐CH GPS Travel Recorder ................................................ Play shows your travel log by means of animation. You can adjust the flow speed and use scroll bar to forward or backward. Photo Slide Show allows the program activate slide show when playing process encounters any matched photos on tracks. Click right mouse button on a column. You can choose Column Type, Column Size, Sort or Group data. Beyond Navigation ...
- Page 35 ® BT‐Q1200 Ultra Super 51‐CH GPS Travel Recorder ................................................ 15. <Altitude Graph> / <Speed graph> Switch to <Speed/Altitude View> window will show the speed and altitude graph. The waypoints with photos on it will be marked with red square. Moving cursor on red square will display the photo. You can pan left, pan right, zoom in, zoom out in the speed or altitude graph. 16. <File> \ <New Project> <Open Project> <Save Project> <Save Project As> Save Project will save the tracks and photo as a project file. Open project will open the saved project. The project, photos, and photo comments will be restored after the project opened. Beyond Navigation ...
- Page 36 ® BT‐Q1200 Ultra Super 51‐CH GPS Travel Recorder ................................................ 17. <Tools> \ <Options> <Unit and Coordination> Distance unit: Metric: Kilometer / meters will be used for displaying. Imperial: Miles / feet will be used for displaying. Lat/Long: Degrees, minutes, seconds: Latitude and longitude will be display like 23°12’20” Degrees: Latitude and longitude will be display like 23.22152° <Photo> Photo Time Zone: Please refer to Title 11. Max photo/track diff time: The setting is used to match photo and track waypoints. PC Utility V4 Beyond Navigation ...
- Page 37 ® BT‐Q1200 Ultra Super 51‐CH GPS Travel Recorder ................................................ will match photos and waypoints by time. It will find the nearest waypoint time to locate the photo. Yet, if the closest waypoint time is more than the “Max photo/track diff time”, it will not match the photo. Group photos when distance is less than: This setting can organize specific range of photos into just one waypoint which allows you to avoid massive place marks sticking together when you take too many photos in one location. <Flickr Account> Please refer to Title 8. <Google Earth / Google Map> Photo size in KMZ: The size of the photos packed in the KMZ file. It is related to the command “File” > “Export As KMZ…” <Display Language> Preferred Language: Set the languages for menu, buttons and messages. Beyond Navigation ...
-
Page 38: Useful Reference Applications On The Internet
® BT‐Q1200 Ultra Super 51‐CH GPS Travel Recorder ................................................ 8. Useful reference Applications on the internet 8‐1. locr GPS Photo BT‐Q1200Ultra is the member of locr GPS Photo certified product. This utility can integrate travel log and digital photos by date/time to show your photos on the map directly. After the integration, the current GPS coordinates also can be imported to your digital photos for the further application. Please find the installation file for Windows XP/Vista or Symbian system in Qstarz GPS CD. Go to http://www.locr.com for the further information. Beyond Navigation ... -
Page 39: Gpsbabel
® BT‐Q1200 Ultra Super 51‐CH GPS Travel Recorder ................................................ 8‐2. GPSBabel This utility can transfer your NMEA file to GPX file or other format. Please go to http://www.gpsbabel.org for free download. 1. Select “NMEA 0813 sentences” 2. Open your NMEA file 3. Select “GPX XML” 4. Enter your GPX file name 5. Click “let’s go” to transfer ... -
Page 40: Sportsmate
® BT‐Q1200 Ultra Super 51‐CH GPS Travel Recorder ................................................ 8‐3. SPORTSMATE This web site can share your travel log with your friends. Before sharing your trip, please apply a new account first. Please go to http://www.ttsm.com for the further information. Beyond Navigation ... -
Page 41: Jet Photo Studio
® BT‐Q1200 Ultra Super 51‐CH GPS Travel Recorder ................................................ 8‐4. JetPhoto Studio This utility can integrate travel log and digital photos by date/time to show your photos on the map directly. After the integration, the current GPS coordinates also can be imported to your digital photos for the further application. Please go to http://www.jetphotosoft.com for free download. Beyond Navigation ... -
Page 42: Veogeo
® BT‐Q1200 Ultra Super 51‐CH GPS Travel Recorder ................................................ 8‐5. VeoGeo This website allows you to combine travel log and video by date/time to show your video on the map directly. Please go to www.veogeo.com for further information and register for a free new account. Beyond Navigation ... -
Page 43: Trouble Shooting
® BT‐Q1200 Ultra Super 51‐CH GPS Travel Recorder ................................................ 9. Trouble Shooting Question Answer Can BT‐Q1200Ultra be used to navigate Yes, you can use BT‐Q1200Ultra to navigate when travel log is when travel log is on simultaneously. on? I lost my travel DC Input range of BT‐Q1200Ultra is 4.5~5.5V. You can use a charger and battery. travel charger which support DC output range from 4.5~5.5V. Where can I find You can also use a common mini USB cable to charge your unit replacements for via the laptop. Besides, The battery for BT‐Q1200Ultra is both? compatible with Nokia N73. The battery model is BP‐6M. How can I know if If you see the Log LED is steady lighted up, which means the my memory is full? memory is full. I noticed that the There is no internal clock delay; it is UTC time (Greenwich internal clock time is time) that confused you. For local time, you can adjust under 1 hour behind, how <Tool> \ <Option> and see the local Date/Time under "Satellite can I do? Information" tab of utility. Actually it’s okay for Q1200Ultra to download data via Can the logged data Bluetooth interface. However, since it is not stable and with be downloaded by lower download performance than that of USB interface, we Bluetooth? ... -
Page 44: Appendix
® BT‐Q1200 Ultra Super 51‐CH GPS Travel Recorder ................................................ 10. Appendix Navigate as a Bluetooth GPS Receiver with Handheld devices 10‐1. Activate the Bluetooth function in your PDA/Smart phone or PC Before activating the Bluetooth function in your PDA/PC, please switch BT‐Q1200Ultra on for paring and check if your device is equipped with Bluetooth function. If not, you may need to acquire an optional CF/SD Bluetooth card or Bluetooth dongle. NOTE 1: BT‐Q1200Ultra would be identified as”iBT‐GPS” under Bluetooth Manager. In further use, you just need to click it to connect to this GPS Travel Recorder. NOTE 2: The pairing procedure is required to execute in the first time only. And the pass code is “0000” if required. NOTE 3: Select correct com port and baud rate : 115,200 under your navigation software (Most of navigation software can auto‐detect Bluetooth Com port, so you do not need to setup manually). Beyond Navigation ... -
Page 45: Create Bluetooth Setting (Windows Mobile 5/6 For Pocket Pc)
® BT‐Q1200 Ultra Super 51‐CH GPS Travel Recorder ................................................ 10‐2. Create Bluetooth Setting (Windows Mobile 5/6 for Pocket PC) 1. Switch BT‐Q1200Ultra on. 2. From the Start menu, click Settings. On the Connections tab, click the Bluetooth icon 3. On the Devices tab, click Add New Device… The settings application will search for your device. When it is found, click Next. 4. Enter the passcode “0000” and click Next. Beyond Navigation ... - Page 46 ® BT‐Q1200 Ultra Super 51‐CH GPS Travel Recorder ................................................ 5. On the Partnership Settings screen, select Serial Port and click Next 6. Select the Mode tab and check the Turn on Bluetooth checkbox if it is not already checked. Beyond Navigation ...
- Page 47 ® BT‐Q1200 Ultra Super 51‐CH GPS Travel Recorder ................................................ 7. Select the COM Ports tab and click New Outgoing Port 8. Select “iBT‐GPS” from the Add a Device list and click Next Beyond Navigation ...
-
Page 48: Configure The Gps Intermediate Driver
® BT‐Q1200 Ultra Super 51‐CH GPS Travel Recorder ................................................ 9. Uncheck Secure Connection. From the Port drop‐down list, select a port number. Remember the port you choose. You will need it when you configure the GPS Intermediate Driver. 10. Click Finish and exit the Bluetooth Control Panel item. 10‐3. Configure the GPS Intermediate Driver The GPS Intermediate Driver is a software layer between a Windows Mobile application and the GPS hardware drivers. This allows applications to work with a variety of GPS hardware. The GPS Intermediate Driver uses the registry to determine what COM port should be used to communicate with the GPS hardware. The recommended way to configure the registry to work with your GPS device is the GPS Settings icon Beyond Navigation ... - Page 49 ® BT‐Q1200 Ultra Super 51‐CH GPS Travel Recorder ................................................ 1. From the Start menu, click Settings. On the System tab, click the External GPS icon. On some devices, this item has a different name. 2. On the Programs tab, select any available COM port from the GPS Program Port drop‐down list. The GPS data sent through the GPS Intermediate Driver is streamed to applications through this port. This should not be the same port that your GPS receiver is configured to use. If your application can’t receive GPS data stream, leave GPS Program Port for empty. Applications will use GPS Hardware Port as communication port. 3. On the Hardware tab, select the COM port BT‐Q1200Ultra is configured to use from the GPS Hardware Port drop‐down list Beyond Navigation ...
- Page 50 ® BT‐Q1200 Ultra Super 51‐CH GPS Travel Recorder ................................................ 4. On the Access tab, make sure that the Manage GPS Automatically checkbox is checked Beyond Navigation ...
-
Page 51: Start Your Navigation Software
® BT‐Q1200 Ultra Super 51‐CH GPS Travel Recorder ................................................ 10‐4. Start your navigation software Activate your navigation software and make sure to select the correct “COM Port”. NOTE 1: In the map software such as TomTom, you might need to change preference and set “Other Bluetooth GPS Device” according to PDA/phone model. In some case please consult map software company to vary the setting if you have issue on positioning. NOTE 2: There might be specific setting requirement per navigation software. Such as Tomtom, please delete other GPS settings under Tomtom software, and keep one only. Beyond Navigation ... -
Page 52: Safety Notices
® BT‐Q1200 Ultra Super 51‐CH GPS Travel Recorder ................................................ 10‐5. Safety Notices R&TTE / CE Notice This device is confirmed to comply with the requirements set out in the Council Directive on the Approximation of the Laws of the Member States relating to Electromagnetic Compatibility (89/336/EEC), Low‐voltage Directive (73/23/EEC) and the Amendment Directive(93/68/EEC), the procedures given in European Council Directive 99/5/EC and 89/336/EEC. The equipment was passed. The test was performed according to the following European standards: EN 300 328‐2 V .1.2.1 (2001‐08) EN 301 489‐1 V .1.4.1 (2002‐04) / EN 301 489‐17 V .1.2.1 (2002‐04) EN 50371: 2002 EN 60950: 2000 FCC Notice This device complies with part 15 of the FCC rules. Operation is subject to the following two conditions: This device may not cause harmful interference. This device must accept any interference received, including interference that may cause undesired operation. Spec. is subject to change without prior notice. All rights reserved. All registered trademark is belong to their respected companies. Beyond Navigation ...
Need help?
Do you have a question about the SOLAR Travel Recorder BT-QI 200 Ultra and is the answer not in the manual?
Questions and answers