Table of Contents
Advertisement
Available languages
Available languages
Quick Links
Explore 2000
.................................................................................................................................................................................................................................................................................................
Explore 2000 Quick Installation Guide
A. Standard Package
(1) GPS Unit Explore 2000 (2) Lithium‐ION Rechargeable Battery (3) mini USB Cable (4)
Travel Charger (5) Software CD (6) Warranty Card + Quick Guide (7) Bike Mount Kit
(Optional) (8) Incase Sports Armband (Optional)
1. 2. 3. 4.
5. 6. 7. 8.
.................................................................................................................................................................................................................................................................................................
www.Qstarz .com
English
1
Advertisement
Table of Contents

Subscribe to Our Youtube Channel
Related Manuals for Qstarz Explore 2000


Summary of Contents for Qstarz Explore 2000
- Page 1 Explore 2000 English ……………………………………………..………………………………………………………………………………………………………………………………….……………………………………………………………………………. Explore 2000 Quick Installation Guide A. Standard Package (1) GPS Unit Explore 2000 (2) Lithium‐ION Rechargeable Battery (3) mini USB Cable (4) Travel Charger (5) Software CD (6) Warranty Card + Quick Guide (7) Bike Mount Kit (Optional) (8) Incase Sports Armband (Optional) 1. 2. 3. 4. ...
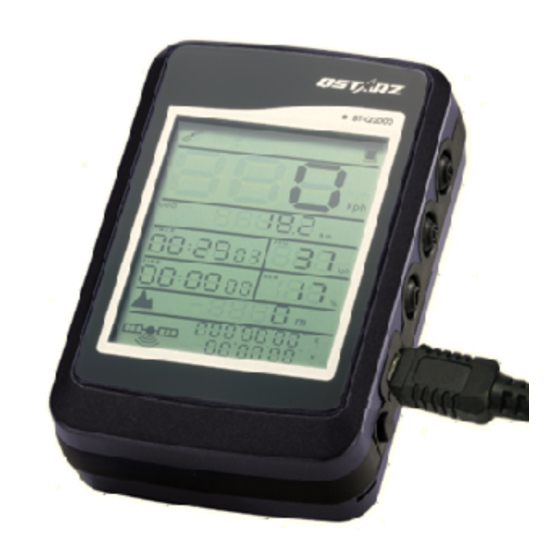
- Page 2 1. Power Button (ON/OFF/Enable LOG mode/Disable LOG mode) 2. LCD Backlight Button 3. Tool Button (Distance Unit Switch / Reset Measurement) 4. Power jack (mini USB type) 5. Battery charge LED (Red) 6. Internal antenna 7. LCD Screen ……………………………………………..………………………………………………………………………………………………………………………………….……………………………………………………………………………. www.Qstarz.com...
-
Page 3: Safety Notice
Explore 2000 English ……………………………………………..………………………………………………………………………………………………………………………………….……………………………………………………………………………. C. Safety Notice Charging time is about 3 hour typically for this unit. We suggest disconnecting the unit from the cigarette charger or AC charger after the unit has been fully charged. Be sure to use the supplied Travel charger included in package; otherwise excessive voltage may be applied to the unit and may cause smoke, fire, or accident. When the unit is not in use or not charged, we suggest disconnecting the unit from the Travel charger. Otherwise battery drain may result. Note that the built in battery cannot be charged outside the temperature range 0℃ ~ 45℃. The charging time might be extended if you use the product while charging Do not heat or leave the unit in high temperature or direct sunshine for a long period of time as the built‐in battery capacity will deteriorate, or will become unchargeable. D. Hardware Function Hardware Function Description Take the power cable and connect it to the power jack Power Jack (mini USB type) for charging only Power Button (On / Off) Press and hold for 5 sec to power On/Off Explore 2000. After power on Explore 2000, press and hold for 1 sec to Power Button enable/disable log mode. Then Explore 2000 would (Enable / Disable Log mode) start/stop logging and the log indicator would appear/disappear. After power on Explore 2000, press and hold for 1 sec to LCD Backlight Button (On / Off) enable/disable LCD backlight. ……………………………………………..………………………………………………………………………………………………………………………………….……………………………………………………………………………. www.Qstarz .com... - Page 4 The number 00‐23 is one way circling. Press LCD Backlight button to save the time zone setting. Please refer to the conversion chart below when your time zone is with negative value. Time Zone ‐1 ‐2 ‐3 ‐4 ‐5 ‐6 ‐7 ‐8 ‐9 ‐10 ‐11 (GMT) Device 23 22 21 20 19 18 17 16 15 14 13 Setting NOTE: The device time zone setting is for LCD on‐screen display only and will not affect log data. Log data are all recorded as standard GMT+0 and can be changed in accordance with your local time after loading to SW. ……………………………………………..………………………………………………………………………………………………………………………………….……………………………………………………………………………. www.Qstarz.com...
-
Page 5: Lcd Screen
Explore 2000 English ……………………………………………..………………………………………………………………………………………………………………………………….……………………………………………………………………………. E. LCD Screen Icon Indicators: Bluetooth GPS not Fix Connected GPS Fix Low Battery (Flash) Log Mode Enabled Battery Full Timer: Timer will only measure the moving time. Your stop time will be eliminated. Average Speed: Average Speed will show the Moving Average Speed eliminating stop time. Current Time: It will show the local time depending on hardware time zone setting. ……………………………………………..………………………………………………………………………………………………………………………………….……………………………………………………………………………. www.Qstarz .com... -
Page 6: Battery Installation
English ……………………………………………..………………………………………………………………………………………………………………………………….……………………………………………………………………………. F. Battery Installation Put Battery in place: Use a screwdriver to unlock both screws on the battery cover. Pull out the battery cover. Insert battery in the unit. Put weatherproof rubber on the cabinet first and then put battery cover on it. Then push down and force it forward to fit firmly. Use a screwdriver again to lock both screws. G. Charging your battery For the first time using the Explore 2000, please charge battery until it is fully charged. Take the power cable and connect it to the power jack (mini USB type) and recharge through USB cable, travel charger or car cigarette adaptor. This will begin to charge the battery. Charging time is 3 hours typically. ‐ When the Battery indicator starts to flash, battery power is in low status. Please recharge. ‐ When the battery charge LED is on, the battery is under charging mode. ‐ When the battery charge LED is off, the battery is fully charged. NOTE 1: During charging under off status, the device is unable to be turned on. If you wish to use the device during charging, please turn on the device before plug in the mini USB cable. NOTE 2: During charging under on status, the Bluetooth is disabled. If you wish to use Bluetooth connection, please unplug the mini USB cable. H. Setup Explore 2000 H‐1 Install the USB Driver and software utility (Only support Microsoft Windows XP / Vista) ……………………………………………..………………………………………………………………………………………………………………………………….……………………………………………………………………………. www.Qstarz.com... -
Page 7: Start To Use
Explore 2000 English ……………………………………………..………………………………………………………………………………………………………………………………….……………………………………………………………………………. Please insert the Software CD to your computer, and find the folder “Utility\Qstarz PC Suite\”. Double click “Qstarz_PC_Suite_installer.exe” to install the software utility package. This software package contains USB driver, PC Utility V4, and QSports™ inside. H‐2 Install Google Earth Explore 2000 supports showing your travel path directly on Google Earth. Please go to http://earth.google.com for the free download of Google Earth, and then install it to your computer. I. Start to use I‐1 Fully charge the battery when using at the first time A fully charged battery can last up to 20 hours continuously operation (under optimum conditions). I‐2 Connect Explore 2000 with your PC Power on Explore 2000 and then connect Explore 2000 with your PC by mini USB cable. I‐3 Start the software utility NOTE: Qstarz PC Suite only supports Explore 2000. Any intention to use PC Suite connecting GPS units other than Explore 2000 would result in software disconnection automatically. QSports™: QSports™ is software with database structure QSports™ can record, manage, and analyze all your daily/weekly/monthly activities with various sports gear such as Cycling, Running, Jogging, Climbing, Skiing, etc. Train yourself by means of QSports™ statistics to have good health control. Different sport gear will generate corresponding category for better management and analysis. 1. Click from <Start> / <All Programs> / <Qstarz PC Suite> / QSports Users have to input product key at the first time of use. The product key is located on the ... - Page 8 3. <File> \ < Import Wizard > Import Wizard can guide you to load the tracks from GPS device easily. 3.1 Select default “Sport Type”. QSports will create tracks with the default sport type, and users can change the sport type after import. 3.2 PC Utility will automatically detect the COM port and baud rate and load in the GPS tracks. NOTE: Make sure to Power on GPS unit first before connecting with computer for downloading tracks. 4. <File> \ <Export Wizard> Export Wizard can guide you to proceed export process easily. 4.1 HTML: Pack selected tracks and photos into editable html files or a single easy sharing mht file. 4.2 Google Earth: KML and KMZ are Google Earth files formats. KML file contains detail waypoints and tracks info. KMZ file contains both simple track and photos info. 4.3 Track File: Export tracks and placemarks as GPX, NMEA, and CSV file formats. Travel Recorder™ PC Utility V4: PC Utility V4 is the best Geotagging software to integrating your travel track and photo together easily. Support track editing, playback, and import/export Wizard. 1. Click from <Start> / <All Programs> / <Qstarz PC Suite> / Travel Recorder Users have to input product key at the first time of use. The product key is located on the cover of the software CD. ……………………………………………..………………………………………………………………………………………………………………………………….……………………………………………………………………………. www.Qstarz.com...
- Page 9 Explore 2000 English ……………………………………………..………………………………………………………………………………………………………………………………….……………………………………………………………………………. 2. <File> \ < Import Wizard > Import Wizard can guide you to proceed the Geotag process easily. 2.1 The Import Wizard will jump out every time during program startup. You can also launch it by clicking <File> \ <Import Wizard> or the quick link icon. 2.2 PC Utility will automatically detect the com port and baud rate and load in the GPS tracks. 2.3 A track list window will be popped up. Select the tracks to import. 2.4 Please select the photo folder to import photos for geotag. You can also skip this step by clicking <Finish> directly and then there will be only tracks shown on Google Map. NOTE: Make sure to Power on GPS unit first before connecting with computer for downloading tracks. 3. <File> \ <Export Wizard> Export Wizard can guide you to proceed export process easily. 3.1 HTML: Pack selected tracks and photos into editable html files or a single easy sharing mht file. 3.2 Google Earth: KML and KMZ are Google Earth files formats. KML file contains detail waypoints and tracks info. KMZ file contains both simple track and photos info. ...
-
Page 10: Gps Features
English ……………………………………………..………………………………………………………………………………………………………………………………….……………………………………………………………………………. J‐2 Automatically create a shortcut in Bluetooth Manager window After the pairing complete, the system will then find a quick connect device “Qstarz GPS” in Bluetooth Manager. In further use, you just need to click it to connect to this Bluetooth GPS Receiver. J‐3 Check the Serial Port in Bluetooth Setting After complete pairing with Explore 2000, please click “Serial Port” to confirm the assigned COM port. If you use PDA/PC to pair the GPS Receiver, please check “Outbound COM port”. J‐4 Set correct Serial Port in your map software Activate your navigation software and make sure to select the correct “Serial Port”. NOTE 1: In the map software such as TomTom, you might need to change preference and set “Other Bluetooth GPS” according to PDA/phone model. In some case please consult map software company to vary the setting if you have issue on positioning. NOTE 2: There might be specific setting requirement per navigation software. Such as Tomtom, please delete other GPS settings under Tomtom software, and keep one only. J‐5 Switch off the Bluetooth function Switch off GPS function in your PDA/Smart phone/PC, and the Bluetooth connection will be disconnected automatically. Then power off Explore 2000. K. GPS Features 1. Baud Rate: 4,800~38,400 bps / Datum: WGS‐84; Hot/Warm/Cold Start: 1/38/42 sec. (averaged) 2. Super high sensitivity at ‐159dBm 3. Bluetooth Version: V2.0 / SPP profile / Class 2 with 10 meters in open space 4. Low power consumption, built‐in rechargeable Lithium battery ……………………………………………..………………………………………………………………………………………………………………………………….……………………………………………………………………………. ... -
Page 11: Troubleshooting
Explore 2000 English ……………………………………………..………………………………………………………………………………………………………………………………….……………………………………………………………………………. 5. Size: 71.3 (L) X 43 (W) X 20 (H) mm 6. Operating Temperature: ‐ 10 ℃ to + 60 ℃ Storage Temperature: ‐ 20 ℃ to + 60 ℃ L. Trouble Shooting Question Answer Can Explore 2000 be Yes, you can use Explore 2000 to navigate when travel log is on used to navigate when simultaneously. travel log is on? DC Input range of Explore 2000 is 4.5~5.5V. You can use a travel I lost my travel charger. charger which supports DC output range from 4.5~5.5V. You Where can I find the can also use a common mini USB cable to charge your unit via replacement? the laptop. My device acts abnormally. Is there any Please take out the battery over 5 mins to reset the device. way to reset it? ……………………………………………..………………………………………………………………………………………………………………………………….……………………………………………………………………………. www.Qstarz .com... - Page 12 5. 6. 7. 8. ……………………………………………..………………………………………………………………………………………………………………………………….……………………………………………………………………………. www.Qstarz.com...
- Page 13 Explore 2000 DEUTSH ……………………………………………..………………………………………………………………………………………………………………………………….……………………………………………………………………………. B. Äußeres 1. Stromschalter (EIN/AUS/LOG‐Modus aktivieren/LOG‐Modus deaktivieren) 2. LCD‐Beleuchtungstaste 3. Werkzeugtaste (Entfernungseinheiten umschalten/Messung rücksetzen) 4. Stromanschluss (Mini‐USB) 5. Battery charge LED (Rot) 6. Internal antenna 7. LCD‐Bildschirm ……………………………………………..………………………………………………………………………………………………………………………………….……………………………………………………………………………. www.Qstarz .com...
- Page 14 DEUTSH ……………………………………………..………………………………………………………………………………………………………………………………….……………………………………………………………………………. C. Allgemeine und Sicherheitshinweise Die Ladezeit beträgt gewöhnlich etwa eine Stunde. Wir empfehlen, das Gerät nach dem Aufladen wieder vom Zigarettenanzünder oder Netzteil zu trennen. Verwenden Sie ausschließlich das mitgelieferte Reiseladegerät; andernfalls kann das Gerät mit zu hoher Spannung versorgt werden, in Brand geraten sowie Unfälle und Verletzungen verursachen. Bitte beachten Sie, dass der Akku nur bei Außentemperaturen zwischen 0 und 45 °C aufgeladen werden darf. Die Ladezeit verlängert sich, wenn Sie das Gerät beim Aufladen benutzen Erwärmen Sie das Gerät nicht, lassen Sie es nicht an Stellen liegen, an denen hohe Temperaturen herrschen – z. B. nicht im prallen Sonnenlicht. Ansonsten kann der interne Akku Schaden nehmen, seine Kapazität verlieren oder komplett ausfallen. Trennen Sie das Gerät vom Reiseladegerät, wenn Sie es nicht verwenden und nicht aufladen möchten. Andernfalls kann der Akku Schaden nehmen. D. Hardwarefunktion Hardwarefunktion Beschreibung Mit diesem Anschluss verbinden Sie das Stromkabel (Mini‐USB) Stromanschluss zum Aufladen. Stromschalter (Ein / Halten Sie den Stromschalter für 5 Sekunden gedrückt, um den Aus) Explore 2000 einzuschalten / auszuschalten. Stromschalter Zum Ein‐/Ausschalten des Protokollierungsmodus nach dem (Log‐Modus Einschalten des Explore 2000 eine Sekunde lang gedrückt halten. aktivieren / Ihr Explore 2000 beginnt oder beendet die Protokollierung, die Log‐Modus Protokollierungsanzeige erscheint oder erlischt. deaktivieren) ……………………………………………..………………………………………………………………………………………………………………………………….……………………………………………………………………………. www.Qstarz.com...
- Page 15 Explore 2000 DEUTSH ……………………………………………..………………………………………………………………………………………………………………………………….……………………………………………………………………………. LCD‐Beleuchtungstast Zum Ein‐/Ausschalten der LCD‐Hintergrundbeleuchtung nach dem e (Ein / Aus) Einschalten des Explore 2000 eine Sekunde lang gedrückt halten. Werkzeugtaste ‐ Entfernungseinheiten Zum Umschalten der beiden Entfernungseinheiten nach dem umschalten Einschalten des Explore 2000 eine Sekunde lang gedrückt halten. (Metrisch/Imperial) Zum Rücksetzen der Messwerte (Kilometerzähler, Timer und Werkzeugtaste ‐ Durchschnittsgeschwindigkeit) nach dem Einschalten des Explore Messung rücksetzen 2000 fünf Sekunden lang gedrückt halten. Hinweis: Die Messwerte werden auch beim Ausschalten des Gerätes gespeichert. Die Messwerte werden lediglich beim Rücksetzen gelöscht. ‐ Zeitzone ändern: Bei ausgeschaltetem Gerät: Halten Sie die Ein‐/Austaste und die Werkzeugtaste gleichzeitig gedrückt, bis sich das Gerät einschaltet. Anschließend beginnt „Zeit“ zu blinken. Wählen Sie die gewünschte Zeitzone mit der Ein‐/Austaste. Die Einstellungen 00 bis 23 werden der Reihe nach durchgeschaltet. Mit der LCD‐Beleuchtungstaste speichern Sie die eingestellte ...
- Page 16 DEUTSH ……………………………………………..………………………………………………………………………………………………………………………………….……………………………………………………………………………. grundsätzlich als GMT + 0 aufgezeichnet. Anpassungen an Ihre örtliche Zeitzone können Sie vornehmen, nachdem die Daten in eine geeignete Software geladen wurden. E. LCD‐Bildschirm Symbole: GPS‐Position nicht Bluetooth‐Verbindung ermittelt besteht Niedriger GPS‐Position ermittelt Energiestand (Blinken) Protokollmodus aktiv Voller Energiestand ……………………………………………..………………………………………………………………………………………………………………………………….……………………………………………………………………………. www.Qstarz.com...
-
Page 17: Akku Einlegen
Explore 2000 DEUTSH ……………………………………………..………………………………………………………………………………………………………………………………….……………………………………………………………………………. Timer: Vom Timer wird lediglich die Zeit in Bewegung erfasst. Die Zeit, in der Sie sich nicht bewegen, wird nicht berücksichtigt. Durchschnittsgeschwindigkeit: Die Durchschnittsgeschwindigkeit bezieht sich auf die Zeit in Bewegung; die Zeit bei Stillstand wird nicht berücksichtigt. Aktuelle Zeit: Diese Anzeige entspricht der Lokalzeit – je nach Zeitzoneneinstellung. F. Akku einlegen Akku einlegen: Lösen Sie beide Schrauben an der Akkufachabdeckung mit einem Schraubendreher. Ziehen Sie die Akkufachabdeckung heraus. Legen Sie den Akku in das Gerät ein. Legen Sie die Dichtung auf das Gehäuse auf, setzen Sie erst dann die Akkufachabdeckung auf. Drücken Sie die Abdeckung hinab und fest nach vorne. Ziehen Sie beide Schrauben mit einem Schraubendreher an. G. Akku aufladen Bevor Sie den Explore 2000 zum ersten Mal benutzen, laden Sie den Akku bitte vollständig auf. Verbinden Sie das Stromversorgungskabel mit dem Stromanschluss (Mini‐USB) des Gerätes und laden Sie das Gerät über USB‐Kabel, Reiseladegerät oder Zigarettenanzünderadapter auf. Der Akku wird nun geladen. Die Ladezeit liegt gewöhnlich bei etwa einer Stunde. ‐ Die Energieanzeige blinkt bei niedrigem Energiestand. Bitte aufladen. ‐ Wenn die Energieanzeige‐LED grün leuchtet, wird der Akku gerade geladen. ‐ Bei abgeschalteter Energieanzeige‐LED ist der Akku voll geladen. ……………………………………………..………………………………………………………………………………………………………………………………….……………………………………………………………………………. www.Qstarz .com... - Page 18 DEUTSH ……………………………………………..………………………………………………………………………………………………………………………………….……………………………………………………………………………. Hinweis 1: Wenn der Akku bei abgeschaltetem Gerät geladen wird, lässt sich das Gerät nicht einschalten. Wenn Sie das Gerät beim Aufladen benutzen möchten, schalten Sie das Gerät bitte ein, bevor Sie das Mini‐USB‐Kabel anschließen. Hinweis 2: Die Bluetooth‐Funktionalität ist abgeschaltet, wenn Sie das Gerät im eingeschalteten Zustand aufladen. Trennen Sie die USB‐Verbindung, wenn Sie die Bluetooth‐Funktion nutzen möchten. H. Explore 2000 einrichten H‐1 USB‐Treiber und Software für installieren (nur unter Microsoft Windows XP / Vista unterstützt) Legen Sie die Treiber‐CD ein und öffnen Sie den Ordner „Utility\Qstarz PC Suite\“. Zur Installation des USB‐Treibers doppelklicken Sie auf die Datei „Qstarz_PC_Suite_installer.exe“. Dieses Softwarepaket enthält USB‐Treiber und PC Suite Software. Im Softwarepaket sind USB‐Treiber, PC Utility V4 und QSports™ enthalten. H‐2 Google Earth installieren Ihr Explore 2000 kann Ihre Reiseroute direkt über Google Earth anzeigen. Bitte rufen Sie http://earth.google.com auf. Dort können Sie Google Earth kostenlos herunterladen und auf Ihrem Computer installieren. I. Anwendung I‐1 Akku vor der ersten Benutzung vollständig aufladen Ein komplett geladener Akku sorgt (bei optimalen Bedingungen) für bis zu 20 Stunden ununterbrochenen Betrieb. I‐2 Explore 2000 an den PC anschließen Schalten Sie den Explore 2000 ein, verbinden Sie BT‐Q2000 anschließend über das ...
- Page 19 Explore 2000 DEUTSH ……………………………………………..………………………………………………………………………………………………………………………………….……………………………………………………………………………. I‐3 Software‐Dienstprogramm starten HINWEIS: Das Qstarz PC Suite unterstützt ausschließlich den Explore 2000. Jeder Versuch, das PC Suite mit anderen GPS‐Geräten als dem Explore 2000 zu verbinden, führt zum sofortigen Abbruch der Softwareverbindung. QSports™: QSports™ ist eine Datenbanksoftware Mit QSports™ können Sie Ihre täglichen/wöchentlichen/monatlichen sportlichen Aktivitäten wie Radfahren, Laufen, Jogging, Klettern, Skifahren, usw. aufzeichnen, verwalten und analysieren. Wenn Sie mit den QSports™ ‐Statistiken trainieren, haben Sie Ihre Gesundheit im Griff. Unterschiedliche Sportarten werden in entsprechende Kategorien eingeteilt und können so bequem verwaltet und analysiert werden. 1. Klicken Sie auf <Start> / <Alle Programme> / <Qstarz PC Suite> / QSports Beim ersten Starten des Programms müssen Sie die Produktseriennummer eingeben. Die Produktserienummer finden Sie auf der Hülle der Treiber‐CD. 2. Neuen Benutzer hinzufügen QSports™ unterstützt mehrere Benutzer. Zu den Benutzerinformationen zählen Benutzername, Geschlecht, Geburtsdatum und Gewicht. Bitte geben Sie korrekte persönliche Daten ein, damit zum Beispiel Kalorien richtig berechnet werden können. 3. <Datei> \ <Importassistent> Mit dem Importassistent können Sie die Daten Ihres GPS‐Gerätes bequem laden. 3.1 Wählen Sie die Standard‐„Sportart“. QSports erstellt entsprechende Eintragungen zur Standardsportart, die Sportart kann nach dem Importieren geändert werden. 3.2 Das PC‐Dienstprogramm erkennt COM‐Port und Baudrate zum Laden der GPS‐Daten automatisch. Hinweis: Achten Sie darauf, dass das GPS‐Gerät eingeschaltet ist, bevor Sie es zur Datenübertragung mit dem Computer verbinden. ……………………………………………..………………………………………………………………………………………………………………………………….……………………………………………………………………………. www.Qstarz .com...
- Page 20 DEUTSH ……………………………………………..………………………………………………………………………………………………………………………………….……………………………………………………………………………. 4. <Datei> \ <Exportassistent> Vom Exportassistent können Sie sich auf einfache Weise durch den Exportprozess leiten lassen. 4.1 HTML: Packt ausgewählte Tracks und Fotos in editierbare HTML‐Dateien oder in eine einzelne mht‐Datei zur gemeinsamen Nutzung. 4.2 Google Earth: KML und KMZ sind Dateiformate von Google Earth. KML‐Dateien enthalten detaillierte Informationen zu Wegpunkten und Tracks. KMZ‐Dateien enthalten einfache Track‐ und Fotodaten. 4.3 Track‐Datei: Exportiert Tracks und Ortsmarken in den Dateiformaten GPX‐, NMEA‐ und CSV. Travel Recorder™ PC Utility V4: PC Utility V4 ist eine praktische Geotagging‐Software, mit der Sie Fotos ganz einfach mit dem Aufnahmeort verbinden können. Die Software bietet die Bearbeitung von Tracks, Wiedergabe sowie einen Import‐/Exportassistenten. 1. Klicken Sie auf <Start> / <Alle Programme> / <Qstarz PC Suite> / Travel Recorder Beim ersten Starten des Programms müssen Sie die Produktseriennummer eingeben. Die Produktserienummer finden Sie auf der Hülle der Treiber‐CD. 2. <Datei> \ <Importassistent> Vom Importassistent können Sie sich durch die Geotag‐Schritte leiten lassen. 2.1 Der Importassistent wird bei jedem Programmstart automatisch eingeblendet. Sie können ihn auch starten, indem Sie <Datei> \ <Importassistent> wählen oder auf das Schnellverbindung‐Symbol klicken. 2.2 Das PC Utility erkennt den genutzten COM‐Port und die Baudrate automatisch und liest anschließend die GPS‐Tracks ein. 2.3 Ein Fenster mit einer Track‐Liste wird eingeblendet. Wählen Sie die zu importierenden Tracks. 2.4 Bitte wählen Sie den entsprechenden Foto‐Ordner zum Importieren von Fotos für ……………………………………………..………………………………………………………………………………………………………………………………….……………………………………………………………………………. www.Qstarz.com...
- Page 21 Explore 2000 DEUTSH ……………………………………………..………………………………………………………………………………………………………………………………….……………………………………………………………………………. Geotag. Sie können diesen Schritt auch überspringen, indem Sie direkt auf <Fertig stellen> klicken; in diesem Fall werden lediglich Tracks in Google Maps angezeigt. Hinweis: Achten Sie darauf, dass das GPS‐Gerät eingeschaltet ist, bevor Sie es zur Datenübertragung mit dem Computer verbinden. 3. <Datei> \ <Exportassistent> Vom Exportassistent können Sie sich auf einfache Weise durch den Exportprozess leiten lassen. 3.1 HTML: Packt ausgewählte Tracks und Fotos in editierbare HTML‐Dateien oder in eine einzelne mht‐Datei zur gemeinsamen Nutzung. 3.2 Google Earth: KML und KMZ sind Dateiformate von Google Earth. KML‐Dateien enthalten detaillierte Informationen zu Wegpunkten und Tracks. KMZ‐Dateien enthalten einfache Track‐ und Fotodaten. 3.3 Track‐Datei: Exportiert Tracks und Ortsmarken in den Dateiformaten GPX‐, NMEA‐ und CSV. J. Gerät als Bluetooth‐GPS‐Empfänger zur Navigation mit einem Handgerät einsetzen J‐1 Aktivieren Sie die Bluetooth‐Funktionalität Ihres PDAs/Smartphones oder PCs Bevor Sie die Bluetooth‐Funktion auf Ihrem PDA/PC aktivieren, schalten Sie bitte den Explore 2000 für die Kopplung ein. Prüfen Sie bitte, ob Ihr Gerät über die Bluetooth‐Funktion verfügt. Wenn nicht, dann müssen Sie eventuell eine CF/SD‐Blueooth‐Karte oder einen Bluetooth‐Dongle beschaffen. (Der Verbindungscode ist "0000".) J‐2 Verknüpfung im Bluetooth Manager‐Fenster automatisch anlegen Nach abgeschlossener Kopplung wird ein Schnellverbindungsgerät „Qstarz GPS“ im Bluetooth Manager angelegt. Beim nächsten Einsatz können Sie zur Verbindung mit Ihrem Bluetooth‐GPS‐Empfänger einfach darauf klicken. ...
- Page 22 DEUTSH ……………………………………………..………………………………………………………………………………………………………………………………….……………………………………………………………………………. J‐3 Seriellen Port in den Bluetooth‐Einstellungen prüfen Nachdem die Kopplung mit dem Explore 2000 abgeschlossen wurde, klicken Sie zur Bestätigung des zugewiesenen COM‐Ports bitte auf „Serieller Port“. Wenn Sie den GPS‐Empfänger mit einem PDA oder PC koppeln, markieren/überprüfen Sie bitte „Ausgehender COM‐Port“. J‐4 Richtigen seriellen Port in Ihrer Kartensoftware einstellen Starten Sie Ihre Navigationssoftware und wählen Sie den richtigen „seriellen Port“ aus. HINWEIS 1: Wenn Sie eine Kartensoftware wie TomTom benutzen, müssen Sie eventuell einige Voreinstellungen ändern und je nach PDA‐ oder Telefonmodell „Anderes Bluetooth‐GPS“ wählen. Falls es dennoch zu Problemen bei der Positionsbestimmung kommen sollte, wenden Sie sich bitte an den Hersteller der Kartensoftware. HINWEIS 2: Je nach Navigationssoftware können bestimmte Einstellungen erforderlich sein. Bei TomTom löschen Sie bitte sämtliche anderen GPS‐Einstellungen in der TomTom‐Software bis auf die aktuelle. J‐5 Bluetooth‐Funktionalität abschalten Schalten Sie zunächst die GPS‐Funktion Ihre PDAs, Smartphones oder PCs aus; die Bluetooth‐Verbindung wird automatisch getrennt. Schalten Sie anschließend den Explore 2000 aus. K. GPS‐Merkmale 1. Baudrate: 4.800~38.400 bps / Datum: WGS‐84; Heiß‐/Warm‐/Kaltstart: 1/38/42 Sek. (durchschnittlich) 2. Bluetooth‐GPS‐Empfänger, extrem hohe Empfindlichkeit: ‐159 dBm 3. Bluetooth‐Version: V2.0 / SPP‐Profil / Klasse 2, 10 Meter bei freier Sicht 4. Geringer Stromverbrauch, integrierter Lithium‐Akku ……………………………………………..………………………………………………………………………………………………………………………………….……………………………………………………………………………. www.Qstarz.com...
-
Page 23: Problemlösung
Explore 2000 DEUTSH ……………………………………………..………………………………………………………………………………………………………………………………….……………………………………………………………………………. 5. Abmessungen: 71.3(L) x 43 (B) x 20 (H) mm 6. Betriebstemperatur: ‐10 °C bis +60 ° C Lagerungstemperatur: ‐20 °C bis +60 ° C L. Problemlösung Frage Antwort Kann der Explore 2000 zur Navigation Ja, der Explore 2000 kann zur Navigation verwendet werden, verwendet werden, wenn der Log‐Modus aktiviert ist. wenn der Log‐Modus aktiviert ist? Der Explore 2000 arbeitet mit einer Eingangsspannung von 4,5 Ich habe das bis 5,5 VDC. Sie können ein passendes Reiseladegerät Reiseladegerät und den verwenden, das eine Gleichstromspannung von 4,5 bis 5,5 V Akku verloren. Wo finde liefert. Darüber hinaus können Sie auch ein handelsübliches ich Ersatz für die Mini‐USB‐Kabel verwenden, um das Gerät über z.B. ein beiden? Notebook aufzuladen. Das Gerät verhält sich Zum Rücksetzen des Gerätes nehmen Sie den Akku heraus und anormal. Wie kann ich warten mindestens 5 Minuten lang ab. es zurücksetzen? ……………………………………………..………………………………………………………………………………………………………………………………….……………………………………………………………………………. ... - Page 24 5. 6. 7. 8. ……………………………………………..………………………………………………………………………………………………………………………………….……………………………………………………………………………. www.Qstarz.com...
- Page 25 Explore 2000 ESPAÑOL ……………………………………………..………………………………………………………………………………………………………………………………….……………………………………………………………………………. B. Appearance 1. Botón de alimentación (ENCENDER/APAGAR/Habilitar modo REGISTRO/Deshabilitar modo REGISTRO) 2. Botón LCD Backlight (Iluminación LCD) 3. Botón Tool (Herramientas) (conmutador de unidades de distancia / restablecimiento de medida) 4. Conector de alimentación (tipo Mini‐USB) 5. Battery charge LED (Rojo) 6. Antena interna 7. Pantalla LCD ……………………………………………..………………………………………………………………………………………………………………………………….……………………………………………………………………………. www.Qstarz .com...
-
Page 26: Advertencia De Seguridad
ESPAÑOL ……………………………………………..………………………………………………………………………………………………………………………………….……………………………………………………………………………. C. Advertencia de seguridad El tiempo de carga es de aproximadamente 3 hora para este dispositivo. Le sugerimos que desconecte el dispositivo del cargador de mechero o el cargador AC después de cargarlo por completo. Asegúrese de utilizar el cargador de viaje incluido en la caja; de lo contrario podría aplicarse un voltaje excesivo al equipo y generarse humo, o derivar en incendios o accidentes. Recuerde que la batería integrada no se puede cargar a temperaturas que se encuentren fuera del rango 0 ºC ~ 45 ºC. El tiempo de carga podría ser mayor si utiliza el producto durante la carga No caliente ni deje el equipo en entornos de alta temperatura o bajo la luz solar directa durante un periodo largo de tiempo. La capacidad de la batería integrada podría deteriorarse o quedar inutilizada. Si el equipo no se encuentra en uso o no está cargado, desconéctelo del cargador de viaje. De lo contrario, la batería podría agotarse. D. Función de hardware Función de hardware Descripción Conecte el cable de alimentación al conector de alimentación Conector de alimentación (tipo Mini‐USB) sólo para cargar Botón de alimentación Mantenga presionado este botón durante 5 segundos para (encender / apagar) encender / apagar la unidad Explore 2000. Botón de alimentación Después de encender el dispositivo Explore 2000, mantenga (habilitar el modo Registro pulsado este botón durante 1 segundo para activar / / deshabilitar el modo desactivar el modo de registro. El dispositivo Explore 2000 ……………………………………………..………………………………………………………………………………………………………………………………….……………………………………………………………………………. www.Qstarz.com... - Page 27 Explore 2000 ESPAÑOL ……………………………………………..………………………………………………………………………………………………………………………………….……………………………………………………………………………. Registro) iniciará / detendrá entonces el registro y el aparecerá / desaparecerá el indicador correspondiente. Después de encender el dispositivo Explore 2000, mantenga Botón LCD Backlight pulsado este botón durante 1 segundo para activar / (encender / apagar) desactivar la iluminación LCD. Botón Tool (Herramientas) Después de encender el dispositivo Explore 2000, mantenga ‐ conmutador de unidades pulsado este botón durante 1 segundo para alternar entre de distancia (Métrico / las unidades de distancia disponibles. Imperial) Después de encender el dispositivo Explore 2000, mantenga Botón Tool (Herramientas) pulsado este botón durante 5 segundos para restablecer el ‐ restablecimiento de valor de la medida: cuentakilómetros, temporizador y medida velocidad media. Nota: el valor de la medida se mantendrá almacenado incluso aunque se apague el dispositivo. La única forma de eliminar dicho valor es pulsando el botón de Restablecimiento de medida. ‐ Cambiar zona horaria: Mantenga pulsados los botones Encendido y Herramientas hasta que se encienda el dispositivo. Comenzará a parpadear el indicador “Time” (Tiempo). Presione el botón Encendido para seleccionar la zona horaria. El rango 00‐23 es cíclico. Presione el botón ...
-
Page 28: Pantalla Lcd
18 17 16 15 14 13 dispositivo Nota: la configuración de zona horaria del dispositivo afecta únicamente a los datos presentados en la pantalla LCD y no a los datos de registro. Los datos de registro se graban siempre en formato GMT+0 estándar y pueden modificarse de acuerdo con su hora local tras cargarlo en la aplicación. E. Pantalla LCD Iconos indicadores: Conexión Bluetooth GPS no fijado establecida GPS fijado Batería baja (Intermitente) Modo de registro Batería llena activado ……………………………………………..………………………………………………………………………………………………………………………………….……………………………………………………………………………. www.Qstarz.com... -
Page 29: Instalación De La Batería
Explore 2000 ESPAÑOL ……………………………………………..………………………………………………………………………………………………………………………………….……………………………………………………………………………. Temporizador: el temporizador mide únicamente el tiempo que permanece en movimiento. No contabilizará el tiempo que permanezca detenido. Velocidad media: este valor corresponde a la velocidad media en movimiento sin contar el tiempo de detenimiento. Hora actual: muestra la hora local, dependiendo de la configuración de zona horaria del hardware. F. Instalación de la batería Instalar la batería: utilice un destornillador para extraer ambos tornillos de la tapa de la batería. Extraiga la tapa de la batería. Inserte la batería en el equipo. Coloque primero el caucho impermeable sobre la carcasa y después la batería sobre él. Presione hacia abajo y empújela hacia delante hasta que encaje firmemente. Utilice de nuevo un destornillador para fijar los tornillos. ……………………………………………..………………………………………………………………………………………………………………………………….……………………………………………………………………………. www.Qstarz .com... -
Page 30: Cargar La Batería
ESPAÑOL ……………………………………………..………………………………………………………………………………………………………………………………….……………………………………………………………………………. G. Cargar la batería Cargue completamente la batería cuando vaya a utilizar el dispositivo Explore 2000. Enchufe el cable de alimentación al conector de alimentación (tipo mini USB) y realice la recarga a través del cargador de viaje o del adaptador del encendedor de cigarrillos. De este modo la batería comenzará a cargarse. El tiempo de carga es de 3 horas. ‐ Si el indicador de la batería comienza a parpadear, indica que el nivel de batería es bajo. Por favor, recárguela. ‐ Si está encendido el LED de carga de la batería, indica que la batería se encuentra en modo de carga. ‐ Si está apagado el LED de carga de la batería, indica que la batería se encuentra completamente cargada. NOTA1: Si realiza la carga con el dispositivo apagado, no podrá volver a encenderlo durante el proceso. Si desea utilizar el dispositivo durante la carga, encienda el dispositivo antes de conectar el cable mini USB. NOTA2: Si realiza la carga con el dispositivo encendido, la función Bluetooth se desactivará. Si desea utilizar la conexión Bluetooth, desconecte el cable mini USB. H. Configurar la unidad Explore 2000 H‐1 Instalar el controlador USB y utilidad de software (sólo compatible con Microsoft Windows XP y Vista) Inserte el CD con el controlador y busque la carpeta “Utility\Qstarz PC Suite\”. Haga doble clic en el archivo “Qstarz_PC_Suite_installer.exe.” Este paquete de software contiene un controlador USB y software de PC Suite en el interior. Este paquete de aplicaciones contiene el controlador USB, PC Utility V4 y QSports™. ……………………………………………..………………………………………………………………………………………………………………………………….……………………………………………………………………………. www.Qstarz.com... - Page 31 Explore 2000 ESPAÑOL ……………………………………………..………………………………………………………………………………………………………………………………….……………………………………………………………………………. H‐2 Instalar Google Earth La unidad Explore 2000 puede mostrar la ruta del viaje directamente en Google Earth. Visite la dirección http://earth.google.com para obtener una descarga gratuita de Google Earth y, a continuación, instálelo en su PC. I. Empezar a usar la unidad I‐1 Cargue completamente la batería cuando la use por primera vez Una batería completamente cargada puede proporcionar una autonomía de hasta 20 horas de funcionamiento continuo (en condiciones óptimas). I‐2 Conecte la unidad Explore 2000 a su PC Encienda el dispositivo Explore 2000 y conecte BT‐Q2000 a su PC utilizando el cable mini USB. I‐3 Iniciar la utilidad de software NOTA: Qstarz PC Suite sólo admite Explore 2000. Cualquier intento de utilizar equipos GPS de conexión PC Suite distintos del Explore 2000 provocaría la desconexión automática del software. QSports™: QSports™ es una aplicación que funciona por medio de una base de datos QSports™ puede registrar, administrar y analizar todas sus actividades diarias / semanales / mensuales relacionadas con distintos deportes, como ciclismo, carrera, jogging, escalada, esquí, etc. Entrénese utilizando las estadísticas de QSports™ y controle su salud. Los distintos deportes generan categorías correspondientes para una mejor administración y análisis. 1. Haga clic en <Start> (Inicio) / <All Programs> (Todos los programas) / <Qstarz PC Suite> ...
- Page 32 ……………………………………………..………………………………………………………………………………………………………………………………….……………………………………………………………………………. 2. Agregar un usuario nuevo QSports™ es compatible con varios usuarios. La información del usuario incluye un “Nombre de usuario”, género, fecha de nacimiento y peso. Con el fin de realizar correctamente el cálculo de calorías, introduzca los datos personales correctamente. 3. <Archivo> \ <Asistente de importación> El Asistente de importación le guiará para cargar fácilmente los rastros del dispositivo GPS. 3.1 Seleccione la opción predeterminada " Tipo de deporte ". QSports creará rastros con el tipo de deporte predeterminado. El usuario podrá cambiar el tipo de deporte después de la importación. 3.2 PC Utility detectará automáticamente el puerto COM y la velocidad de baudio y leerá el rastro GPS. Nota: asegúrese de encender el dispositivo GPS antes de conectarlo al equipo para descargar los rastros. 4. <File> (Archivo) \ <Export Wizard> (Asistente de Exportación) El Asistente de Exportación puede guiarle para llevar a cabo el proceso de exportación. 4.1 HTML: Incluye en un paquete las rutas y fotos seleccionadas en archivos html editables o en un solo archivo mht para compartirlas con facilidad. 4.2 Google Earth: KML y KMZ son formatos de archivos de Google Earth. El archivo KML contiene información detallada sobre puntos de referencia y rutas. El archivo KMZ contiene información sencilla de rutas y fotos. 4.3 Archivo de Rutas: Exporta las rutas y puntos de interés como formatos de archivo GPX, NMEA, y CSV. Travel Recorder™ PC Utility V4: PC Utility V4 es el mejor programa de etiquetado geográfico para integrar con facilidad su rastro de desplazamiento y sus fotografías. Es compatible con la edición de rastros, la reproducción y cuenta con un asistente de importación / exportación. 1. Haga clic en <Start> (Inicio) / <All Programs> (Todos los programas) / <Qstarz PC Suite> ……………………………………………..………………………………………………………………………………………………………………………………….……………………………………………………………………………. www.Qstarz.com...
- Page 33 Explore 2000 ESPAÑOL ……………………………………………..………………………………………………………………………………………………………………………………….……………………………………………………………………………. / Travel Recorder Los usuarios deben introducir la clave del producto la primera vez que lo usen. La clave del producto está situada en la portada del CD del controlador. 2. <File> (Archivo) \ < Import Wizard > (Asistente de Importación) El Asistente de Importación puede guiarle para llevar a cabo el proceso Geotag con facilidad. 2.1 El Asistente de Importación se abrirá cada vez que se inicie el programa. También puede ejecutarlo haciendo clic en <Archivo> \ <Asistente de Importación> o en el icono de enlace rápido. 2.2 La Utilidad de PC detectará automáticamente el puerto com y la velocidad en baudios, y cargará las rutas por GPS. 2.3 Se abrirá una ventana con una lista de rutas. Seleccione las rutas que quiera importar. 2.4 Por favor, seleccione la carpeta de fotos para importar fotos para geotag. También puede saltarse este paso haciendo clic en <Finalizar> directamente. Después sólo se mostrarán las rutas en Google Map. 3. <File> (Archivo) \ <Export Wizard> (Asistente de Exportación) El Asistente de Exportación puede guiarle para llevar a cabo el proceso de exportación. 3.1 HTML: Incluye en un paquete las rutas y fotos seleccionadas en archivos html editables o en un solo archivo mht para compartirlas con facilidad. 3.2 Google Earth: KML y KMZ son formatos de archivos de Google Earth. El archivo KML contiene información detallada sobre puntos de referencia y rutas. El archivo KMZ contiene información sencilla de rutas y fotos. 3.3 Archivo de Rutas: Exporta las rutas y puntos de interés como formatos de archivo GPX, NMEA, y CSV. ……………………………………………..………………………………………………………………………………………………………………………………….……………………………………………………………………………. www.Qstarz .com...
- Page 34 ESPAÑOL ……………………………………………..………………………………………………………………………………………………………………………………….……………………………………………………………………………. J. Navegar como un receptor GPS Bluetooth con un dispositivo de bolsillo J‐1 Activar la función Bluetooth en la unidad PDA, en el teléfono inteligente o en su PC Antes de activar la función Bluetooth en su PDA/PC, proporcione alimentación a la unidad Explore 2000 para asociarla y comprobar si el dispositivo cuenta con dicha función. Si no cuenta con es función, tendrá que adquirir la tarjeta Bluetooth CF/SD opcional o la base de conexión Bluetooth. (La contraseña es “0000”) J‐2 Crear automáticamente un acceso directo en la ventana del administrador Bluetooth Una vez realizada la asociación, el sistema buscará un dispositivo de conexión rápida “Qstarz GPS” en el administrador Bluetooth. Para utilizarlo, solamente tendrá que hacer clic en él para conectarse a este receptor GPS Bluetooth. J‐3 Check the Serial Port in Bluetooth Setting Una vez completada la asociación con el receptor, haga clic en “Puerto serie” para confirmar el puerto COM asignado. Si utiliza la unidad PDA o su PC para asociar el receptor GPS, active la opción “Puerto COM saliente”. J‐4 Establecer el puerto serie correcto en el software cartográfico Active el software de navegación y asegúrese de seleccionar el puerto serie correcto en “Serial Port” (Puerto serie). NOTA 1: en el software cartográfico (como TomTom) puede que tenga que cambiar las preferencias y establecer la opción “Otro GPS Bluetooth” conforme al modelo de teléfono o la unidad PDA. En cualquier caso, consulte a la compañía del software cartográfico para variar la configuración si tiene problemas con el posicionamiento. NOTA 2: puede haber requisitos de configuración específicos según el software de ...
-
Page 35: Gps Features
Explore 2000 ESPAÑOL ……………………………………………..………………………………………………………………………………………………………………………………….……………………………………………………………………………. Tomtom y mantenga solamente una. J‐5 Desactivar la función Bluetooth Desactive la función GPS de la unidad PDA, el teléfono inteligente y su PC. Una vez hecho esto, la conexión Bluetooth se desconectará automáticamente. A continuación, apague la unidad Explore 2000. K. GPS Features 1. Tasa de baudios: 4.800~38.400 bps / Datos: WGS‐84. Inicio en caliente, templado y caliente: 1, 38 y 42 s (promedio) 2. Receptor GPS Bluetooth de 20 canales con sensibilidad superalta a ‐159 dBm 3. Versión Bluetooth: V2.0. Perfil SPP. Clase 2 con un alcance de 10 metros en espacio abierto 4. Bajo consumo de energía, batería de litio recargable integrada 5. Tamaño: 71.3 (LA) x 43 (AN) x 20(AL) mm. 6. Temperatura operativa: ‐ 10 ℃ a + 60 ℃ Temperatura de almacenamiento: ‐ 20 ℃ a + 60 ℃ ... -
Page 36: Solucionar Problemas
ESPAÑOL ……………………………………………..………………………………………………………………………………………………………………………………….……………………………………………………………………………. L. Solucionar problemas Pregunta Responder ¿Se puede usar la unidad Explore 2000 para navegar Sí, puede usar la unidad Explore 2000 para navegar y activar cuando el registro de viaje el registro de viaje simultáneamente. está activado? El intervalo de entrada de CC de la unidad Explore 2000 está Perdí el cargador de viaje y comprendido entre 4,5 y 5,5 V. Puede usar el cargador la batería. ¿Donde puedo portátil que admite el intervalo de salida de CC comprendido encontrar accesorios de entre 4,5 y 5,5 V. También puede usar un cable Mini‐USB repuesto? común para cargar la unidad a través del equipo portátil. Mi dispositivo no funciona Mantenga la batería extraída durante más de 5 minutos para normalmente. ¿Hay alguna reiniciar el dispositivo. forma de reiniciarlo? ……………………………………………..………………………………………………………………………………………………………………………………….……………………………………………………………………………. www.Qstarz.com... - Page 37 Explore 2000 FRANÇAIS ……………………………………………..………………………………………………………………………………………………………………………………….……………………………………………………………………………. Guide d’installation rapide du Explore 2000 A. Emballage standard (1) Unité GPS Explore (2) batterie rechargeable au lithium‐ion (3) câble mini USB (4) chargeur de voyage (5) CD logiciel (6) Carte de garantie + Guide rapide (7) Kit de montage vélo (Optionnel) (8) Brassard de sport avec étui (Optionnel) 1. 2. 3. 4. ...
- Page 38 3. Bouton Outil (Commutation d'unité de distance / Réinitialisation de mesure) 4. Plot (type mini USB) 5. Battery charge LED (Rouge) 6. Antenne interne 7. Écran LCD ……………………………………………..………………………………………………………………………………………………………………………………….……………………………………………………………………………. www.Qstarz.com...
- Page 39 Explore 2000 FRANÇAIS ……………………………………………..………………………………………………………………………………………………………………………………….……………………………………………………………………………. C. Avertissement relatif à la sécurité La durée de mise en charge est d'environ 3 heure typiquement pour cet appareil. Nous vous conseillons de débrancher l'appareil de l'allume‐cigare ou du chargeur CA une fois l'appareil complètement chargé. Assurez‐vous d'utiliser le chargeur de voyage fourni, inclus dans l'emballage ; sinon, une surtension pourrait être appliquée à l'appareil et causer de la fumée, un incendie ou un accident. Notez que la batterie intégrée ne peut pas être chargée hors d'une plage de température de 0℃ ~ 45℃. La durée de mise en charge peut être prolongée si vous utilisez le produit pendant la charge Ne chauffez pas et ne laissez pas l'appareil sous une température élevée ni sous la lumière directe du soleil pendant une période prolongée, car la capacité de la batterie intégrée se détériorerait, ou deviendrait non chargeable. Quand l'appareil n'est pas en service ou n'est pas chargé, nous vous conseillons de débrancher l'appareil du chargeur de voyage. Sinon la batterie peut se vider. D. Fonction du matériel Fonction du matériel Description Prendre le câble d’alimentation et le connecter au plot (type mini Plot USB) pour le chargement uniquement. Touche de mise en Appuyer sur la touche de mise en marche et la maintenir 4 sec. marche (On / Off) pour mettre le Explore 2000 sous tension / hors tension. Touche de mise en Après mise en route d'Explore 2000, maintenez la touche marche (activer le enfoncée pendant 1 sec pour activer / désactiver le mode journal. mode LOG / Puis Explore 2000 démarre / arrête l'enregistrement du journal, et ...
- Page 40 désactiver le mode l'indicateur de journal apparaît / disparaît. LOG) Bouton de Après mise en route d'Explore 2000, maintenez la touche rétroéclairage LCD enfoncée pendant 1 sec pour activer / désactiver le mode (On / Off) rétroéclairage LCD. Bouton Outil Après mise en route d'Explore 2000, maintenez la touche (Commutation enfoncée pendant 1 sec pour basculer entre les deux unités de d'unité de distance distance (Métrique / Impérial) Bouton Outil ‐ Après mise en route d'Explore 2000, maintenez la touche Réinitialisation de enfoncée pendant 5 sec pour réinitialiser la valeur de mesure: mesure Odomètre, minuterie, et vitesse moyenne Remarque: La valeur de la mesure est sauvegardée, même lorsque l'appareil est éteint. Sa valeur n'est effacée qu'après l'avoir réinitialisé en appuyant sur le bouton Réinitialiser la mesure. ‐ Changement de fuseau horaire: Lorsque l’appareil est à l'état éteint, maintenez enfoncés les boutons Alimentation et Outil jusqu'à ce qu'il soit sous tension. Ensuite, L' "Heure" commence à clignoter. Appuyez sur le bouton Alimentation pour choisir le fuseau horaire. Le numéro 00‐23 est défile dans un seul sens. Appuyez sur le bouton de Rétroéclairage LCD pour enregistrer le paramètre de fuseau horaire. ……………………………………………..………………………………………………………………………………………………………………………………….……………………………………………………………………………. www.Qstarz.com...
-
Page 41: Écran Lcd
Explore 2000 FRANÇAIS ……………………………………………..………………………………………………………………………………………………………………………………….……………………………………………………………………………. Veuillez vous référer au tableau de conversion ci‐dessous lorsque votre fuseau horaire est avec une valeur négative. Time Zone ‐1 ‐2 ‐3 ‐4 ‐5 ‐6 ‐7 ‐8 ‐9 ‐10 ‐11 (GMT) Réglage de 23 22 21 20 19 18 17 16 15 14 13 l'appareil Remarque: Le réglage de fuseau horaire de l'appareil est pour l'affichage sur écran LCD uniquement et n'affecte pas les données des journaux. Les données de journaux sont toutes enregistrées sous le standard GMT+0 et peuvent être modifiées en fonction de votre heure locale après chargement vers SW. ... -
Page 42: Installation De La Batterie
FRANÇAIS ……………………………………………..………………………………………………………………………………………………………………………………….……………………………………………………………………………. Minuterie: La minuterie ne mesure que le temps en mouvement. Vos temps d'arrêt vont être éliminés. Vitesse moyenne: Vitesse moyenne affiche la vitesse moyenne mobile en éliminant les temps d'arrêt. Heure actuelle: Ceci affiche l'heure locale en fonction du réglage de fuseau horaire du matériel. F. Installation de la batterie Mettez en place la batterie: Utilisez un tournevis pour déverrouiller les deux vis situées sur le couvercle de la batterie. Retirez le couvercle de la batterie. Insérez la batterie dans l'appareil. Mettez le caoutchouc étanche sur le boîtier d'abord puis mettez le couvercle sur celui‐ci. Ensuite, enfoncez et forcez vers l'avant pour verrouiller. Utilisez un tournevis pour ……………………………………………..………………………………………………………………………………………………………………………………….……………………………………………………………………………. www.Qstarz.com... - Page 43 Explore 2000 FRANÇAIS ……………………………………………..………………………………………………………………………………………………………………………………….……………………………………………………………………………. verrouiller à nouveau les deux vis. G. Chargement de votre batterie Lors de la première utilisation du Explore 2000, veuillez charger la batterie complètement. Prenez le cordon d’alimentation et branchez‐le à la prise (type mini USB), puis rechargez la batterie au moyen du chargeur de voyage ou de l’allume‐cigare de la voiture. Cela déclenchera le chargement de la batterie. Le temps de chargement est généralement de 3 heures. ‐ Lorsque l'indicateur de batterie commence à clignoter, la batterie est dans un état faible. Veuillez recharger. ‐ Lorsque la DEL de charge de la batterie est allumée, la batterie est en mode de charge. ‐ Lorsque la DEL de charge de la batterie est éteinte, la batterie est entièrement chargée. REMARQUE 1: Pendant la charge à l'état éteint, l'appareil ne peut pas être allumé. Si vous souhaitez utiliser l'appareil pendant la charge, veuillez allumer l'appareil avant de brancher le câble mini USB. REMARQUE 2: Pendant la charge à l'état allumé, le Bluetooth est désactivé. Si vous souhaitez utiliser la connexion Bluetooth, veuillez débrancher le câble mini USB. H. Configuration du Explore 2000 H‐1 Installer le pilote USB et un l’utilitaire logiciel (ne prend en charge que Microsoft Windows XP/Vista) Insérez le CD des pilotes et recherchez le dossier “Utility\Qstarz PC Suite\”. Cliquez deux fois sur “Qstarz_PC_Suite_installer.exe” La boîte de ce logiciel contient un lecteur USB et un logiciel PC Suite. Ce package logiciel contient le pilote USB, l'utilitaire PC V4, et QSports ™ à ……………………………………………..………………………………………………………………………………………………………………………………….……………………………………………………………………………. www.Qstarz .com...
- Page 44 FRANÇAIS ……………………………………………..………………………………………………………………………………………………………………………………….……………………………………………………………………………. l'intérieur. H‐2 Installer Google Earth Le Explore 2000 est capable d’afficher votre itinéraire de voyage directement sur Google Earth. Veuillez visiter le site http://earth.google.com pour obtenir le téléchargement gratuit de Google Earth, puis installez‐le sur votre ordinateur. I. Lancer l’utilisation I‐1 Recharger complètement la batterie lors de la première utilisation Une batterie complètement rechargée peut durer jusqu’à 20 heures sans interruption (dans des conditions optimales). I‐2 Connecter le Explore 2000 au PC Mettez en marche Explore 2000, puis connectez le BT‐Q2000 avec votre PC via le câble mini USB. I‐3 Lancer l’utilitaire logiciel REMARQUE: Qstarz PC Suite ne prend en charge que le Explore 2000. Toute tentative d'utiliser PC Suite en branchant des appareils GPS autres que le Explore 2000 provoque une déconnexion logicielle automatiquement. QSports™: QSports™ est un logiciel avec une structure de base de données QSports ™ permet d'enregistrer, de gérer, et d'analyser toutes vos activités quotidiennes / hebdomadaires / mensuelles avec divers équipements de sport comme le cyclisme, la course à pied, le jogging, l'escalade, le ski, etc. Entraînez‐vous par le biais des statistiques QSports™ pour avoir un bon contrôle de la santé. Différents équipements de sport génèrent des catégories correspondantes pour améliorer la gestion et l'analyse. 1. Cliquez sur <Démarrer>/<Tous les programmes> / <Qstarz PC Suite> / QSports™ L’utilisateur doit saisir le code du produit lors de la première utilisation. Le code du produit est situé sur le couvercle du CD pilote. ……………………………………………..………………………………………………………………………………………………………………………………….……………………………………………………………………………. www.Qstarz.com...
- Page 45 Explore 2000 FRANÇAIS ……………………………………………..………………………………………………………………………………………………………………………………….……………………………………………………………………………. 2. Ajouter un nouvel utilisateur QSports ™ prend en charge plusieurs utilisateurs. Les information sur l'utilisateur comprennent le "Nom d'utilisateur", le sexe, la date de naissance, et le poids. Afin d'obtenir le calcul exact des calories, veuillez remplir correctement les données personnelles. 3. <fichier> \ <Assistant d'importation> L'Assistant d'importation peut vous guider pour charger des itinéraires depuis un périphérique GPS facilement. 3.1 Choisissez le "Type de sport" par défaut. QSports créée les itinéraires avec le type de sport par défaut, et les utilisateurs peuvent modifier le type de sport après l'importation. 3.2 L'Utilitaire PC détecte automatiquement le port COM et la vitesse de transmission et charge les itinéraires GPS. Remarque: Assurez‐vous d'allumer le GPS d'abord avant de raccorder à l'ordinateur pour télécharger des itinéraires. 4. <File> (Fichier) \ <Export Wizard> (Assistant d’exportation) L’Assistant d’exportation vous guidera pas à pas dans la procédure d’exportation. 4.1 HTML : Regroupez les pistes et photos sélectionnées dans des fichiers html éditables ou dans un unique fichier mht à partager en toute simplicité. 4.2 Google Earth : KML et KMZ sont des formats de fichier Google Earth. Un fichier KML contient des détails de positionnement et des informations sur les pistes. Un fichier KMZ contient des informations simples sur les pistes et les photos. 4.3 Fichier piste : Permet d’exporter les pistes et emplacements au format GPX, NMEA, et CSV. Travel Recorder™ PC Utility V4: L'Utilitaire PC V4 est le meilleur logiciel de geotagging pour intégrer votre itinéraire de voyage et vos photos en même temps et facilement. Prend en charge l'édition d'itinéraires, ……………………………………………..………………………………………………………………………………………………………………………………….……………………………………………………………………………. www.Qstarz .com...
- Page 46 FRANÇAIS ……………………………………………..………………………………………………………………………………………………………………………………….……………………………………………………………………………. la lecture, et l'Assistant d'importation / exportation. 1. Cliquez sur <Démarrer>/<Tous les programmes> / <Qstarz PC Suite> / Travel Recorder L’utilisateur doit saisir le code du produit lors de la première utilisation. Le code du produit est situé sur le couvercle du CD pilote. 2. <File> (Fichier) \ < Import Wizard > (Assistant importation) L’Assistant d’importation vous guidera pas à pas dans la procédure de Géocodage. 2.1 L’Assistant d’importation s’affichera lors du démarrage du programme. Vous pouvez également l’appeler en cliquant sur <Fichier> \ <Assistant importation> ou sur l’icône d’accès rapide. 2.2 PC Utility détectera automatiquement le port Com et le débit en bauds et chargera les pistes GPS. 2.3 Une liste des pistes s’affiche simultanément. Sélectionnez‐y les pistes à importer. 2.4 Veuillez ensuite sélectionner le dossier photo dans lequel importer les photos à géocoder. YVous pouvez omettre cette étape en cliquant directement sur <Finish> (Terminer) et seules les pistes Google Map seront alors affichées. Remarque: Assurez‐vous d'allumer le GPS d'abord avant de raccorder à l'ordinateur pour télécharger des itinéraires. 3. <File> (Fichier) \ <Export Wizard> (Assistant d’exportation) L’Assistant d’exportation vous guidera pas à pas dans la procédure d’exportation. 3.1 HTML : Regroupez les pistes et photos sélectionnées dans des fichiers html éditables ou dans un unique fichier mht à partager en toute simplicité. 3.2 Google Earth : KML et KMZ sont des formats de fichier Google Earth. Un fichier KML contient des détails de positionnement et des informations sur les pistes. Un fichier KMZ contient des informations simples sur les pistes et les photos. 3.3 Fichier piste : Permet d’exporter les pistes et emplacements au format GPX, NMEA, et CSV. ...
- Page 47 Explore 2000 FRANÇAIS ……………………………………………..………………………………………………………………………………………………………………………………….……………………………………………………………………………. J. Naviguer comme récepteur GPS Bluetooth avec périphérique portable J‐1 Activer la fonction Bluetooth dans l’assistant numérique/téléphone intelligent ou PC Avant d’activer la fonction Bluetooth sur votre assistant numérique/PC, veuillez mettre le Explore 2000 sous tension pour l’appariement et vérifier si votre appareil est équipé de la fonction Bluetooth. Si ce n’est pas le cas, vous pourriez être amené à acheter une carte Bluetooth CF/SD ou une clé électronique Bluetooth en option. (Le mot de passe est “0000”). J‐2 Créer automatiquement un raccourci dans la fenêtre du Gestionnaire Bluetooth Une fois l’appariement terminé, le système cherchera ensuite un dispositif de connexion rapide “Qstarz GPS” dans le Gestionnaire Bluetooth. Pour l’utilisation future, il vous suffit de cliquer dessus pour le connecter à ce récepteur GPS Bluetooth. J‐3 Cocher le port série dans la configuration Bluetooth Après appariement complet avec le Explore 2000, veuillez cliquer sur “Port série” pour confirmer le port COM assigné. Si vous utilisez le PDA/PC pour apparier le récepteur GPS, veuillez cocher “Port COM de sortie”. J‐4 Définir le bon port série dans le logiciel de cartographie Activez votre logiciel de navigation et assurez‐vous de sélectionner le bon “port série”. REMARQUE 1: Dans le logiciel de mappage tel que TomTom, vous pourriez être amené à modifier la préférence et à définir « Autre GPS Bluetooth » conformément au modèle de PDA/téléphone. Dans ce cas, veuillez consulter le fabricant de logiciels de mappage pour varier la configuration si vous avez des problèmes de positionnement. REMARQUE 2: Il pourrait y avoir des exigences de configuration propres au logiciel de navigation. Dans le cas de TomTom, veuillez supprimer les autres paramètres GPS dans le logiciel TomTom et n’en garder qu’un. J‐5 Désactiver la fonction Bluetooth ...
-
Page 48: Dépannage
K. Caractéristiques du GPS 1. Débit en bauds: 4,800~38,400 bits/seconde ; Donnée: WGS‐84; Démarrage chaud/tiède/froid: 1/38/42 sec. (en moyenne) 2. Récepteur GPS Bluetooth 20 canaux avec hypersensibilité à ‐159 dBm 3. Version Bluetooth: V2.0/Profil SPP/Classe 2 avec 10 mètres en espace ouvert 4. Faible consommation d’énergie, batterie au lithium rechargeable intégrée 5. Taille: 71.3 (L) X 43 (l) X 20 (h) mm 6. Température de fonctionnement: ‐ 10 ℃ à + 60 ℃ ℃ ℃ Température de stockage: ‐ 20 à + 60 L. Dépannage Question Réponse Le Explore 2000 peut‐il être utilisé pour naviguer Oui, vous pouvez utiliser le Explore 2000 pour naviguer quand le registre de lorsque le registre de voyage est activé simultanément. voyage est activé? La plage d’alimentation CC du Explore 2000 est de 4,5~5,5 V. J’ai perdu mon chargeur Vous pouvez utiliser un chargeur de voyage qui prend en de voyage et ma batterie. charge la plage d’alimentation CC de 4,5~5,5 V. Vous pouvez Où puis‐je en trouver pour également utiliser un câble mini USB courant pour charger les remplacer? votre appareil par l’intermédiaire de l’ordinateur portable. Mon périphérique réagit Veuillez enlever la batterie pendant plus de 5 minutes pour de façon anormale. Est‐il réinitialiser l'appareil. possible de le réinitialiser? ……………………………………………..………………………………………………………………………………………………………………………………….……………………………………………………………………………. www.Qstarz.com... - Page 49 Explore 2000 ITALIANO ……………………………………………..………………………………………………………………………………………………………………………………….……………………………………………………………………………. Guida all'installazione rapida Explore 2000 A. Confezione standard (1) Unità GPS Explore (2) Batteria ricaricabile agli ioni di (3) Cavo USB mini (4) Caricatore da viaggio (5) CD Software (6) Garanzia + Guida rapida (7) Kit montaggio su bici (opzionale) (8) Fascia sport (opzionale) 1. 2. 3. 4. ...
- Page 50 ITALIANO ……………………………………………..………………………………………………………………………………………………………………………………….……………………………………………………………………………. B. Aspetto 1. Interruttore modalità (ON/OFF/Attiva modalità LOG /Disattiva modalità LOG) 2. Pulsante Retroilluminazione LCD 3. Pulsante Strumenti (Interruttore unità distanza / Ripristino misurazione) 4. Connettore alimentazione (tipo USB mini) 5. Battery charge LED (Rosso) 6. Antenna interna 7. Schermo LCD ……………………………………………..………………………………………………………………………………………………………………………………….……………………………………………………………………………. www.Qstarz.com...
-
Page 51: Considerazioni Sulla Sicurezza
Explore 2000 ITALIANO ……………………………………………..………………………………………………………………………………………………………………………………….……………………………………………………………………………. C. Considerazioni sulla sicurezza Il periodo di ricarica per questa unità è generalmente di circa 3 ora. Si consiglia di scollegare l’unità dal caricatore da auto o dal caricatore CA una volta che l’unità è completamente carica. Assicurarsi di utilizzare il caricatore da viaggio incluso nella confezione; in caso contrario, potrebbe essere applicata all’unità una tensione eccessiva causando fumo, fuoco o incidenti. La batteria integrate non può essere caricata in temperature non comprese tra 0℃ e 45℃. Il periodo di carica potrebbe aumentare nel caso venga utilizzato il prodotto durante la carica. Non scaldare o lasciare l’unità esposta a temperature elevate o alla luce diretta del sole per molto tempo poiché la capacità della batteria interna potrebbe ridursi o la batterie potrebbe non essere più ricaricabile. Quando l’unità non è in uso o in carica, si consiglia di scollegare l’unità dal caricatore da viaggio. In caso contrario si potrebbe esaurire la batteria. D. Funzionamento dell’hardware Funzionamento Descrizione dell’hardware Connettore Collegare il cavo d’alimentazione al connettore alimentazione (tipo alimentazione USB mini) solo per caricare Interruttore modalità Tenere premuto l’interruttore modalità per 5 secondi per (On / Off) accendere / spegnere il Explore 2000. ……………………………………………..………………………………………………………………………………………………………………………………….……………………………………………………………………………. www.Qstarz .com... - Page 52 Una volta acceso Explore 2000, tenere premuto per 1 sec per (Attiva la modalità attivare/disattivare la modalità log. Quindi Explore 2000 Log / Disattiva la attiva/disattiva la funzione di log mentre l’indicatore di log viene modalità Log) visualizzato/rimosso. Pulsante Una volta acceso Explore 2000, tenere premuto per 1 sec per Retroilluminazione attivare/disattivare la retroilluminazione dell’LCD. LCD (On / Off) Pulsante Strumenti ‐ Interruttore unità Una volta acceso Explore 2000, tenere premuto per 1 sec per distanza (Metrico / cambiare l’unità della distanza Imperiale) Pulsante Strumenti ‐ Una volta acceso Explore 2000, tenere premuto per 5 sec per Ripristino ripristinare il valore della misurazione: contachilometri, timer, e misurazione velocità media Nota: Il valore della misurazione verrà salvato anche quando il dispositivo viene spento. Il valore verrà eliminato solo dopo aver eseguito il ripristino premendo il pulsante Ripristino misurazione. ‐ Cambiare il fuso orario: Quando il dispositivo è nello stato di spento, tenere premuti entrambi i pulsanti Accensione e Strumenti fino all’accensione. Inizierà a lampeggiare “Time”. Premere il pulsante Accensione per selezionare il fuso orario. La rotazione delle cifre da 00 a 23 avviene in un'unica direzione. Premere il pulsante Retroilluminazione LCD per salvare l’impostazione. ……………………………………………..………………………………………………………………………………………………………………………………….……………………………………………………………………………. www.Qstarz.com...
-
Page 53: Schermo Lcd
Explore 2000 ITALIANO ……………………………………………..………………………………………………………………………………………………………………………………….……………………………………………………………………………. Se il valore del fuso orario è negative, fare riferimento alla seguente tabella di conversione. Time Zone ‐1 ‐2 ‐3 ‐4 ‐5 ‐6 ‐7 ‐8 ‐9 ‐10 ‐11 (GMT) Impostazione 23 22 21 20 19 18 17 16 15 14 13 dispositivo Nota: L’impostazione del fuso orario del dispositivo è solo per la visualizzazione sullo schermo LCD e non ha effetto sui dati del log. I dati del log vengono registrati secondo lo standard GMT+0 e possono essere cambiati in relazione all’ora locale dopo averli caricati sul software. E. Schermo LCD Icone indicatori: ... -
Page 54: Installazione Della Batteria
ITALIANO ……………………………………………..………………………………………………………………………………………………………………………………….……………………………………………………………………………. Timer: Il Timer misura solamente il tempo in movimento. I tempi delle soste vengono eliminati. Velocità media: La Velocità media mostra la Velocità media in movimento eliminando le soste. Ora corrente: Mostra l’ora locale in relazione all’impostazione hardware del fuso orario. F. Installazione della batteria Inserire la batteria: Usare un giraviti per rimuovere le viti sul coperchio della batteria. Sollevare il coperchio. Inserire la batteria nell’unità. Per prima cosa inserire una guarnizione in gomma resistente agli agenti atmosferici sulla scocca quindi posizionarvi sopra il coperchio della batteria. Quindi premere e forzare il coperchio in posizione. Usare nuovamente il giraviti per bloccare entrambe le viti. ……………………………………………..………………………………………………………………………………………………………………………………….……………………………………………………………………………. www.Qstarz.com... - Page 55 Explore 2000 ITALIANO ……………………………………………..………………………………………………………………………………………………………………………………….……………………………………………………………………………. G. Caricamento della batteria La prima volta che si usa il Explore 2000, caricare completamente la batteria. Collegare il cavo di alimentazione all’apposito jack (di tipo mini USB) ed effettuare la ricarica tramite un trasformatore da viaggio o un adattatore per accendisigari. La ricarica in genere richiede 3 ore. ‐ Quando l’indicatore della batteria inizia a lampeggiare, indica che la batteria è quasi scarica. Ricaricare la batteria. ‐ Quando il LED di carica è acceso, la batteria è in modalità di carica. ‐ Quando il LED di carica è spento, la batteria è completamente carica. NOTA 1: Durante la carica in stato spento, il dispositivo non può essere acceso. Per utilizzare il dispositivo durante la carica, accendere il dispositivo prima di collegare il cavo mini USB. NOTA 2: Durante la carica in stato acceso, il Bluetooth è disattivo. Per utilizzare la connessione Bluetooth, scollegare il cavo mini USB. H. Configurazione di Explore 2000 H‐1 Installare il driver USB e il l’utilità software (supporta solo Microsoft Windows XP / Vista) Inserire il CD Driver e trovare la cartella “Utility\Qstarz PC Suite\”. Fare doppio clic su “Qstarz_PC_Suite_installer.exe.” La confezione del software contiene al suo interno i driver USB e il software PC Suite. Questo pacchetto software contiene il driver USB, PC Utility V4, e QSports™. H‐2 Installare Google Earth Explore 2000 supporta la visualizzazione del percorso di viaggio direttamente su Google Erta. Andare al sito http://earth.google.com per scaricare gratuitamente Google Earth, e poi ……………………………………………..………………………………………………………………………………………………………………………………….……………………………………………………………………………. www.Qstarz .com...
- Page 56 ITALIANO ……………………………………………..………………………………………………………………………………………………………………………………….……………………………………………………………………………. installarlo sul computer. I. Iniziare ad usare I‐1 Caricare completamente la batteria prima dell'uso iniziale Una batteria completamente carica può operare fino a 20 ore continuate (in condizioni ottimali). I‐2 Collegare Explore 2000 al PC Accendere Explore 2000 e collegare il BT‐Q2000 con il PC tramite il cavo mini USB. I‐3 Avviare l’utilità software NOTA: Qstarz PC Suite supporta solamente il Explore 2000. Qualsiasi tentativo di utilizzare le unità di collegamento GPS PC Suite con dispositivi diversi dal Explore 2000 potrebbe causare la disconnessione automatica del software. QSports™: QSports™ è un software con una struttura a database QSports™ può registrare, gestire, e analizzare le attività giornaliere/settimanali/mensili per vari sport come ad esempio Ciclismo, Corsa, Jogging, Arrampicata, Sci, ecc. Tenetevi in allenamento tramite le statistiche di QSports™ che aiutano ad avere il controllo della propria salute. Diversi sport daranno luogo a diverse categorie per meglio gestire e analizzare l’allenamento. 1. Fare clic su <Start> / <All Programs> (Tutti i programmi) / <Qstarz PC Suite> / QSports™ 2. Aggiungere un nuovo utente QSports™ supporta utenti multipli. Le informazioni utente comprendono “Nome utente”, Genere, Data di nascita, e Peso. Per ottenere un calcolo più preciso delle calorie, inserire i dati corretti. 3. <File> \ < Procedura guidata per l’importazione > Procedura guidata per l’importazione aiuta a caricare in modo semplice i percorsi dal dispositivo GPS. ……………………………………………..………………………………………………………………………………………………………………………………….……………………………………………………………………………. www.Qstarz.com...
- Page 57 Explore 2000 ITALIANO ……………………………………………..………………………………………………………………………………………………………………………………….……………………………………………………………………………. 3.1 Selezionare il “Tipo sport” predefinito. QSports crea i percorsi con il tipo di sport predefinito; l’utente può cambiare il tipo di sport dopo l’importazione. 3.2 PC Utility rileva automaticamente la porta COM e il baud rate e i percorsi del GPS da caricare. Nota: Assicurarsi di accendere l’unità GPS prima di collegarla al computer per scaricare i percorsi. 4. <File> \ <Export Wizard> Export Wizard (La procedura guidata per l’esportazione) può guidarvi attraverso il processo di esportazione in modo semplice. 4.1 HTML: Riunite le tracce e le foto in file html modificabili o in un solo file mht facile da condividere. 4.2 Google Earth: KML e KMZ sono formati di file per Google Earth. I file KML contengono informazioni dettagliate su punti importante e tracce. I file KMZ contengono sia informazioni semplici sulle tracce che foto. 4.3 Track File (File tracce): esporta tracce e punti di riferimento nei formati GPX, NMEA, e CSV. Travel Recorder™ PC Utility V4: PC Utility V4 è il migliore software per la Georeferenziazione che consente di integrare in modo semplice i percorsi e le foto. Supporta la modifica dei percorsi, la riproduzione, e la Procedura guidata per l’importazione/esportazione. 1. Fare clic su <Start> / <All Programs> (Tutti i programmi) / <Qstarz PC Suite> / Travel Recorder 2. <File> \ < Import Wizard > Import Wizard (Procedura guidata per l’importazione) può guidarvi nella procedura Geotag in modo semplice. 2.1 La Import Wizard (Procedura guidata) viene visualizzata ogni volta che si avvia il ...
- Page 58 ITALIANO ……………………………………………..………………………………………………………………………………………………………………………………….……………………………………………………………………………. oppure sull’icona per il collegamento rapido. 2.2 La utilità PC rileva automaticamente la porta com e il baud rate e carica le tracce GPS. 2.3 Viene visualizzata una finestra con l’elenco tracce. Selezionare le tracce da importare. 2.4 Selezionare la cartella foto per importare le foto di geotag. È possibile saltare questo punto facendo cli su <Finish> (Fine) rimarranno solo le tracce mostrate su Google Map. Nota: Assicurarsi di accendere l’unità GPS prima di collegarla al computer per scaricare i percorsi. 3. <File> \ <Export Wizard> Export Wizard (La procedura guidata per l’esportazione) può guidarvi attraverso il processo di esportazione in modo semplice. 3.1 HTML: Riunite le tracce e le foto in file html modificabili o in un solo file mht facile da condividere. 3.2 Google Earth: KML e KMZ sono formati di file per Google Earth. I file KML contengono informazioni dettagliate su punti importante e tracce. I file KMZ contengono sia informazioni semplici sulle tracce che foto. 3.3 Track File (File tracce): esporta tracce e punti di riferimento nei formati GPX, NMEA, e CSV. J. Navigazione come ricevitore GPS Bluetooth usando un dispositivo palmare J‐1 Attivare la funzione Bluetooth del PDA /Smartphone o PC Prima di attivare la funzione Bluetooth sul PDA/PC, accendere il Explore 2000 per associare e verificare se il dispositivo è dotato della funzione Bluetooth. In caso contrario, sarà necessario acquistare un scheda Bluetooth CF/SD o un donale Bluetooth. (Il codice è ……………………………………………..………………………………………………………………………………………………………………………………….……………………………………………………………………………. www.Qstarz.com...
- Page 59 Explore 2000 ITALIANO ……………………………………………..………………………………………………………………………………………………………………………………….……………………………………………………………………………. “0000”) J‐2 Creare automaticamente un collegamento nella finestra Bluetooth Manager (gestione Bluetooth) Al termine dell’accoppiamento, il sistema troverà un dispositivo d connessione rapida “Qstarz GPS” in Bluetooth Manager (gestione Bluetooth). In futuro, basterà fare clic per collegarsi a questo ricevitore GPS Bluetooth. J‐3 Verificare la porta seriale nelle impostazioni Bluetooth Una volta completata l’associazione con il ricevitore, fare clic su “Porta seriale” per confermare la porta COM assegnata. Se per l’associazione si usa un PDA/PC, selezionare “Porta COM in uscita”. J‐4 Impostare la porta seriale corretta sul software mappa Attivare il software di navigazione ed assicurarsi di selezionare la porta seriale “Serial Port” corretta. NOTA 1: Nei software di mappe come TomTom, potrebbe essere necessario cambiare la preferenza e impostare "Altro GPS Bluetooth" in base al modello di PDA/telefono. Se ci sono problemi di posizionamento, in alcuni casi può essere necessario consultare l'azienda produttrice del software delle mappe per cambiare l'impostazione. NOTA 2: Ogni software di navigazione potrebbe avere dei requisiti di impostazione specifici. Ad esempio nel caso del TomTom, bisogna eliminare le impostazioni GPS nel software e lasciarne solo una. J‐5 Disattivazione della funzione Bluetooth ...
-
Page 60: Risoluzione Dei Problemi
ITALIANO ……………………………………………..………………………………………………………………………………………………………………………………….……………………………………………………………………………. K. GPS Features 1. Velocità Baud: 4.800~38.400 bps / Dato: WGS‐84; Avvio Immediato / Caldo / Freddo: 1/38/42 secondi (media) 2. Ricevitore GPS Bluetooth 20 canali con sensibilità altissima di ‐159dBm 3. Versione Bluetooth: V2.0 / Profilo SPP / Classe 2 con 10 metri in spazio aperto 4. Basso consumo energetico, batteria ricaricabile integrata agli ioni di litio 5. Dimensioni: 71.3(L) X 43 (P) X 20 (H) mm 6. Temperatura di funzionamento: da ‐ 10 ℃ a + 60 ℃ Temperatura di stoccaggio: da ‐ 20 ℃ a + 60 ℃ L. Risoluzione dei problemi Domanda Riposta Il Explore 2000 può essere utilizzato per S’, è possibile utilizzare il Explore 2000 per navigare anche navigare quando la quando la registrazione del viaggio è attiva. registrazione del viaggio è attiva? Ho smarrito il caricatore La portata di corrente CC n ingresso di Explore 2000 è 4.5~5.5V. da auto e la batteria. Si può usare un caricatore che supporta la portata di corrente Dove posso CC in uscita di 4.5~5.5V. Inoltre, si può anche usare un comune riacquistarli? cavo USB mini per caricare l’unità usando PC portatile. Il mio dispositivo funziona in modo Estrarre la batteria per 5 minuti in modo da ripristinare il anomalo. Esiste un dispositivo. modo per ripristinarlo? ……………………………………………..………………………………………………………………………………………………………………………………….……………………………………………………………………………. www.Qstarz.com... -
Page 61: Zawartość Opakowania
Explore 2000 POLSKI ……………………………………………..………………………………………………………………………………………………………………………………….……………………………………………………………………………. Explore 2000 Instrukcja obsługi A. Zawartość opakowania (1) Odbiornik GPS Explore (2) Akumulator (bateria) litowo‐jonowy (3) kabel mini USB (4) ładowarka sieciowa (5) Dysk CD z oprogramowaniem (6) Karta gwarancyjna + Skrócona instrukcja (7) Zestaw do montażu na rowerze (Opcjonalny) (8) Sportowy futerał na ramię (Opcjonalny) 1. 2. 3. 4. ... - Page 62 2. Przycisk podświetlenia LCD 3. Przycisk narzędzi (Przełącznik jednostek odległości/Zerowanie pomiaru) 4. Gniazdo zasilające i przesyłania danych (typ mini USB) 5. Battery charge LED (Czerwona) 6. Wbudowana antena 7. Ekran LCD ……………………………………………..………………………………………………………………………………………………………………………………….……………………………………………………………………………. www.Qstarz.com...
- Page 63 Explore 2000 POLSKI ……………………………………………..………………………………………………………………………………………………………………………………….……………………………………………………………………………. C. Uwaga dotycząca bezpieczeństwa Typowy czas ładowania dla tego urządzenia wynosi około 3 godziny. Po pełnym naładowaniu urządzenia zalecamy odłączenie go od ładowarki zasilanej z gniazda zapalniczki samochodowej lub ładowarki zasilanej prądem zmiennym. Należy używać dostarczonej w opakowaniu ładowarki podróżnej; w przeciwnym razie dostarczone do urządzenia nadmierne napięcie, może spowodować dym, ogień lub wypadek. Należy pamiętać, że wbudowana bateria może być ładowana w zakresie temperatur 0℃ ~ 45℃. Czas ładowania może zostać wydłużony, jeśli urządzenie będzie używane w trakcie ładowania Nie należy ogrzewać lub pozostawiać urządzenia w wysokiej temperaturze lub w bezpośrednim świetle słonecznym w wydłużonym okresie czasu, ponieważ ulegnie zmniejszeniu pojemność wbudowanej baterii lub bateria utraci możliwość ponownego ...
- Page 64 Po włączeniu zasilania Explore 2000, naciśnij i przytrzymaj Przycisk główny przez 1 sekundę w celu włączenia/wyłączenia trybu zapisu. (włączanie trybu Log / Nastąpi uruchomienie/zatrzymanie zapisu przez Explore wyłączanie trybu LOG) 2000 i pojawi się/zniknie wskaźnik zapisu. Przycisk podświetlenia Po włączeniu zasilania Explore 2000, naciśnij i przytrzymaj LCD (zasilanie włączone / przez 1 sekundę w celu włączenia/wyłączenia podświetlenia zasilanie wyłączone) LCD. Przycisk narzędzi ‐ Po włączeniu zasilania Explore 2000, naciśnij i przytrzymaj Przełącznik jednostek przez 1 sekundę w celu przełączenia pomiędzy jednostkami odległości (Metric / odległości Imperial) Po włączeniu zasilania Explore 2000, naciśnij i przytrzymaj Przycisk narzędzi ‐ przez 5 sekund w celu wyzerowania wartości pomiaru: Zerowanie pomiaru Drogomierz, Timer i Average Średnia prędkość Uwaga: Wartość pomiaru zostanie zapisana nawet, jeśli nastąpi wyłączenie urządzenia. Wartość ta zostanie usunięta jedynie po naciśnięciu przycisku Zerowanie pomiaru. ‐ Zmiana strefy czasowej: Gdy urządzenie jest wyłączone, naciśnij i przytrzymaj przyciski Zasilanie i Narzędzia, aż do włączenia zasilania. Zacznie migać “Czas”. Naciśnij przycisk Zasilanie w celu wyboru strefy czasowej. Nastąpi kolejne, jednokierunkowe przełączanie w zakresie 00‐23. Naciśnij przycisk Podświetlenie LCD, aby zapisać ustawienie strefy czasowej. ……………………………………………..………………………………………………………………………………………………………………………………….……………………………………………………………………………. www.Qstarz.com...
-
Page 65: Ekran Lcd
Explore 2000 POLSKI ……………………………………………..………………………………………………………………………………………………………………………………….……………………………………………………………………………. Gdy strefa czasowa ma wartość ujemną, sprawdź schemat konwersji poniżej. Time Zone ‐1 ‐2 ‐3 ‐4 ‐5 ‐6 ‐7 ‐8 ‐9 ‐10 ‐11 (GMT) Ustawienia 23 22 21 20 19 18 17 16 15 14 13 urządzenia Uwaga: Ustawienie strefy czasowej dotyczy wyłączeniem wyświetlacza LCD i nie wpływa na dane zapisu. Dane zapisu są nagrywane według standardu GMT+0 i można je zmienić na lokalną strefę czasową, po załadowaniu do SW. E. Ekran LCD Wskaźniki ikon: ... -
Page 66: Instalacja Baterii
Wkładanie baterii: Użyj śrubokręta do odkręcenia obu śrub na pokrywie baterii. Wyciągnij pokrywę baterii. Włóż baterię do urządzenia. Włóż najpierw do obudowy gumową osłonę zabezpieczającą przed zmianami pogody, a następnie włóż na nią pokrywę baterii. Następnie naciśnij i przesuń do przodu w celu pewnego dopasowania. Użyj ponownie śrubokręta do dokręcenia obu śrub. ……………………………………………..………………………………………………………………………………………………………………………………….……………………………………………………………………………. www.Qstarz.com... -
Page 67: Ładowanie Baterii
Explore 2000 POLSKI ……………………………………………..………………………………………………………………………………………………………………………………….……………………………………………………………………………. G. Ładowanie baterii Przed pierwszym użyciem Explore 2000, należy całkowicie naładować baterię. W celu ładowania należy podłączyć kabel zasilający z jednej strony do wejścia w odbiorniku (typ mini USB) z drugiej zaś albo do ładowarki sieciowej albo do ładowarki samochodowej. Proces ładowania trwa zwykle ok. 3 godzin. Zaleca się jednak by pierwsze ładowanie trwało ok.8 godz. ‐ Gdy zacznie migać wskaźnik baterii, oznacza to słabe naładowanie. Należy naładować baterię. ‐ Gdy wskaźnik LED baterii świeci, bateria jest ładowana. ‐ Gdy wskaźnik LED baterii nie świeci, bateria jest całkowicie naładowana. NOTE 1: Po rozpoczęciu ładowania przy wyłączonym urządzeniu, nie będzie można włączyć urządzenia. Aby używać urządzenia podczas ładowania należy włączyć urządzenie przed podłączeniem kabla mini USB. NOTE 2: Po rozpoczęciu ładowania przy włączonym urządzeniu, wyłączane jest Bluetooth. Aby korzystać z połączenia Bluetooth należy odłączyć kabel mini USB. H. Instalowanie odbiornika Explore 2000 w komputerze PC H‐1 Instalacja sterowników USB (działa tylko dla systemu Windows XP / Vista) Włóż płytę CDROM ze sterownikami i wyszukaj folder “Utility\Qstarz PC Suite\”. Kliknij dwukrotnie “Qstarz_PC_Suite_installer.exe.” Niniejszy zestaw zawiera sterowniki USB oraz oprogramowanie Qstarz PC Suite. Ten pakiet oprogramowania zawiera sterownik USB, PC Utility V4 i QSports™. H‐2 Instalacja Google Earth Explore 2000 pokazuje trasę podróży bezpośrednio na Google Earth. Proszę wejść na stronę http://earth.google.com, aby pobrać darmowe oprogramowanie Google Earth, następnie ……………………………………………..………………………………………………………………………………………………………………………………….……………………………………………………………………………. www.Qstarz .com... -
Page 68: Rozpoczęcie Użytkowania
POLSKI ……………………………………………..………………………………………………………………………………………………………………………………….……………………………………………………………………………. zainstalować na swoim komputerze. I. Rozpoczęcie użytkowania I‐1 Przed pierwszym użyciem naładuj całkowicie baterię. W pełni naładowana bateria pozwala na korzystanie z odbiornika nieprzerwanie aż do 20 godzin (w optymalnych warunkach). I‐2 Podłączanie Explore 2000 do komputera PC Włącz zasilanie Explore 2000, a następnie podłącz BT‐Q2000 do komputera PC kablem mini USB. I‐3 Korzystanie z oprogramowania Qstarz PC Suite UWAGA: Qstarz PC Suite obsługuje tylko odbiornik Explore 2000. Jakakolwiek próba użycia PC Suite do podłączenia urządzenia GPS innego niż odbiornik Explore 2000 spowoduje automatyczne rozłączenie oprogramowania. QSports™: QSports™ to oprogramowanie ze strukturą bazy danych QSports™ może nagrywać, zarządzać i analizować wszystkie dzienne/tygodniowe/miesięczne stany aktywności dla różnych ćwiczeń sportowych, takich jak jazda na rowerze, bieganie, jogging, wspinaczka, narciarstwo, itd. Trening z wykorzystaniem statystyk QSports™ zapewnia właściwą kontrolę zdrowia. Różne ćwiczenia sportowe generują odpowiednią kategorię dla lepszego zarządzania i analizy. 1. Naciśnij <Start> / <Wszystkie programy> / <Qstarz PC Suite> / QSports™ Przy pierwszym uruchomieniu programu należy wpisać klucz produktu. Klucz produktu jest umieszczony na okładce płyty CD z oprogramowaniem. 2. Dodaj nowego użytkownika QSports™ obsługuje wielu użytkowników. Informacje użytkownika obejmują “Nazwa użytkownika”, Płeć, Data urodzenia i Waga. Aby uzyskać prawidłowe obliczenie kategorii należy wprowadzić prawidłowe dane osobiste. ……………………………………………..………………………………………………………………………………………………………………………………….……………………………………………………………………………. ... - Page 69 Explore 2000 POLSKI ……………………………………………..………………………………………………………………………………………………………………………………….……………………………………………………………………………. 3. <Plik> \ < Kreator importu > Kreator importu może ułatwić użytkownikowi łatwe ładowanie tras z urządzenia GPS. 3.1 Wybierz domyślny “Typ sportu”. QSports utworzy trasy z domyślnym rodzajem sportu, a po zaimportowaniu użytkownicy będą mogli zmienić rodzaj sportu. 3.2 Program PC Utility automatycznie wykryje port COM i szybkość przesyłania oraz załaduje trasy GPS. Uwaga: Przed połączeniem z komputerem w celu pobrania tras należy sprawdzić, czy włączone jest zasilanie modułu GPS. 4. < Plik> \ <Kreator importu> Export Wizard (Kreator eksportu) umożliwia użytkownikowi wykonanie eksportu w łatwy sposób. 4.1 HTML: Powoduje spakowanie wybranych tras i zdjęć w edytowalne pliki html lub pojedynczy plik mht, który można łatwo udostępniać. 4.2 Google Earth: KML oraz KMZ są formatami plików dla Google Earth. Plik KML zawiera szczegółowe punkty trasy oraz informacje na temat tras. Plik KMZ zawiera proste informacje na temat trasy i zdjęć. 4.3 Plik trasy: Trasy oraz oznaczenia miejsc na trasie można eksportować jako pliki w formacie GPX, NMEA oraz CSV. Travel Recorder™ PC Utility V4: Program PC Utility V4 to najlepsze oprogramowanie Geotagging do łatwej integracji tras podróży i zdjęć. Obsługuje edycję tras, odtwarzanie i kreatora importu/eksportu. 1. Naciśnij <Start> / <Wszystkie programy> / <Qstarz PC Suite> / Travel Recorder Przy pierwszym uruchomieniu programu należy wpisać klucz produktu. Klucz produktu jest umieszczony na okładce płyty CD z oprogramowaniem. 2. < Plik> \ <Kreator importu> Import Wizard (Kreator importu) umożliwia użytkownikowi wykonanie procesu Geotag w łatwy sposób. ...
- Page 70 ……………………………………………..………………………………………………………………………………………………………………………………….……………………………………………………………………………. 2.1 Import Wizard (Kreator importu) pojawi się za każdorazowo przy uruchamianiu programu. Kreator można także uruchomić poprzez kliknięcie < Plik> \ <Kreator importu> lub ikonę skrótu. 2.2 PC Utility automatycznie wykryje port Com oraz prędkość transmisji, a także wczyta trasy GPS. 2.3 Pojawi się wyskakujące okno listy tras. Należy wybrać trasy, które mają być zaimportowane. 2.4 Następnie należy wybrać folder, do którego mają być importowane zdjęcia dla Geotag. Można także pominąć tę czynność poprzez bezpośrednie kliknięcie przycisku <Finish> (Zakończ) i wtedy wyświetlone będą jedynie trasy na Google Map Uwaga: Przed połączeniem z komputerem w celu pobrania tras należy sprawdzić, czy włączone jest zasilanie modułu GPS. 3. < Plik> \ <Kreator importu> Export Wizard (Kreator eksportu) umożliwia użytkownikowi wykonanie eksportu w łatwy sposób. 3.1 HTML: Powoduje spakowanie wybranych tras i zdjęć w edytowalne pliki html lub pojedynczy plik mht, który można łatwo udostępniać. 3.2 Google Earth: KML oraz KMZ są formatami plików dla Google Earth. Plik KML zawiera szczegółowe punkty trasy oraz informacje na temat tras. Plik KMZ zawiera proste informacje na temat trasy i zdjęć. 3.3 Plik trasy: Trasy oraz oznaczenia miejsc na trasie można eksportować jako pliki w formacie GPX, NMEA oraz CSV. J. Korzystanie z funkcji odbiornika bluetooth GPS dla urządzeń przenośnych J‐1 Uruchom komunikację Bluetooth w PDA/telefonie lub komputerze PC ……………………………………………..………………………………………………………………………………………………………………………………….……………………………………………………………………………. www.Qstarz.com...
- Page 71 Explore 2000 POLSKI ……………………………………………..………………………………………………………………………………………………………………………………….……………………………………………………………………………. W celu sparowania proszę włączyć odbiornik Explore 2000, upewniając się wcześniej czy PDA/telefon lub PC jest wyposażony w komunikację Bluetooth. Jeśli nie, to zaopatrzyć się w stosowny moduł Bluetooth. W zależności od urządzenia albo z interfejsem CF/SD dla PDA albo klucz USB dla PC. (Kod dostępu (hasło) do odbiornika to “0000”). J‐2 Automatycznie utworzony skrót w oknie Menadżera Bluetooth Po dokonaniu parowania, system w Menadżerze Bluetooth znajdzie odbiornik jako “Qstarz GPS”. W celu użycia odbiornika (połączenia z nim) wystarczy kliknąć jego ikonę w Menadżerze. J‐3 Sprawdź numer portu seryjnego w ustawieniach Bluetooth Po sparowaniu, proszę kliknąć “Serial Port” by potwierdzić przyznanie portu COM. Jeśli do parowania z odbiornikiem używany jest PDA/PC to proszę sprawdzić numer wychodzącego portu COM (“Outbound COM port”). J‐4 Ustawienie właściwego portu seryjnego COM w oprogramowaniu nawigacyjnym Należy uruchomić oprogramowanie nawigacyjne oraz sprawdzić w ustawieniach czy wybrany jest właściwy numer portu seryjnego COM “Serial Port”. UWAGA 1:W oprogramowaniu nawigacyjnym takim jak TomTom, zajdzie prawdopodobnie potrzeba zmiany ustawień domyślnych z odbiornika TomTom na inny odbiornik GPS zgodnie z modelem PDA/ telefonu. W niektórych przypadkach konieczny może okazać się kontakt z producentem oprogramowania celem konfiguracji z odbiornikiem. UWAGA 2: W oprogramowaniu nawigacyjnym mogą wystąpić specjalne wymagania co do ustawień odbiornika (np. TomTom dla PDA). J‐5 Wyłącznie funkcji Bluetooth ...
-
Page 72: Rozwiązywanie Problemów
POLSKI ……………………………………………..………………………………………………………………………………………………………………………………….……………………………………………………………………………. K. Cechy GPS 1. Prędkość transmisji: 4,800~38,400 bps / Datowanie: WGS‐84; Gorący/Ciepły/Zimny Start: 1/38/42 sek. (przeciętnie) 2. 20‐kanałowy odbiornik Bluetooth GPS o ultra wysokiej czułości‐159dBm 3. Wersja Bluetooth: V2.0 / profil SPP / Klasa 2/ zasięg do 10 metrów 4. Niskie zużycie energii, wbudowana bateria litowo‐jonowa 5. Wymiary: 71.3 (dł.) X 43 (szer.) X 20 (wys.) mm 6. Temperatura działania: ‐ 10 ℃ do + 60 ℃ Temperatura przechowywania: ‐ 20 ℃ do + 60 ℃ L. Rozwiązywanie problemów Pytanie Odpowiedź Czy Explore 2000 może być używany do nawigacji Tak, można używać Explore 2000 do nawigacji równocześnie gdy funkcja zapisu/ wraz z funkcją zapisu/ logowania. logowania jest włączona? Zakres prądu DC ładowania dla Explore 2000 wynosi 4.5~5.5V. Można użyć ładowarki sieciowej, z zakresem prądu DC na Zgubiłem ładowarkę sieciową i baterię, gdzie wyjściu 4.5~5.5V. Można użyć ładowarki z zakresem prądu DC mogę znaleźć zamienniki? wyjścia 4.5~5.5V. Można też użyć załączonego kabla mini USB do ładowania z komputera PC. Moje urządzenie nie działa normalnie. Jak można je Wyciągnij baterię na ponad 5 min., aby wyzerować urządzenie. zresetować? ……………………………………………..………………………………………………………………………………………………………………………………….……………………………………………………………………………. www.Qstarz.com... - Page 73 ……………………………………………..………………………………………………………………………………………………………………………………….……………………………………………………………………………. Explore 2000 簡易使用指南 盒裝標準配備 (1) GPS 本體 Explore 2000 (2) 可充電式鋰電池(3) mini USB 連接線(4) 旅行/家用 電源充電器 (5) 軟體光碟 (6) 保固說明卡 + 簡易使用指南 (7) (選購) 腳踏車架組 (8) (選購) 運動型臂套 1. 2. 3. 4. ...
- Page 74 繁體中文 ……………………………………………..………………………………………………………………………………………………………………………………….……………………………………………………………………………. 外觀 B. 1. 電源鍵 ( 開 / 關 / 開始旅遊行程記錄 / 停止旅遊行程記錄) 2. LCD背光鍵 3. 工具鍵 (距離單位切換 / 重置) 4. 電源插座 (mini USB) 5. 電池充電指示燈 (紅) 6. 內建天線 7. LCD螢幕 ……………………………………………..………………………………………………………………………………………………………………………………….……………………………………………………………………………. www.Qstarz.com...
- Page 75 將電源線連接電源插座 (mini USB) 並進行充電 電源鍵 (開啟 / 關閉) 按下電源鍵並壓住超過五秒以啟動 Explore 2000 電源鍵 開啟Explore 2000後,按下電源鍵並壓住超過一秒便可開 (開始 / 停止旅遊行程記 啟/關閉 旅遊行程記錄功能,旅遊行程記錄指示符號會 錄) 出現/消失 代表Explore 2000已 開始/停止記錄行程 LCD背光鍵 開啟Explore 2000後 , 按下LCD背光鍵並壓住超過一秒便可 (開啟 / 關閉) 開啟/關閉 LCD背光 工具鍵 – 距離單位切 開啟Explore 2000後,按下工具鍵並壓住超過一秒便可在 換 (公制 / 英制) 兩種距離單位中切換...
- Page 76 繁體中文 ……………………………………………..………………………………………………………………………………………………………………………………….……………………………………………………………………………. 開啟Explore 2000後,按下工具鍵並壓住超過五秒便可重 工具鍵 – 重置 置里程記、計時器和平均速度的數值 注意:: 里程記、計時器和平均速度的數值即使在關機後仍會被儲存,只有使用工具鍵 重置後數值才會被移除並重新開始計算 - 更改時區: 當機器處於關機的狀態,同時按下並押住電源和工具鍵直到開機,然後LCD螢幕的現在 時間會開始閃爍,接著按下電源鍵選擇時區, 0到23的數字為單向循環 , 完成後請按LCD 背光鍵儲存設定 請參考下表當您所在的時區為負值: 時區 (GMT) 機器設定 注意:機器的時區設定只是為了螢幕顯示用途,將不會影響到所記錄的旅遊資料,所有 的旅遊資料將會以GMT+0來記錄,稍後並可在軟體中來調整 ……………………………………………..………………………………………………………………………………………………………………………………….……………………………………………………………………………. www.Qstarz.com...
- Page 77 Explore 2000 繁體中文 ……………………………………………..………………………………………………………………………………………………………………………………….……………………………………………………………………………. 螢幕 E. LCD 符號指示: GPS 未定位 藍芽已連線 GPS 已定位 (閃爍) 電力不足 旅遊行程記錄已開啟 電力充足 ……………………………………………..………………………………………………………………………………………………………………………………….……………………………………………………………………………. www.Qstarz .com...
- Page 78 計時器: 只會顯示您的移動時間,靜止的時間將不會被計算 平均速度: 平均的移動速度,靜止的速度將不會被計算 現在時間: 將會根據您硬體的時區設定,顯示當地的現在時間 電池安裝 F. 將電池放入主體: 使用螺絲起子將被蓋的兩顆螺絲轉開,將被蓋打開並放入電池,依 序將防水膠膜和被蓋放回原處,向下加壓將被蓋固定好,再用螺絲起子將兩顆螺絲鎖 緊 為您的電池進行充電 G. 如果您是第一次使用 Explore 2000,請將電池完全充電。 將電源線連接電源插座並藉由mini USB線、旅行充電器或 車用充電器進行充電。充電時間約為3小時 - 當電池指示符號開始閃爍,電池將耗盡電源,請進行充電 - 當電池充電指示燈紅色恆亮,電池正在進行充電 - 當電池充電指示燈熄滅,電池電源已充電完畢. 注意1: 當關機充電時,機器會無法開機,如果需要一邊充電並一邊使用機器,請先開 機後再插入mini USB線進行充電 N 注意2: 當開機充電時,藍芽功能將會關閉,如果需要用藍芽連線功能,請中斷mini USB ……………………………………………..………………………………………………………………………………………………………………………………….……………………………………………………………………………. www.Qstarz.com...
- Page 79 “Qstarz_PC_Suite_installer.exe” 並進行軟體工具程式安裝 , 此安裝包含USB驅動程 式以及軟體工具程式 G-2 安裝 Google地球 Explore 2000 可以讓您在 Google地球 上顯示您的旅行軌跡紀錄,請至 http://earth.google.com 免費下載 Google地球 軟體並安裝在您的電腦上 開始使用 I. I-1 第一次使用前請將電池完全的充電 完全充電的電池可以讓 Explore 2000 持續使用達20小時(在最佳的情況下) I-2 將 Explore 2000 與電腦連接 請先開啟電源,再使用 mini USB 連接線將 Explore 2000 與您的電腦連接 I-3 開始使用軟體工具程式 ……………………………………………..………………………………………………………………………………………………………………………………….……………………………………………………………………………. www.Qstarz .com...
- Page 80 Suite連接將導致軟體自動斷線 QSports™: QSports™ 是個以資料庫為基礎的軟體 QSports™ 能根據不同的運動類型,例如單車、跑步、慢跑、登山、滑雪等… .來記錄、 管理和分析您每天、每周或每個月的運動,不同運動類型的資料將會產生並歸納成不 同的運動資料庫,您可依據QSports™ 整理的統計資料來訓練自己以達到健康管理的目 的 1. 請從 <開始> / <所有程式> / <Qstarz PC Suite> / QSports 第一次使用必須輸入產品金鑰才能啟用本軟體,產品金鑰位於驅動程式光碟的封套上 2. 新增使用者 QSports™ 支援多重使用者的資料管理,為了得到正確的卡路里消耗計算,請輸入正 確的個人資料,包括”姓名” “性別” “生日” “體重” 3. <檔案> \ < 匯入精靈 > 匯入精靈將會導引您下載GPS中的軌跡記錄 3.1 選擇預設的”運動類型,QSports™ 將會依選擇的運動類型產生軌跡,使用者...
- Page 81 4.3 其他軌跡檔案: 輸出軌跡檔案和景點座標成為 GPX, NMEA, 或 CSV 檔案格 式 Travel Recorder™ PC Utility V4: PC Utility V4 是您最佳的相片地理標籤寫入幫手,並支援軌跡編輯、軌跡動畫撥放和 輸入輸出精靈界面 1. 請從 <開始> / <所有程式> / <Qstarz PC Suite> / Travel Recorder 第一次使用必須輸入產品金鑰才能啟用本軟體,產品金鑰位於驅動程式光碟的封套上 2. <檔案> \ < 匯入精靈 > 匯入精靈將會導引您軌跡相片寫入的步驟 2.1 匯入精靈會在您每次程式執行時出現,您也可以從 <檔案>\<匯入精靈> 或快...
- Page 82 3.2 Google 地球: KML 和 KMZ 是 Google 地球的檔案格式 KML包含詳細的路徑點記錄和軌跡記錄 KMZ 包含簡易的軌跡記錄和照片資訊 3.3 其他軌跡檔案: 輸出軌跡檔案和景點座標成為 GPX, NMEA, 或 CSV 檔案格 式 使用行動裝置藉由藍牙連線進行導航 J. J-1 啟動您 PDA/Smart Phone 或 PC 的藍牙連線功能 在啟動您 PDA/PC 的藍牙連線功能前,請先開啟 Explore 2000 進行配對並檢查您的 裝備是否具備藍牙功能,如果不具備藍牙功能,您可能需要選購 CF/SD Bluetooth card 或 Bluetooth dongle (配對碼為 “0000”) ……………………………………………..………………………………………………………………………………………………………………………………….……………………………………………………………………………. www.Qstarz.com...
- Page 83 PDA/Phone 設定 “Other Bluetooth GPS”,在某些無法定位的特殊情況下 您可能需要請教您的導航軟體公司關於設定方面的問題 注 2: 每個導航軟體可能會有特定的設定要求,例如 TOMTOM,請只保留一個 GPS 設定並刪除其他 GPS 所留下來的設定 J-5 關閉藍牙連線功能 關閉您 PDA/Smart phone/PC 的藍牙連線功能,與 Explore 2000 的藍牙連接便會 自動停止,接著將 Explore 2000 關閉 特色 K. GPS 1. Baud Rate: 4,800~38,400 bps / Datum: WGS-84; 熱/暖/冷 開機: 1/38/42 秒 (平...
- Page 84 6. 操作溫度: - 10 ℃ to + 60 ℃ ; 儲存溫度: - 20 ℃ to + 60 ℃ 疑難排除 L. 問題 解決方法 在使用 Explore 2000 來導航的時候也可以同 是的,您可以同時使用 Explore 2000 來導航並記錄旅遊行 時開啟旅遊行程記錄 程 嗎? 我把旅遊家用充電器弄 Explore 2000 之 DC 輸入範圍為 4.5~5.5V,你也可以使 丟了,哪裡可以買到新 用 DC 輸出範圍為 4.5~5.5V 之充電器或是藉由 mini 的? USB 插座進行充電。 我的機器運作好像不太 正常,有可以重置狀態 請將電池移除超過五分鐘以上,機器將會恢復出場設定 的方法嗎? ……………………………………………..………………………………………………………………………………………………………………………………….……………………………………………………………………………. www.Qstarz.com...
Need help?
Do you have a question about the Explore 2000 and is the answer not in the manual?
Questions and answers