Table of Contents
Advertisement
Quick Links
Advertisement
Table of Contents

Related Manuals for Prism Healthcare smirthwaite Asiento


Summary of Contents for Prism Healthcare smirthwaite Asiento
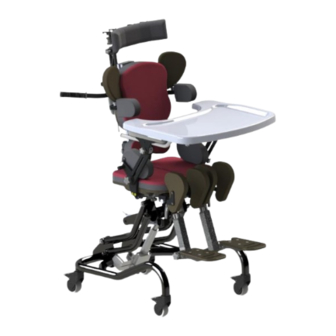
- Page 1 User Manual Asiento 999-1-57 – REV B P a g e...
-
Page 2: Table Of Contents
CONTENTS Safety Instructions and Warnings ......................... 4 Introduction ............................... 4 Manufacture ..............................4 European Authorised Representative ....................... 4 Symbols Used ..............................5 Contraindications/Limitations ..........................6 Intended Use ..............................6 1.6.1 Intended User ............................6 1.6.2 Frequency of use: ............................6 Chair Operating Environment .......................... - Page 3 CONTENTS Compatible Accessories ............................22 Installing and Removing Accessories ......................22 4.1.1 Pelvic Lap Strap ............................22 4.1.2 Harnesses ............................... 23 Operating Instructions ............................25 Manoeuvring the Chair ............................ 25 Brakes ................................25 Pelvic Lap Strap Buckle ..........................26 Technical Specification ............................26 Chair Specification ............................
-
Page 4: Safety Instructions And Warnings
SAFETY INSTRUCTIONS AND WARNINGS SAFETY INSTRUCTIONS AND WARNINGS 1.1 Introduction The information in this manual is important to your safety. Please read and understand this manual in its entirety before using your Asiento chair. If you require larger print or videos – these are available on the Smirthwaite website: www.smirthwaite.co.uk/product/Asiento/ The information in this manual is important for the safety of anyone near the Asiento chair and must be read and understood to help prevent injuries. -
Page 5: Symbols Used
SAFETY INSTRUCTIONS AND WARNINGS 1.4 Symbols Used The Table below includes all Symbols from BS EN ISO 15223-1:2021 that can be found in this Manual and on the Product and what they represent. Refer back to this Table when you are unsure of what a symbol represents. -
Page 6: Contraindications/Limitations
SAFETY INSTRUCTIONS AND WARNINGS 1.5 Contraindications/Limitations There are no known “contraindications” associated with the usage of the Asiento chair and its accessories, provided they are used as per manufacturer’s recommendations and guidelines. Smirthwaite Ltd. does not recommend a required number of care givers for the use of our products. -
Page 7: Chair Operating Environment
SAFETY INSTRUCTIONS AND WARNINGS 1.7 Chair Operating Environment The Asiento chair is suitable for use within the professional health care facility environment as well as the home health care environment. The chair is not intended to be used in environments where there are rapid changes in the environmental temperature and humidity during intended use. - Page 8 SAFETY INSTRUCTIONS AND WARNINGS • The chair is ONLY to be used indoors on a flat level surface. • The chair should only be transported at minimum height when the user is in the chair. • Do not exceed user maximum weight limits. •...
- Page 9 SAFETY INSTRUCTIONS AND WARNINGS • In facilities where more than one operator will be responsible for using the chair, it is imperative that all such members be trained on the chair prior to use. A training program should be established by the facility to acquaint new operators with this equipment. •...
-
Page 10: Components/Key Parts
COMPONENTS/ KEY PARTS 2.0 COMPONENTS/KEY PARTS 2.1 Key Parts When delivered, the chair will be supplied fully assembled except for the attachment of any special accessories ordered. Export orders may require the chair to be fully assembled, if in any doubt, always seek advice. -
Page 11: Configurations
COMPONENTS/ KEY PARTS 2.2 Configurations Smirthwaite Ltd. will document and maintain a record of the original product configuration at the time of first sale. Smirthwaite Ltd. will not be held responsible for any subsequent changes to this configuration unless authorized to do so in writing by Smirthwaite Ltd. It is the owner’s responsibility to maintain their own records of changes to the equipment configuration and to be able to provide such records to subsequent owners to maintain traceability. -
Page 12: Installation
INSTALLATION 3.0 INSTALLATION When delivered, the chair will be supplied fully assembled except for the attachment of any special accessories ordered. Always turn hand wheels, levers and screws clockwise to tighten or anti- clockwise to loosen. 3.1 Standard Features The Asiento chair comes with a variety of standard features. These features and part codes are listed below Standard Features Size 1... -
Page 13: Adjustments
INSTALLATION 3.2 Adjustments The Asiento has components that are adjustable to your requirements. See the instructions below on how to adjust these components correctly. If you are unsure of any process, do not continue and seek advice. 3.2.1 Back Rest Height/Depth To adjust the back rest height, Using a 4mm Allen Key release the four screws located on the back of the chair as seen in... -
Page 14: Lateral Positioning
INSTALLATION 3.2.3 Lateral Positioning To adjust the laterals in height and width, locate the hand wheels on the back of the chair and release. Once released you can move the laterals to the position desired. Please see Fig. 3 (highlighted in yellow). To release the lateral swing away mechanism, release the plunger pin located on the top of the lateral by pulling up, this... -
Page 15: Sacral Pad Positioning
INSTALLATION 3.2.4 Sacral Pad Positioning Adjusting the sacral pad position will require the use of a 4mm hex key. To adjust the sacral pad, release the two bolts behind the pad, they are positioned either side of the mount, see Fig. 5 (highlighted in yellow). -
Page 16: Seat Depth Adjustment
INSTALLATION 3.2.6 Seat Depth Adjustment To adjust the seat depth, locate the hand wheels located underneath the seat, see Fig. 7 (highlighted in yellow). Once located release the hand wheels and move the seat forward or back to the desired position. -
Page 17: Dynamic Back
INSTALLATION 3.2.8 Dynamic Back To operate the dynamic back system, locate the shock absorber located at the rear of the chair. See Error! Reference source not found.9 (highlighted in yellow). Once located, you can choose to have the shock absorber ‘locked’ or ‘unlocked’. -
Page 18: Leg Rest Angle
INSTALLATION 3.2.10 Leg Rest Angle To adjust the leg rest angle, locate the lever locks under the seat, see Fig. 92 (highlighted in yellow), which shows the chair from front to back. Release the lever locks and leg rests to the desired angle, once in place tighten the lever locks. -
Page 19: Knee Cushion Swing Away
INSTALLATION 3.2.13 Knee Cushion Swing Away To swing away the knee cushions, locate the plunger pin on the side of the relevant knee cushion (see Fig. 115). Pull the plunger pin and rotate the knee cushion underneath the seat base. Fig. -
Page 20: Tray Height & Angle
INSTALLATION 3.2.15 Tray Height & Angle To adjust the tray height and angle, locate the bolts on both sides of the chair as shown in Error! Reference source not found.7 (highlighted in yellow). Once located release the bolts, using a 4mm hex key, and move the tray to the desired height and/or angle. -
Page 21: Armrest Height/Angle Indicators
INSTALLATION 3.2.18 Armrest Height/ Angle Indicators To align the angle indicators, use the angle indicators located behind the handwheels (Error! Reference source not found.0) and the curved notches on the armrest bar (Error! Reference source not found.1) to record the desired position of the armrest. All adjustment for height and angle come from the same operation/same two handwheels). -
Page 22: Compatible Accessories
COMPATIBLE ACCESSORIES 4.0 COMPATIBLE ACCESSORIES The Asiento chair comes with a variety of compatible accessories. These accessories and part codes are listed below. Approved Accessories Size 1 Size 2 Size 3 Four point lap strap size 1 HN077 HN077 HN077 Four point lap strap size 2 HN078 HN078... -
Page 23: Harnesses
COMPATIBLE ACCESSORIES • Adjust the length of the strap to suit the client and lock the cam locks to set the position. A padded pelvic lap strap is provided for your client’s safety. 4.1.2 Harnesses The 4 Point Harness are installed and removed following the same process. Follow the instructions below to install and remove the Harnesses. - Page 24 COMPATIBLE ACCESSORIES 4.1.3 Point Lap Strap Harnesses The 4 Point Lap Strap Harness are installed and removed following the same process. Follow the instructions below to install and remove the Harnesses. To fit the harness, following these steps: - Feed the 4 straps through cam locks (1,2,3 & 4 below).
-
Page 25: Operating Instructions
See section 5.2 on how to activate the brakes. 5.2 Brakes A. The Smirthwaite Asiento chair has four braked castors. B. The castors should/can be applied when parking, to avoiding lateral movement, and using the chair and as an emergency stopping system. -
Page 26: Pelvic Lap Strap Buckle
TECHNICAL SPECIFICATION 5.3 Pelvic Lap Strap Buckle Below is a step-by-step instruction guide on how to operate the pelvic lap strap buckle. A. Press areas (U) to unlock the buckle and pull the two buckle parts apart. B. To fasten simply reconnect the two parts – the buckle will ‘click’ and lock. 6.0 TECHNICAL SPECIFICATION 6.1 Chair Specification... - Page 27 TECHNICAL SPECIFICATION The diagram(s) above include the relevant dimensions of the chair, for further details on the chair specification, see the table below. All dimensions are in millimetres unless otherwise stated. Size 1 Size 2 Size 3 Age range 1-6 Years 6-12 Years 12-18 350 –...
- Page 28 TECHNICAL SPECIFICATION Dimensions Size 1 Size 2 Size 3 Turning Circle 920mm 920mm 925mm Overall Height 1170mm 1440mm 1600mm Overall Width 550mm 550mm 615mm Overall Width (with Quick Release Tray) 565mm 565mm 565mm Ground Clearance 115mm 115mm 115mm Front and Rear Castors Size 75mm 75mm 75mm...
-
Page 29: Environmental - Storage And Operating Conditions
ENVIRONMENTAL ENVIRONMENTAL - STORAGE & OPERATING CONDITIONS The chair is intended for internal use within normal environmental conditions. It is not intended to be used in environments where there are rapid changes in the environmental temperature and humidity during intended use. The Asiento chair suffers little from any effects of lint, dust and light. -
Page 30: Disposal
ENVIRONMENTAL 8.0 DISPOSAL When the chair has completed its life cycle and can no longer perform to its intended use safely the chair must be decommissioned by an approved service engineer. The following specifies the importance of correct disposal procedure including local laws and being environmentally friendly. -
Page 31: Fault Finding
FAULT FINDING 9.0 FAULT FINDING Should a problem arise with the use of the Asiento chair, review the table below. Find the fault and complete the recommended solution. If the fault is not found and/or the solution does not correct the problem, contact your local Smirthwaite authorised dealer immediately –... -
Page 32: General Inspection And Maintenance
GENERAL INSPECTION AND MAINTENANCE 10.0 GENERAL INSPECTION & MAINTENANCE 10.1 Service No service is to be carried out on the Asiento chair while transferring a person to reduce the risk of injury. Service must be completed by a Smirthwaite authorised service engineer. Do not attempt to service the product yourself, or warranty is void. -
Page 33: User Serviceable Parts
GENERAL INSPECTION AND MAINTENANCE We will continue to provide full support beyond the nominal service life provided the following conditions are met: 1. A full service schedule has been maintained. 2. A full service and inspection is undertaken at the end of the nominal service life period. 3. -
Page 34: Daily Checks (Inspection) - To Be Completed By User
GENERAL INSPECTION AND MAINTENANCE 10.6 Daily Checks (Inspection) - To Be Completed By User Inspection is to be completed prior to each use by the user of the Asiento chair. Should any of the components in the table below fail the inspection, DO NOT use the chair. - Page 35 GENERAL INSPECTION AND MAINTENANCE Frame Examine the full frame of the product for any cracks or fractures. Ensure the frame is solid and there are no loose attachments between the frame and the accessories or any other constructional part. Footrest Inspect the footrests for damage including cuts and breaks.
-
Page 36: Cleaning
CLEANING 10.7 Cleaning Please follow the cleaning guidelines below; noting the frequency is appropriate with usage. It is recommended to clean the Asiento chair and accessories before use by a different person, reducing the risk of cross–contamination. 10.7.1 General cleaning The exterior of the Asiento chair can be cleaned using a damp soapy cloth for general cleaning duties. -
Page 37: Warranty
WARRANTY 11.0 WARRANTY Smirthwaite Ltd warrants the products detailed on your order to be free from defects in materials and workmanship for a period of 2 years from date of delivery. If a fault develops during the period, please call customer services by email or telephone 01626 835552 who will advise you on the best course of action. -
Page 38: Service Record History
SERVICE DOCUMENTATION 13.0 SERVICE RECORD HISTORY Complete this record after each service, repair inspection and/or maintenance. * Photocopy additional pages as required * 13.1.1 Product Information Model Size Date of Manufacture Serial Number 13.1.2 Service & inspection record for Date Procedure Service Personnel... - Page 39 Date Procedure Service Personnel...
- Page 40 Disclaimer While every effort has been made to ensure the accuracy of information contained in this user manual, no liability can be accepted by Smirthwaite Ltd for any errors or omissions. Smirthwaite Ltd operates a policy of continuous improvement. Specifications and other data are subject to change without notice.
Need help?
Do you have a question about the smirthwaite Asiento and is the answer not in the manual?
Questions and answers