Table of Contents
Advertisement
Quick Links
Advertisement
Table of Contents

Related Manuals for Prism Healthcare smirthwaite Asiento


Summary of Contents for Prism Healthcare smirthwaite Asiento
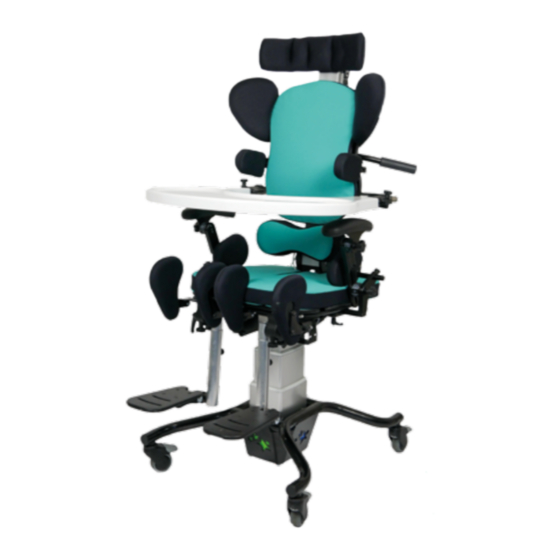
- Page 1 User Manual Asiento P a g e...
-
Page 2: Table Of Contents
CONTENTS Safety Instructions and Warnings ......................4 Introduction ............................4 Service and Support ......................... 4 Symbols Used ..........................5 Contraindications/Limitations ......................5 Intended Use ........................... 6 Intended User ..........................6 Chair Operating Environment ......................6 Frequency of use: .......................... 6 Chair Essential Performance ...................... - Page 3 CONTENTS Armrest Removal ........................23 Compatible Accessories ........................24 Headrest ............................24 Head Rest Position ........................24 Head Rest Height/Removal ......................25 Head Rest Pad ..........................25 Shoulder Protractors ........................26 Shoulder Pad Angle ........................26 Elbow Pads ............................ 27 Elbow Pads ..........................
-
Page 4: Safety Instructions And Warnings
SAFETY INSTRUCTIONS AND WARNINGS 1.0 SAFETY INSTRUCTIONS AND WARNINGS 1.1 Introduction The information in this manual is important to your safety. Please read and understand this manual in its entirety before using your Asiento chair. If you require larger print or videos – these are available on the Smirthwaite website: www.smirthwaite.co.uk/product/Asiento/ The information in this manual is important for the safety of anyone near the Asiento chair and must be read and understood to help prevent injuries. -
Page 5: Symbols Used
SAFETY INSTRUCTIONS AND WARNINGS 1.3 Symbols Used Consult instructions before Caution Class II Equipment - electrical Safe Working Load represents equipment in which protection the maximum load rated for against electric shock does not safe operation rely on basic insulation only Manufacturer Date of manufacture Packaging indicator –... -
Page 6: Intended Use
SAFETY INSTRUCTIONS AND WARNINGS 1.5 Intended Use For internal use only. Intended to provide postural support. Intended User The Asiento has been designed for use by a child’s carer, therapist, and/or teaching staff who will maintain and clean the chair as per the recommended guidelines in section 7.0 Cleaning. -
Page 7: Vicinity To Other Equipment
SAFETY INSTRUCTIONS AND WARNINGS 1.8 Vicinity to Other Equipment Use of this equipment stacked with other equipment should be avoided, unless the equipment is an approved accessory. Contact your local authorised dealer if assistance is required – contact details on the last page of this manual. -
Page 8: Components/Key Parts
COMPONENTS/ KEY PARTS 2.0 COMPONENTS/KEY PARTS 2.1 Key Parts When delivered, the chair will be supplied fully assembled except for the attachment of any special accessories ordered. Export orders may require the chair to be fully assembled. If in any doubt, always seek advice. -
Page 9: Asiento Configurations
COMPONENTS/ KEY PARTS 2.2 Asiento Configurations Smirthwaite Ltd. will document and maintain a record of the original product configuration at the time of first sale. Smirthwaite Ltd. will not be held responsible for any subsequent changes to this configuration unless authorized to do so in writing by Smirthwaite Ltd. It is the equipment owner’s responsibility to maintain their own records of changes to the equipment configuration and to be able to provide such records to subsequent owners to maintain traceability. -
Page 10: Installation
INSTALLATION 3.0 INSTALLATION When delivered, the chair will be supplied fully assembled except for the attachment of any special accessories ordered. Always turn hand wheels, levers and screws clockwise to tighten or anti-clockwise to loosen. 3.1 Standard Features The Asiento chair comes with a variety of standard features. These features and part codes are listed below (Table 2);... -
Page 11: Adjustments
INSTALLATION 3.2 Adjustments Back Rest Height/Depth To adjust the back rest height, release the four lever locks located on the back of the chair as seen in the Fig. 1 (highlighted in yellow). Once released, you can move the backrest up and down, and also adjust the angle and depth of the back rest too. -
Page 12: Lateral Positioning
INSTALLATION Lateral Positioning To adjust the laterals in height and width, locate the hand wheels on the back of the chair and release. Once released you can move the laterals to the position desired. Please see Fig. 3 (highlighted in yellow). To release the lateral swing away mechanism, release the plunger pin located on the top of the lateral by pulling up, this... -
Page 13: Sacral Pad Positioning
INSTALLATION Sacral Pad Positioning Adjusting the sacral pad position will require the use of a 4mm hex key. To adjust the sacral pad, release the two bolts behind the pad, they are positioned either side of the mount, see Fig. 5 (highlighted in yellow). -
Page 14: Seat Depth Adjustment
INSTALLATION Seat Depth Adjustment To adjust the seat depth, locate the hand wheels located underneath the seat, see Fig. 7 (highlighted in yellow). Once located release the hand wheels and move the seat forward or back to the desired position. CAUTION - Ensure the footrest is raised when lowering the chair. -
Page 15: Tilt In Space Operation
INSTALLATION Tilt in Space Operation To operate the tilt in space mechanism, locate the lever on the handle bars on the rear of the chair, see Fig. 9 (highlighted in yellow). Pull the lever to release the lock, position the chair into the required position and release the lever. -
Page 16: Dynamic Back
INSTALLATION Dynamic Back To operate the dynamic back system, locate the shock absorber located at the rear of the chair. See Fig. 11 (highlighted in yellow). Once located, you can choose to have the shock absorber ‘locked’ or ‘unlocked’. To unlock the dynamic back system, turn the lever to the unlocked setting. -
Page 17: Dynamic Back Pressure
INSTALLATION Dynamic Back Pressure To alter the pressure in the dynamic back system, locate and remove the valve cap on the shock absorber, see Fig. 12 (highlighted in yellow). Attach the hose end of the pump, see Fig. 13 (highlighted in yellow), and secure it to the exposed valve. -
Page 18: Leg Rest Height
INSTALLATION Leg Rest Height To adjust the leg rest heights, locate the plunger pin on the rear of the leg rest, see Fig. 15 (highlighted in yellow). Pull the pin and move the leg rest to the desired position, once in the desired location ensure the pin locks back into a location hole. -
Page 19: Knee Cushion Swing Away
INSTALLATION Knee Cushion Swing Away To swing away the knee cushions, locate the plunger pin on the side of the relevant knee cushion (see Fig. 17). Pull the plunger pin and rotate the knee cushion underneath the seat base. Fig. 17 Foot Rest Angle To adjust the foot rest angle, locate the hand wheels shown in Fig. -
Page 20: Tray Height & Angle
INSTALLATION Tray Height & Angle To adjust the tray height and angle, locate the bolts on both sides of the chair as shown in Fig. 19 (highlighted in yellow). Once located release the bolts, using a 4mm hex key, and move the tray to the desired height and/or angle. -
Page 21: Tray Removal And Depth
INSTALLATION Tray Removal and Depth To change the tray depth, locate the small hand wheels on top of the tray assembly, see Fig. 21 (highlighted in yellow). Once located, release and push or pull the tray to the desired depth. Once in position, lock the tray in place by tightening the hand wheels. -
Page 22: Armrest Height/ Angle Indicators
INSTALLATION Armrest Height/ Angle Indicators To align the angle indicators, use the angle indicators located behind the handwheels (Fig. 23) and the curved notches on the armrest bar (Fig. 24) to record the desired position of the armrest. All adjustment for height and angle come from the same operation/same two handwheels). -
Page 23: Armrest Removal
INSTALLATION Armrest Removal To remove the armrests, locate the hand wheel underneath the chair, see Fig. 25 (highlighted in yellow). Once located, release the hand wheel and pull the arm rest out of the clamp. Fig. 25... -
Page 24: Compatible Accessories
COMPATIBLE ACCESSORIES 4.0 COMPATIBLE ACCESSORIES The Asiento chair comes with a variety of compatible accessories. These accessories and part codes are listed below (Table 3); Accessories Size 1 Size 2 Size 3 Code Code Code Headrest HT030 HT030 HT030 Shoulder Protractors AS017 AS018 AS001... -
Page 25: Head Rest Height/Removal
COMPATIBLE ACCESSORIES Head Rest Height/Removal To adjust the head rest height, release the hand wheel located on the back of the chair as seen in Fig. 27 (highlighted in yellow). Once released you can move the head rest up and down to achieve the desired position, once in place tighten the hand wheel to secure the head rest height. -
Page 26: Shoulder Protractors
COMPATIBLE ACCESSORIES Shoulder Protractors Shoulder Pad Angle To adjust the shoulder pad angle, release the lever locks on the top of the chair as seen in the Fig. 29 (highlighted in yellow). Once released you can change the angle to the desired position. -
Page 27: Elbow Pads
COMPATIBLE ACCESSORIES 4.3 Elbow Pads Elbow Pads To add or remove the elbow pads, locate the small hand wheels on top of the tray assembly, see Fig. 30. The elbow pads can only be used when the tray is not in use. Turn the hand wheel to tighten or loosen the elbow pads. - Page 28 COMPATIBLE ACCESSORIES Always lock the castors when attaching items or making adjustments. To lock, apply foot to point (A), to unlock apply foot to point (B). LAP STRAPS & HARNESSES SAFETY NOTICE Lap straps and harnesses must be appropriate and safe for the user and the users clothing.
-
Page 29: Technical Specification
TECHNICAL SPECIFICATION 5.0 TECHNICAL SPECIFICATION 5.1 Chair Dimensions User Size 1 Size 2 Size 3 Product Code 1011 1012 1013 Max User Weight 80kg 80kg 100kg Size 1 Size 2 Size 3 Back Rest Height 350 – 480 420 – 570 490 –... -
Page 30: Environmental - Storage And Operating Conditions
TECHNICAL SPECIFICATION 5.2 Environmental - Storage and Operating Conditions The chair is intended for internal use within normal environmental conditions. It is not intended to be used in environments where there are rapid changes in the environmental temperature and humidity during intended use. The Asiento chair suffers little from any effects of lint, dust and light. -
Page 31: Standards Applied
TECHNICAL SPECIFICATION 5.3 Standards Applied The standards that have been applied to the device are as follows: • BS EN ISO 12182:2012 (Assistive products for persons with disability. General requirements and test methods). • IEC 62366:2015 (Application of usability engineering to medical devices). •... -
Page 32: General Inspection And Maintenance
GENERAL INSPECTION AND MAINTENANCE 6.0 GENERAL INSPECTION AND MAINTENANCE No maintenance is to be carried out on the chair while in use to reduce the risk of injury. The user will not require any tools when completing their inspections. When completing services, the authorised service engineer will provide their own tools, including: 1 x set of metric Allen keys. -
Page 33: Nominal Service Life
GENERAL INSPECTION AND MAINTENANCE 6.4 Nominal Service Life Your product has a nominal service life of 7 years, during which full post-sales support will be available with regard to spares and servicing. Product service life has been determined based upon the design complexity of product, and the anticipated exposure to normal use. -
Page 34: Final Inspection
GENERAL INSPECTION AND MAINTENANCE 6.7 Final Inspection When the service is complete: • Remove any waste created as part of the service from the site. • Confirm with the operator if the chair is safe to use and that it has been left in a working state. -
Page 35: Cleaning
CLEANING 7.0 CLEANING Please follow the cleaning guidelines below; noting the frequency is appropriate with usage. It is recommended to clean the Asiento chair and accessories before use by a different person, reducing the risk of cross–contamination. 7.1 General cleaning The exterior of the Asiento chair can be cleaned using a damp soapy cloth for general cleaning duties. -
Page 36: Service Documentation
SERVICE DOCUMENTATION 8.0 SERVICE DOCUMENTATION 8.1 Documentation/ Records It is the responsibility of the current equipment owner to ensure the Service Manual (As well as any further manuals for accessories fitted to the equipment) are handed over to the new owner at the time of exchange/sale. -
Page 37: Service Record History
SERVICE DOCUMENTATION 8.2 Service Record History Complete this record after each service, repair inspection and/or maintenance. * Photocopy additional pages as required * Product Information Model Size Date of Manufacture Serial Number Service & inspection record form: Date Procedure Service Personnel... -
Page 38: Warranty
WARRANTY 9.0 WARRANTY Smirthwaite Ltd warrants the products detailed on your order to be free from defects in materials and workmanship for a period of 2 years from date of delivery. If a fault develops during the period, please call Customer Services by email or telephone 01626 835552 who will advise you on the best course of action. - Page 39 Smirthwaite Ltd, 16 Wentworth Road • Heathfield • Newton Abbot • Devon • TQ12 6TL Part Number: 999-1-13 / Rev: 1 / Date: Sep 21...
Need help?
Do you have a question about the smirthwaite Asiento and is the answer not in the manual?
Questions and answers