
Related Manuals for Avigilon H4SL-MT-DCIL


Summary of Contents for Avigilon H4SL-MT-DCIL
- Page 1 Installation Guide Avigilon H4 SL Dome Camera Models with In-Ceiling Mounting Adapter: H4SL-D/H4SL-DO plus H4SL-MT-DCIL...
- Page 2 The H4SL-DO product is intended to be supplied by Power over Ethernet (PoE) that is a “Limited Power Source” or “LPS” rated 48 VDC, 7W min. Any external power supply connected to this product may only be connected to another Avigilon product of the same model series. External power connections must be properly insulated.
- Page 3 Connect the equipment into an outlet on a circuit different from that to which the receiver is connected. Consult the dealer or an experienced radio/TV technician for help. Changes or modifications made to this equipment not expressly approved by Avigilon Corporation or parties authorized by Avigilon Corporation could void the user’s authority to operate this equipment.
- Page 4 The absence of the symbols ™ and ® in proximity to each trademark in this document is not a disclaimer of ownership of the related trademark. Avigilon Corporation protects its innovations with patents issued in the United States of America and other jurisdictions worldwide: avigilon.com/patents.
-
Page 5: Table Of Contents
Table of Contents Overview Cover View Adapter View Camera Base Bottom View Camera Base Front View Camera Base Rear View Installation Required Tools and Materials Camera Package Contents Installation Steps Removing the Dome Cover Inserting Cables through the Sealing Grommet Using the In-Ceiling Mounting Adapter Installing the Camera Base to the Mounting Adapter (Optional) Using the USB Wi-Fi Adapter... -
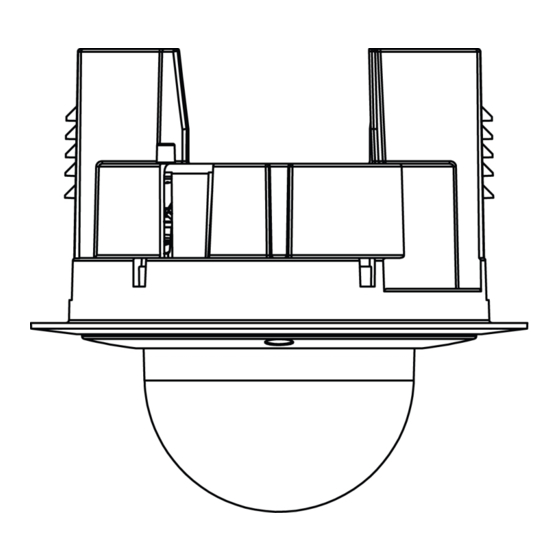
Page 6: Overview
Overview Cover View 1. In-ceiling mount adapter Used to mount the dome camera to a wall, ceiling or electrical box. 2. Dome cover Vandal resistant dome cover. Only available on H4SL-DO models. 3. Tamper resistant screws Torx captive screws to fix the dome cover to the base. Overview... -
Page 7: Adapter View
Adapter View 1. Camera housing clips Snaps to hold camera module during installation. 2. Lanyard Connects to the lanyard anchor on the dome camera base. 3. Clamps Manually adjustable clamps for securing the dome camera to the ceiling. 4. Clamp retainer Used to hold the clamps together before installation. -
Page 8: Camera Base Bottom View
Camera Base Bottom View 1. Cable entry hole An entry hole for the cables required for camera operation. 2. Lanyard anchor The safety lanyard attaches to the anchor to prevent the camera from falling during installation. 3. Vent Vent to allow moisture vapor to escape the sealed housing and equalize pressure. Only available on H4SL-DO models. -
Page 9: Camera Base Front View
Camera Base Front View 1. IR illuminator Provides scene illumination in the IR spectrum. Only available on -IR models. 2. Ethernet port Accepts power and Ethernet connection to the network. The camera can only be powered by Power over Ethernet (PoE). Server communication and image data transmission also occur over this connection. -
Page 10: Camera Base Rear View
Provides a locking mechanism for the image pan adjustment 4. Micro USB port Accepts a micro USB to USB adapter. Only required when using the Avigilon USB Wi-Fi Adapter. 5. Serial number tag Device information, product serial number and part number label. -
Page 11: Installation
4 screws and anchors for solid walls Surface mount adapter Side conduit cover Side conduit plate (2 sizes) Ensure the mounting adapter (H4SL-MT-DCIL) package contains the following: In-ceiling mounting adapter for an H4 SL Dome Camera Mounting template sticker Installation Steps... -
Page 12: Removing The Dome Cover
(Optional) Using the USB Wi-Fi Adapter Assigning an IP Address Accessing the Live Video Stream Aiming the Dome Camera (Optional) Configuring microSD Card Storage Installing the Dome Cover Zooming and Focusing the Dome Camera Configuring the Camera Removing the Dome Cover NOTE: Be careful not to scratch or touch the dome bubble. The resulting marks or fingerprints may affect the overall image quality. -
Page 13: Using The In-Ceiling Mounting Adapter
If you are installing the outdoor model (H4SL-DO), use one of the following methods: a. If the Ethernet cable is uncrimped, push the cable through the grommet. b. If the Ethernet cable is already crimped, place the grommet piercing cap on the Ethernet connector then push the cable through the grommet. - Page 14 1. Use the in-ceiling mounting template to cut an entry hole for the camera into the ceiling. 2. Insert the in-ceiling mounting adapter into the entry hole then pull the required cable through the adapter. 3. Pull off the clamp retainer holding the clamps in place. Using the In-Ceiling Mounting Adapter...
- Page 15 4. Push the orange clamp handles up so that the metal arms extend outside the mounting adapter. 5. With your thumb on the outside edge of the mounting adapter and your forefinger on one of the orange clamp handles, pinch the clamp down until the clamp is secured. 6.
-
Page 16: Installing The Camera Base To The Mounting Adapter
Installing the Camera Base to the Mounting Adapter After you install the mounting adapter, mount the camera base to the adapter. 1. Attach the lanyard on the mounting adapter to the anchor on the camera base. 2. Pull the required Ethernet cable through the cable entry hole on the camera base. 3. -
Page 17: (Optional) Using The Usb Wi-Fi Adapter
For more information about configuring the camera from the mobile web interface see Avigilon USB Wi-Fi Adapter System User Guide. NOTE: The camera will reserve the 10.11.22.32/28 subnet for internal use while the USB Wi-Fi Adapter is plugged in. -
Page 18: Aiming The Dome Camera
The mobile web interface using the USB Wifi Adapter. For more information, see (Optional) Using the USB Wi-Fi Adapter on the previous page. Web browser interface: http://< camera IP address>/. Network Video Management software application (for example, the Avigilon Control Center software). NOTE: The default camera username is administrator with no password. Aiming the Dome Camera Reference the camera's live stream as you aim the camera. -
Page 19: (Optional) Configuring Microsd Card Storage
4. Rotate the azimuth control ring to set the image to the correct angle. 5. In the camera web browser interface or the Avigilon Control Center software, adjust the camera’s Image and Display settings. (Optional) Configuring microSD Card Storage To use the camera's SD card storage feature, you must insert an microSD card into the card slot. -
Page 20: Installing The Dome Cover
For more information, see the Avigilon Camera Configuration Tool User Guide. If the camera is connected to the Avigilon Control Center system, you can use the client software to configure the camera. For more information, see the Avigilon Control Center Client User Guide. -
Page 21: For More Information
Additional information about setting up and using the device is available in the following guides: Avigilon Control Center Client User Guide Avigilon High Definition H.264 Web Interface User Guide Avigilon Camera Configuration Tool User Guide The manuals are available on the Avigilon website: avigilon.com/support-and-downloads. For More Information... -
Page 22: Led Indicators
LED Indicators Once connected to the network, the Connection Status LED will display the progress in connecting to the Network Video Management software. The following table describes what the LEDs indicate: Connection Status Connection State Description One short flash every Obtaining IP Address Attempting to obtain an IP address. -
Page 23: Removing The Dome Camera From The Mounting Adapter
Removing the Dome Camera from the Mounting Adapter 1. Loosen the Torx screws and remove the dome cover. 2. Locate the small orange arrows that point at the camera housing clips. 3. Insert a flat head screwdriver or grommet piercing cap against one of the camera housing clips. 4. -
Page 24: Resetting To Factory Default Settings
Resetting to Factory Default Settings If the camera no longer functions as expected, you can choose to reset the camera to its factory default settings. Use the firmware revert button to reset the camera. The firmware revert button is shown in the following diagram: 1. -
Page 25: Setting The Ip Address Using The Arp/Ping Method
NOTE: The ARP/Ping Method will not work if the Disable setting static IP address through ARP/Ping method check box is selected in the camera's web browser interface. For more information, see the Avigilon™ High Definition H.264 Web Interface User Guide. -
Page 26: Specifications
Specifications Camera Lens 3-9 mm, motorized, varifocal USB Port USB 2.0 microSD/microSDHC/microSDXC slot – minimum class 6; class 10/UHS-1 or better SD Storage recommended Network Network 100Base-TX Cabling Type CAT5 Connector RJ-45 ONVIF® compliance version 1.02, 2.00, Profile S (www.onvif.org) Device Management SNMP v2c Protocols SNMP v3... - Page 27 RTC Backup Battery 3V manganese lithium Environmental H4SL-D — 0 °C to 55 °C (32 °F to 131 °F) Operating Temperature H4SL-DO — -30 °C to 60 °C (-22 °F to 140 °F) Storage -10 °C to +70 °C (14 °F to 158 °F) Temperature Humidity 0-95% non-condensing...
-
Page 28: Limited Warranty And Technical Support
Limited Warranty and Technical Support Avigilon warranty terms for this product is provided at avigilon.com/warranty. Warranty service and technical support can be obtained by contacting Avigilon Technical Support: avigilon.com/contact-us/. Limited Warranty and Technical Support...
Need help?
Do you have a question about the H4SL-MT-DCIL and is the answer not in the manual?
Questions and answers