Table of Contents
Advertisement
Quick Links
Advertisement
Table of Contents

Related Manuals for Electrolux EW30MC65PS


Summary of Contents for Electrolux EW30MC65PS
- Page 1 EN WALL OVEN/MICROWAVE COMBINATION USE AND CARE GUIDE 807574601 rev. A (15/05)
-
Page 2: Table Of Contents
Finding Information Table of contents Please read & save this guide Finding information ............2 Thank you for choosing Electrolux, the new Safety ...............3-8 premium brand in home appliances. This Use & Information You Need To Know ......9-12 Care Guide is part of our commitment to customer Features..............13-16... - Page 3 Important Safety Instructions What you need to know about safety instructions Warning and Important Instructions appearing in this guide are not meant to cover all possible conditions and situations that may occur. Common sense, caution and care must be exercised when installing, maintaining or operating a microwave.
- Page 4 Use extreme care when inserting a spoon or DO NOT use this product near water—for other utensil into the container. example, near a kitchen sink, in a wet If the oven light fails, consult a Electrolux basement, near a swimming pool, or similar Authorized Servicer. locations.
- Page 5 Important Safety Instructions Recognize safety symbols, words and labels Tip Over Hazard Safety items throughout this manual are labeled with a WARNING or CAUTION based on the risk • A child or adult can tip the type as described below: oven and be killed.
- Page 6 Important Safety Instructions • Protective liners—Do not use aluminum foil to IMPORTANT line the oven bottom, except as suggested in the manual. Improper installation of these liners Do not attempt to operate the appliance may result in a risk of electrical shock, or fi re. during a power failure.
- Page 7 Important Safety Instructions • Cold temperatures can damage the electronic Self cleaning ovens control. When using the appliance for the fi rst • Clean in the self-cleaning cycle only the parts time, or when the appliance has not been used listed in this Use &...
- Page 8 Important Safety Instructions Federal Communications Commission Radio Frequency Interference Statement (U.S.A. Only) This equipment generates and uses ISM frequency energy and if not installed and used properly, that is in strict accordance with the manufacturer's instructions, may cause interference to radio and television reception.
-
Page 9: Safety
Information You Need To Know About your oven on and off. It is normal for the exterior of the oven This Use and Care Guide is valuable: read it care- to be warm to the touch when cooking or reheating. fully and always save it for reference. - Page 10 Information You Need To Know About microwave cooking hamburgers. Large items like roasts must be • Arrange food carefully. Place thickest areas towards outside of dish. turned over at least once. • Rearrange foods such as meatballs halfway • Watch cooking time. Cook for the shortest through cooking both from top to bottom and amount of time indicated and add more as from the center of the dish to the outside.
- Page 11 Information You Need To Know About utensils and coverings for microwave cooking It is not necessary to buy all new cookware. Many pieces already in your kitchen can be used successfully in your Convection Microwave Oven. The chart below will help you decide what utensils and coverings should be used in each mode.
- Page 12 A microwave-safe thermometer will assist you in determining correct doneness and assure you that foods have been cooked to safe temperatures when using microwave-only cooking. Electrolux is not responsible for any damage to the oven when accessories are used.
-
Page 13: Features
Features Oven features & options 1. Standard cooking 8. Fast preheat • Bake 9. Convection convert • Broil 10. Fresh cleaning • Perfect-Convect ™ convection bake Minimum & maximum control settings • Perfect-Convect ™ convection roast • Perfect-Convect ™ convection broil Feature Min. - Page 14 Features Oven control display & keys 11. Perfect-Pair™ oven key pads Minimum & maximum time settings • Microwave upper oven • Sure-2-fi t™ Lower oven Feature Min. time Max. time 12. User preferences Timer 1 1 min 11 hr 59 min The following options are available under User Timer 2 1 min...
- Page 15 Features Microwave convection oven features & options 17. Popcorn Auto Bake Sensor Cook Auto Cook Auto Defrost 18. Auto cook 1 Bundt Cake 1 Ground Meat 1 Pizza 1 Ground Meat 19. Fast bake 2 Cookies 2 Baked Potato 2 Beverage 2 Steak / Chops / 20.
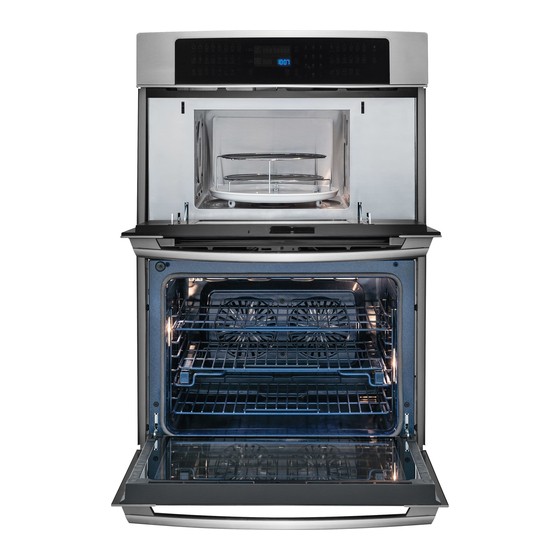
- Page 16 Features Your oven features Your oven features include: 1. Glass touch control panel. 2. Stainless steel micro-wave upper oven interior. 3. Micro-wave convection fan (hidden). 4. Micro-wave oven ventilation. 5. Full-width door with tinted window glass. 6. Large metal door handles. 7.
-
Page 17: Getting Started
Getting Started Setting clock at power up Timers You will be prompted to enter the time of day in the The two timers provided with the oven control event of a power failure or when you fi rst provide serve as extra reminders in the kitchen. When a timer reaches less than 1 minute the display will electric power to your appliance. -
Page 18: Control Lock & Oven Lights
Getting Started Changing settings Control lock Software controls the micro and lower ovens The control lock will lock the oven controls and the so that both may be set to operate at the same lower oven door. Once locked, the lower oven light time with unique settings. -
Page 19: Settings For Best Results
Setting for Best Results Lower oven rack supports & Tilt the lower part of the rack support toward the cavity wall, as shown below. oven vents Installing Oven Rack Supports Always install oven rack support before turning on the oven (when the oven is cool). To install oven rack support, insert the two top prongs of the support into the two upper holes in the cavity wall, as shown below. - Page 20 Setting for Best Results Lower oven racks Removing Sliding Oven Racks Replacing Sliding Oven Racks 1. With the rack in its closed position; grasp the To replace the oven racks, follow the instructions rack and the sliders at once. above in reverse order. 2.
-
Page 21: Setting Microwave Controls
Setting Microwave Controls Time cooking Manual defrost Your Microwave Oven can be programmed for If the food that you wish to defrost is not listed on 99 minutes 59 seconds (99.59). Always enter the the Defrost chart (page 26) or is above or below seconds after the minutes, even if they are both the limits in the "Amount"... -
Page 22: Sensor Modes
Setting Microwave Controls Sensor Modes Covering Foods: Some foods cook better when covered. Use the The sensor is a semi-conductor device that detects cover recommended in the food charts. the vapor (moisture and humidity) emitted from the 1. Casserole lid. food as it heats. - Page 23 Setting Microwave Controls Sensor Cook chart Food Amount Procedure 1. Ground Meat 0.25 - 2.00 lb Use this setting to cook ground beef or turkey as patties or in a casserole to be added to other ingredients. Place patties on a microwave-safe rack and cover with wax paper.
-
Page 24: Popcorn
Setting Microwave Controls Popcorn Auto Cook Your oven has convenient pads to assist with You can cook popcorn by touching a quick pad meal preparation. The Auto Cook settings will (popcorn). You don't need to calculate cooking automatically compute the correct cooking time time or power level. - Page 25 Setting Microwave Controls Auto Cook chart Food Amount Default Procedure 1. Pizza 1 - 6 slices 1 slice Use this setting to reheat refrigerated leftover pizza, 1 slice is (6 - 8 oz) approximately 1/8th of a 12-inch pizza or 1/12th of a 16-inch pizza.
-
Page 26: Auto Defrost
Setting Microwave Controls Auto Defrost Auto Defrost automatically defrosts all the foods NOTES found in the Auto Defrost chart below. • Suppose you want to defrost a 2.0 pound steak. 1. To defrost other food or foods above or below Example the weights allowed on the Defrost chart, use time and 30% power. -
Page 27: Auto Reheat
Setting Microwave Controls Auto Reheat • Suppose you want to heat 2 fresh rolls or muffins. The auto reheat pad includes two different way of reheating your favorite meals. Example The sensor reheat detects the vapor (moisture and Step Press humidity) emitted from the food as it heats. -
Page 28: Convection Cooking
Setting Microwave Controls This section gives you specific convection cooking Preheat and Cook with instructions and procedures. Convection The oven should not be used without the turntable in place, and it should never be restricted so that it Your oven can be programmed to combine cannot rotate. - Page 29 Setting Microwave Controls Convection Broil Use convection broil setting for steaks, chops, NOTES chicken pieces and many other foods. Only actual cooking time is entered; the temperature is set at 450˚F and cannot be changed. The oven will reach the broil temperature in 7 to 10 minutes depending on temperature of room •...
-
Page 30: Auto Cooking
Setting Microwave Controls Auto Bake auto bake automatically bakes cakes, brownies, NOTES muffins and French fries. • Suppose you want to bake a bundt cake. Auto Bake can be programmed with More/Less Example Time Adjustment. See corresponding section. Step Press 1. - Page 31 Setting Microwave Controls Auto Roast auto roast automatically roasts chicken, turkey, NOTES turkey breast or pork. • Suppose you want to roast a 2.5 pound chicken. 1. Auto Roast can be programmed with More/Less Example Time Adjustment. See corresponding section. Step Press 2.
- Page 32 Setting Microwave Controls Auto Broil auto broil automatically broils hamburgers, chicken NOTES pieces, steaks and fish steaks. • Suppose you want to broil 2 hamburgers. 1. Auto Broil can be programmed with More/ Example Less Time Adjustment. See corresponding section. Step Press 2.
-
Page 33: Preheat- Slow Cook
Setting Microwave Controls Preheat Slow Cook Your oven can be programmed to preheat. This slow cook is preset at 300˚F for 4 hours. The feature is preset at 350˚F. The temperature can be temperature can be changed to below 300˚F. The changed to from 100˚F to 450˚F. -
Page 34: Fast Cooking
Setting Microwave Controls Fast Cooking To Cook with Fast Cooking This oven has two pre-programmed settings that • Suppose you want to bake a cake for 25 minutes make it easy to cook with both convection heat and on fast bake. microwave automatically. - Page 35 Setting Microwave Controls Add 30 Seconds More or less time adjustment add 30 seconds provides a convenient way to extend Should you discover that you like any of the Sensor cooking time by 30 seconds while the oven timer is Modes, Auto Cook, Auto Reheat or Auto Defrost counting down.
-
Page 36: Fast Preheat
Setting Lower Oven Controls About fast preheat Use the fast preheat option on single rack NOTE baking to quickly bring the lower oven to baking temperature. You may press CANCEL at any time when The fast preheat option may be set with the setting the control or during the cooking process. -
Page 37: Bake
Setting Oven Lower Controls About baking in lower oven If your recipe requires a different baking temperature than the auto-suggested (default) temperature (example below shows lower oven Use the bake feature to cook most food items that temperature set for 425°F/ 218°C): require normal cooking temperatures. -
Page 38: Using Cook Time
Setting Lower Oven Controls Using cook time in lower oven Adding a cook time when baking is benefi cial when See example below to set the lower oven for bake, a recipe requires a specifi c temperature and period starting immediately with preheating to the auto- of time to cook. -
Page 39: Setting Lower Oven Controls
Setting Lower Oven Controls Using cook time with end time in lower oven See example below to set the lower oven with Adding a cook time along with a specifi c end time preheating for bake at 375°F (176°C) for 50 gives the same benefi... -
Page 40: Broil
Setting Lower Oven Controls Broiling in lower oven Setting broil Use the broil feature to cook meats that require See example below to set broil for the lower oven direct exposure to radiant heat for optimum starting immediately with the auto-suggest (default) browning results. - Page 41 Setting Lower Oven Controls Setting broil Insert The broil pan insert (if equipped) contains slots that allows grease from the meat to drain into the broil pan. Place prepared meat on broil pan insert and then place onto broiler pan as shown -Fig. 1-. Recommended broiling times Use the broiling table -Fig.
-
Page 42: Convection Bake
Setting Lower Oven Controls About convection bake Setting convection bake Convection bake is part of the Perfect-Convect³™ The following temperature settings apply to the system. Convection bake uses a fan to circulate conv bake feature: the oven heat evenly and continuously. The •... -
Page 43: Using Convection Convert
Setting Lower Oven Controls Using convection convert Setting convection convert The conv convert option allows you to convert any See the example below to set conv bake, starting normal baking recipe using the convection bake immediately with the auto-suggest (default) setting feature. -
Page 44: Convection Roast
Setting Lower Oven Controls About convection roast Setting convection roast How convection roast works See example below to set convection roast to start immediately with the auto-suggest (default) setting: Convection roast is part of the Perfect-Convect³™ system. Convection roast combines a cook cycle Example with the convection fan and element to rapidly roast meats and poultry. - Page 45 Setting Lower Oven Controls Roasting recommendations Roasting rack instructions When preparing meats for convection roasting, you Roasting rack may use the broiler pan, insert and the roasting rack supplied with your appliance. The broiler pan will catch grease spills and the insert will help prevent grease splatters.
- Page 46 Setting Lower Oven Controls About the probe function Checking the internal temperature of your food is IMPORTANT the most effective way of insuring that your food has been properly cooked. When cooking meat such as roasts, hams or poultry you can use the •...
- Page 47 Setting Lower Oven Controls Setting the probe See the example below to set the probe target By the default, your oven will adjust to the warm temperature to180°F/82°C when using the oven setting once the probe has reached the set convection roast feature with oven set temperature temperature.
-
Page 48: Convection Broil
Setting Lower Oven Controls About convection broiling Setting convection broil Convection broiling is part of the Perfect- See example below to set conv broil for the lower Convect³™ system. Use the conv broil feature oven to start immediately with the auto-suggest to cook thicker cuts of meats that require direct (default) setting. -
Page 49: Keep Warm
Setting Lower Oven Controls About keep warm Setting keep warm Use the keep warm feature to keep hot foods See example below to set warm oven for the lower warm. Keep warm may be set with the following oven to start immediately with the auto-suggest options: (default) setting. -
Page 50: Slow Cook
Setting Lower Oven Controls About slow cook Setting slow cook The slow cook feature may be used to cook foods See the example below to set a slow cook on Lo. more slowly at lower oven temperatures. The cooking results will be like that of a Slow Cooker or Example Crock-Pot. -
Page 51: Perfect Turkey
Setting Lower Oven Controls About Perfect Turkey™ Setting Perfect Turkey™ Heated air circulates around the turkey from all Perfect Turkey is designed to cook the poultry to sides, sealing injuices and fl avors. Poultry cooked the set internal temperature using the probe. The with this feature are crispy brown on the outside default oven temperature of 325°F is the optimal while staying moist on the inside. -
Page 52: Defrost
Setting Lower Oven Controls About defrost About dehydrate Use the defrost feature to thaw small portions of The dehydrate feature dries with heat from the delicate items such as cream cakes, frozen cream elements. The heat is circulated throughout the pies and cheesecake at room temperature. -
Page 53: Bread Proof
Setting Lower Oven Controls Setting dehydrate Setting bread proof See example below to set bread proof for For best results 85°F/30°C. Example • Dry most fruits and vegetables at 140°F. Dry Step Press herbs at 100°F. • Drying times vary depending on the moisture 1. -
Page 54: My Favorites
Setting Lower Oven Controls About my favorite Recalling a favorite You may store up to 3 of your most frequently used The example below shows how to recall a favorite heat settings and cooking times, for the lower oven. cooking instruction. These keys will light in the display when they are available for setting or recalling. -
Page 55: Multi Stage
Setting Lower Oven Controls Perfect Program™ multi stage Multi stage will allow you to program up to 3 stages Example for 2 stages of cooking. Each stage may be programmed with a cooking feature, set temperature and a cook time. Step Press Multi stage is ideal when you want to add a keep... - Page 56 Setting Lower Oven Controls Setting multi stage See the example to program a multi stage feature Example for 3 stages for a casserole. For stage 1, bake at 350°F for 1 hr. For stage 2, to brown, broil for at 500°F for 4 Step Press minutes.
-
Page 57: Setting Sabbath Mode
Setting Lower Oven Controls Sabbath mode It is recommended that any oven temperature This appliance provides special settings for use modifi cation made within an active Sabbath mode when observing the Jewish Sabbath/Holidays. This be followed with 2 presses of the START key. This mode will turn off all audible tones or visual display will insure the oven remains ON even if an attempt changes normally provided by the oven control. - Page 58 Setting Lower Oven Controls Setting Sabbath mode Canceling Sabbath mode The example below shows setting the oven to The example below shows how to cancel the observe the Sabbath (and Jewish holidays). Sabbath mode. Example Example Step Press Step Press 1.
-
Page 59: Setting Your Preferences
Setting Your Preferences User preferences Setting clock display The clock display mode allows you to turn the key controls options for preferences. The clock display on or off. display will show a digital abbreviation and a value for every preference each time a key is pressed See the example below to change the clock display one at a time. -
Page 60: Setting 12 Or 24 Hour Mode
Setting Your Preferences Setting 12 or 24 hour mode Changing between F° or C° The clock display mode allows you to choose Your control has the ability to display and set Fahrenheit or Celsius temperatures. The factory between 12 and 24 hour mode. The factory preset preset temperature display is Fahrenheit. -
Page 61: Setting 12Hr Energy Saving Mode
Setting Your Preferences Setting 12hr energy saving Setting audio mode mode The audio mode allows you to control the audio for the oven control. You may turn the audio off and The oven control has a factory preset built-in 12 later return to operating with all the normal audible hour energy saving feature that will shut off the sounds and alerts. -
Page 62: Adjusting Oven Temperature
Setting Your Preferences Factory default reset Adjusting oven temperature User preference offset You may choose to restore your factory settings. This will erase all settings or favorites that you Your appliance has been factory calibrated and have saved. tested to ensure an accurate baking temperature. See the example below to reset your control. -
Page 63: User Preferences Chart
Setting Your Preferences User preferences chart The following chart will help you navigate through the user preferences. User Preferences Options Preference 1st option 2nd option Setting clock Clock display 12 or 24 hour mode F° or C° 12hr energy save mode Audio mode User Programmable Offset Reset to factory... - Page 64 Lower Oven Self-Clean Before starting self-clean A self-cleaning oven automatically cleans with high temperatures that are well above those used for normal cooking. The self-clean feature eliminates During the self-clean cycle, the outside of the soils completely or reduces them to a fi ne appliance can become very hot to the touch.
-
Page 65: Lower Oven Self-Clean
Lower Oven Self-Clean Setting fresh clean Setting delayed fresh clean The clean feature provides 3 different choices for You may wish to set your appliance to perform a self-cleaning the lower oven. Set the clean for lite self-clean cycle sometime later (up to 12 hours (2 hrs), med (3 hrs) or heavy soils (4 hrs). -
Page 66: Lower Oven Care & Cleaning
Lower Oven Care and Cleaning Cleaning Recommendations Surface Type Cleaning Recommendation • Aluminum (trim pieces) & vinyl Use hot, soapy water and a cloth. Dry with a clean cloth. • Painted and plastic control knobs For general cleaning, use hot, soapy water and a cloth. -
Page 67: Oven Door Removal
Lower Oven Care and Cleaning Cleaning Recommendations Surface Type Cleaning Recommendation • Porcelain enamel broiler pan and insert (if Gentle scouring with a soapy scouring pad will equipped) remove most spots. Rinse with a 1:1 solution of clear water and ammonia. If necessary, cover •... - Page 68 Lower Oven Care and Cleaning The oven door with Luxury- Hold™ hinges • To prevent possible burns, do not attempt to remove the oven door until the oven has completely cooled. • To avoid possible injury to hands when removing or replacing the oven door, follow the instructions below carefully and always hold the oven door with hands positioned away from the door hinge area...
- Page 69 Lower Oven Care and Cleaning The oven door with Luxury- Hold™ hinges To replace the Lift-Off oven door 1. Firmly grasp the oven door along both sides just below the door handle. When positioning the door hinge arms with the door hinge slots in the oven frame, you may wish to use your knee to stabilize the door before attempting to insert the door hinge arms in the hinge slots -Fig.
-
Page 70: Changing Oven Lights
Lower Oven Care and Cleaning Special door care instructions Changing lower oven lights IMPORTANT Most oven doors contain glass that can • Be sure the appliance is unplugged and all break. Read the following recommendations: parts are COOL before replacing oven light. Wear a leather-faced glove for protection •... -
Page 71: Microwave Care & Cleaning
Microwave Care and Cleaning Disconnect the power cord before cleaning or leave the door open to inactivate the oven during cleaning. Exterior Waveguide Cover Clean the outside with mild soap and water; rinse and The waveguide cover is made from mica so requires dry with a soft cloth. - Page 72 Solutions to Common Oven Problems Before you call for service, review the following list. It may save you time & expense. The list includes common occurrences that are not the result of defective workmanship or materials in this appliance. Before you call Problem Solution •...
-
Page 73: Solutions To Common Problems
Solutions to Common Oven Problems Before you call Problem Solution Soil not completely removed after • Failure to clean bottom, from top of oven, frame of self-cleaning cycle is completed oven or door area outside oven seal. These areas are not in the self-cleaning area, but get hot enough to burn on residue. - Page 74 Solutions to Common Oven Problems Baking problems For best cooking results pre-heat the oven when baking cookies, breads, cakes, pies or pastries, etc. There is no need to preheat the oven for roasting meats or baking casseroles. The cooking times and temperatures needed to bake a product may vary slightly from your previous appliance.
-
Page 75: Microwave Service Call Check
If "NO" is the answer to any of the above ques- NOTE tions, please check electrical outlet, fuse and/ or circuit breaker. If they are functioning prop- erly, CONTACT YOUR NEAREST ELECTROLUX If time appearing in the display is counting AUTHORIZED SERVICER. down very rapidly, check Demonstration Mode and cancel. - Page 76 Notes...
- Page 77 Notes...
- Page 78 Notes...
-
Page 79: Warranty
Major Appliance Warranty Information Your appliance is covered by a one year limited warranty. For one year from your original date of purchase, Electrolux will repair or replace any parts of this appliance that prove to be defective in materials or workmanship when such appliance is installed, used, and maintained in accordance with the provided instructions. - Page 80 www.electrolux-store.com...
Need help?
Do you have a question about the EW30MC65PS and is the answer not in the manual?
Questions and answers