
Subscribe to Our Youtube Channel
Related Manuals for SHOWTEC Indigo 4600


Summary of Contents for SHOWTEC Indigo 4600
- Page 1 Indigo 4600 ORDERCODE 41385 Highlite International B.V. Vestastraat 2 6468 EX Kerkrade The Netherlands Phone: +31 45-5667700...
- Page 2 Congratulations! You have bought a great, innovative product from Showtec. The Showtec Indigo 4600 LED brings excitement to any venue. Whether you want simple plug-&-play action or a sophisticated DMX show, this product provides the effect you need. You can rely on Showtec, for more excellent lighting products.
-
Page 3: Table Of Contents
Showtec Showtec Indigo 4600 LED Product Guide ™ Warning ............................................2 Safety Instructions .................................... 2 Operating Determinations ................................4 Rigging ....................................... 4 Return Procedure ..................................... 6 Claims ......................................... 6 Description of the device ...................................... 7 Overview ......................................8 Backside......................................8 Installation ........................................... -
Page 4: Warning
Your shipment includes: • Showtec Indigo 4600 LED with Volex IEC powercable 1,5m • 2 brackets for truss mounting • Safety cable •... - Page 5 If your Showtec device fails to work properly, discontinue use immediately. Pack the unit securely (preferably in the original packing material), and return it to your Showtec dealer for service.
-
Page 6: Operating Determinations
Operating Determinations • This device is not designed for permanent operation. Consistent operation breaks will ensure that the device will serve you for a long time without defects. • The minimum distance between light-output and the illuminated surface must be more than 1 meter. •... - Page 7 Mounting a clamp to the underside of the Indigo moving head Clamp Eye for safety-cable Unlocked Locked Improper installation can cause serious damage to people and property ! Connection with the mains Connect the device to the mains with the power-plug. Always pay attention, that the right color cable is connected to the right place.
-
Page 8: Return Procedure
Return Procedure Returned merchandise must be sent prepaid and in the original packing, call tags will not be issued. Package must be clearly labeled with a Return Authorization Number (RMA number). Products returned without an RMA number will be refused. Highlite will not accept the returned goods or any responsibility. Call Highlite 0031-455667723 or mail aftersales@highlite.nl and request an RMA prior to shipping the fixture. -
Page 9: Description Of The Device
The Showtec Indigo 4600 LED is a moving-head with high output and great effects. The Indigo 4600 is the successor of the very popular Indigo 4500. It has a revolutionary new optical system which gives the Indigo 4600 20% more light output with half the LED power (30W). -
Page 10: Overview
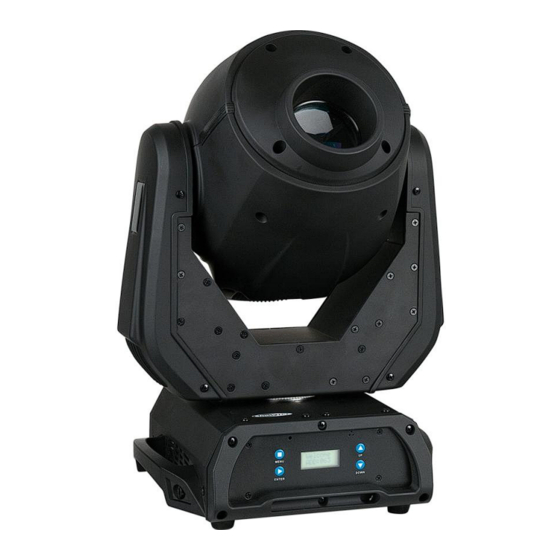
Overview Fig. 1 1) Lens 2) Menu Buttons + LCD Display Backside Fig. 2 On/Off 4) Volex IEC power connector + Fuse 3,15A / 250V DMX signal connector (IN) 5-pin DMX signal connector (OUT) 5-pin DMX signal connector (OUT) 3-pin DMX signal connector (IN) 3-pin... -
Page 11: Installation
Installation Remove all packing materials from the Indigo 4600 LED. Check that all foam and plastic padding is removed. Connect all cables. Do not supply power before the whole system is set up and connected properly. Always disconnect from electric mains power supply before cleaning or servicing. -
Page 12: Multiple Indigo"S (Dmx Control)
Multiple Indigo’s (DMX Control) 1. Fasten the effect light onto firm trussing. Leave at least 0,5 meter on all sides for air circulation. 2. Always use a safety cable. Use a 3-p XLR cable to connect the Indigo‟s and other devices. Link the units as shown in (figure 4), Connect a DMX signal cable from the first unit's DMX "out"... -
Page 13: Fixture Linking
Fixture Linking You will need a serial data link to run light shows of one or more fixtures using a DMX-512 controller or to run synchronized shows on two or more fixtures set to a master/slave operating mode. The combined number of channels required by all the fixtures on a serial data link determines the number of fixtures the data link can support. -
Page 14: Control Panel
The Indigo 4600 LED can be operated with a controller in control mode or without the controller in stand- alone mode. Control Panel Fig. 5 A. LCD Display D. Up Button B. MENU button E. Down Button C. ENTER Button Control Mode The fixtures are individually addressed on a data-link and connected to the controller. -
Page 15: Menu Overview
Menu Overview You first have to create a step and press enter. then the rest of the menu will appear... -
Page 16: Main Menu Options
Main Menu Options 1. Address DMX Addressing With this menu you can set the DMX address. 1) Press Menu, until the display shows: Address 2) Press enter to open this menu. You can choose 512 different DMX addresses. Use the Up / Down buttons to select the required address from 000 - 512. 3) Once you have set the desired DMX address, press the enter button to store your DMX address. -
Page 17: Settings
3. Settings With this menu you can set the Settings of the Indigo. 1) Press Menu, until the display shows: Settings 2) Press enter to open this menu. You can choose 4 different submenus. Page 15 Page 16 Page 16 Page 16 3.1 Performance / Settings Menu 1) Press Menu, until the display shows: Settings... -
Page 18: Range
PT Speed: Pan/Tilt movement Speed Pan Inv: For Normal/Inverted Pan control Tilt Inv: Normal/Inverted Tilt control OP Speed: Slow/Fast Optics Speed Black D: Instant: Immediate blackout when using Pan/Tilt. Delay: 3 seconds delay before blackout when using Pan/Tilt Dimmer: DIM1, DIM2, DIM3, DIM4, OFF When DIMMER is set to OFF, then RGBW and MASTER DIMMER are linear. -
Page 19: Runmode
4. Runmode With this menu you can set the different run modes for the Indigo. 1) Press Menu, until the display shows: Runmode 2) Press enter to open this menu. You can choose 3 different submenus. 4.1 Run DMX Active With this menu you able to control the device by DMX. - Page 20 Built-in Programs Mode With this menu you can select 5 different Programs when using the Indigo. 1) Press Menu, until the display shows: Runmode 2) Press Enter and use the Up/Down buttons to go to the Run menu. 3) Press enter to open this menu. Scroll through the menu until the display shows Auto1, Auto2, Sound1, Sound2 or Custom.
-
Page 21: Edit
4.2. Edit With this menu you are able to set a wide variety of special settings. You first have to create a Step and press enter. Then the entire Menu will appear 1) Press Menu, until the display shows: Runmode 2) Press Enter, until the display shows: Edit 3) Press Enter and then create a Step and press enter. -
Page 22: Manual
4) Once you have set Yes, the device will perform a full reset and it will take 15 seconds to reset. 5.2 DMX Value With this menu you are able to manually set, control and adjust the Indigo 4600. 1) Press Menu, until the display shows: Manual... -
Page 23: Service
6. Service 6.1 Access Mode 1) Press Menu, until the display shows: Service 2) Press Enter and use the Up/Down buttons until the display shows: Access menu. 3) Press Enter to open this menu. Use the Up / Down buttons to select Settlock or Servlock. Settlock: access the settings Menu (Yes or No) Servlock access the service menu (Yes or No) 4) Press Enter to open one of these menus. -
Page 24: Dmx Channels
DMX Channels 14 Channels (Person 1) Channel 1 – Horizontal movement (Pan) Push the slider up, in order to move head horizontally (PAN). Gradual head adjustment from one end of the slider to the other (0-255, 128-center). The head can be turned by 540° and stopped at any position you wish. –... - Page 25 Channel 8 – Rotating Gobo-wheel + Gobo Shake 0-10 Open / White 11-20 Glass Gobo 1 21-30 Glass Gobo 2 31-40 Metal Gobo 3 41-50 Metal Gobo 4 51-60 Metal Gobo 5 61-70 Metal Gobo 6 71-80 Metal Gobo 7 81-95 Gobo Shake 7 from slow to fast 96-110...
-
Page 26: Channels (Person 2)
190-199 Sound 2 (activated after 5 seconds) 200-219 Reset (activated after 5 seconds) 220-235 No Function 236-239 DIM 0 (activated after 5 seconds) 240-243 DIM 1 (activated after 5 seconds) 244-247 DIM 2 (activated after 5 seconds) 248-251 DIM 3 (activated after 5 seconds) 252-255 DIM 4 (activated after 5 seconds) When CH14 is set between 236-255, CH 12 (Dimmer) must also be used, for the DIM functions to work... - Page 27 Channel 5 – Rotating Gobo-wheel + Gobo Shake 0-10 Open / White 11-20 Glass Gobo 1 21-30 Glass Gobo 2 31-40 Metal Gobo 3 41-50 Metal Gobo 4 51-60 Metal Gobo 5 61-70 Metal Gobo 6 71-80 Metal Gobo 7 81-95 Gobo Shake 7 from slow to fast 96-110...
-
Page 28: Channel Settings
3. Mechanically moving parts like axles, eyes and others may not show any traces of wearing. 4. The electric power supply cables must not show any damages or material fatigue. The Showtec Indigo 4600 LED requires almost no maintenance. However, you should keep the unit clean. Otherwise, the fixture‟s light-output will be significantly reduced. -
Page 29: Replacing A Fuse
Replacing a Fuse Power surges, short-circuit or inappropriate electrical power supply may cause a fuse to burn out. If the fuse burns out, the product will not function whatsoever. If this happens, follow the directions below to do Unplug the unit from electric power source. Insert a flat-head screwdriver into a slot in the fuse cover. -
Page 30: Glass Gobo Orientation
Gently lift up the gobo holder 10º and then gently pull out the gobo from its position. Fig. 9 8. Very carefully take the gobo out of the gobo holder with a pair of pliers. 9. Place the new gobo in the gobo holder. Carefully put the pinchcock back, gently press the pinchcock a little bit together. -
Page 31: Static Gobowheel, Rotating Gobowheel And Colorwheel
Response: Suspect three potential problem areas: the power supply, the lamp, the fuse. 1. Power supply. Check that the unit is plugged into an appropriate power supply. 2. The LEDs. Return the Indigo 4600 LED to your Showtec dealer. 3. The fuse. Replace the fuse. See page 27 for replacing the fuse. -
Page 32: No Response To Dmx
No Response to DMX Response: Suspect the DMX cable or connectors, a controller malfunction, a light effect DMX card malfunction. 1. Check the DMX cable: Unplug the unit; change the DMX cable; then reconnect to electrical power. Try your DMX control again. 2. -
Page 33: Product Specification
Product Specification Model: Showtec Indigo 4600 LED • Input Voltage: 100~240VAC...47/63Hz • Power consumption: 120W max @FO • Fuse 3,15 A / 250V • Dimensions (LxWxH): 330 x 270 x 500 mm (LxWxH) • Weight: 9,5 kg Operation and Programming... - Page 34 : 80°C Cooling: axial fans Motor: high quality stepping-motor controlled by microprocessors Minimum distance: Minimum distance from flammable surfaces: 0.5m Minimum distance to lighted object: 1.3m Design and product specifications are subject to change without prior notice. Website: www.Showtec.info Email: service@highlite.nl...
Need help?
Do you have a question about the Indigo 4600 and is the answer not in the manual?
Questions and answers