Table of Contents
Advertisement
Quick Links
Advertisement
Table of Contents

Related Manuals for Bionet Cardio7-S


Summary of Contents for Bionet Cardio7-S
- Page 1 Cardio7-S Operation Manual Ver. 1.11 2017.01.13 www.ebionet.com...
- Page 2 Cardio7-S Operation Manual Warranty - This product was made through strict quality control and examination. The repair and compensation standards follow the consumer damage compensation regulations of the Ministry of Finance and Economy. - The warranty for this product runs for 1 year. (2 years in EU) But the warranty for accessories runs for 6 months.
- Page 3 • Fax: +82-2-6499-7789 • E-mail: Sales@ebionet.com Service@ebionet.com • URL: http://www.ebionet.com ※ In the event of a malfunction or failure, contact Service Dept. Of Bionet Co., Ltd. along with the model name, serial number, date of purchase and explanation of failure. 3/136 C7SOM-1.11...
- Page 4 Cardio7-S Operation Manual Fee-Based Service If you wish to make a claim when the product is damaged through misuse, we charge repair fees. Please read the manual before you make a claim. - For simple inspection without giving instruction Fee charged: From the...
- Page 5 Cardio7-S Operation Manual Definition of WARNING, CAUTIONS and NOTE In order to stress the contents of this manual, we define the terms as below. ⚫ Please follow the warning and cautions instruction. ⚫ The manufacturer or service agents are not responsible for damage resulting from inappropriate use or carelessness.
- Page 6 Cardio7-S Operation Manual Environment Instructions Please do NOT use or place the product in such environments explained below. Steamy environment. Do not use the Direct sunlight. product with wet hands. Place where the temperature and humidity condition are extreme...
- Page 7 Cardio7-S Operation Manual Safety Instructions for Electricity Please note the following precautions before using the product. • Is the power supply cord proper? (100 - 240V AC) • Is every cord connected properly to the product? • Is the grounding connected correctly? (Otherwise, noise can occur.) Classification.
- Page 8 Cardio7-S Operation Manual Safety Messages The following messages apply to the product as a whole. Specific messages may also appear elsewhere in the manual. WARNING: ACCIDENTAL SPILLS — If liquids enter a device, take the device out of service and have it checked by a service technician before it is used again.
- Page 9 DISPOSAL — At the end of its service life, the product described in this manual, as well as its accessories, must be disposed of in compliance with local, state, or federal guidelines regulating the disposal of such products. If you have questions concerning the disposal of the product, please contact bionet or its representative. CAUTION: EQUIPMENT DAMAGE —...
- Page 10 Cardio7-S Operation Manual Safety Symbols Symbols Contents ATTENTION : Consult accompanying documents Consult instructions for use: This symbol advises the reader to consult the operating instructions for information needed for the proper use of the device. Safety Sign : To signify that the instruction manual must be read.
- Page 11 Cardio7-S Operation Manual Symbols Contents Spirometry Connector Local Area Network(LAN) Connector Power Off Power On Battery Operation Indicator AC Power Connection Indicator Manufacturer name and address Authorized European representative Waste of electrical and electronic equipment must not be disposed as unsorted municipal waste and must be collected separately.
-
Page 12: Table Of Contents
Cardio7-S Operation Manual Contents Contents ..............12 Chapter 1. General Information ....... 15 2) Indication for use ..............15 1) Product Overview ..............16 2) Indication for use ..............16 3) Product Features ............... 17 4) Product Configuration .............. 18 Basic Components and Accessories ............ - Page 13 Cardio7-S Operation Manual FVC+(PRE-POST Bronchodilator Comparison) Test ........56 4) SVC(Slow Vital Capacity) TEST ..........59 5) MVV(Maximum Voluntary Ventilation) TEST ......64 6) Calibration ................. 69 7) System Setup ................74 Basic Setup ....................75 Network Setup .................... 81 Hospital Setup ....................
- Page 14 Cardio7-S Operation Manual 7) Data search ................122 Chapter 6. System Management ......123 1) Maintenance and Cleaning ..........124 2) Regular Check-up ..............125 3) Trouble Shooting ..............125 4) Manufacturer Declaration ............130 Chapter 7. Specification ......... 134 14/136 C7SOM-1.11...
-
Page 15: Chapter 1. General Information
Cardio7-S Operation Manual Chapter 1. General Information 1) Product Overview 2) Indication for use 3) Product Features 4) Product Configuration Basic Components and Accessories Body Configuration Spirometer Configuration Front Panel Control Panel Power 5) System Installation Precautions For Installation Power Connection... -
Page 16: Product Overview
Cardio7-S Operation Manual 1) Product Overview Cardio7-S is a Spirometer device capable of measuring and recording lung capacities of patients. Upon entering information on the patient, users can get not just lung capacity of patients measured by Cardio7-S, but also record of automatic detection of abnormalities, which Cardio7-S calculated using measurements and patient information. -
Page 17: Product Features
PC printer. - Unlike competitors’ mouthpieces (screen or turbine modules) which needs to be washed and disinfected after each use due to potential germ and bacteria growth, Cardio7-S’ mouthpiece uses patented SmarTube™ technology which is disposable and does not require such efforts by users. -
Page 18: Product Configuration
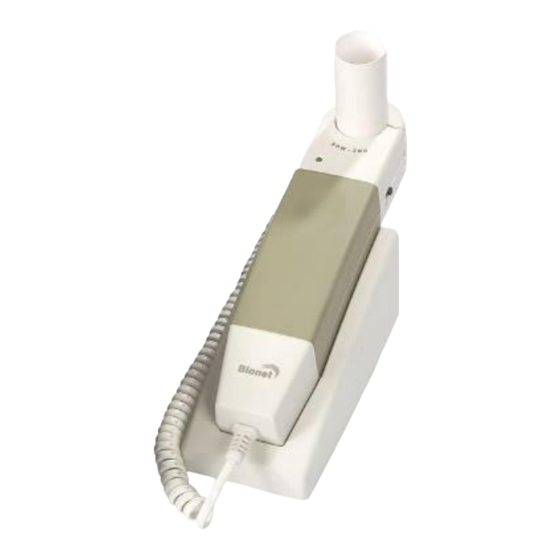
Cardio7-S Operation Manual 4) Product Configuration The Cardio7-S system consists of the items below. Unpack the package and check the items below are included. Also, be sure to check for any damage to the body and accessories. Basic Components and Accessories ▣... - Page 19 Cardio7-S Operation Manual ▣ Spirometer ③ ④ ① ⑤ ⑥ ⑦ ② ① Spirometer Handle (1 EA) ② Handle Dock (1 EA) ③ Disposable Mouthpiece (2 EA) ④ Nose clip (1 EA) ⑤ Mouthpiece Adapter (1 EA) ⑥ User Manual & Diagnosis Guide (1 EA) ⑦...
- Page 20 Cardio7-S Operation Manual ▣ Options ① ③ ② ④ ⑥ ⑤ ⑦ ① Battery (1 EA) ② Hanger (1 EA) ③ Cart (1 EA) ④ Disposable Sensor (100 EA) ⑤ Reusable Adaptor (2 EA) ⑥ PFT Filter (100 EA) ⑦ Calibration Syringe[3L] (1 EA)
-
Page 21: Body Configuration
Cardio7-S Operation Manual Body Configuration ▣ Top view ① ② ③ ④ ⑤ ① Handle ② Printer Cover ③ Printer Cover Switch ④ LCD ⑤ Control Panel 21/136 C7SOM-1.11... - Page 22 Cardio7-S Operation Manual ▣ Front View ① ① Printer Cover Switch ▣ Rear View ① ② ③ ④ ⑤ ⑥ ① Protective Ground Terminal ② Power Switch ③ AC Power Connection Port ( Fuse : 250V , 5A ( High breaking type )) ④...
- Page 23 ▣ Left Side View ① ① Handle ▣ Right Side View ① ① Patient Cable Connection Port NOTE To avoid an expected electric shock, do not open the equipment cover or disassemble the equipment. Refer servicing to Bionet, Inc. 23/136 C7SOM-1.11...
-
Page 24: Spirometer Configuration
Cardio7-S Operation Manual Spirometer Configuration ▣ Front part of spirometer handle Upper cover: Upper cover that fixes mouthpiece. Upper cover lock: Part that locks upper cover fixing the mouthpiece. Action lamp: Lamp showing action status (green) Connection conductor: Conductor connected to serial cable connection hole of serial cable in the back of the main body. - Page 25 Cardio7-S Operation Manual ▣ Left side of spirometer handle Upper cover: Upper cover that fixes mouthpiece. Upper cover lock: Part that locks upper cover fixing the mouthpiece. Connection conductor: Conductor connected to serial cable connection hole in the back of the main body.
- Page 26 Cardio7-S Operation Manual ▣ Right side of spirometer handle Upper cover: Upper cover that fixes the mouthpiece. Power switch: Switch that turns on or off the power. Connection conductor: Conductor connected to serial cable connection hole in the back of the main body.
- Page 27 Cardio7-S Operation Manual ▣ Back of the spirometer handle 1. Upper cover: Upper cover that fixes the mouthpiece. 2. Upper cover lock: Part that locks upper cover fixing the mouthpiece. 3. Power switch: Switch that turns on or off the power.
-
Page 28: Front Panel
Cardio7-S Operation Manual Front Panel Graphic Display Window Battery status Rotary key Button Power status During device boot up, you can see the system version and the company name. 28/136 C7SOM-1.11... - Page 29 Cardio7-S Operation Manual The following descriptions explain data on the graphic LCD. ① ② ③ ④ ⑤ ⑥ ⑦ ⑧ ⑨ ⑩ ① Display patient ID ② External connecting device display ③ Display battery status or AC power connection status ④...
-
Page 30: Control Panel
Cardio7-S Operation Manual Control Panel ① ② ③ ④ ▣ Button Change a view of the graphic display window to initial ① main window. ▣ LED A light indicator lets you know that the battery is on and shows your current battery charging status. A red light ②... -
Page 31: Power
Cardio7-S Operation Manual Power ▣ AC Power When AC Power is connected to the device, power LED light will be green; if the battery is installed, charging will commence. <AC Power> <Battery Power> ▣ Battery Power The device will get its power from the battery and the unit will display the battery power icon (shown above), when the system is powered on, the battery is connected to the device and the AC power is disconnected. -
Page 32: System Installation
Paper Installation - Push the printer cover release switch to the right to open the printer door of the Cardio7-S. Install recording paper with the side to be recorded appear on top. Close the cover to finish paper installation process Caution Do not use Cardio7-S in combination with any Electro-surgical equipment. -
Page 33: System Start
Cardio7-S Operation Manual System Start When every preference is set, the system version and the company name will be displayed when switched on, and then the initial menu selection will show on the screen as in the figure below. You can move to the main page of the chosen menu by touching the menu on the screen or rotating the key on the control panel. -
Page 34: Chapter 2. Installing Spirometer
Cardio7-S Operation Manual Chapter 2. Installing Spirometer 1) Connecting Spirometer Handle 2) Installing Mouthpiece 34/136 C7SOM-1.11... -
Page 35: Connecting Spirometer Handle
Cardio7-S Operation Manual 1) Connecting Spirometer Handle Spirometer handle should be connected to the main body by plugging in the end of its cable to serial input port in the main body (shown below) <Rear View> (1) Connect spirometer handle to main body while the power of the main body is off. - Page 36 Cardio7-S Operation Manual (2) Insert Mouthpiece into a groove made in open side (3) Close upper cover by giving it a little pressure on top Caution Mouthpiece is designed for single-use ⚫ Do not close cover while Lock Switch is pressed.
-
Page 37: Chapter 3. Using Spirometer
Cardio7-S Operation Manual Chapter 3. Using Spirometer 1) Start 2) Entry of Patient Information 3) FVC(Forced Vital Capacity) TEST FVC Test FVC+(PRE-POST Bronchodilator Comparison) Test 4) SVC(Slow Vital Capacity) TEST 5) MVV(Maximum Voluntary Ventilation) TEST 6) Calibration 7) System Setup... -
Page 38: Start
Cardio7-S Operation Manual 1) Start Turn on the switch on the main body and locate the selection box in the Spirometer area by turning the rotary key on the initial screen. Afterward, press the rotary key or touch the selection box in the Spirometer area to shift to Spirometer measurement mode. -
Page 39: Entry Of Patient Information
Cardio7-S Operation Manual 2) Entry of Patient Information The personal information of the patient must be entered before the pulmonary function test begins. Specifically, items such as “Age”, “Gender”, “Height” and “Race”, which are indicated as “*” in their input fields, must be entered because they are essential for the diagnosis of the pulmonary function. - Page 40 Cardio7-S Operation Manual 〈Patient Information Selection Mode〉 To activate the Information Input mode, locate the shaded block in the desired “Patient Information” area and press the rotary key. The information can be entered by using the rotary key or touching the desired area. The Entry Mode consists of the Keyboard mode, which enables the input of both characters and numbers, and the Key Pad mode, which enables the input of numbers only.
- Page 41 Cardio7-S Operation Manual 〈Keyboard〉 Entering Name Enter the name of the patient in the same way as in “ID” entry Entering Age After selecting “Age”, the number entry keypad titled “Edit Age”, as seen below, will appear. Press “OK” key, after entering patient’s age.
- Page 42 Cardio7-S Operation Manual Entering Gender If you press and turn the rotary key, while “Gender” is highlighted, the patient’s gender will alternate between “Male” and “Female”. Once selection is complete, you may turn the rotary key clockwise to move the cursor to “Height” entry space.
- Page 43 Normally barcode scanners are compatible with all products. However, because because of inconsistensies in barcode scanner manufacturers implementation of input methods, you need to verify the scanner is supported by Bionet. • Input methods supported by Bionet : International standards, USB •...
-
Page 44: Fvc(Forced Vital Capacity) Test
Cardio7-S Operation Manual 3) FVC(Forced Vital Capacity) TEST FVC Test Select “FVC” by turning the rotary key or touch. At this time, the patient information must be entered beforehand to ensure diagnosis based on the measured results. 44/136 C7SOM-1.11... - Page 45 Cardio7-S Operation Manual When you select the "FVC" menu, the screen shifts to the FVC Test screen following the test preparation process as shown in the figure below. 45/136 C7SOM-1.11...
- Page 46 Cardio7-S Operation Manual A message appears as shown below if the Spirometer handle is not connected or power is turned off on the handle. This message is also displayed in the same way during the SVC Test and MVV Test. At this time, touch “Exit” by hand or press it using the rotary key to go to the main menu and check the handle before resuming the test.
- Page 47 Cardio7-S Operation Manual The screen below appears, and FVC test measurement is ready if the Spirometer handle is connected normally. The measurement begins if the “Start” button is pressed and the patient begins to breathe into the mouthpiece. To ensure accuracy, measurement must be carried out exactly according to the procedure described below.
- Page 48 Cardio7-S Operation Manual How to breathe in times of FVC measurement < > 1) Take normal breaths three times or more. Prepare measurement by first taking normal breaths, which are recommended for achieving higher accuracy. 2) Inhale as much as possible (TLC level) Make sure the patient inhales as much air as possible regardless of speed.
- Page 49 Cardio7-S Operation Manual If the patient has any difficulties with breathing while performing aforementioned tasks, change the procedures as following. 1) Take normal breath at least once and then, 2) Inhale as much as possible, 3) Exhale as much as possible, 4) Inhale again.
- Page 50 Cardio7-S Operation Manual Result screen Press “Stop” button by using rotary key or touchscreen to signal the machine that measurement is finished. After pressing the button, the following screen showing the result of the measurement will appear. 50/136 C7SOM-1.11...
- Page 51 Cardio7-S Operation Manual < Result screen menu > ● New: The machine begins to take a new measurement. - This is used for starting another new test upon completion of measurement. If you click 'Yes,' the screen for a new measurement will appear as shown below; click 'Start' again to start.
- Page 52 Cardio7-S Operation Manual ● Print: It prints the measurement result. - It prints the measurement result in a graph and a chart. Note You should avoid connecting or disconnecting a USB device while printing out, as it could cause the printer module to rattle.
- Page 53 Cardio7-S Operation Manual ● Exit: It finishes measurement mode and returns to the main screen. - If you press “Yes” after finishing all measurements, the machine will show the main screen. At this time, select “Yes” to save the data, or “No” to cancel.
- Page 54 Cardio7-S Operation Manual (3) Once the saving process is complete, a message box asking whether the patient information is to be deleted appears. (4) The main screen of Spiro is displayed. NOTE The following messages will appear when the memory is full.
- Page 55 Cardio7-S Operation Manual - FVC Test Pint Form 55/136 C7SOM-1.11...
-
Page 56: Fvc+(Pre-Post Bronchodilator Comparison) Test
Cardio7-S Operation Manual FVC+(PRE-POST Bronchodilator Comparison) Test (1) “FVC+” enables the comparison of the results of the test performed twice before and after medicine is administered. The procedure is as follows: First, conduct the measurement according to the FVC test method, and then save the data. - Page 57 Cardio7-S Operation Manual (5) The test can be conducted in the same way as FVC by selecting “FVC+” menu. (6) The parameters and graphs of pre-administration (Base) and post-administration (Post) can be compared if the results of measurement are printed.
- Page 58 Cardio7-S Operation Manual - FVC+ Test Print Form 58/136 C7SOM-1.11...
-
Page 59: Svc(Slow Vital Capacity) Test
Cardio7-S Operation Manual 4) SVC(Slow Vital Capacity) TEST If you select “SVT” in the initial menu and press rotary key or touch the touchscreen, the machine will begin to take a “SVC” measurement. Make sure for the patient to put the mouthpiece into his or her mouth and take breaths in following manner as described below. - Page 60 Cardio7-S Operation Manual How to breathe in times of SVC measurement < > 1) Take normal breaths at least four times or more. If the machine senses four or more normal breaths, it beeps. 2) Exhale as much volume as possible to the end, slowly.
- Page 61 Cardio7-S Operation Manual If you breathe in above-mentioned order, a graph of breathing speed (F-T) appears first. If you take a small normal breath while taking a big breath according to step 2 to 3, a big graph would be re-drawn on screen.
- Page 62 Cardio7-S Operation Manual Once the measurement is finished, a graph(V-T) showing change in volume of lungs to passage of time is drawn like the screen shown below. Like in “FVC” test, there are three menus(“New”, “Print” and “Exit”) on the bottom of the screen with their functions remains the same.
- Page 63 Cardio7-S Operation Manual - SVC Test Print Form 63/136 C7SOM-1.11...
-
Page 64: Mvv(Maximum Voluntary Ventilation) Test
Cardio7-S Operation Manual 5) MVV(Maximum Voluntary Ventilation) TEST If you select “MVV” in the initial menu and press rotary key or touch the touchscreen, the following screen appears. Press “Start” to begin taking the first “MVV” measurement. 64/136 C7SOM-1.11... - Page 65 Cardio7-S Operation Manual Make sure for the patient puts the mouthpiece into his or her mouth, and then perform “MVV” measurement in the following manner. It is not possible to take an accurate “MVV’ measurement, unless the patient follows the instructions.
- Page 66 Cardio7-S Operation Manual How to breathe in times of MVV measurement < > 1) Begin to take measurement of vital capacity. 2) Instruct the patient to breathe as fast and much as possible. (MVV) 3) After a specified measurement time (T-MVV) has passed, the machine concludes the measurement, and shows the resulting values on the screen.
- Page 67 Cardio7-S Operation Manual If the patient performs “MVV” test following the above orders, Volume-Time graph would be drawn on the screen. The volume shown here is the result of adding amounts of inhaled and exhaled air. The measurement is automatically completed 12 seconds after the predetermined duration of measurement (T-MVV), and the results are displayed on the screen.
- Page 68 Cardio7-S Operation Manual - MVV Test Print Form 68/136 C7SOM-1.11...
-
Page 69: Calibration
Cardio7-S Operation Manual 6) Calibration Select ’CAL’ from the sub-menu and press the Rotary key, or tab to the ’CAL’ field to see the Calibration Main menu screen as below. 69/136 C7SOM-1.11... - Page 70 Cardio7-S Operation Manual Calibration should be conducted in the following order: Violation of order might cause error in measurement. 1) Connect conductor of measurement part of spirometer to the main body. 2) Connect the mouthpiece installed in the spirometer handle to mouth of syringe.
- Page 71 Cardio7-S Operation Manual Calibration Correction can be made by pressing the “Start” button once you are ready for correction. The screen below appears if the syringe handle is moved back and forth. To ensure accurate correction, move the handle only after a beeping sound is heard.
- Page 72 Cardio7-S Operation Manual A graph as the visual representation of flow and volume will be drawn along the movement of the syringe. The results of previous volume measurement and error (%) will be displayed on the screen as shown below if the syringe makes the round trip 5 times.
- Page 73 Cardio7-S Operation Manual - Calibration Print Form 73/136 C7SOM-1.11...
-
Page 74: System Setup
Cardio7-S Operation Manual 7) System Setup System Setup menu is used to set up device-related details. From the initial screen of Spirometer, select ‘SETUP’ by using Rotary switch or tab. Ststem Setup menu consists of Basic Setup, Network Setup, Hospital Setup, Spiro Setup, Calibration Setup and Service Setup and you can change the setting at each window. -
Page 75: Basic Setup
Cardio7-S Operation Manual Basic Setup When choosing Basic menu at the left side of the Setup page, you will see the page for Basic Setup. Basic Setup consists of Date, Time, Touch screen, Start Option, Unit, Date Type and Device Name menus. - Page 76 Cardio7-S Operation Manual Touch Setup This is a menu to set up the coordinates of the touchpad. When selecting the 'Touch' menu at the Basic Setup page, setup page will disappear and the coordinates for setting calibration will appear as shown below. Follow the instructions shown on the screen, and then the coordinates will be set up.
- Page 77 Cardio7-S Operation Manual Language As shown below, when selecting 'Language menu at the Basic Setup page, you can choose the language among English, French, German, Italian, Korean, Polish, Portuguese, Rumanian, Russian, Spanish and Turkish. Select the language you want to use and click the OK button and then you can use the service in the chosen language.
- Page 78 Cardio7-S Operation Manual Start Option You can set up the index page shown at the time of initial boot up, according to the common dialog. When clicking the ‘Start Option’ button, a small menu window will appear and you can select the initial page you want to have among MAIN, FILE, WORKLIST, ECG, SPIRO.
- Page 79 Cardio7-S Operation Manual Units This menu is to select the units for height and weight of the patient. When you click ‘Units’ button, cm/kg or Inch/Lbs will be shown. If you select Inch/Lbs unit, the patient’s height information will be expressed in *** Ft (Feet) *** Inch.
- Page 80 Cardio7-S Operation Manual Date Type As seen in the figure below, the date format for printout can be selected by choosing 'Date Type' from the Basic Setup menu. Choose the date format to be used, and then click the 'OK' button; the selected date format is seen on the output.
-
Page 81: Network Setup
Cardio7-S Operation Manual Network Setup When connecting the equipment with LAN to interface with the outside PC, network setup is needed. Network IP is required and DNS is not used. When selecting the Network menu at the left side of the System Setup page, Network Setup page will show up at the right side. - Page 82 Then, input the information required and press 'OK' button to save or 'ESC' to cancel the information. The server interlocking device can be selected as BMS Server of Bionet or PACS Server. After selecting the type of interlocking server, select the 'Setting' button; an appropriate setup window to the choice of server will be displayed.
- Page 83 Cardio7-S Operation Manual BMS Server Setting IP setup on BMS Server-installed PC can be performed by choosing either Automatic IP (DHCP) or Fixed IP (Manually) in 'Configure’ setup. If ‘DHCP’ is chosen, the IP of the BMS Server-installed PC will be shown on the input box.
- Page 84 Cardio7-S Operation Manual PACS Server Setting When selecting the PACS Server, the additional information should be set through the Settings Menu. The screen for related settings such as the AE Title, IP and Port of Cardio7, Worklist Server and Store Server will appear.
- Page 85 Cardio7-S Operation Manual When successful, the “Verify : Success” message will appear; when it has failed, “Verify : C-Echo Failed” will appear. Set the PACS option by pressing the More button when connection to the server is confirmed. Spiro Exam Code Enter the Exam Code of FVC, SVC and MVV for the Spiro test.
- Page 86 Cardio7-S Operation Manual Data Range The range of dates when the worklist is brought can be set at the Worklist Server. You can choose appropriate one from the options such as “Today,” “Yesterday,” “Tomorrow” and “One Week”. Auto Update Worklist If you tick the Auto Update Worklist, the Worklist update will be run automatically whenever you enter the Worklist screen.
- Page 87 Cardio7-S Operation Manual Data Format Set the data format for the file to be transferred to the PACS Server. You can select either “JPEG,” “PDF” or “RAW” after checking the format supported by the PACS Server. Retry Count Select the number of Retransmission attempts when a communication error occurs during transfer of data to the PACS Server.
- Page 88 Cardio7-S Operation Manual Character Set By selecting the Character Set, multiple selections of language are available; it should be selected according to the character set in order to present contents such as patient information by language when transferring a DICOM file to the PACS Server.
- Page 89 Cardio7-S Operation Manual Wireless Network Setting 1) Connect the USB wireless LAN card to the USB port of Cardio7, and check whether or not the wireless icon ( ) appears in the Status bar on the top of the screen.
- Page 90 Cardio7-S Operation Manual Refresh : AP re-searching << : Page up >> : Page down Connect : Attempting to connect Close : Closing the window 4) Select the AP to be connected by using the rotary key or touching.
- Page 91 Cardio7-S Operation Manual 5) After clicking the Key Value input line by using the rotary key or touching, enter the security key. 6) Upon the completion of input, click the "OK" button; Connection will be attempted and the message describing the connection status will appear.
-
Page 92: Hospital Setup
Cardio7-S Operation Manual 9) When connection with the AP is successful, set the Device IP, Subnet Mask, Gateway, etc. by selecting manually or Configuring with DHCP. Refer to the Network Setup part of the User Manual for more details. Note It is recommended to use English for the name of the AP wireless network (SSID). -
Page 93: Spiro Setup
Cardio7-S Operation Manual SPIRO Setup When selecting the ‘SPIRO’ menu at the left side of the Setup page, Spiro Setup page will show up at the right side. Formula The ‘Formula’ is the diagnosis standard when executing a FVC test, therefore, after selecting the ‘Formula’, it is required to select one menu among ‘Morris’, ‘Knudson’,... - Page 94 Cardio7-S Operation Manual Extrapolation The ‘Extrapolation’ function decides if the extapolated volume is printed in the FVC test. You are able to select ON/OFF by using the touch or rotary key. 1-second forced vital capacity is calculated at the point of 1 second from the start.
- Page 95 Cardio7-S Operation Manual Set the 'FVC' graph format ‘FVC Graph” is used to set the 'FVC' graph format. If it will be set up as 'All', the all graphs of three times test are printed. And if it will be set up as 'BEST", the best one graph of three times test are printed.
- Page 96 Cardio7-S Operation Manual The settings for the Post inspection In case of the FVC inspection, all details of the drug test could be set. If it is set up as ON, the post inspection could be executed and if it is set up as OFF, the post inspection is not going to be executed.
-
Page 97: Calibration Setup
Cardio7-S Operation Manual Calibration Setup When selecting the ‘CALIB’ menu at the left side of the Setup page, Calibration Setup page will show up at the right side. When selecting items such as Pressure, Humidity, Temperature and Syringe Size by using Rotary switch or tabbing, the number keypad input window will appear. -
Page 98: Service Setup
‘User Security Set’ and ‘Manufacture Set’ will appear. At ‘User Security Set’ setup, it is possible to change Factory Setting and User Password. At ‘Manufacture Set’ setup, it is possible to change Upgrade and Device Options; please contact the Bionet Service Center. 98/136 C7SOM-1.11... - Page 99 Cardio7-S Operation Manual Factory(Reset Settings) In order to reset to factory conditions, press the ‘Factory’ button and enter the Password. Reset will proceed, with the message below appearing on the LCD screen for 1 second. The initialized values are as follows.
- Page 100 Cardio7-S Operation Manual Grid Rec Form 3ch + 3 Paper Size Print Line Normal Beat Form Rhythm II, V1, V5 Base Filter For ENG and KOR language, ‘60Hz’ AC Filter For other languages, ‘50Hz’ Low Pass Filter 150Hz EMG Filter...
- Page 101 Cardio7-S Operation Manual Data Erase All data in Files and Worklist will be deleted. 101/136 C7SOM-1.11...
- Page 102 Cardio7-S Operation Manual Change PW User Password can be configured. User Password is the number entered for Factory and Data Erase. The password should be a 4-digit number. NOTE The default User Password is ‘1234’. If you forget the password, enter ‘1234’ and reset.
-
Page 103: Chapter 4. Spiro File Management
Cardio7-S Operation Manual management Chapter 4. Spiro file 1) Display and function 2) Data printing 3) Data deleting 4) System Setup 5) Switching menu 6) Patient information 7) Data Search 8) Data transfer 9) Data import 103/136 C7SOM-1.11... -
Page 104: Display And Function
Cardio7-S Operation Manual 1) Display and function ⓛ ② ③ ④ ⑤ ⑥ ⑦ ⑧ ⑨ ⑩ ① Page information - For example, [1/20] means that you see the first page among total 20 pages. 1 Page contains 24 lines Data. -
Page 105: Data Printing
Cardio7-S Operation Manual ⑦ Button to print out the chosen saved data ⑧ Button to delete the data ⑨ Button to set up the environment of ‘File Management’ ⑩ Button to move to other main screen from ‘File Management’ At the initial file management page, the first data of the list has the focus. The... -
Page 106: Data Deleting
Cardio7-S Operation Manual 3) Data deleting When pressing the ‘Delete’ button, a small pop-up menu will show up. You can choose to press the ‘select’ or ‘all’ button. When you press the ‘Select’ button, one data will be deleted, but if you press the ‘All’... -
Page 107: System Setup
Cardio7-S Operation Manual 4) System Setup When clicking the ‘Setup’ button at the ECG data file management page, you will see a ‘System Setup’ window as shown below. ‘PAT Info.’ menu is to set up whether the patient information is retained or not, when you move the main screen of the Spiro. - Page 108 Cardio7-S Operation Manual When clicking the ‘Export’ button, you will see ‘Export’ window as shown below. When clicking the ‘Target’ button, a POP-UP window will show up and it will disappear when selecting one of PC or USB. - PC: To save the data in the PC connected with the equipment - USB: To save the data in the external USB Memory When clicking the ‘Method’...
-
Page 109: Switching Menu
Cardio7-S Operation Manual When clicking the ‘Format’ button, a line window will show up and it will disappear when selecting EKG/FVC/SVC/MVV, MFER(ECG), XML(ECG), JPEG, PDF. ‘Format’ menu is used to select the user’s options when transferring the data. - EKG/FVC/SVC/MVV: To save the data by type of ‘***.ekg' / ‘***.fvc' / ‘***.svc' / ‘***.mvv'... -
Page 110: Patient Information
Cardio7-S Operation Manual 6) Patient information When selecting a saved data at the Spiro file management page by using a rotary key or a touch screen, the focus will appear at the data list. Press the ‘Info’ button. Then you will see a ‘Patient Information’ window as shown below. -
Page 111: Data Search
Cardio7-S Operation Manual 7) Data search When clicking the ‘Search’ button at the Spiro data file management page, you will see a ‘Patient Search’ window as shown below. If you rotate the rotary key, the ‘search condition’ button will have focus. Press the ‘Find’ button after inputting the information about ID, Name, Date or Age. -
Page 112: Data Transfer
Cardio7-S Operation Manual 8) Data transfer You can transfer the saved data to the external device at the Spiro data file management page by using the ‘NETWORK’ key on the control panel. When pressing the ‘NETWORK’ key, a message will show up, asking which menu you want to select. -
Page 113: Data Import
Cardio7-S Operation Manual NOTE When transmitting multiple sets of data to PC after saving, a network error could occur which may cause transmission halt and subsequent loss of data. Therefore, it is recommended to transfer files immediately rather than aggregate a set of saved files. - Page 114 If 2 different USB memory devices are connected, a system message window prompting you to select one of them will appear. If the external device is not connected to Cardio7-S, the error message will be shown as below. If you select the ‘Selected’ menu in the ‘Import File List’ screen, after receiving the selected data from the external device a system message will be shown as below.
- Page 115 Cardio7-S Operation Manual If you select the ‘All’ menu in the ‘Import File List’ screen, a system message with progress speed will be shown as below. After receiving all data from the external device, a system message will be shown as below.
-
Page 116: Chapter 5. Spiro Worklist Management
Cardio7-S Operation Manual Spiro worklist management Chapter 5. 1) Display and function 2) Spiro Test 3) Data deleting 4) System Setup 5) Switching menu 6) Patient information 7) Data search 116/136 C7SOM-1.11... -
Page 117: Display And Function
Cardio7-S Operation Manual 1) Display and function ⓛ ② ③ ④ ⑤ ⑥ ⑧ ⑨ ⑩ ⑦ ① Page information - For example, [1/20] means that you see the first page among total 20 pages. 1 Page contains 24 Data. -
Page 118: Spiro Test
Cardio7-S Operation Manual ⑦ Go to test window for the requested choice of data ⑧ Button to delete the data ⑨ Button to set up the environment of ‘Worklist Management’ ⑩ Button to move to other main screen from ‘Worklist Management’... -
Page 119: Data Deleting
Cardio7-S Operation Manual 3) Data deleting When pressing the ‘Delete’ button, a small pop-up menu will show up. You can choose to press the ‘select’ or ‘all’ button. When you press the ‘Select’ button, one data will be deleted, but if you press the ‘All’... -
Page 120: System Setup
Cardio7-S Operation Manual 4) System Setup When clicking the ‘Setup’ button at the Spiro data worklist management page, you will see the ‘worklist System Setup’ window as shown below. Note The steps for Network, Hospital and Service Setting are identical with the steps for Spiro Main setting. -
Page 121: Switching Menu
Cardio7-S Operation Manual 5) Switching menu When selecting the Main button at the main page of the Spiro file management, a line window will show up. You can choose ECG or FILE to go to the chosen page. The patient’s information of selected data does not transmit, when moving to other main screen. -
Page 122: Data Search
Cardio7-S Operation Manual 7) Data search When clicking the ‘Search’ button at the Spiro data order management page, you will see a ‘Patient Search’ window as shown below. If you rotate the rotary key, the ‘search condition’ button will have focus. -
Page 123: Chapter 6. System Management
Cardio7-S Operation Manual Chapter 6. System Management 1) Maintenance and Cleaning 2) Regular Check-up 3) Trouble Shooting 4) Manufacturer Declaration 123/136 C7SOM-1.11... -
Page 124: Maintenance And Cleaning
Cardio7-S Operation Manual 1) Maintenance and Cleaning There are many ways to clean Cardio7-S, but it is best to use our recommendation to avoid damage or sanitary issues. The warranty does not cover problems resulting from the use of harmful substances (unauthorized substances). -
Page 125: Regular Check-Up
Cardio7-S Operation Manual 2) Regular Check-up Like every other medical product, Cardio7 requires a regular check-up once a year. Please refer to the service manual for the information on the check-up. 3) Trouble Shooting Printing was not successful: ⚫ The cover may not be closed properly. Please close the cover and print again. - Page 126 System message Cause Solution Please contact CS (Customer Please check Internal coin battery is Support) team of Bionet to date and time discharged. replace old coin type battery with new one When wrong network Address is not...
- Page 127 Cardio7-S Operation Manual There is no Access There wireless Point. Please Check AP and retry access point detected. check the AP Fail, connecting. When wireless AP - Press Retry button Do you want to connection is failed - Retry after checking AP...
- Page 128 Cardio7-S Operation Manual When file transmission to Retry after checking network Fail to send Image PACS store server has conditions failed When there is Fail to connect Connection failure Check network condition with Store Server between PACS PACS store server...
- Page 129 Cardio7-S Operation Manual - When the calibration time is exceeded React the calibration Fail : Time out!! - When the FVC test time React the FVC test is exceeded The breath When the test protocol Re-test with right test protocol of...
-
Page 130: Manufacturer Declaration
Cardio7-S Operation Manual 4) Manufacturer Declaration Electromagnetic compatibility_ Guidance and manufacturer's declaration Guidance and manufacturer’s declaration – electromagnetic emissions The Cardio7 is intended for use in the electromagnetic environment specified below. The customer or the user of the Cardio7 should assure that it is used in such an environment. - Page 131 Cardio7-S Operation Manual Guidance and manufacturer’s declaration – electromagnetic immunity The Cardio7 is intended for use in the electromagnetic environment specified below. The customer or the user of the Cardio7 should assure that it is used in such an environment.
- Page 132 Cardio7-S Operation Manual Guidance and manufacturer’s declaration – electromagnetic immunity The Cardio7 is intended for use in the electromagnetic environment specified below. The customer or the user of the Cardio7 should assure that it is used in such an environment.
- Page 133 Cardio7-S Operation Manual Field strengths from fixed transmitters, such as base stations for radio (cellular/cordless) telephones and land mobile radios, amateur radio, AM and FM radio broadcast and TV broadcast cannot be predicted theoretically with accuracy. To assess the electromagnetic environment due to fixed RF transmitters, an electromagnetic site survey should be considered.
-
Page 134: Chapter 7. Specification
Cardio7-S Operation Manual Specification Chapter 7. Dimension 47(W) x 200(H) x 34(D)mm, approx. 250g FVC: FVC, FEV1, FEV1/FVC, FEF 0.2-1.2L, FEF 25-75%, FEF 75-85%, PEF, FEF 25%, FEF 50%, FEF 75%, FIVC, FEV6, PEFT, FET 100%, FVL Error Code Measuring values... - Page 135 Cardio7-S Operation Manual WARRANTY Spirometer Product Name Cardio7 Model Name Type Name SPM-7 License Number License Date Serial Number Warranty period 1 year from the date of purchase Date of purchase (yyyy/mm/dd) Hospital: Address: Customer Name: Contact No: Seller’s Name Manufacturer’s...
- Page 136 Cardio7-S Operation Manual International Sales & service Bionet Co., Ltd. : 5F, Shinsegae I&C Digital Center 61 Digital-ro 31 gil, Guro-gu, SEOUL 08375, REPUBLIC OF KOREA Tel : +82-2-6300-6410 / Fax : +82-2-6499-7789 / e-mail: sales@ebionet.com Website: www.ebionet.com U.S.A sales & service representative Bionet America, Inc.
Need help?
Do you have a question about the Cardio7-S and is the answer not in the manual?
Questions and answers