Table of Contents

Subscribe to Our Youtube Channel
Related Manuals for Techly IDATA EX-HL41TY


Summary of Contents for Techly IDATA EX-HL41TY
- Page 1 1x4 HDMI Extender Splitter su CAT6/6a/7 40m 1x4 HDMI Extender Splitter over CAT6/6a/7 40m Manuale d’istruzione User’s manual IDATA EX-HL41TY www.techly.com - info@techly.com...
-
Page 2: Importanti Informazioni Sulla Sicurezza
1x4 HDMI Extender Splitter 1X4 HDMI EXTENDER SPLITTER Gentile Cliente Grazie per aver acquistato questo prodotto. Per ottenere il massimo delle prestazioni nella salvaguardia della sua sicurezza, le consigliamo di leggere con attenzione il presente manuale prima di collegare e mettere in funzione il prodotto. Tenga sempre a disposizione il presente manuale per ulteriori esigenze future. -
Page 3: Contenuto Della Confezione
1x4 HDMI Extender Splitter • Non collegare o scollegare i cavi di rete o i cavi IR quando la periferica è in uso; non confondere il trasmettitore HDMI con il ricevitore HDMI e il blaster IR con il ricevitore IR. • Alimentatore: DC 5V, utilizzare solo l’alimentatore fornito nella confezione. -
Page 4: Requisiti D'installazione
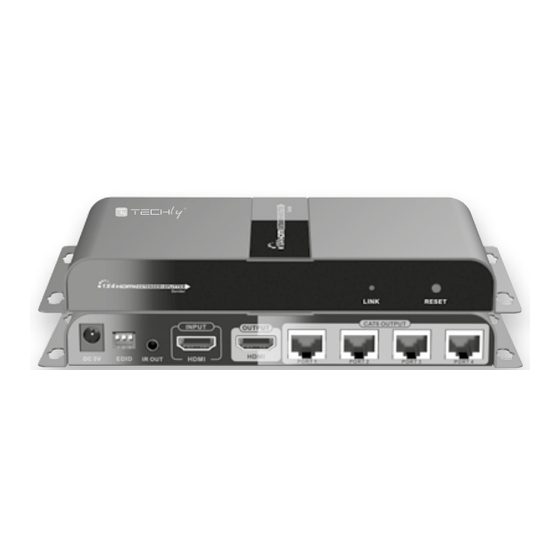
1x4 HDMI Extender Splitter REqUISITI D’INSTALLAZIONE 1. Periferica sorgente HDMI (scheda grafica computer, DVD, PS3, apparecchiature di monitoraggio HD, ecc..) 2. Schermi HDMI come SDTV, HDTV e proiettore con porta HDMI. 3. Cavi di rete: cavi di rete UTP/STP Cat6/6A/7, che rispondano allo standard EIA568B DESCRIZIONE DEL PANNELLO 1. Trasmettitore (TX) Ingresso alimentazione (DC5V) ➊ EDID dip switch ➋ Uscita segnale IR per il collegamento con il cavo prolunga del ➌... -
Page 5: Procedura Per L'installazione
1x4 HDMI Extender Splitter Osservazione: il tasto LENGHT è stato progettato per la commutazione tra la regolazione automatica e quella manuale per far fronte alle diverse lunghezze del cavo. Appena acceso, senza alcuna operazione, il dispositivo lavora con un set di parametri precedentemente memorizzati. Accendere quindi l’apparecchiatura e premere il tasto LENGHT. Dopo le prime due pressioni, passerà... - Page 6 1x4 HDMI Extender Splitter Osservazione: controllare remoto ricevitori contemporaneamente perchè questo può provocare delle interferenze. ISTRUZIONI PER LA CONNESSIONE 1) Connettere la sorgente di segnale HDMI alla porta HDMI di ingresso tramite un cavo HDMI. 2) Connettere l’IR blaster all’EXTENDER IR OUT. 3) Connettere la porta RJ45 del trasmettitore alla porta RJ45 di ingresso del ricevitore tramite un cavo di rete.
- Page 7 1x4 HDMI Extender Splitter q: Nessuna immagine o audio in uscita sullo schermo? A: 1) Verificare che il monitor non sia in modalità standby; 2) Verificare che il canale del segnale HDMI sul monitor sia conforme con la porta di ingresso HDMI; 3) Verificare che il led “LINK” sul ricevitore sia acceso, il led che lampeggia significa che non riceve alcun segnale dal trasmettitore;...
- Page 8 Contattate le autorità locali competenti per ottenere informazioni in merito allo smaltimento corretto della presente apparecchiatura. Con il marchio CE, Techly garantisce che il prodotto e ® conforme alle norme e direttive europee richieste.
-
Page 9: Important Safety Instruction
1x4 HDMI Extender Splitter 1X4 HDMI EXTENDER SPLITTER Dear Customer Thank you for purchasing this product. For optimum performance and safety, please read these instructions carefully before connecting, operating or adjusting this product. Please keep this manual for future reference. IMPORTANT SAFETY INSTRUCTION INTENDED USE We do not permit using the device in other ways like... -
Page 10: Package Contents
1x4 HDMI Extender Splitter • Do not mix up the HDMI sender and HDMI receiver, and the IR blaster and IR receiver. • Power supply: DC 5V, usage only the supplied power unit, do not use the power supply if it is damaged. Make sure the specification matched if using 3rd party DC adapters. INTRODUCTION This HDMI extender splitter includes one transmitter and four receivers, extends 1 HDMI source to 4 HDMI displays over single CAT6/6a/7 cable up to 40m. The highest resolution supported is 1920x1080@60Hz, and is supports IR pass back, EDID pass through and only one power adapter for the transmitter is needed, the receiver... -
Page 11: Installation Requirements
1x4 HDMI Extender Splitter INSTALLATION REqUIREMENTS 1. HDMI source device (computer graphics card, DVD, PS3, HD monitoring equipment, etc..) 2. HDMI display device like SDTV, HDTV and projector with HDMI port. 3. Network cables: UTP/STP Cat6/6A/7 networking cables, which following the standard of EIA568B PANEL DESCRIPTION 1. Transmitter unit (TX) Power input (DC5V) ➊... -
Page 12: Installation Procedures
1x4 HDMI Extender Splitter Remarks: the LENGTH key is designed for switching between automatic and manual setting to adjust the cable length. Powered on without any operation, extender works with parameter set and memorized before. Powered on and then press LENGTH key. The first two press, it will enter automatic mode to adapt cable length. The following 12 times of pressing, it will enter manual mode in 12 level to meet different cable length. After all 12 level of press, it will enter auto mode again and into next loop. -
Page 13: Connection Instruction
1x4 HDMI Extender Splitter CONNECTION INSTRUCTION: 1) Connect the HDMI signal source device to the Transmitter HDMI input port with HDMI cable. 2) Connect IR blaster to EXTENDER IR OUT. 3) Connect the Transmitter RJ45 port to HDMI EXTENDER RX’s RJ45 input port by network cable. 4) Connect HDMI EXTENDER RX’s HDMI output port to HDMI display’s HDMI input port by HDMI cable and set the HDMI display’s signal source to be HDMI port. 5) Supply the power (Power’s signal light is red when there are signal input then the power light is blue), the product will work. EDID SETTING 1) HDMI source device reads the EDID information of the transmitter (TX) and then output the relative HDMI signal format. -
Page 14: Specification
1x4 HDMI Extender Splitter q: N o image or audio output on display? A: 1) Please check whether display on standby mode; 2) Please check whether display HDMI signal channel in accord with HDMI input port; 3) Please check whether “LINK” LED on RX side keeps on, LED flash means RX does not receive signal from TX; 4) Check the link light on the TX side is normally on, ON when there is HDMI input signal, OFF when there is no HDMI signal. q: Image unstable ? A: 1) Please check the length button to adjust the length of the cable;... - Page 15 In compliance with EU Directive WEEE this product is marked with this symbol. It means that used electrical and electronic products should not be mixed with general household waste. There is a separate collections system for these products in compliance with WEEE directive, otherwise contaminative and hazardous substances can pollute the environment. With the CE sign, Techly ensures that the product is ® conformed to the basic European standards and directives.
- Page 16 www.techly.com...
Need help?
Do you have a question about the IDATA EX-HL41TY and is the answer not in the manual?
Questions and answers