Advertisement
Quick Links
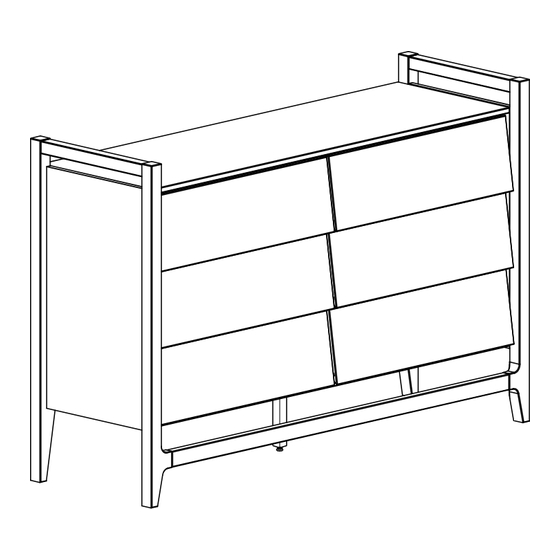
Item # : BR58OSW6D
Assembly Instructions
Please visit our website for the most current instructions, assembly tips, to report damage
or request parts. www.walkeredison.com
Revised 12/2022
P.1
Copyright © 2018, by Walker Edison Furniture Co., LLC, All rights reserved.
Advertisement

Related Manuals for Walker Edison BR58OSW6D


Summary of Contents for Walker Edison BR58OSW6D
- Page 1 Item # : BR58OSW6D Assembly Instructions Please visit our website for the most current instructions, assembly tips, to report damage or request parts. www.walkeredison.com Revised 12/2022 Copyright © 2018, by Walker Edison Furniture Co., LLC, All rights reserved.
- Page 2 Ensure that all parts and hardware are available before beginning assembly. Follow each step carefully to ensure the proper assembly of this product. III. Two people are recommended for ease in the assembly of this product. The three main types of hardware used to assemble this product are wood dowels, screws and bolts.
- Page 3 The side drawer with WARNING LABEL, should be mounted in highest drawer. Part# Description Part# Description Top panel 01 pcs Front drawer 06 pcs Side panel Right side drawer 02 pcs 06 pcs Top crossbeam Left side drawer 06 pcs 02 pcs Base Drawer bottom...
-
Page 4: Hardware List
Hardware List Ø8*40mm Wooden dowel Ø8*30mm Wooden dowel Ø8*20mm Wooden dowel Screw Ø4,0*40mm Ø4,0*30mm Screw Ø4,0*20mm Screw Screw Ø3,5*16mm Cam bolt Cam lock Ø15*09mm Ø8*8 Nail ‘’H’’ Profile 1390 mm Screw Ø7,0*50mm CB 10 Hex key Foot support Wall anchor Washer Ø6mm Tape measure and hammer... - Page 5 Step 1 Please assemble on a clean soft surface to avoid damage. Insert wood dowel (B) into parts (1, 4, 5, 12, 13). Ø8*30mm Step 2 Attention to the dowel size: Ø8*20mm Please assemble on Insert wood dowel (C) a clean soft surface into part (8,9).
- Page 6 Step 3 Insert wood dowel (A) Please assemble on into part (2). a clean soft surface to avoid damage. Ø8*40mm Step 4 Use screw (E,) to a ach parts (3) to part (16, 18), with Phillips head screwdriver. Ø4,0*30mm...
- Page 7 Step 5 Heads up: 05 holes up Use screw (E,) to a ach parts (2) to part (18). with Phillips head screwdriver. Please assemble on a clean soft surface to avoid damage. Ø4,0*30mm Step 6 Heads up: 05 holes up Please assemble on a clean soft surface to avoid damage.
- Page 8 Step 7 Please assemble on a clean soft surface to avoid damage. Use screw (E) to a ach part (17) to part (2), with Phillips head screwdriver. Ø4,0*30mm making it the right side (20). Use screw (M) to a ach parts (17) to part (3) whit Ø7,0*50mm cb 10 Hex Key (M)
- Page 9 Step 9 Insert cam bolt (H) to part (20, 21). with Phillips head screwdriver. Please assemble on a clean soft surface to avoid damage. Step 10 NOTE: The extra holes in part (8) should face the top of parts (20,21) Use screw (F) to a ach part (8) to parts (20, 21) with Phillips head screwdriver.
- Page 10 Step 11 Use screw (F) to a ach part (9) to part (5) with Phillips head screwdriver. NOTE: The extra holes in part (5) should face the top of parts (20,21) Ø4,0*20mm Step 12 Put protection so that no damage occurs Use screw (D) to a ach part (4) to part (5) with Phillips head screwdriver.
- Page 11 Step 13 Use screw (E) to a ach parts (1) to part (5) with Phillips head screwdriver. Ø4,0*30mm Step 14 Put protection so that no damage occurs Secure parts (1) to part (20). Insert cam locks (I) into part (1) and ghten with a phillips head screwdriver.
- Page 12 Step 15 Use screw (E) to a ach part (7) to part (20) with a phillips head screwdriver. Ø4,0*30mm Step 16 Secure parts (1)to part (21). Insert cam locks (I) into part (1) and ghten with a phillips head screwdriver Ø4,0*30mm Use screw (E) to a ach part (7) to part (21) ghten with a phillips head screwdriver A ach part (4) to part (21) with a phillips head screwdriver...
- Page 13 Put protection so that no damage occurs Step 17 Use the screw (L) to a ach the foot support (O) to the center foot (10). Use the hex key (N) for this. Ø7,0*50mm cb 10 Put protection so that no damage occurs Step 18 Use screw (G) to a ach part (10) to part (4) Ø3,5*16mm...
- Page 14 Put protection so that no damage occurs Step 19 Name and address of the supplier and date of production. Place the profile (K) between the panels and secure back panel (6) with part (J) and hammer. 1390mm Ø8*8mm Step 20 FRONT Insert wood dowel (B) into the front hole in the drawer rails (8 &...
- Page 15 Put protection so that no damage occurs Step 21 Atach parts (12,13) to part (11), with screws(E) and philips head screwdriver. Ø4,0*30mm Put protection so that no damage occurs Step 22 Insert panel (14) into parts (12, 13). Secure part (15) to part (12, 13) with a phillips head screwdriver.
- Page 16 Put protection so that no damage occurs Step 23 The assembled drawer with this warning must be placed on top of the unit. Insert wood dowel (A) on the inside of all drawers, with the drawer inside the unit, a er having passed the wood dowel that is in the runner.
- Page 17 Step 24 WARNING Serious or fatal injuries can occur from furniture tipping over. To prevent the furniture from tipping over we recommend that it is permanently fixed to the wall. Wall anchor and hardware are included with this product. Please make sure hardware is suitable for your walls before installing, as different wall materials may require different types of anchors.
- Page 18 Step 25 Assembly Complete! Maintenance Guide To maintain long term performance and easy gliding of your solid wood drawers, we recommend applying wax to the wooden guide rails. 1. Bee's wax is recommended or Paraffin wax from a standard candle can be used. 2.
Need help?
Do you have a question about the BR58OSW6D and is the answer not in the manual?
Questions and answers