Advertisement
Quick Links
Advertisement

Subscribe to Our Youtube Channel
Summary of Contents for Yellowtec hush
- Page 1 & Operations Manual version 1...
-
Page 2: Table Of Contents
Content Safety Instructions First steps Hardware – hush Front Panel Hardware – hush Rear Panel Hardware – hush Remote Modes Software – hush Firmware Software – hush App Block Diagrams hush & hush + Examples of Use Declarations of Conformity... -
Page 3: Safety Instructions
OnAir signaling. hush + comes with additional control functions over your mic signal like a mute function. With 12dB up to 75dB pre-amplification, hush + ensures first-class sound! Whenever we speak of hush( + ) in this manual, both models hush and hush + are being addressed. Safety instructions! Notes on proper use! Read this manual carefully before using any hush device. -
Page 4: First Steps
To use hush without your computer, use a certified 5V power supply. When using hush for the first time, connect it to your PC or Mac via USB-C and open the hush App. It will prompt you to specify which type of m!ka OnAir Mic Arm you are using. Specify whether it is an older model with a red OnAir indicator or the current model with a dual-color OnAir indicator (red/white). -
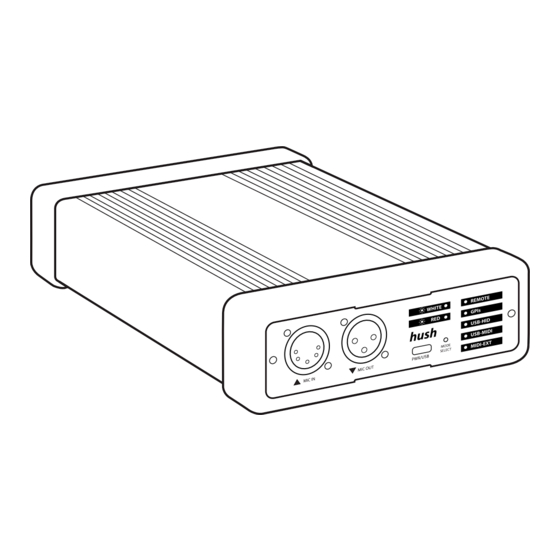
Page 5: Hardware - Hush Front Panel
See page 10. See page 10. computer. *The fronts of the hush and hush + models differ in the logo print. Another difference is that hush provides a Mic Out, while hush + is equipped with a Line Out. Front panel details 5-pin XLR female A m!ka OnAir Mic Arm, for example, can be connected to the 5-pin XLR. - Page 6 With hush, the unchanged audio signal with microphone level is present here. With hush + , on the other hand, a pre-amplified line signal is available here, which can also be mu- ted (MUTE function). With hush + , the preamplification of +12..75dB, 48V phantom power and the high-pass filter can be set via the hush App.
- Page 7 The Mode Select is used to set the operating mode. The Mode Select Switch on the front panel can be operated with a paper clip or similar to adjust your selected mode to control hush directly on the device. Alternatively, you can set the mode in the hush App available at: www.yellowtec.com/hush/downloads.
-
Page 8: Hardware - Hush Rear Panel
The litt CONTROL output is suitable for controlling a Yellowtec litt Signaling Device. For details check www.yellowtec.com/litt. When the function RED is active, no matter if triggered by GPI, MIDI event, hush App or hush Remote, the CONTROL output switches to +12V. The current carrying capacity is limited to 60mA maximum. - Page 9 If WHITE and RED are connected to GND at the same time, RED gets priority and the RED function becomes active. MUTE : A connection to the GND pin mutes the audio signal of hush + . This input has no function on the hush...
-
Page 10: Modes
Optionally, a wired remote control can be connected to the USB-C on the back of the hush( + ). Then this mode has to be set and the functions of the two buttons of the remote control are: OnAir Button In idle mode, the button is lit white and the audio of the hush+ is muted (MUTE). - Page 11 The MIDI preset contains a predefined set of MIDI events which are assigned to the functions RED / WHITE / MUTE (ON / OFF). If a corresponding MIDI event is sent to the hush( + ) in the DAW software, the corresponding function is triggered.
- Page 12 MIDI setup. External MIDI controllers or keyboards can be connected via the 5-pin MIDI socket on the rear of the hush(+). To be able to use these to control the functions RED / WHITE / MUTE, this mode must be set.
- Page 13 The hush App is a desktop application for Windows and macOS for setting, testing and updating a hush( + ) device. In the hush App you can choose your desired mode to control your hush or hush + device. To determine the currently active Mode, please select the tab STATUS in the hush App.
- Page 14 MIDI presets will be loaded from the device into the software automatically. The hush App can only be connected to one hush( + ) device at a time. To manage multiple devices at the same time, the hush App must be opened multiple times.
- Page 15 App Footer Menu: left side The version of the hush App is displayed at the bottom left. If an update is available and the info is enabled in the settings, an update info icon is displayed next to the version.
- Page 16 Test In the USB HID / Test mode the soft keys Red, White and (with hush + ) Mute are enabled. With the help of the buttons, the corresponding function can be triggered for test purposes, e.g. to check the correct cabling of the device.
- Page 17 In addition to red light control, the hush+ model also allows you to control your microphone signal. Using hush+, you will find several settings in the PREAMP tab of the hush App. Make use of them to optimize your mic signal.
- Page 18 If you want to control hush via USB-MIDI or EXT-MIDI, you will find various configuration options in the hush App. To access them, select the tab MIDI SETUP. There you can add your own profiles or select one of the stored MIDI profiles, e.g. the HUI protocol.
- Page 19 SAVE: SAVE opens the dialog for saving the hush App MIDI preset in YMP format. Any storage location and file name can be assigned. The name of the preset in the display field is independent see below.
- Page 20 RED, WHITE, MUTE For the functions RED ON | OFF, WHITE ON | OFF, (and hush+) MUTE ON | OFF there are additional EDIT buttons, which open an extra input field. In this input field you will find the current MIDI event for the corresponding function.
- Page 21 / firmware. Update The firmware of the hush( + ) hardware can be updated via the update dialog. If only one device is connected, the file selection dialog opens directly. Here the hush.yfi, i.e. the firmware file must be selected.
- Page 22 Unicode. After renaming, a restart of the hardware is required. Restart If it should be necessary to restart the hush( + ) by software there is a button for it. Normally it should not be necessary to restart the device via software.
- Page 23 Update info icon: If update info is required, the hush App must be able to reach the update server over the network. For this it may be necessary to specify a proxy server. Ask your administrator or IT support, if you do not know the data.
- Page 24 Block Diagram hush Block Diagram hush The block diagram below shows you the functional structure of the model hush. Please note that your microphone signal is passed through completely unaffected when using hush. A mute func- tion, for example, is not provided in this variant.
- Page 25 Block Diagram hush + Block diagram hush + The block diagram below shows the functional structure of the hush+ device. In contrast to hush, hush+ offers you control options for your microphone signal. hush+ comes with a high-quality microphone preamp. It offers you various options optimizing and controlling your mic signal, e.g.
-
Page 26: Examples Of Use
PC workstation for red light control. Use the mode “USB- MIDI“ and connect hush via USB to your PC or Mac. This setup allows you to control the OnAir indicator of your m!ka Mic Arm directly from your PC. As soon as you start a recording in your DAW software, the OnAir indicator on your mic arm will be activated simultaneously. - Page 27 Comfortably integrate your hush or hush+ device into your MIDI infrastructure via plug‘n‘play to control it via MIDI hardware. You can use any MIDI device for this purpose. hush gets you maximum flexibility for integrating the OnAir signaling into your individual MIDI environment. If you need to make adjustments to your hush‘s default MIDI preset, use the hush App.
- Page 28 Select the GPIs to integrate hush into the already existing red light logic of your system (red / white / mute). Besides controlling the OnAir signal at your m!ka Mic Arm, hush optionally also allows you to control the LED signal of Yellowtec‘s litt Signaling Device. For example, install litt from the outside next to your studio door to show everyone around that you are currently OnAir and do not want to be disturbed.Find more info about litt at www.yellowtec.com/litt.
- Page 29 EC Declaration EU Declaration of Conformity According EC Directive 2014/30/EU (EMC - Directive) We, Yellowtec GmbH, Heinrich-Hertz-Str. 3, 40789 Monheim, Germany herewith declare in sole responsibility that the products hush + OnAir Controller (Product Code: YT3902) hush OnAir Controller (Product Code: YT3903)
- Page 30 UKCA Declaration UK Declaration of Conformity According to Electromagnetic Compatibility Regulations 2016 We, Yellowtec GmbH, Heinrich-Hertz-Str. 3, 40789 Monheim, Germany herewith declare in sole responsibility that the products hush + OnAir Controller (Product Code: YT3902) hush OnAir Controller (Product Code: YT3903)
- Page 31 Commission‘s requirements. Manufacturer‘s Signature: April 2023, Reinhard Gallos, Product Manager Responsible Party‘s Signature: April 2023, Hanno Mahr, CEO Yellowtec GmbH...
- Page 32 Manual v1 www.yellowtec.com/hush shop.yellowtec.com Manufactured by Yellowtec GmbH, Heinrich-Hertz-Str. 3, 40789 Monheim, Germany...
Need help?
Do you have a question about the hush and is the answer not in the manual?
Questions and answers