Advertisement
INTRODUCTION
The IZYMO™ LED dimmer receiver io is a radio micromodule designed for controlling and dimming a LED lighting. It can be installed in the flushmounted box behind the wall switch, in a derivation box or at the light source level. It can be controlled via an io-homecontrol radio transmitter, via TaHoma and/or via any simple or double push-button wall switch.

This micromodule is designed for LED lightbulbs and resistive loads.
COMPATIBILITY
Light sources

This micromodule is adapted for dimmable LED lightbulbs.
| Type of load | Power range |
| 220-240V 50Hz dimmable LED lightbulbs | 0-100W |
| 12/24V LED or halogen spot lights with trailing-edge-compatible dimmable electronic transformer | 0-100W |
| Trailing-edge dimmable LED driver for LED strips | 0-100W |
| 220-240V non-dimmable LED lightbulbs | 0-100W, in ON/OFF mode only |
| Resistive loads (incandescent and halogen) | 0-150100WW |
| 12/24V LED or halogen spot lights with dimmable ferromagnetic transformer | Not compatible |
| Dimmable fluo-compact | Not compatible |
Tips for an enhanced user experience:
- Use only one type of light source, and make sure to use the same brand and same reference if you have several lightbulbs.
- Use preferably a lightbulb from our compatibility list.
List available by scanning the QR code below:
![]()

Wall fixtures (types of wall switch)
- Any single push-button
- Any double push-button
- Without any wall fixture. Controlled using only one or more io transmitters.

Not compatible with the push buttons with indicator light, the rocker switches, the rotary knob dimmers and the wall switches with integrated dimmers.
io-homecontrol transmitters
- IZYMO™ transmitter io
- Smoove Lighting io (in mode 2)
- TaHoma
- Connexoon io
- Nina
- All the io-homecontrol remote controls (incl. Situo Variation io)
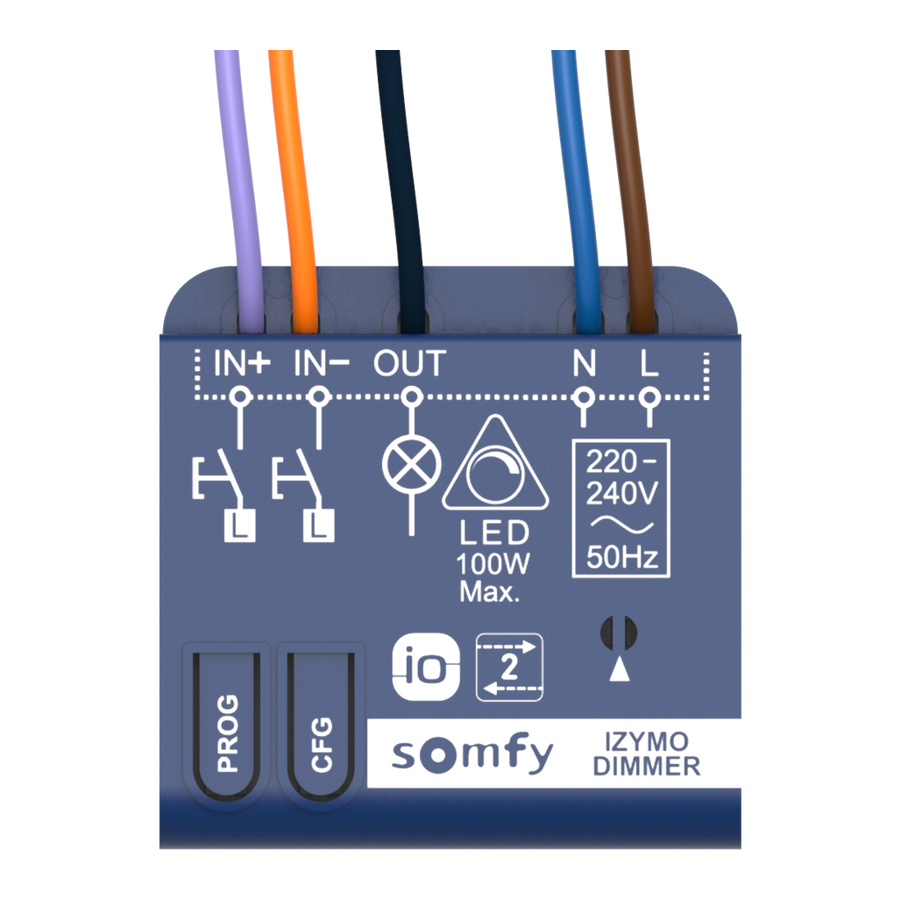
DESCRIPTION

| Designation | Cable | Mark |
| Input + (IN+) | Violet | A |
| Input - (IN-) | Orange | B |
| Output (OUT) | Black | C |
| Neutral power supply N | Blue | D |
| Live power supply L | Brown | E |
| Multi-coloured LED | - | F |
| PROG button (association) | - | G |
| CFG button (configuration) | - | H |
Use the IN+ input OR the IN- input if you connect the receiver to a single push-button.
Use the IN+ input AND the IN- input if you connect the receiver to a double push-button. In this case, the push-button wired to the IN+ input dims the light in the MAX direction and the push-button wired to the IN- input dims the light in the MIN direction.
INSTALLATION
Before installing, switch the mains power supply off at the electrical panel.
Connect the product in accordance with the electrical installation standards and directives in force in the country in which the appliance is being installed.
The IZYMO™ LED dimmer receiver io must be supplied with a mains The wires of inputs IN+ and IN- are not isolated from the mains. voltage of 220-240V AC, 50Hz with the live and neutral. It can be installed in:
- The flush-mounted box behind the wall switch (min. 50 mm depth or with a micromodule pocket) if both the live and neutral are available:

- The flush-mounted box in the ceiling above the lamp:

- A junction box:


WIRING & USAGE
- Wiring with one or several single push-buttons in parallel


not connected
Unconnected wires must be insulated using an insulating terminal lug.
| Action on the wall switch | Action on the load |
| Short press | OFF / Last Operating Value |
| Press and hold | Dim to MIN or MAX value NB: dimming in the opposite direction as the previous order (wired or radio) |
| Double short press | ON 100% |
- Wiring with a double push-button


| Action on the wall switch | Action on the load |
| Short press | On « + » button: Last Operating Value On « - » button: OFF |
| Press and hold | On « + » button: dim to MAX value On « - » button: dim to MIN value |
| Double short press | - |
- Wiring without any wall fixture:


not connected
Unconnected wires must be insulated using an insulating terminal lug. It is possible to use the same terminal lug to connect the IN+ and IN- inputs.
In this case, please consult the "Resetting the dimming range" part in the "SET-UP" section to set the right MIN and MAX values without using any push-button.
Nb. Within the 3 options above (A, B and C), the IZYMO™ LED dimmer receiver io can also be controlled with io remote controls, including the UP/MY/DOWN remote controls:
| Action on UP/MY/DOWN io remote control (i.e. Situo 1 & 5) | Action on the load |
| Short press on UP | MAX value |
| Short press on MY | 50% by default (*) |
| Short press on DOWN | OFF |
| Press & hold on UP | Dim in the MAX direction |
| Press & hold on DOWN | Dim in the MIN direction |
| Wheel (Situo Variation only) | Dim in the MIN or MAX direction |
(*) The MY value can be set on another value via a UP/MY/DOWN remote control.
Checking the wiring
Briefly press the PROG button (<0.5s) on the receiver to switch on the light.
Press again to switch it off.
SET-UP
Enter the configuration mode
Switch the IZYMO™ LED dimmer receiver io to configuration mode by pressing the CFG button > 2s until the multicoloured LED turns blue.
The blue LED is lit during the entire configuration process. Configuration mode is active for 5 minutes.
Description of the different settings
Dimming range
All lightbulbs are different, as is their dimming range. You can set the dimming range that is the most suitable for your lightbulb by choosing the right MIN and MAX values.
Product functioning mode
This dimmer is designed to be compatible with trailing-edge dimmable LED lightbulbs. If you use a non-dimmable or a leading-edge LED lightbulb, please switch the dimmer to ON-OFF mode. In this case, it will be possible to switch on or off the lightbulb, but the dimming function will not be available.
Return after power cut
After a power cut, the light wired to the receiver may remain off or return to its last status before the cut.
Type of control point
The controls can be single push-button(s) or double push-button (one single type at a time). During the product set-up (or when it is reinitialized), the receiver automatically detects if it is wired to a single or a double push-button. This setting allows the installer to manually correct the mode if needed.
Adjusting the different settings
| Settings categories | Settings | Number of short press on CFG (<1s) | Number of LED flashes (confirmation) | Value after reset |
| Dimming range | Set the MIN dimming value | x2 | x2 | MIN by default |
| Set the MAX dimming value | x3 | x3 | MAX by default | |
| Product functioning mode | Dimming mode | x4 | x4 | Default value |
| ON/OFF mode | x5 | x5 | - | |
| Status after power cut | Light OFF | x6 | x6 | Default value |
| Last status before power cut | x7 | x7 | - | |
| Type of wall switch | Single push button | x8 | x8 | Auto-detection of the type of wall switch after (re) initialization |
| Double push button | x9 | x9 |
→ Set the dimming range once in configuration mode:
- Press and hold the wired push-button to dim your light, then release when you reach the brightness you want to set as the MIN value of the dimming range.
- Save this MIN value by pressing the CFG button 2 times in a row.
- Repeat the step 1. to find the brightness you want to set as the MAX value of the dimming range.
- Save this MAX value by pressing the CFG button 3 times in a row.
Exit configuration mode
Press the CFG button > 2s until the blue LED switches off,
The receiver automatically exits configuration mode after 5 min.
Resetting the dimming range
When changing the lightbulb, there are several ways to reset the MIN and MAX values of the dimming range:
With access to the product:
- Via the CFG button of the receiver and the wired push-button: see "Set the dimming range once in configuration mode" section above.
Without access to the product:
- Via the TaHoma app
- Via a setting tool dedicated to our PRO customers
- Via a 3-button io remote control:

Reset the MIN value
-
Enter the reconfiguration mode
-
Find the most convenient MIN value for the lightbulb
-
Save this MIN value
Reset the MAX value
- Enter the reconfiguration mode
- Find the most convenient MAX value for the lightbulb
- Save this MAX value
ASSOCIATION
- Switch the receiver to association mode
- If the receiver has not been associated yet
- From the receiver
- From the wall switch
- From an already associated transmitter
- Complete the association with the other product
- Exit association mode
- Automatically
- From the receiver
- From the wall switch
| Associate to TaHoma, Connexoon io or Nina | Associate to an io 1-way transmitter | Confirmation | ||||||
| 1. | A) | Switch OFF then ON the mains power supply via the electrical cabinet. | Switch OFF then ON the mains power supply via the electrical cabinet. Then press the PROG button of the new remote for 2 seconds. | The lamp switches ON for 2 seconds before turning OFF. + The LED turns green until the first association is complete or for 10 minutes. | ||||
| B) | Press the receiver's PROG button for 2 seconds. | |||||||
| C) | Switch OFF then ON the mains power supply via the electrical cabinet. Then press 5 times in a row quickly on the push-button in the next 10 minutes. | |||||||
| D) | Press the PROG button of the transmitter which is already paired to the receiver for 2 seconds to switch the receiver to association mode. | |||||||
| 2. | Start the procedure to add a new equipment from the TaHoma, Connexoon io or Nina interface. Then follow the instructions on screen. | Press the PROG button of the transmitter to add for <0,5 second to complete the adding procedure. | The lamp switches ON for 2 seconds before turning OFF. + The LED flashes green before turning OFF. | |||||
| 3. | A) | Automatically: when an association is complete or after 10 minutes | - | |||||
| B) | Press <0,5 second on the receiver's PROG button. | |||||||
| C) | Press the push-button. | |||||||
Deleting the receiver from TaHoma, Connexoon io or Nina
- Select the equipment to delete via the TaHoma, Connexoon io or Nina interface.
- Start the procedure for deleting an equipment.
- Follow the instructions on screen.
Deleting the receiver from an io 1-way transmitter
- Switch the receiver to association mode.
- Press the PROG button of the transmitter to be deleted for <0,5 second to complete the deleting procedure.
- The light switches ON for 2 seconds before turning OFF, and the LED flashes green before turning OFF.
REINITIALIZATION
Reinitializing the IZYMO™ LED dimmer receiver io
There are 2 types of reinitialization for this receiver.
Delete the radio associations only:
Press the PROG button of the receiver for 7 seconds (or the PROG button of an associated transmitter) until the light switches ON and OFF 2 times or until the LED flashes green before turning OFF. The receiver is no longer associated to any radio transmitter.
And/or
Reset the parameters to default values only: Press the CFG button of the receiver for 7 seconds until the LED flashes blue before turning OFF. The receiver parameters come back to their default values, and the autodetection of the type of wall switch restarts.
FAQ
To consult the Frequently Asked Questions and their answers, go to our dedicated webpage:
| United Kingdom | https://www.somfy.co.uk/support |
| Lebanon | https://www.somfy.com.lb/en-lb/assistance/faq |
For any other country, please contact Somfy customer service.
TECHNICAL DATA
| Power supply | 220-240V ~, 50Hz |
| Output | 220-240V ~, 50Hz, 0.65A max0.43A |
| Pollution | Cat II |
| Power supply cable section | Mini: 0.75 mm² Maxi: 1.5 mm² |
| Degree of protection | IP 20  |
| Protection class | Double insulation with no earth  |
| Dimensions | 43 x 43 x 13 mm |
| Protocole radio | Io-homecontrol 2-way |
| Frequency range and effective radiated power | 868.000MHz - 868.600MHz p.a.r. < 25 mW 868.700MHz - 869.200MHz p.a.r. < 25 mW 869.700MHz - 870.000MHz p.a.r. < 25 mW |
| Radio range in open space | 250 m (« HOME » radio range) |
| Radio range between 2 concrete walls | 20 m |
| Number of io-homecontrol control points | 1-way: 10 remote control devices 2-way: unlimited |
| Operating temperature | 0°C à + 55°C |
| Humidity | 85% HR à 25°C |
| Altitude | < 2000m |


Documents / Resources
References
Download manual
Here you can download full pdf version of manual, it may contain additional safety instructions, warranty information, FCC rules, etc.
Advertisement


Need help?
Do you have a question about the IZYMO and is the answer not in the manual?
Questions and answers