Table of Contents
Advertisement
Quick Links
Advertisement
Table of Contents

Related Manuals for Weber mt CF 1 R


Summary of Contents for Weber mt CF 1 R
- Page 1 Operating and Maintenance Manual CF 1 R Robin-Subaru EX 17 from Serial-No. 2100295 Weber Maschinentechnik GmbH Im Boden 5 - 8 , 10 D-57334 Bad Laasphe-Rückershausen / Germany Tel.: + 49 (0) 27 54 / 398 0 Fax: + 49 (0) 27 54 / 398 101 E-Mail: info@webermt.de...
- Page 2 CF 1 R...
-
Page 3: Table Of Contents
Safety guidelines Graphic presentation Device description Technical data Activities prior to starting work Starting Compacting Shutting down Maintenance overview Maintenance work Operating fluids and fill levels Troubleshooting Measures to be taken if stored for long periods Contact addresses CF 1 R... -
Page 4: Introduction
You can obtain information on the assembled Robin-Subaru petrol engine and find a spare-part list for it at www.robin-europe.de The valid conformity declaration is enclosed with every machine delivery. CF 1 R... -
Page 5: Safety Guidelines
This machine is capable of exceeding the permissible sound level of 80 dB(A). The owner might also face additional dangers when using the machine. Precautionary action must, therefore, be taken. Protective equipment includes: Ear protection Hard hat Safety shoes Protective gloves CF 1 R... - Page 6 Do not position yourself or work under suspended loads. If lubricating oils and fuel come into contact with skin, they can cause skin cancer. Upon contact with the skin, clean affected skin with suitable cleaning agent without delay. CF 1 R...
- Page 7 Important information for operating and maintenance personnel is marked by pictograms. Warning against irritants or materials hazardous to health Warning against a hazardous place Warning against a suspended load Wear ear protection General regulation Environmental protection Hard hat Safety shoes Protective gloves CF 1 R...
-
Page 8: Graphic Presentation
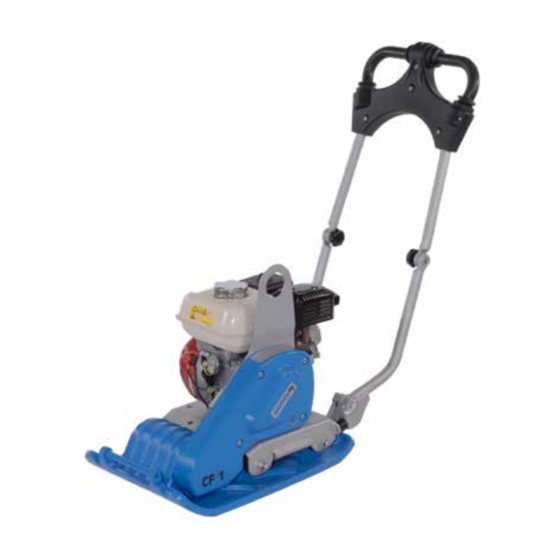
Graphic presentation Overall view CF 1 R 1 Water tank 2 Engine 3 Handle 4 Under carriage 5 Engine bracket 6 Base plate 7 Wear ear protection (Stickers) CF 1 R... -
Page 9: Device Description
Start the Robin -Subaru-gasoline engine with the attached reversing starter. After starting, vibration is switched on via the centrifugal clutch attached to the engine. Use the gas lever to vary the engine speed between idle and full throttle. The machine is steered with the handle. CF 1 R... -
Page 10: Technical Data
EN ISO 3744 and EN 500, in dB (A) Vibration values Root-mean-square acceleration value for hand-arm vibration ascertained in accordance with EN 500 in m/s² In accordance with directive 2006/42/EC, complying with the vibration values is the owner‘s responsibility. CF 1 R... - Page 11 1Description 2 TYPE ....................... 3 Serial-Number 4 Year of construction ......................5 Mass 6 Rated power KW CF 1 R...
-
Page 12: Activities Prior To Starting Work
Transport with hand truck Bend the manual guidance rod (1) over the machine. Use the screws (2) to fasten the chassis mount (1) to the engine console (3). Fasten the chassis (1) inside the chassis mount (2). CF 1 R... - Page 13 Unscrew and remove the oil dip stick (1) from the crankcase. Insert the oil dip stick in the oil filler neck, however do not screw it in The correct oil level is between the min. and max. marks. max. min. CF 1 R...
- Page 14 Attach the poly pad to the rear of the base plate. Fasten the poly pad with holder, screws, spring-lock washers and nuts (1) on the base plate front and rear. Ensure that the poly pad rests under the base plate. CF 1 R...
- Page 15 Lock the water tank (1) in place at the tank holder using the lever (2). If necessary, cut off the water supply by closing the water valve (1). In case of danger of frost, completely drain the water tank. CF 1 R...
-
Page 16: Starting
(open). Compacting Open the water valve (1) Bring the gas lever (1) into full-throttle position. Control drive speed and direction of travel with the handle (1). Only run machine within reach of the manual guidance rod. CF 1 R... -
Page 17: Shutting Down
Push the fuel cock (1) to the right (close). Turn the short-circuit button (1) to the „0“ - OFF position. During breaks—even if they are short—the machine must be shut down. Parked devices that represent an obstacle must be safeguarded against conspicuously. CF 1 R... -
Page 18: Maintenance Overview
If lubricating oils and fuel come into contact with skin, they can cause skin cancer. Upon contact with the skin, clean affected skin with suitable cleaning agent without delay. If accessible during maintenance, check the condition and stability of all screws. CF 1 R... -
Page 19: Maintenance Work
Clean the air filter insert in accordance with theguidelines provided by the engine manufacturer, or replace if there is extreme fouling. Dispose of oils, oil-soaked cloths, and parts replaced and smeared with oil in an environmentally friendly manner. CF 1 R... - Page 20 Checking the V-belt Remove the V-belt guard (1). Check the V-belt (1) for cracks, damaged flanks, and wear. If there is excessive wear - replace the V-belt as specified in the repair manual. CF 1 R...
- Page 21 Remove the V-belt guard (1). Block the V-belt pulley (1) using a wedge (2). Unscrew the screw (1) on the V-belt pulley (2). Take off the V-belt pulley (1) and replace the V-belt (1). Mount the V-belt guard (1). CF 1 R...
-
Page 22: Operating Fluids And Fill Levels
Lack of fuel Check the fuel level Fuel filter fouled Change the fuel filter Air filter fouled Clean/change air filter cartridge No vibration / no forward motion Vibrator V-belt Change vibrator V-belt or insufficient defective forward motion CF 1 R... -
Page 23: Measures To Be Taken If Stored For Long Periods
Check fuel filter, change if necessary All bare parts/accelerator/accelerator - Oil/grease control cable/fastening bolts If the machine is to be stored for longer than six months, then contact the Weber service organi- zation to discuss additional measures. CF 1 R... - Page 24 CF 1 R...
- Page 25 CF 1 R...
- Page 26 CF 1 R...
-
Page 27: Contact Addresses
South - WEBER Maschinentechnik do Brasil Telefon + 55 (0) 51- 587 3044 America Rua João Werno Erhart, 4691 Telefax + 55 (0) 51- 587 2271 Bairro Rincão 93310-405 Novo Hamburgo /RS E-Mail webermt.@webermt.com.br Brasil CF 1 R... - Page 28 > Vibration rollers > Joint cutters > Internal vibrators and converters > Rollers Weber MASCHINENTECHNIK GmbH Im Boden 57334 Bad Laasphe - Rückershausen Telephone + 49 27 54 / 398 0 - Fax +49 27 54 / 398 101 CF 1 R...
Need help?
Do you have a question about the CF 1 R and is the answer not in the manual?
Questions and answers