Table of Contents
Advertisement
Available languages
Available languages
Quick Links
DO7296S
Handleiding
Mode d'emploi
Gebrauchsanleitung
Instruction booklet
Manual de instrucciones
Istruzioni per l'uso
Návod k použití
Návod na použitie
Robotstofzuiger
Aspirateur robot
Staubsauger-Roboter
Robot vacuum cleaner
Robot aspirador
Aspirapolvere robot
Robotický vysavač
Robtický vysávač
PRODUCT OF
Advertisement
Table of Contents

Related Manuals for Linea 2000 DOMO DO7296S


Summary of Contents for Linea 2000 DOMO DO7296S
- Page 1 DO7296S Handleiding Robotstofzuiger Mode d’emploi Aspirateur robot Gebrauchsanleitung Staubsauger-Roboter Instruction booklet Robot vacuum cleaner Manual de instrucciones Robot aspirador Istruzioni per l’uso Aspirapolvere robot Návod k použití Robotický vysavač Návod na použitie Robtický vysávač PRODUCT OF...
- Page 2 Required for R32/R290 Refrigerant only CAUTION RISK OF FIRE Lees aandachtig alle instructies - bewaar deze handleiding voor latere raadpleging. Lisez attentivement les instructions - gardez le mode d’emploi pour utilisation ultérieure. Lesen Sie genau die Anweisungen - bewahren Sie die Gebrauchsanleitung für spätere Referenz auf.
-
Page 3: Garantie
GARANTIE Geachte klant, Al onze producten ondergaan steeds een strenge kwaliteitscontrole, alvorens ze aan je worden aangeboden. Mocht je desondanks toch nog problemen hebben met jouw toestel, dan betreuren wij dit ten zeerste. In dat geval verzoeken wij je contact op te nemen met onze klantendienst. Onze medewerkers zullen je met plezier verder helpen. - Page 4 · Boerderijen · Hotel- en motelkamers en andere omgevingen met een residentieel karakter · Gastenkamers, of gelijkaardige · Dit toestel mag gebruikt worden door kinderen vanaf 16 jaar en personen met een fysieke of sensoriële beperking of mensen met een beperkte mentale capaciteit of gebrek aan ervaring of kennis, op voorwaarde dat deze personen toezicht krijgen of instructies hebben gekregen over het gebruik van het toestel op een veilige manier en dat ze ook de gevaren...
- Page 5 · Rol de voedingskabel volledig af om oververhitting van de kabel te voorkomen. Laat de voedingskabel niet onder of rond het laadstation hangen. · Het toestel mag niet gebruikt worden met een verlengsnoer of een stekkerdoos. · Gebruik het toestel nooit wanneer het snoer of de stekker beschadigd is, na een slechte werking van het toestel of wanneer het toestel beschadigd is.
- Page 6 · Als het toestel niet goed onderhouden wordt, kan dit de levensduur van het toestel drastisch verminderen en een gevaarlijke situatie veroorzaken. I PRODUCTSPECIFIEKE WAARSCHUWINGEN · Gebruik de stofzuiger niet om detergenten, brandbare/ bijtende vloeistoffen (zoals oplosmiddelen, brandbare en explosieve materialen zoals benzine, alcohol etc.) en andere gelijkaardige vloeistoffen, naalden, lucifers, scherpe voorwerpen of brandbare voorwerpen op te zuigen.
- Page 7 · Na gebruik van het toestel is het belangrijk het waterreservoir te reinigen, dit om te voorkomen dat de zuigkracht afneemt en de motor opwarmt als gevolg van blokkering. Dit zou de prestaties en de levensduur van het toestel kunnen beïnvloeden.
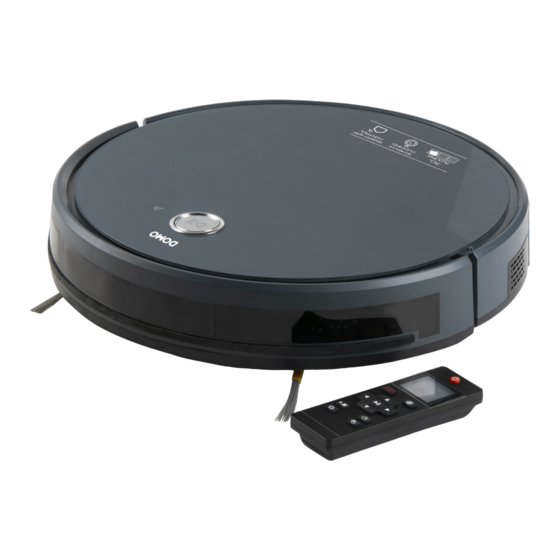
- Page 8 ONDERDELEN Apparaat Laadstation Afstandsbediening Adapter Stofborstel Waterreservoir Zijborstel Stoffilter HEPA Dweil APPARAAT Bovenkant: 10. Bumper WiFi-indicator 12. Bedieningsknop Onderkant: Universeel wiel 14. Laadcontacten Zijborstel 16. Batterijcompartiment Zijwiel 18. Roterende borstel 19. Stofopvangbakje Zijkant: 20. Adapteringang 21. Aan-uitschakelaar 22. Ontgrendeling stofopvangbakje 21 20 DO7296S...
-
Page 9: Voor Het Eerste Gebruik
STOFOPVANGBAKJE Voorfilter 24. HEPA filter 25. Filterspons 26. Stofopvangbakje Deksel stofopvangbakje WATERRESERVOIR 28. Afdichtingsdop van reservoir 29. Waterreservoir 30. Dweil LAADSTATION Indicatielampje 32. Adapteringang Laadcontacten VOOR HET EERSTE GEBRUIK · Plaats twee AAA-batterijen in de afstandsbediening. · Stel de klok in. Zie “Gebruik / Gebruik met afstandsbediening / Klokinstelling”. ·... - Page 10 · Als de batterij bijna leeg is, of het toestel heeft zijn programma afgerond, zal de stofzuiger automatisch terugkeren naar het laadstation als er een laadstation is geïnstalleerd. Als er geen laadstation is geïnstalleerd, gaat de stofzuiger in stand-bymodus. · Je kan ook kiezen om het toestel eerder op te laden door op de HOME-knop op de afstandsbediening te duwen.
- Page 11 GEBRUIK MET AFSTANDSBEDIENING Belangrijk: bij elke instelling met de afstandsbediening moet je goed richten naar het toestel. Gebruik de afstandsbediening niet in de buurt van het oplaadstation, want dit kan het signaal verstoren en de werking beïnvloeden. Indien je de afstandsbediening langere tijd niet gebruikt, verwijder dan de batterijen. ON/OFF: aan-uitknop Display Planreiniging (slim reinigen)
- Page 12 Bevestigingsknop/pauzeknop · Als het toestel in stand-bymodus staat, start je met deze knop de automatische reiniging. De stofzuiger zal zelf een pad uitstippelen om de hele ruimte te stofzuigen, rekening houdend met muren, obstakels en trappen. · Als de batterij bijna leeg is, of het toestel heeft zijn programma afgerond, zal de stofzuiger automatisch terugkeren naar het laadstation als er een laadstation is geïnstalleerd.
- Page 13 REINIGINGSMODI Je hebt de keuze uit 4 reinigingsmodi: Planreiniging (S-vormig reinigen): de stofzuiger zal in een S-vormige beweging doorheen de ruimte stofzuigen. Spotreiniging: de stofzuiger voert een geconcentreerde reiniging uit op een erg vuile plaats. Deze instelling kan je enkel via de app instellen. Reiniging met wand volgen: de stofzuiger werkt in een route waarbij hij langs muren rijdt en ook de hoeken reinigt.
- Page 14 ANTI-VALSYSTEEM · De robotstofzuiger is uitgerust met een anti-valdetectie. Het toestel detecteert een trap of afgrond zodat hij er niet zal afvallen. · Toch is het steeds aangewezen om hier voorzichtig mee te zijn en de stofzuiger zoveel mogelijk uit de buurt van trappen te houden.
- Page 15 Je kan de stofzuiger manueel toevoegen of automatisch zoeken naar nabijgelegen toestellen. · Manueel toevoegen: klik na het inloggen op ‘+’ rechtsboven in de hoek van de startpagina om de robotstofzuiger toe te voegen. Kies vervolgens op de apparaatkeuzepagina de kleine apparaten aan de linkerkant en de robotstofzuigers aan de rechterkant.
-
Page 16: Error Codes
Deze interface kan verbonden worden met slimme audiosystemen om meerdere bedieningsfuncties met één toets uit te voeren. XXXXXXX-robot XXXXX ERRORCODES Het toestel kan via de app foutmeldingen geven, meestal is dit omdat een voorwerp de stofzuiger blokkeert. Verwijder het voorwerp dat de stofzuiger blokkeert zodat deze kan verder werken. Indien het toestel dan nog niet werkt, neem contact op met de dienst na verkoop van DOMO. - Page 17 WATERRESERVOIR REINIGEN Druk op de ontgrendeling voor het verwijderen van het waterreservoir. Verwijder de dweil van het reservoir. Was de dweil in warm water met een mild detergent. Laat de dweil volledig drogen. Giet het water uit het reservoir. Spoel het reservoir uit met warm water en laat het volledig drogen. REINIGING TOESTEL ·...
-
Page 18: Probleem En Oplossing
REINIGING ROTERENDE VLOERBORSTEL Open het klepje van de vloerborstel. Veeg het klepje schoon met een zachte doek. Verwijder de roterende vloerborstel. Verwijder haren en ander vuil die zich rond de vloerborstel gewikkeld hebben. Wanneer de vloerborstel niet regelmatig schoongemaakt wordt, kan deze beschadigd geraken en kan het toestel onbruikbaar worden. - Page 19 Houd de bedieningsknop op het toestel enkele seconden ingedrukt totdat de WiFi-indicator snel knippert. Het toestel is nu klaar om te verbinden. SPECIFICATIES ADAPTER Bekendgemaakte informatie Waarde en precisie Eenheid Linea 2000 BV – Dompel 9 – 2200 Herentals - België Modelnummer DO7296S Voedingsspanning 100-240 Voedingsfrequentie...
- Page 20 MILIEURICHTLIJNEN Dit symbool op het product of op de verpakking wijst erop dat dit product niet als huishoudafval mag worden behandeld. Het moet naar een plaats worden gebracht waar elektrische en elektronische apparatuur wordt gerecycleerd. Als je ervoor zorgt dat dit product op de correcte manier wordt verwijderd, voorkom je mogelijk voor mens en milieu negatieve gevolgen die zich zouden kunnen voordoen in geval van verkeerde afvalbehandeling.
-
Page 21: Garantie
GARANTIE Chère cliente, cher client, Tous nos produits sont soumis à des contrôles qualité stricts avant d’être proposés à la vente. Si vous deviez toutefois rencontrer un problème avec votre appareil, nous le déplorons vivement. Dans ce cas, nous vous invitons à prendre contact avec notre service clientèle. Nos collaboratrices se feront un plaisir de vous aider ! +32 14 21 71 91 info@linea2000.be... - Page 22 · Chambres d’hôtel ou de motel et autres environnements à caractère résidentiel · Chambres d’hôtes ou comparables · Cet appareil peut être utilisé par des enfants âgés de 16 ans ou plus et par des personnes présentant un handicap physique ou sensoriel, une capacité mentale limitée ou un manque d’expérience ou de connaissances, à...
- Page 23 · Déroulez complètement le cordon d’alimentation. Ne laissez pas le cordon d’alimentation se coincer sous le station de charge ou pendre autour de celui-ci. · L’appareil ne peut pas être utilisé avec une rallonge ou un bloc multiprise. · N’utilisez jamais l’appareil lorsque le cordon d’alimentation ou la fiche est endommagé(e), après un mauvais fonctionnement de l’appareil ou lorsque l’appareil est lui-même endommagé.
- Page 24 I AVERTISSEMENTS SPÉCIFIQUES AU PRODUIT · N’utilisez pas l’aspirateur pour récupérer des détergents, des liquides inflammables/corrosifs (tels que solvants, matières inflammables et explosives comme de l’essence, de l’alcool, etc.) et autres liquides similaires, des aiguilles, des allumettes, des objets pointus ou inflammables. ·...
- Page 25 · Utilisez uniquement le chargeur fourni pour recharger l’appareil. D’autres chargeurs pourraient endommager l’appareil/la batterie et rendre l’appareil inutilisable. · Veillez à ce que l’appareil ne soit pas mouillé lorsque vous l’utilisez dans des pièces humides (salle de bains, toilettes, débarras, etc.).
-
Page 26: Réservoir À Poussière
Partie inférieure: Roulette universelle 14. Contacts de charge Brosse latérale 16. Compartiment de la batterie Roulette latérale 18. Brosse pour sols rotative 19. Réservoir à poussière Côté : 20. Entrée de l’adaptateur 21. Interrupteur allumé/éteint 22. Déverrouillage du réceptacle à poussières 21 20 RÉSERVOIR À... - Page 27 RECHARGER Allumez l’appareil avec l’interrupteur. Vous pouvez charger l’appareil avec ou sans la station de charge. CHARGEMENT AVEC LA STATION DE CHARGE Assurez-vous que la station de charge est correctement installée. Consultez la rubrique « Avant la première utilisation / Installation de la station de charge ». Branchez l’adaptateur sur la prise électrique et branchez la sortie de l’adaptateur sur la station de charge.
- Page 28 Arrêt Pour éteindre complètement l’appareil en mode veille, appuyez sur le bouton marche/arrêt situé sur le côté. UTILISATION SANS TÉLÉCOMMANDE · Appuyez sur le bouton de commande pour lancer le nettoyage automatique. L’aspirateur va définir lui-même un trajet, et ainsi nettoyer toute la surface en tenant compte des murs, des obstacles et des marches.
- Page 29 · Si une station de charge est installée, l’aspirateur retourne automatiquement à la station de charge lorsque sa batterie est faible ou s’il a terminé son programme. Si aucune station de charge n’est installée, l’aspirateur se met en mode veille. Flèches ·...
-
Page 30: Modes De Nettoyage
· Réglez l’heure à l’aide des flèches. · Choisissez ensuite la puissance d’aspiration. · Validez le réglage à l’aide du bouton de confirmation. · Sur l’écran, l’icône s’affiche en permanence pour vous indiquer qu’un réglage a été effectué. Pour annuler ce réglage, appuyez sur le bouton de programmation pendant quelques secondes jusqu’à ce que le symbole disparaisse de l’écran. - Page 31 Retirez le réceptacle à poussière de l’aspirateur à l’aide de la poignée de déverrouillage et mettez le réservoir d’eau à sa place. Vous entendrez un clic lorsque le réservoir est placé correctement dans l’appareil. SYSTÈME ANTICHUTE · L’aspirateur robot est équipé d’un système antichute. Il détecte une marche ou un vide, ce qui évite toute chute.
- Page 32 Vous pouvez ajouter l’aspirateur manuellement ou rechercher automatiquement les appareils à proximité. · Ajouter manuellement : après vous être connecté, cliquez sur « + » dans le coin supérieur droit de la page d’accueil pour ajouter l’aspirateur robot. Ensuite, sur la page de sélection des appareils, choisissez les petits appareils sur la gauche et les aspirateurs-robots à...
-
Page 33: Nettoyage Et Entretien
XXXXX XXXXXXX-robot Fig ‚ r $ C Fig ‚ r $ D Cette interface peut être connectée à des systèmes audio intelligents pour exécuter plusieurs fonctions de commande à l’aide d’un seul bouton. XXXXXXX-robot XXXXX CODES D’ERREUR L’appareil peut communiquer des messages d’erreur via l’application, généralement parce qu’un objet bloque l’aspirateur. -
Page 34: Nettoyage Du Réservoir D'eau
Rincez le collecteur de poussière et le porte-filtre sous l’eau courante. Laissez-les sécher avant de les remettre en place. Nettoyez le filtre HEPA et l’éponge de filtration avec la brossette à poussières. · Quand le filtre HEPA est sale, après environ 30 jours d’utilisation, vous pouvez également le passer sous l’eau courante. -
Page 35: Problèmes Et Solutions
· Après de multiples utilisations, les brosses latérales doivent être remplacées. La durée maximale d’utilisation des brosses est d’environ 12 mois. Assurez-vous que le L (gauche) et le R (droite) de la brosse et de l’appareil soient bien placés en regard. ·... - Page 36 WiFi clignote rapidement. L’appareil est maintenant prêt à être appairé. CARACTÉRISTIQUES TECHNIQUES ADAPTEUR Informations divulguées Valeur et précision Unité Linea 2000 SRL – Dompel 9 – 2200 Herentals – Belgique Numéro de modèle DO7296S Tension d’alimentation 100-240 Fréquence d’alimentation...
-
Page 37: Mise Au Rebut
MISE AU REBUT Ce symbole sur le produit ou son emballage indique que ce produit ne peut être traité comme déchet ménager. Il doit plutôt être remis au point de ramassage concerné, se chargeant du recyclage du matériel électrique et électronique. - Page 38 GARANTIE Sehr geehrte Kundin, sehr geehrter Kunde, Sämtliche unserer Produkte unterliegen einer strengen Qualitätskontrolle, bevor sie Ihnen angeboten werden. Sollten dennoch Probleme mit Ihrem Gerät auftreten, bedauern wir dies zutiefst. Wir möchten Sie in diesem Fall bitten, unseren Kundenservice zu kontaktieren. Unsere Mitarbeiter helfen Ihnen gern weiter! +32 14 21 71 91 info@linea2000.be...
- Page 39 · Küchenbereich für Mitarbeiter von Geschäften, Büros und anderen ähnlichen beruflichen Umfeldern · Bauernhöfe · Hotel- und Motelzimmer und andere Bereiche mit wohnungsähnlichem Charakter · Gästezimmer oder Ähnliches · Dieses Gerät darf von Kindern ab 16 Jahren und Menschen mit körperlichen oder sensorischen Behinderungen oder Menschen mit eingeschränkten geistigen Fähigkeiten oder mangelnder Erfahrung bzw.
- Page 40 · Das elektrische Kabel von heißen Teilen entfernt halten und das Gerät nicht abdecken. · Rollen Sie das Netzkabel vollständig ab, um eine Überhitzung des Kabels zu vermeiden. Lassen Sie das Netzkabel nicht unter oder rund um das Ladestation hängen. ·...
- Page 41 I REINIGUNG UND WARTUNG · Tauchen Sie das Gerät, das Kabel oder den Stecker auf keinen Fall in Wasser oder andere Flüssigkeiten. Dies dient der Vermeidung von elektrischen Stromschlägen und Feuer. · Wenn das Gerät nicht gut gewartet wird, kann dies die Lebensdauer des Geräts drastisch verringern und zu Gefahrensituationen führen.
- Page 42 ist. Halten Sie das Gerät frei von Staub, Haaren oder allem, was die Luftzufuhr behindern könnte. · Entfernen Sie große und scharfe Gegenstände vom Boden, um eine Beschädigung der Plastikteile, der Bürsten und des Motors zu vermeiden. · Halten Sie locker sitzende Kleidung, Finger und andere Körperteile fern von Öffnungen und beweglichen Teilen.
- Page 43 TEILE Gerät Ladestation Fernbedienung Adapter Staubbürste Wasserbehälter Seitenbürste HEPA-Filter Wischtuch GERÄT Oberseite: 10. Dämpfer WiFi-Anzeige 12. Einschaltknopf Unterseite: Universal-Rad 14. Ladekontakte Seitenbürste 16. Batteriefach Seitenrad 18. Rotierende Bürsten 19. Staubsammelbehälter Seite: 20. Adapteranschluss 21. Ein-/Ausschalter 22. Entriegelung des Staubbehälters 21 20 www.domo-elektro.be DO7296S...
-
Page 44: Vor Der Ersten Inbetriebnahme
STAUBSAMMELBEHÄLTER Vorfilter 24. HEPA-Filter 25. Filterschwamm 26. Staubsammelbehälter Deckel des Staubbehälters WASSERBEHÄLTER 28. Verschlusskappe des Behälters 29. Wasserbehälter 30. Wischtuch LADESTATION Kontrollleuchte 32. Adapteranschluss Ladekontakte VOR DER ERSTEN INBETRIEBNAHME · Legen Sie zwei AAA-Batterien in die Fernbedienung ein. · Stellen Sie die Uhrzeit ein (siehe „Gebrauch/Benutzung mit Fernbedienung/ Einstellung der Uhr“). ·... -
Page 45: Aufladen Ohne Ladestation
· WICHTIG: Sorgen Sie stets dafür, dass keine Kabel vor oder neben der Ladestation liegen, da sie zwischen den Rädern oder Bürsten des Staubsaugers eingeklemmt werden könnten. · Wenn der Akku fast leer ist oder das Gerät sein Programm beendet hat, kehrt der Staubsauger automatisch zur Ladestation zurück, falls diese installiert ist. - Page 46 · Wenn das Gerät mit dem Staubsaugen fertig ist, kehrt es automatisch zur Ladestation zurück. Wenn keine Ladestation installiert ist, wechselt der Staubsauger in den Standby-Modus. · Sie können auch selbst bestimmen, dass das Gerät die Reinigung beenden soll. Drücken Sie dazu den Einschaltknopf.
- Page 47 · Halten Sie diesen Pfeil im Stand-by-Modus gedrückt, um den Staubsauger nach links zu bewegen. Bei anderen Einstellungen können Sie mit dieser Taste von Minuten zu Stunden wechseln. · Halten Sie diesen Pfeil im Stand-by-Modus gedrückt, um den Staubsauger nach rechts zu bewegen.
- Page 48 Um diese Einstellung zu löschen, halten Sie die Taste für die Zeitplaneinstellung einige Sekunden lang gedrückt, bis das Symbol auf dem Display verschwindet. REINIGUNGSPROGRAMME Sie können aus 4 Programmen wählen: Reinigung mit Schema (S-förmige Reinigung): der Staubsauger bewegt sich in S-förmigen Bewegungen durch den Raum.
- Page 49 Entriegeln Sie den Staubbehälter nehmen Sie ihn vom Staubsauger ab, um stattdessen den Wasserbehälter zu befestigen. Der Behälter rastet hörbar ein, wenn er korrekt in das Gerät eingesetzt wurde. ANTI-FALLSYSTEM · Der Saugroboter ist mit Fallschutzsensoren ausgestattet. Das Gerät erkennt eine Treppe oder einen Abgrund, sodass er dort nicht herunterfallen kann.
- Page 50 Sie können den Staubsauger manuell hinzufügen oder automatisch nach Geräten in der Nähe suchen. · Manuelles Hinzufügen: Klicken Sie nach dem Einloggen auf „+“ oben rechts auf der Startseite, um den Staubsauger-Roboter hinzuzufügen. Wählen Sie dann auf der Seite mit der Geräteauswahl links die Kleingeräte und rechts die Saugroboter aus.
-
Page 51: Reinigung Und Wartung
XXXXX XXXXXXX-robot Fig ‚ r $ C Fig ‚ r $ D Dieses Interface kann mit intelligenten Audiosystemen verbunden werden, um mehrere Bedienungsfunktionen mit einer Taste auszuführen. XXXXXXX-robot XXXXX FEHLERCODES Das Gerät kann über die App Fehlermeldungen anzeigen. Meist handelt es sich hierbei darum, dass ein Objekt den Staubsauger blockiert. -
Page 52: Wasserbehälter Reinigen
Spülen Sie den Staubbehälter und die Filterhalterung unter fließendem Wasser. Lassen Sie diese trocknen, bevor Sie sie wieder einsetzen. Reinigen Sie den HEPA-Filter und den Filterschwamm mit der Staubbürste. · Wenn der HEPA-Filter verschmutzt ist, nach ca. 30 Tagen Gebrauch, kann dieser auch unter fließendem Wasser gereinigt werden. -
Page 53: Probleme Und Lösungen
REINIGUNG DES GERÄTS · Reinigen Sie die Seitenbürsten, Räder, Sensoren, Akku-Ladekontakte und die Ladestation regelmäßig mit einem weichen Tuch. · Nach häufiger Benutzung müssen die Seitenbürsten ersetzt werden. Die maximale Lebensdauer der Bürsten beträgt etwa 12 Monate. Bürste und Gerät sind mit einem L (links) und R (rechts) versehen. - Page 54 PROBLEME LÖSUNGEN Der Staubsauger kehrt in die Ladestation zurück, Der Akku des Staubsaugers ist zu schwach, lassen ohne sein Reinigungsprogramm beendet zu Sie ihn aufladen. haben. Der Staubsauger führt die eingestellte Reinigung · Schalten Sie das Gerät ein. nicht automatisch durch. ·...
- Page 55 SPEZIFIKATIONEN NETZTEIL Veröffentlichte Informationen Wert und Präzision Einheit Linea 2000 BV – Dompel 9 – 2200 Herentals - Belgien Modellnummer DO7296S Netzspannung 100-240 Netzfrequenz 50/60 Ausgangsspannung Ausgangsstrom Ausgangsleistung 11,4 Durchschnittlicher aktiver Wirkungsgrad > = 85,72 Wirkungsgrad bei Niedriglast Energieverbrauch bei Nulllast <...
- Page 56 ENTSORGEN Dieses Symbol auf dem Produkt oder seiner Verpackung weist darauf hin, dass dieses Produkt nicht als normaler Haushaltsabfall zu behandeln ist, sondern an einem Sammelpunkt für das Recyling von elektrischen und elektronischen Geräten abgegeben werden muss. Durch Ihren Beitrag zum korrekten Entsorgen dieses Produkts schützen Sie die Umwelt und die Gesundheit Ihrer Mitmenschen.
-
Page 57: Warranty
WARRANTY Dear client , All of our products are always submitted to a strict quality control before they are sold to you. Should you nevertheless experience problems with your device, we sincerely regret this. In that case, we kindly request you to contact our customer service. Our staff will gladly assist you. - Page 58 · farm houses; · by clients in hotels, motels and other residential type environments; · bed and breakfast type environments. · Children should be supervised to ensure that they do not play with the appliance. · This appliance can be used by children aged from 16 years and above and persons with reduced physical, sensory or mental capabilities or lack of experience and knowledge if they have been given supervision or instruction concerning use of the...
- Page 59 · The appliance may not be used with an extension lead or a multiple socket. · Do not operate this appliance with a damaged cord or plug or in the event the appliance malfunctions or has been damaged in any manner. Return the appliance to the DOMO Service Department or its service agent for examination, repair, or electrical or mechanical adjustment.
- Page 60 · Do not use the vacuum cleaner to vacuum up cement, powder and other small particles. Also avoid vacuuming up large objects. The vacuum cleaner could be clogged, the motor could overheat or other damage may occur. · Make sure that the air intake or the floor suction opening do not become blocked.
- Page 61 SAVE THESE INSTRUCTIONS FOR FUTURE REFERENCE PARTS Appliance Charging station Remote control Adapter Cleaning brush Water tank Side brushes HEPA filter APPLIANCE Top: 10. Bumper Wi-Fi indicator 12. Control button Bottom: Universal wheel 14. Charging contacts Side brushes 16. Battery compartment Side wheel 18.
-
Page 62: Before The First Use
DUST BIN Pre-filter 24. HEPA filter 25. Filter sponge 26. Dust bin Dust collector lid WATER TANK 28. Tank sealing cap 29. Water tank 30. Mop CHARGING STATION Indicator light 32. Adapter input Charging contacts BEFORE THE FIRST USE · Put two AAA batteries in the remote control. - Page 63 · When the battery is almost empty, or when the appliance has finished its programme, the vacuum cleaner will automatically return to the charging station if one has been installed. If no charging station is installed, the vacuum cleaner will enter standby mode. ·...
- Page 64 USE WITH REMOTE CONTROL Important: when adjusting settings with the remote control, you must aim it at the machine. Do not use the remote control near the charging station as it may interfere with the signal and affect its operation. If you will not be using the remote control for a long period of time, remove the batteries.
- Page 65 Confirmation button/pause button · This button can be used to start automatic cleaning when the appliance is in standby mode. The vacuum cleaner will plot its own path to vacuum the entire room, and will avoid walls, obstacles, and stairs. ·...
-
Page 66: Cleaning Modes
CLEANING MODES You can choose from 4 cleaning modes: Plan cleaning (S-shaped cleaning): The vacuum cleaner will move through the room and vacuum in an S-shaped motion. Spot cleaning: the vacuum cleaner will carry out concentrated cleaning on a very dirty spot. This setting can only be selected in the app. - Page 67 ANTI-FALL SYSTEM · The robot vacuum cleaner is equipped with an anti-fall detection. The machine will detect stairs or drops, preventing it from falling. · Nevertheless, it is recommended that you exercise caution and restricted the vacuum cleaner from the area with stairs.
- Page 68 You can add the vacuum cleaner manually or search automatically for nearby devices. · Manual add: after logging in, click the ‘+’ in the top right corner of the start page to add the robot vacuum cleaner. Then on the device options page, select small appliances on the left, and robot vacuum cleaners on the right.
-
Page 69: Cleaning And Maintenance
This interface can be connected to smart audio systems to perform several operating functions using a single button. XXXXXXX-robot XXXXX ERROR CODES The appliance can send error messages via the app, this is usually because the vacuum cleaner is blocked. Remove the object blocking the vacuum cleaner so it can continue to work. -
Page 70: Cleaning The Water Tank
CLEANING THE WATER TANK Press the release catch to remove the water tank. Remove the mop from the tank. Wash the mop in warm water with a mild detergent. Allow the mop to dry completely. Pour the water from the tank. Rinse the tank using warm water and allow to dry completely. CLEANING THE MACHINE ·... -
Page 71: Problem And Solution
CLEAN ROTATING FLOOR BRUSH Open the cover of the floor brush. Wipe the cover clean with a soft cloth. Remove the rotating floor brush. Remove hairs and other dirt that have wrapped around the floor brush. If you do not clean the floor brush regularly, it will become damaged and your machine will become unusable. - Page 72 Wi-Fi indicator flashes rapidly. The appliance is now ready to connect. SPECIFICATIONS ADAPTOR Published information Value and precision Unit Linea 2000 BV – Dompel 9 – 2200 Herentals – Belgium Model number DO7296S Supply voltage 100-240 Power frequency...
-
Page 73: Environmental Guidelines
ENVIRONMENTAL GUIDELINES This symbol on the product or on its packaging indicates that this product may not be treated as household waste. Instead it must be brought to the applicable collection point for recycling of electrical and electronic equipment. By ensuring this product is disposed of correctly, you will help prevent potential negative consequences for the environment and human health, which could otherwise be caused by inappropriate waste handling of this product. -
Page 74: Instrucciones De Seguridad
GARANTIA Este aparato tiene un periodo de garantía de 2 años a partir de la fecha de compra. Durante el periodo de garantía, el distribuidor será completamente responsable de los defectos directamente asignables a errores del material y fabricación. Cuando se detecten este tipo de errores, y siempre que se estime necesario, el aparato se sustituirá... - Page 75 · Los niños no deben jugar con el aparato. · El mantenimiento y la limpieza del dispositivo no deben ser realizados por niños, a menos que tengan 16 años o más o estén supervisados por un adulto. · Mantenga el aparato fuera del alcance de los niños. ·...
- Page 76 su inspección, reparación o para realizar ajustes eléctricos/ mecánicos. Nunca intente reparar el aparato por su cuenta. I INSTALACIÓN · No coloque nunca el aparato cerca de materiales inflamables, gases o explosivos. · No utilice el aparato al aire libre. ·...
- Page 77 · No utilice la aspiradora para aspirar cemento, polvo y otras partículas finas. Evite también la aspiración de objetos grandes. La aspiradora se podría bloquear, el motor se podría sobrecalentar o se podrían producir otros tipos de daños. · Asegúrese de que la entrada de aire o la boca de aspiración del suelo no queda bloqueada.
- Page 78 · Nunca utilice el aparato sin filtros e depósito. De lo contrario, se podría dañar el motor y el aparato ya no se podría utilizar. CONSERVE ESTAS INSTRUCCIONES PARA CONSULTARLAS POSTERIORMENTE PIEZAS Aparato Estación de carga Mando a distancia Adaptador Cepillo para polvo Depósito de agua Cepillo lateral...
-
Page 79: Antes Del Primer Uso
Lateral: 20. Entrada del adaptador 21. Interruptor de encendido/apagado 22. Desbloqueo de la bandeja de polvo 21 20 DEPÓSITO DE POLVO Prefiltro 24. Filtro HEPA 25. Esponja filtrante 26. Depósito de polvo Tapa de la bandeja de polvo DEPÓSITO DE AGUA 28. - Page 80 CARGAR CON LA BASE DE CARGA Asegúrese de que la base de carga está correctamente instalada. Véase «Antes del primer uso / Instalación de la base de carga». Busque el adaptador, conecte el enchufe a la toma de corriente e introduzca la entrada del adaptador a la base de carga.
- Page 81 USAR EL APARATO SIN MANDO A DISTANCIA · Pulse el botón de control para realizar una limpieza automática. La aspiradora esbozará un recorrido para aspirar toda la zona, teniendo en cuenta las paredes, obstáculos y escaleras. · Cuando el aparato haya terminado de aspirar, volverá automáticamente a la estación de carga. Cuando no hay base de carga instalada, la aspiradora se pondrá...
- Page 82 Flechas · En el modo de espera, pulse esta flecha para hacer avanzar la aspiradora. Para otros ajustes puede utilizar este botón para aumentar el valor. · En el modo de espera, pulse esta flecha para hacer girar la aspiradora 180°. Para otros ajustes puede utilizar este botón para reducir el valor.
-
Page 83: Modos De Limpieza
· Confirme el ajuste con el botón de confirmación. · En la pantalla verá que el icono se muestra continuamente para que sepa que se ha realizado un ajuste. Para cancelar este ajuste debe mantener pulsado el botón de ajuste del horario durante unos segundos, hasta que el símbolo desaparezca de la pantalla. - Page 84 Retire el depósito de polvo de la aspiradora utilizando el asa de liberación y vuelva a colocar el depósito de agua en su lugar. Oirá un clic cuando el depósito esté correctamente colocado. SISTEMA ANTICAÍDA · El robot aspirador está equipado con detección anticaída. El aparato detecta escaleras o zonas de mayor altura para evitar caerse.
- Page 85 Puede añadir la aspiradora manualmente o buscar automáticamente dispositivos cercanos. · Añadir manualmente: después de iniciar sesión, haga clic en «+» en la esquina superior derecha de la página de inicio para añadir el robot aspirador. A continuación, en la página de selección de dispositivos, seleccione pequeños dispositivos a la izquierda y los robots aspiradores a la derecha.
-
Page 86: Códigos De Error
XXXXX XXXXXXX-robot Fig ‚ r $ C Fig ‚ r $ D Esta interfaz se puede conectar a sistemas de audio inteligentes para realizar varias funciones de control con un solo botón. XXXXXXX-robot XXXXX CÓDIGOS DE ERROR El aparato puede dar mensajes de error a través de la aplicación. Normalmente, esto se debe a que un objeto está... - Page 87 · Cuando el filtro HEPA está sucio al cabo de unos 30 días de uso, también puede limpiarlo con agua corriente. Deje que se seque antes de volver a colocarlo. · El filtro HEPA debe reemplazarse tras su uso frecuente. La vida útil máxima del filtro es de unos 6 meses.
-
Page 88: Limpieza Del Aparato
LIMPIEZA DEL APARATO · Limpie con frecuencia, con un paño suave, los cepillos laterales, las ruedas, los sensores, los contactos para la carga de la batería y la base de carga. · Después de haber usado los cepillos laterales durante mucho tiempo, estos se deben cambiar. La duración máxima de los cepillos es de aproximadamente 12 meses. - Page 89 WiFi parpadee rápidamente. El aparato ya está preparado para su conexión. ESPECIFICACIONES ADAPTADOR Información publicada Valor y precisión Unidad Linea 2000 BV – Dompel 9 – 2200 Herentals - Bélgica Número de modelo DO7296S Tensión de suministro 100-240 Frecuencia de suministro 50/60 Tensión de salida...
- Page 90 DIRECTRICES MEDIOAMBIENTALES El símbolo en el producto o en el embalaje indica que este producto no puede ser tratado como residuo doméstico. Se debe llevar a un lugar en el que se reciclan equipos eléctricos y electrónicos. Si se asegura de que este producto se desecha correctamente, usted ayudará...
-
Page 91: Garanzia
GARANZIA La garanzia dell’apparecchio è valida per 2 anni a partire dalla data di acquisto. Durante il periodo di validità della garanzia, il distributore si assume la piena responsabilità dei difetti dei materiali o di quelli di fabbricazione. In caso di presenza di tali difetti, se necessario, si procederà alla sostituzione o alla riparazione dell’apparecchio. - Page 92 · Tenere l’apparecchio fuori dalla portata dei bambini di età inferiore a 16 anni. · Tutte le riparazioni che non rientrino nella normale manutenzione dell’apparecchio devono essere effettuate dal produttore o dal suo servizio assistenza. · Gli incidenti o i danni causati dalla mancata osservanza delle presenti istruzioni sono responsabilità...
- Page 93 I INSTALLAZIONE · Non posizionare mai l’apparecchio vicino a materiali infiammabili, gas o esplosivi. · Non utilizzare o conservare l’apparecchio all’aperto. · Utilizzare sempre l’apparecchio su una superficie stabile, asciutta e in piano. · Non posizionare mai l’apparecchio sopra o vicino a un fornello a gas o elettrico oppure in luoghi in cui possa venire a contatto con apparecchi a elevate temperature.
- Page 94 · Caricare sempre completamente la nuova batteria. · Togliere la spina dalla presa quando l’aspirapolvere è completamente carico durante la ricarica diretta. · Questo prodotto contiene una batteria ricaricabile. Quando non più utilizzate, le batterie vanno riciclate in conformità con le normative e i regolamenti locali.
- Page 95 CONSERVARE LE ISTRUZIONI PER POSSIBILI FUTURE CONSULTAZIONI COMPONENTI Unità Stazione di ricarica Telecomando Adattatore Spazzola antipolvere Serbatoio dell’acqua Spazzola laterale Filtro antipolvere HEPA Lavaggio UNITÀ Parte superiore: 10. Paraurti Indicatore WiFi 12. Pulsante di comando Parte inferiore: Ruota universale 14. Contatti di ricarica Spazzole laterali 16.
-
Page 96: Prima Dell'uso
RACCOGLITORE DI POLVERE Prefiltro 24. Filtro HEPA 25. Spugna filtrante 26. Raccoglitore di polvere Raccoglitore di polvere SERBATOIO DELL’ACQUA 28. Tappo del serbatoio 29. Serbatoio dell’acqua 30. Lavaggio STAZIONE DI RICARICA Indicatore luminoso 32. Ingresso adattatore Contatti di ricarica PRIMA DELL’USO ·... - Page 97 · Quando la batteria è quasi scarica, o quando l’apparecchio ha completato il programma, l’aspirapolvere ritorna automaticamente alla stazione di ricarica, se installata. Se non è installata una stazione di ricarica, l’aspirapolvere va in modalità standby. · Si può anche scegliere di ricaricare l’apparecchio premendo il tasto HOME sul telecomando. ·...
- Page 98 UTILIZZO CON TELECOMANDO Importante: ad ogni impostazione con telecomando è necessario mirare al dispositivo. Non utilizzare il telecomando vicino alla stazione di ricarica, poiché ciò potrebbe disturbare il segnale e influire sul funzionamento. Se non si utilizza il telecomando per un lungo periodo, rimuovere le batterie. ON/OFF: pulsante di accensione/spegnimento Display Pulizia programmata (pulizia intelligente)
- Page 99 · Nella modalità stand-by, tenere premuta questa freccetta per fare procedere l’aspirapolvere verso destra. Per le altre impostazioni, è possibile commutare dalle ore ai minuti utilizzando questo pulsante. Pulsante di conferma/pausa · Quando l’apparecchio è nella modalità stand-by, questo pulsante permette di avviare la pulizia automatica.
-
Page 100: Modalità Di Pulizia
MODALITÀ DI PULIZIA È possibile selezionare le 4 modalità di pulizia seguenti: Pulizia programmata (pulizia a S): l’apparecchio aspira la polvere compiendo un movimento a S sul pavimento. Pulizia in un punto: l’aspirapolvere esegue una pulizia concentrata in un punto molto sporco. Questa modalità... - Page 101 SISTEMA ANTI-CADUTA · L’aspirapolvere robot è dotato di un rilevamento anticaduta. Il dispositivo rileva una scala o un avvallamento evitando la caduta. · Tuttavia, è sempre consigliabile fare attenzione e tenere l’aspirapolvere lontano dalle scale il più possibile. UTILIZZO CON L’APPLICAZIONE Per ottenere prestazioni ottimali, si consiglia di utilizzare l’applicazione.
- Page 102 L’aspirapolvere può essere aggiunto manualmente o effettuando una ricerca degli apparecchi nelle vicinanze. · Aggiunta manuale: dopo avere effettuato l’accesso, fare clic sul simbolo ‘+’ nell’angolo in alto a destra della pagina iniziale per aggiungere l’aspirapolvere. Nella pagina di selezione dell’apparecchio, selezionare piccoli elettrodomestici dal lato sinistro e aspirapolvere robot dal lato destro.
-
Page 103: Codici Di Errore
XXXXX XXXXXXX-robot Fig ‚ r $ C Fig ‚ r $ D Questa interfaccia può essere collegata ai sistemi audio intelligenti per eseguire più funzioni con un unico pulsante. XXXXXXX-robot XXXXX CODICI DI ERRORE Tramite l’applicazione, l’apparecchio può indicare dei codici di errore, generalmente poiché un oggetto blocca l’aspirapolvere. -
Page 104: Pulizia Del Serbatoio Dell'acqua
· Il filtro HEPA deve essere sostituito dopo aver raggiunto una certa saturazione. La durata massima del filtro è di circa 6 mesi. Collocare il filtro HEPA con la spugna filtrante nel coperchio del raccoglitore di polvere. Collocare il prefiltro HEPA nel raccoglitore di polvere. Assicurarsi che tutti i componenti siano completamente asciutti prima di rimontarli nell’apparecchio. -
Page 105: Problemi E Soluzione
· Non immergere mai il dispositivo in acqua. · I sensori non devono essere bagnati. PULIZIA SPAZZOLA ROTANTE PER PAVIMENTI Aprire il coperchio della spazzola del pavimento. Pulire il coperchio con un panno morbido. Rimuovere la spazzola rotante per pavimenti. Togliere lo sporco che si è accumulato intorno alla spazzola per i pavimenti. - Page 106 WiFi non inizia a lampeggiare rapidamente. L’apparecchio è ora pronto per essere collegato. SPECIFICHE TECNICHE ADATTATORE Informazione nota Valore e precisione Unità Linea 2000 BV – Dompel 9 – 2200 Herentals - Belgio Numero di modello DO7296S Tensione di alimentazione 100-240...
- Page 107 MISURE AMBIENTALI Il simbolo sul prodotto o sulla confezione indica che esso non deve essere trattato come rifiuto domestico. Deve, al contrario, essere conferito al punto di raccolta predisposto per il riciclo delle apparecchiature elettriche ed elettroniche. Facendo in modo che questo prodotto venga smaltito correttamente aiuterete a prevenire potenziali conseguenze negative per l’ambiente e la salute dell’uomo, che potrebbero essere causate da uno smaltimento non corretto.
-
Page 108: Bezpečnostní Pokyny
ZÁRUKA Práva a povinnosti prodávajícího a kupujícího ohledně práv z vadného plnění se řídí příslušnými obecně závaznými předpisy dle občanského zákoníku. Trvání záruky: 2 roky Záruka se nevztahuje a) na mechanické poškození b) nesprávné používání v rozporu s návodem k použití Záruka zaniká: - při použití... - Page 109 · kuchyňky v obchodech, kancelářích atd. · chaty, chalupy · hotely, penziony a jiné dočasné ubytování · Dohlédněte, aby si děti nehrály s přístrojem. · Tento spotřebič mohou používat děti ve věku 16 let a starší a osoby se sníženými fyzickými, smyslovými nebo mentálními schopnostmi, nebo nedostatkem zkušeností...
- Page 110 · Rozviňte kompletně celý přívodní kabel, jinak hrozí riziko jeho přehřátí. Kabel nenechávejte ležet pod dobíjecí stanice ani nesmí být omotán kolem dobíjecí stanice. · Spotřebič nepoužívejte s prodlužovacím přívodním kabelem. Zapojujte vždy přímo do vlastní zásuvky a nepoužívejte k tomu ani elektrické...
- Page 111 I UPOZORNĚNÍ – SPECIFICKÉ · Nepoužívejte vysavač k vysávání čistících prostředků, kapalin, jehel, zápalek, ostrých objektů nebo hořlavých předmětů. · Nepoužívejte vysavač k vysávání cementu, prášků a jiných malých částí. Také se vyhněte vysávání velkých objektů. Vysavač by se mohl ucpat, motor by se mohl přehřát nebo může dojít k jinému poškození.
- Page 112 · Nikdy nepoužívejte vysavač bez filtrů nebo jinak nekompletní. USCHOVEJTE SI TUTO PŘÍRUČKU NA PŘÍPADNÉ POZDĚJŠÍ NAHLÉDNUTÍ. ČÁSTI Přístroj Dobíjecí stanice Dálkové ovládání Adaptér Čisticí kartáč Nádobka na vodu Boční kartáče HEPA filtr Hadr na vytírání PŘÍSTROJ Horní část/kryt: 10. Infračervený přijímač Kontrolka připojení...
-
Page 113: Před Prvním Použitím
Z boku: 20. Vstup konektoru nabíjení 21. Spínač on/off 22. Sběrná nádoba na nečistoty 21 20 ZÁSOBNÍK NA PRACH Předfiltrační síťka 24. HEPA filtr 25. Filtr (pórovitý) 26. Zásobník na prach Víko sběrné nádoby NÁDOBKA NA VODU 28. Uzávěr nádoby 29. - Page 114 NABÍJENÍ Vysavač zapněte pomocí hlavního spínače on/off. Vysavač můžete nabíjet přímo přes kabel do vysavače a nebo pomocí dokovací/nabíjecí stanice. NABÍJENÍ PŘES NABÍJECÍ STANICI Nejdříve se ujistěte, aby byla stanice správně a kompletně sestavena (viz kapitola „Před prvním použitím/sestavení stanice“. Potom zapojte nabíjecí...
- Page 115 Režim vypnuto Vysavač můžete zcela vypnout vypínačem na boku zařízení, zatímco je v pohotovostním režimu. POUŽITÍ BEZ DÁLKOVÉHO OVLADAČE · Stiskem ovládacího tlačítka na vysavači vyberete a spustíte režim automatického uklízení. Vysavač si navrhne svoji vlastní cestu tak, aby vysál celou oblast i podél stěn, překážek či schodů. ·...
- Page 116 Šipky (vysvětlení) · V pohotovostním režimu: stiskem pošlete/rozjedete vysavač dopředu. V jakémkoli jiném režimu to bude znamenat navýšení dané hodnoty. · V pohotovostním režimu: stiskem otočíte vysavač dozadu o 180°. V jakémkoli jiném režimu to bude znamenat ponížení dané hodnoty. ·...
- Page 117 Pokud si přejete nastavení opět zrušit, tak stiskněte a podržte to tlačítko plánu/rozvrhu na několik vteřin, dokud ikona z displeje nezmizí. REŽIMY ÚKLIDU Na vysavači si můžete vybrat a nastavit ze 4 režimů úklidu. Režim smyčky: Vysavač se bude po místnosti pohybovat po pravidelných smyčkách ve smyslu písmene „S“.
- Page 118 SYSTÉM PROTI PŘEPADU · Vysavač má bezpečnostní funkci proti pádu. Vysavač sám detekuje schody nebo hrany, u kterých hrozí riziko pádu. Automaticky se takovým místům vyhne, což zabraňuje pádu. · Přesto ale doporučujeme věnovat pozornost výběru místa úklidu a vysavač primárně do takových nerovných míst se schodištěm nepouštět.
- Page 119 Do aplikace můžete přidat vysavač ručně a nebo spustit vyhledání dostupných spotřebičů v okolí. · Ruční přidání: po úspěšném přihlášení klikněte na „+“ v pravém horním rohu úvodní stránky a přidejte robotický vysavač. Provedete tak, že: na stránce možností zařízení vyberte (vlevo) malá zařízení (Small Home Appliances) a vpravo vyberte volbu robotické...
-
Page 120: Čištění A Údržba
Přes rozhraní lze připojit i k chytrému audio systému a provádět několik provozních funkcí pomocí jediného tlačítka. XXXXXXX-robot XXXXX CHYBOVÉ HLÁŠENÍ Vysavač vám může přes aplikaci odesílat i jeho chybová hlášení, obvykle je to proto, že někde uvízl / je zablokovaný. -
Page 121: Čištění Vysavače
ČIŠTĚNÍ NÁDRŽKY NA VODU Stisknutím uvolňovací západky vyjměte nádržku na vodu. Z nádrže odejměte hadr vytírání. Hadr/mop vyperte v teplé vodě s jemným čisticím prostředkem. Nechte ho úplně vyschnout. Vylijte zbylou vodu z nádrže. Nádržku opláchněte/vypláchněte teplou vodou a nechte dostatečně vyschnout. -
Page 122: Čištění Rotačního Kartáče
ČIŠTĚNÍ ROTAČNÍHO KARTÁČE Nejdříve otevřete kryt u podlahového kartáče. Kartáč vyjměte a kryt lehce otřete vlhkým hadříkem. Kartáč můžete omýt pod tekoucí vodou a případně odstranit namotané vlasy. Z kartáče vyčistěte všechny vlasy a namotané nečistoty. Kartáč čistěte pravidelně. Pokud nebudete kartáč udržovat čistý, může to vést k nadměrnému namáhání... - Page 123 Stiskněte a chvíli podržte hlavní ovladač nahoře na přístroji. Kontrolka Wi-Fi začne rychleji blikat. Nyní je přístroj připraven k připojení. SPECIFIKACE ADAPTÉR Parametr Hodnota Jednotky Linea 2000 BV – Dompel 9 – 2200 Herentals – Belgie Označení modelu DO7296S Napájecí napětí 100-240 Frekvence 50/60 Výstupní...
- Page 124 OHLED NA ŽÍVOTNÍ PROSTŘEDÍ Symbol na přístroji či na jeho obalu znamená, že s tímto výrobkem není možno nakládat jako s běžným domovním odpadem, nýbrž musí být odevzdán na místech určených ke sběru a likvidaci elektrických a elektronických zařízení. Dodržením tohoto doporučení chráníte životní prostředí...
-
Page 125: Bezpečnostné Pokyny
ZÁRUKA Práva a povinnosti predávajúceho a kupujúceho ohľadom práv z chybného plnenia sa riadi príslušnými všeobecne záväznými predpismi podľa občianskeho zákonníka. Trvanie záruky: 2 roky Záruka sa nevzťahuje a) na mechanické poškodenie b) nesprávne používanie v rozpore s návodom na použitie Záruka zaniká: - pri použití... - Page 126 · kuchynky v obchodoch, kanceláriách atď. · chaty, chalupy · hotely, penzióny a iné dočasné ubytovanie · Dohliadnite, aby sa deti nehrali s prístrojom. · Tento spotrebič môžu používať deti vo veku 16 rokov a staršie a osoby so zníženými fyzickými, zmyslovými alebo mentálnymi schopnosťami, alebo nedostatkom skúseností...
- Page 127 · Prívodný kábel sa nesmie dotýkať horúcich / teplých povrchov. Prístroj nikdy nezakrývajte. · Rozviňte kompletne celý prívodný kábel, inak hrozí riziko jeho prehriatia. Kábel nenechávajte ležať pod nabíjacie staníca ani nesmie byť omotaný okolo nabíjacie staníca. · Spotrebič nepoužívajte s predlžovacím prívodným káblom. Zapájajte vždy priamo do vlastnej zásuvky a nepoužívajte k tomu ani elektrickej rozbočky.
- Page 128 I UPOZORNENIE – ŠPECIFICKÉ · Nepoužívajte vysávač na vysávanie čistiacich prostriedkov, kvapalín, ihiel, zápaliek, ostrých objektov alebo horľavých predmetov. · Nepoužívajte vysávač na vysávanie cementu, práškov a iných malých častí. Tiež sa vyhnite vysávanie veľkých objektov. Vysávač by sa mohol upchať, motor by sa mohol prehriať alebo môže dôjsť...
- Page 129 · Pokiaľ používate prístroj vo veľmi vlhkých miestnostiach (kúpeľne, sklady, toalety), tak zaistite aby prístroj nijako nenavlhol/nenamočil sa. · Nikdy nepoužívajte vysávač bez filtrov alebo inak nekompletný. USCHOVAJTE SI TÚTO PRÍRUČKU DO BUDÚCNOSTI. ČASTI Zariadenie Nabíjacie staníca Diaľkové ovládanie Adaptér Čistiaca kefa Nádobka na vodu Bočné...
-
Page 130: Pred Prvým Použitím
Zboku: 20. Vstup konektora nabíjania 21. Prepínač zapnutia / vypnutia 22. Zberná nádoba na nečistoty 21 20 ZÁSOBNÍK NA PRACH Predfiltračná sieťka 24. HEPA filter 25. Filter (pórovitý) 26. Zásobník na prach Veko zbernej nádoby NÁDOBKA NA VODU 28. Uzáver nádoby 29. - Page 131 Potom zapojte nabíjací adaptér do el. siete a jeho konektor prepojte s nabíjacou stanicou (z boku). · UPOZORNENIE: Kábel adaptéra nesmie byť nikdy obopnutý okolo nabíjacej stanice, ani nesmie ležať pred ním. V tomto prípade je kábel navinutý do čistiacich kefiek vysávača. ·...
- Page 132 · Vysávač môžete vypnúť aj počas vysávania. Alebo ho prerušte pomocou stlačenia hlavného ovládacieho tlačidla na vysávači. Potom vypnite vysávač pomocou spínača na strane stroja. POUŽÍVANIE S DIAĽKOVÝM OVLÁDANÍM Dôležité: Pri jazde musíte zamerať vodič priamo na vysávač. Neodporúčame používať diaľkové ovládanie ak ste veľmi blízko stanice, ovládač by mohol rušiť signál a prístroj nebude správne fungovať.
- Page 133 Tlačidlo potvrdenia / pauza-pozastavenie · Týmto tlačidlom môžete zapnúť režim automatického upratovania (ak je vysávač v pohotovostnom režime). Vysávač si naplánuje náhodne svoju vlastnú cestu, aby vysal celú miestnosť, pričom sa bude vyhýbať prekážkam, stenám a schodom. · Akonáhle je batéria skoro prázdna/vybitá alebo sa dokončil upratovací program, tak sa vysávač automaticky vráti do nabíjacej stanice (ak je zostavená...
- Page 134 REŽIMY UPRATOVANIA Na vysávači si môžete vybrať a nastaviť zo 4 režimov upratovania. Režim slučky: Vysávač sa bude po miestnosti pohybovať po pravidelných slučkách v zmysle písmena „S“. Režim upratovania konkrétneho miesta: Na viac znečistenom mieste vykoná vysávač väčšie upratovanie (väčšia frekvencia prejazdov). Tento režim je možné vybrať a nastaviť iba v aplikácii. Režim upratovania pozdĺž...
- Page 135 SYSTÉM PROTI PREPADU · Vysávač má funkciu ochrany pred pádom. Vysávač rozpozná schody alebo hrany, ktoré sú vystavené riziku pádu. Automaticky sa vyhýba takým miestam, ktoré zabraňujú pádu. · Napriek tomu ale odporúčame venovať pozornosť výberu miesta upratovania a vysávač primárne do takých nerovných miest so schodiskom nepúšťať.
- Page 136 Do aplikácie môžete pridať vysávač ručne alebo spustiť vyhľadanie dostupných spotrebičov v okolí. · Ručné pridanie: po úspešnom prihlásení kliknite na „+“ v pravom hornom rohu úvodnej stránky a pridajte robotický vysávač. Vykonáte tak, že: na stránke možností zariadenia vyberte (vľavo) malé zariadenia (Small Home Appliances) a vpravo vyberte voľbu robotického vysávača (WiFi).
-
Page 137: Čistenie A Údržba
Cez rozhranie je možné pripojiť aj k šikovnému audio systému a vykonávať niekoľko prevádzkových funkcií pomocou jediného tlačidla. XXXXXXX-robot XXXXX CHYBOVÉ HLÁSENIE Vysávač vám môže cez aplikáciu odosielať aj jeho chybové hlásenia, obvykle je to preto, že niekde uviazol/ je zablokovaný. V tom prípade odstráňte blokujúci predmet, aby vysávač mohol pokračovať v práci. Pokiaľ sa ani potom nerozobehne a stále nefunguje, kontaktujte prosím servis DOMO. -
Page 138: Čistenie Nádržky Na Vodu
ČISTENIE NÁDRŽKY NA VODU Stlačením uvoľňovacej západky vyberte nádržku na vodu. Z nádrže odoberte handru vytierania. Handru/mop vyperte v teplej vode s jemným čistiacim prostriedkom. Nechajte ho úplne vyschnúť. Vylejte zvyšnú vodu z nádrže. Nádržku opláchnite/vypláchnite teplou vodou a nechajte dostatočne vyschnúť. -
Page 139: Čistenie Rotačnej Kefy
ČISTENIE ROTAČNEJ KEFY Najskôr otvorte kryt pri podlahovom kefy. Kefa vyberte a kryt jemne utrite vlhkou handričkou. Z kefy vyčistite všetky vlasy a namotané nečistoty. Kefa čistite pravidelne. Ak nebudete kefa udržiavať čistý, môže to viesť k nadmernému namáhaniu a poškodeniu prístroja. Kefa môžete umyť pod tečúcou vodou a prípadne odstrániť... - Page 140 Stlačte a chvíľu podržte hlavný ovládač hore na prístroji. Kontrolka Wi-Fi začne rýchlejšie blikať. Teraz je prístroj pripravený na pripojenie. ŠPECIFIKÁCIE ADAPTÉR Parameter Hodnota Jednotky Linea 2000 BV – Dompel 9 – 2200 Herentals - Belgie Označenie modelu DO7296S Napájacie napätie 100-240 Frekvencia 50/60 Výstupné...
- Page 141 OHĽAD NA ŽIVOTNÉ PROSTREDIE Symbol na prístroji alebo na jeho obale znamená, že s týmto výrobkom nie je možné nakladať ako s domovým odpadom, ale musí byť odovzdaný na miestach určených na zber a likvidáciu elektrických a elektronických zariadení. Dodržaním tohto odporúčania chránite životné prostredie a zdravie spoluobčanov.
- Page 142 DO7296S...
- Page 143 www.domo-elektro.be DO7296S...
- Page 144 über: webshop.domo-elektro.be or scan here: oder hier scannen: of scan hier: ou scannez ici: LINEA 2000 BV - Dompel 9 - 2200 Herentals - Belgium - Tel: +32 14 21 71 91 - Fax: +32 14 21 54 63...
Need help?
Do you have a question about the DOMO DO7296S and is the answer not in the manual?
Questions and answers