
Subscribe to Our Youtube Channel
Related Manuals for Equinox Systems EQLED039A


Summary of Contents for Equinox Systems EQLED039A
- Page 1 Colour Raider Lithium Battery Uplighter Pack User Manual Order code: Black Housing - EQLED039 Chrome Housing - EQLED039A...
-
Page 2: Safety Advice
Safety advice WARNING FOR YOUR OWN SAFETY, PLEASE READ THIS USER MANUAL CAREFULLY BEFORE YOUR INITIAL START-UP! • Before your initial start-up, please make sure that there is no damage caused during transportation. • Should there be any damage, consult your dealer and do not use the equipment. •... - Page 3 Pack weight 8.8kg Order codes Black housing - EQLED039 Chrome housing - EQLED039A *battery life subject to usage and the temperature where the fixture is situated. Maximum run times are based on the fixture being at the lowest brightness setting.
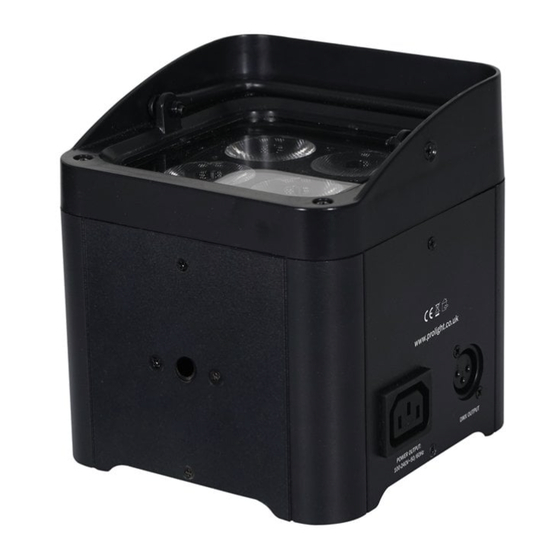
- Page 4 Product overview & technical specifications 01 - Earth point 02 - LED display 03 - Function buttons 04 - Charge indicator 05 - Microphone 06 - M10 rigging point 07 - On/off switch 08 - Adjustable foot 09 - 3-Pin DMX input In the box: 10 - 3-Pin DMX output 4 x fixtures,...
-
Page 5: Dmx Settings
Operating instructions 2 C H 3 C H A d d r 4 - 1 C DMX settings d 5 1 2 4 C H 8 C H S 0 1 S t @ t Static colour mode S 1 8 A u 1 A u t o Auto modes... - Page 6 Operating instructions DMX mode: Operating in a DMX control mode environment gives the user the greatest flexibility when it comes to customising or creating a show. In this mode you will be able to control each individual trait of the fixture and each fixture independently. To access the DMX mode, press the “MENU”...
- Page 7 Operating instructions 4 channel mode: 8 channel mode: Channel Value Function Channel Value Function 000-255 Master dimmer (0-100%) 000-255 Master dimmer (0-100%) 000-009 No function 000-009 No function 010-255 Strobe (slow-fast) 010-255 Strobe (slow-fast) 000-009 No function 000-255 Red (0-100%) 010-019 Red 000-255 Green (0-100%) 020-029 Green...
- Page 8 Operating instructions Wireless DMX operation: To operate the fixture in wireless DMX you will need to connect the fixture to a W-DMX compatible wireless DMX Transmitter. To turn wireless DMX on, press the “MENU” button and use the “UP” and “DOWN” buttons to show 2.
- Page 9 Operating instructions Sound modes: To access the sound modes, press the “MENU” button and use the “UP” and “DOWN” buttons to show Soun on the LED display. Now press the “ENTER” button and use the “UP” and “DOWN” buttons to So 1 So 2 choose one of the sound modes between...
-
Page 10: Master/Slave Mode
Operating instructions DMX fail: To access the DMX fail setting, press the “MENU” button and use the “UP” and “DOWN” buttons to show FAIL on the LED display. Now press the “ENTER” button and use the “UP” and “DOWN” buttons to Auto bLAC HoLd... - Page 11 Operating instructions Battery reference information: When the first battery charge indicator When the first and second battery charge LED is illuminated, the fixture has 25% indicator LEDs are illuminated, the fixture charge or less remaining. has 50% charge or less remaining. When the first, second and third battery When all four battery charge indicator LEDs charge indicator LEDs are illuminated, the...
- Page 12 Operating instructions IR remote functions: 01 - Sets the unit into blackout off/on (LED on/off) 02 - Activates the auto modes, use the ‘+’ and ‘–’ buttons to select the auto mode. Pressing the ‘Speed’ button followed by the ‘+’ and ‘–’ buttons will then allow the auto mode speed to be adjusted BLACK AUTO...
-
Page 13: Dmx Setup
DMX setup Setting the DMX address: The DMX mode enables the use of a universal DMX controller. Each fixture requires a “start address” from 1- 512. A fixture requiring one or more channels for control begins to read the data on the channel indicated by the start address. -
Page 14: Line Termination
DMX setup Notice: Be sure to follow the diagrams below when making your own cables. Pin Configuration Do not connect the cables shield conductor to the ground lug or 3-Pin 5-Pin allow the shield conductor to come in contact with the XLRs Pin 1 - Ground outer casing. - Page 15 Multiple fixture power linking Power linking: This fixture provides power linking via the power output on the rear allowing multiple units to be connected together. The maximum number of fixtures that can be connected is 12 fixtures (3 packs) @ 240V or 4 fixtures (1 pack) @ 120V (including the first fixture). After the maximum number of fixtures are connected a new power run will need to be started.
-
Page 16: Weee Notice
WEEE notice Correct Disposal of this Product (Waste Electrical & Electronic Equipment) (Applicable in the European Union and other European countries with separate collection systems) This marking shown on the product or its literature, indicates that it should not be disposed of with other household wastes at the end of its working life.
Need help?
Do you have a question about the EQLED039A and is the answer not in the manual?
Questions and answers