
Subscribe to Our Youtube Channel
Related Manuals for Panduit TDP42HY


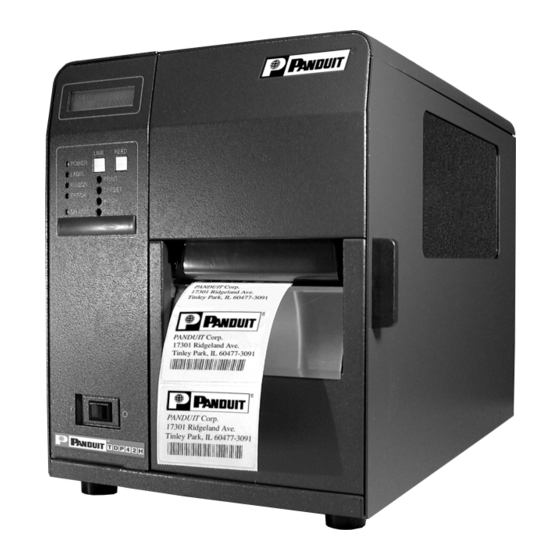
Summary of Contents for Panduit TDP42HY
- Page 1 TDP42HY, TDP43HY, TDP46HY Thermal Transfer Printer OPERATOR MANUAL GMTDPH-MAN Rev. 01 9-2010...
- Page 2 Panduit Europe • EMEA Service Center Almelo, Netherlands Tel: +31-546-580-452 • Fax: +31-546-580-441 email: emeatoolservicecenter@panduit.com website: www.panduit.com/emea Panduit Europe • West World Headquarters Westgate, London England Tel: 208-601-7200 • Fax: 208-601-7319 email: cs@panduit.com website: www.panduit.com/emea Copyright © Panduit Corp. 2010 • All Rights Reserved.
-
Page 3: Table Of Contents
Replacing the Print Head ................4-4 Section 5. Troubleshooting Initial Checklist....................5-1 Using the IEEE1284 Parallel Interface ............5-1 Using the RS232C Serial Interface ..............5-2 Using the Universal Serial Bus (USB) Interface ..........5-3 Using the Lan Ethernet Interface..............5-3 Error Signals ....................5-6 PANDUIT TDP4*HY GMTDPH-MAN... - Page 4 Universal Serial Bus (USB) Interface ..............6-8 Local Area Network (LAN) Optional Interface ..........6-8 BiDirectional communications ................6-8 Section 7. Optional Accessories PCMCIA Memory Cards ..................7-1 Plug-in Interface Modules ................7-2 Cutter ........................7-3 Label Dispenser....................7-4 Label Rewinder ....................7-5 Real Time Clock ....................7-6 GMTDPH-MAN PANDUIT TDP4*HY...
-
Page 5: Section 1. Printer Overview
® The Panduit TDP42HY, TDP43HY and TDP46HY Thermal Transfer Printers, hereafter referred to as TDP4*HY, are complete, high-performance on-site labeling systems. All printer parameters are user programmable using the front panel controls and the DIP switches. All popular bar codes and 14 human-readable fonts, including a vector font and two raster fonts, are resident in memory providing literally thousands of type styles and sizes. -
Page 6: Specifications
Section 1: Overview General Printer Specifications SPECIFICATION TDP42HY TDP43HY TDP46HY PRINT Method Direct or Thermal Transfer 2 to 10 ips 2 to 8 ips 2 to 6 ips Speed (User Selectable) 50 to 250 mm/s 50 to 200 mm/s 50 to 150 mm/s .0049 in. - Page 7 Receive Buffer 2.95 MB Memory Expansion See Options and Accessories (1) Only one interface module can be installed in a printer at a time. *2 - 203 dpi, 3 - 305 dpi, 6 - 609 dpi Page 1-3 PANDUIT TDP4*HY GMTDPH-MAN...
- Page 8 Section 1: Overview Character Fonts SPECIFICATION TDP42HY TDP43HY TDP46HY MATRIX FONTS U Font 5 dots W x 9 dots H S Font 8 dots W x 15 dots H M Font 13 dots W x 20 dots H XU Font...
- Page 9 RAM storage for custom designed characters Graphics Dot addressable, SATO Hex/Binary, BMP or PCX formats Forms Overlay Overlay of predesigned forms in image buffer *2 - 203 dpi, 3 - 305 dpi, 6 - 609 dpi Page 1-5 PANDUIT TDP4*HY GMTDPH-MAN...
- Page 10 30 to 80% RH Non-Condensing Electrostatic Discharge REGULATORY APPROVALS Safety VCCI (CLass B), UL, CUL, CE, FCC Class B RFI/EMI FCC Class B *2 - 203 dpi, 3 - 305 dpi, 6 - 609 dpi Page 1-6 GMTDPH-MAN PANDUIT TDP4*HY...
- Page 11 PARALLEL INTERFACE IEEE1284 Bi-Directional Plug-In Interface Module SERIAL INTERFACE High Speed RS232 Plug-In Interface Module USB INTERFACE Universal Serial Bus Plug-In Interface Module ETHERNET 10/100 Base T Plug-In Interface Module INTERFACE All specifications subject to change without notice. Page 1-7 PANDUIT TDP4*HY GMTDPH-MAN...
- Page 12 Section 1: Overview Notes Page 1-8 GMTDPH-MAN PANDUIT TDP4*HY...
-
Page 13: Section 2. Installation
S E C T I O N 2 . I n s t a l l a t i o n Introduction This section of the manual has been written to help you install the Panduit ® TDP4*HY Series printers and to get started as quickly as possible. -
Page 14: Unpacking And Parts Identification
• Set the printer on a solid, flat surface. Inspect the shipping container and printer for any signs of damage that may have occurred during shipping. NOTE: The following illustrations are representative only. Your printer may not be packed exactly as shown here, but the unpacking steps are similar. Page 2-2 GMTDPH-MAN PANDUIT TDP4*HY... -
Page 15: Setting Up The Printer
A IEEE1284 compliant cable must be used to realize the full throughput potential of the printers. NOTE: For information on interfacing the printer to a host system, see Section 5: Interface Specifications. Page 2-3 PANDUIT TDP4*HY GMTDPH-MAN... - Page 16 Ribbon Supply Ribbon Rewind Spindle Spindle Top Access Door Side Access Door LCD Display Dip Switch Cover Power Switch Label Hold Down Label Roll Retainer Label Supply Spindle Label Guide Print Head Head Latch Platen Page 2-4 GMTDPH-MAN PANDUIT TDP4*HY...
-
Page 17: Loading Labels And Tags
3. Loosen the Label Edge Guide and push it to the outside of the printer to give the maximum label width. 4. Remove the Label Roll Retainer Label Roll Retainer Print Head Head Latch Label Hold Down Sensor Assembly Label Guide Label Edge Guide Page 2-5 PANDUIT TDP4*HY GMTDPH-MAN... - Page 18 10. Close the Label Hold-Down by pushing downward on the green tab until it latches closed. NOTE: If the Label Dispenser option has been purchased, see Appendix A for proper label routing instructions. Print Head Label Guide Page 2-6 GMTDPH-MAN PANDUIT TDP4*HY...
- Page 19 Print Head by rotating the black Head Latch toward the front of the printer until it latches closed. 13. If the ribbon is not loaded, see the following description for loading instructions. 14. Close both the Access Doors. Page 2-7 PANDUIT TDP4*HY GMTDPH-MAN...
-
Page 20: Loading The Ribbon
6. Load the ribbon behind and over the top of the Ribbon Rewind spindle and tape it to the Extra Ribbon Core. Make sure it matches the ribbon path shown in the diagram. 7. Manually turn the Rewind spindle to wrap the ribbon onto the core one to two turns to secure it. Page 2-8 GMTDPH-MAN PANDUIT TDP4*HY... - Page 21 Damage from a label edge is physical damage and is unavoidable. It is not covered by warranty. It is possible to delay such damage by always ensuring that the ribbon used is wider than the label stock. This will help to protect the print head from label edge damage. Page 2-9 PANDUIT TDP4*HY GMTDPH-MAN...
-
Page 22: Driver Installation
The Windows driver for the TDP4*HY printers can be installed from your CD-ROM driver software CD; or downloaded from http://www.panduit.com, then under Product Information, select Downloads. • Windows is a registered trademark of Microsoft Corporation in the United States and other countries. - Page 23 Select Printer Model being installed on the right box and click “Next >” When prompted select LPT1 from the list of available ports and click Finish. The driver will begin to load and install the printer. Page 2-11 PANDUIT TDP4*HY GMTDPH-MAN...
- Page 24 Section 2: Installation The Printer Driver installation is now complete. Printer driver is now installed. Page 2-12 GMTDPH-MAN PANDUIT TDP4*HY...
-
Page 25: Operators Panel
ON LINE Not Used DSW2 DSW3 The Panduit ® TDP4*HY Operator Panel consists of five LED indicators, two momentary contact switches, three DIP switches, four adjustment potentiometers and one LCD Display. All of these are accessible from the front of the printer. - Page 26 (Reprint W/Feed must be enabled in the LCD panel Service Mode). DIP switch array to set operational parameters of the printer. 2 Line x 16 Character LCD display. Used for setting operational parameters of the printer and displaying error conditions. Page 2-14 PANDUIT TDP4*HY GMTDPH-MAN...
-
Page 27: Rear Panel
INTERFACE SLOT Connector for Plug-In Interface Module. MEMORY CARD SLOT Connector for optional PCMCIA Memory Card. External signal connector, AMP 57-60140. Plug-In Interface Module Fan-Fold EXT Port Access Panel Connector PCMCIA Card Cover Fuse AC Connector PANDUIT TDP4*HY Page 2-15 GMTDPH-MAN... -
Page 28: Sensors
A micro-switch that is activated when the head is unlatched. LABEL INDEXING SENSOR The sensing assembly contains two types of sensors, one for label gap and one for eye-mark sensing. The sensors are adjustable over a limited range. Page 2-16 GMTDPH-MAN PANDUIT TDP4*HY... - Page 29 Section 2: Installation Notes Page 2-17 PANDUIT TDP4*HY GMTDPH-MAN...
-
Page 30: Section 3. Configuration
Data Bit Selection (DSW1-1). This switch sets the printer to receive either 7 or 8 bit data bits for each byte transmitted. DSW1 DSW1-1 SETTING 8 Data Bits 7 Data Bits Parity Selection (DSW1-2, DSW1-3). These switches select the type of parity used for error detection. DSW1-1 DSW1-3 SETTING DSW1 No Parity Even Not Used Page 3-1 PANDUIT TDP4*HY GMTDPH-MAN... - Page 31 Xon/Xoff Bi-Com 3 Bi-Com 4 PRINTER SET UP Print Mode Selection (DSW2-1). Selects between direct thermal printing on thermally sensitive paper and thermal transfer printing using a ribbon. DSW2 DSW2-1 SETTING Therm Xfr Direct Therm Page 3-2 GMTDPH-MAN PANDUIT TDP4*HY...
- Page 32 Receive Buffer Selection (DSW2-5). Selects the operating mode of the receive buffer. See Section 6.Interface Specifications for more information. DSW2 DSW2-5 SETTING Single Job Multi Job If a 10/100BaseT LAN card is installed, DS2-5 has the following definitions: DSW2-5 SETTING ENQ Response Periodic Response Page 3-3 PANDUIT TDP4*HY GMTDPH-MAN...
- Page 33 This operation can be performed immediately after a label is printed and used, or immediately prior to the printing of the next label. DSW3-1 SETTING DSW3 Continuous Tear-Off Cutter* Not Used * Defaults to continuous if cutter not installed Page 3-4 GMTDPH-MAN PANDUIT TDP4*HY...
- Page 34 EXT Print Start Signal Selection (DSW3-5). Allows an external device to initiate a label print for synchronization with the applicator. When DSW3-5 is On, the unit is in the Continuous print mode, Backfeed is disabled and External Signals are ignored. DSW3 DSW3-5 SETTING Enabled Disabled Page 3-5 PANDUIT TDP4*HY GMTDPH-MAN...
- Page 35 DSW3-6 DSW3-7 SETTING DSW1 Type 4 Type 3 Type 2 Type 1 Repeat Print via External Signal (DSW3-8). Allows the applicator to reprint the current label in the print buffer. DSW3 DSW3-8 SETTING Enabled Disabled Page 3-6 GMTDPH-MAN PANDUIT TDP4*HY...
-
Page 36: Default Settings
The printer should be powered off while this message is being displayed (or after the beep is heard. This saves the default settings in the non-volatile memory where they will be automatically loaded the next time the printer is powered on. DEFAULT COMPLETED Page 3-7 PANDUIT TDP4*HY GMTDPH-MAN... -
Page 37: Potentiometer Adjustments
3. Press the FEED key to feed out a blank label. 4. Adjust the position using the OFFSET potentiometer on the front control panel and feed another label by depressing the FEED key. Repeat this procedure until the label is fully released from the liner. Page 3-8 GMTDPH-MAN PANDUIT TDP4*HY... - Page 38 Maximum print darkness is obtained by turning the potentiometer all the way clockwise and a maximum counterclockwise setting will give the lightest print. NOTE: The PRINT potentiometer adjustment will affect the darkness in all of the command code speed and darkness ranges. Page 3-9 PANDUIT TDP4*HY GMTDPH-MAN...
-
Page 39: Lcd Panel Printer Configuration
As soon as the label job begins to print, the display will indicate the number of labels in the print job that remains to be printed. Page 3-10 GMTDPH-MAN PANDUIT TDP4*HY... - Page 40 1. Use the Cursor keys to step the cursor to the desired setting. 2. Once the correct setting is selected, press the ENTER key to accept the selection and step the display to the next adjustment. Page 3-11 PANDUIT TDP4*HY GMTDPH-MAN...
- Page 41 Leading edge of the label as detected by the sensor Original (0 offset) first line print position A B C D E F G Moved with positive (+) offset to print on trailing edge of label PANDUIT TDP4*HY Page 3-12 GMTDPH-MAN...
- Page 42 1. Use the LINE key to step the cursor to either the YES or NO selection. 2. Once the correct setting is selected, pressing the FEED key will accept the setting and advance the display to the Print Offset display. Page 3-13 PANDUIT TDP4*HY GMTDPH-MAN...
- Page 43 To enable the Calendar feature, press the LINE key until the cursor is over the YES. If the Calendar feature is to be disabled, press the LINE key until the cursor is over the NO selection. When the desired setting is selected, press the FEED key. Page 3-14 GMTDPH-MAN PANDUIT TDP4*HY...
- Page 44 This selection tells the printer to strip out all carriage return/line feed pairs (CR/LF ) from the data stream, including graphics and 2D bar codes. It is used primarily to maintain compatibility with earlier models of Panduit ® printers. 1. Use the LINE key to step the underline cursor to either the YES or NO selection.
- Page 45 2. Confirm your selection by stepping the cursor to the Yes selection. If you select No, the display will return to the previous selection. TRUETYPEFONTCOPY Press the FEED key to accept the selection. If Yes was selected the copy process will start. COPYING Page 3-16 GMTDPH-MAN PANDUIT TDP4*HY...
- Page 46 Card to Memory Copy All mode. COPY START 2. Confirm your selection by stepping the cursor to the Yes selection. If you select No, the display will return to the previous selection. Page 3-17 PANDUIT TDP4*HY GMTDPH-MAN...
- Page 47 COPY START 2. Confirm your selection by stepping the cursor to the Yes selection. If you select No, the display will return to the previous selection. Page 3-18 GMTDPH-MAN PANDUIT TDP4*HY...
- Page 48 1. Use the LINE key to step the cursor to desired setting. If Yes is selected, the printer will enter the Memory Format mode. If No is selected, the display will advance to the mode display. Page 3-19 PANDUIT TDP4*HY GMTDPH-MAN...
- Page 49 EYE mark varies significantly within a roll of labels or between label rolls. In these instances the value should be set using the following procedures. Page 3-20 GMTDPH-MAN PANDUIT TDP4*HY...
- Page 50 5. Once the setting is correct, pressing the ENTER key will accept the setting and advance the next display. Page 3-21 PANDUIT TDP4*HY GMTDPH-MAN...
- Page 51 1. Use the LINE key to step the cursor to desired setting. If Yes is selected, the printer will feed a blank label anytime an error condition is cleared. 2. Once the setting is correct, pressing the FEED key will accept the setting and advance to the next display. Page 3-22 GMTDPH-MAN PANDUIT TDP4*HY...
- Page 52 3. Press the LINE key to step to the desired setting. 4. When the setting is correct, press the FEED key to accept the setting and step to the next display. Page 3-23 PANDUIT TDP4*HY GMTDPH-MAN...
- Page 53 Once the desired setting is selected, press the FEED key to accept the setting and step to the next display. SERVICE MODE The Service mode is exited by powering the printer off and then back on. Page 3-24 GMTDPH-MAN PANDUIT TDP4*HY...
- Page 54 Test Print cycle must be initiated with a Print Start signal on the EXT connector. You enter the Test Print Mode by pressing the FEED key while powering the printer on. V 05.00.03.00 Displays the firmware during the initialization. INITIALIZING Page 3-25 PANDUIT TDP4*HY GMTDPH-MAN...
- Page 55 1. Use LINE key to select either the YES or NO. 2. Once the desired setting is selected, pressing the FEED key will accept the selection and the printer will reset to the original default conditions. Page 3-26 GMTDPH-MAN PANDUIT TDP4*HY...
- Page 56 LINE key. The printer will emit one long beep after which the LINE key is released. 1. Set DSW2-7 Off to replace the Standard protocol codes or On to replace the Alternate set of protocol codes. Page 3-27 PANDUIT TDP4*HY GMTDPH-MAN...
- Page 57 2. Send the data stream to the printer. 3. The received data will be printed in a hexadecimal format4. To return the printer to normal operation, place DSW2-4 in the off position and power the printer off and then back on. Page 3-28 GMTDPH-MAN PANDUIT TDP4*HY...
-
Page 58: Introduction
• Replacing the Print Head • Replacing the Fuse Adjusting the Print Quality One of the nice features of the Panduit ® printers are their high print quality. They are equipped with two different methods of adjusting the quality of the print; print darkness and speed. When adjusting for optimum print quality, a bar code verifier system should be used. -
Page 59: Cleaning The Print Head, Platen And Rollers
4. Remove the ribbon. 5. Apply Panduit Cleaner to a cotton swab. 6. The Print Head faces downward along the front edge of the assembly. Pass the end of the dampened swab along the epoxy ridge that runs the entire width of the Print Head. -
Page 60: Cleaning The Label Edge Sensors
(immediately below the green PUSH tab. Sensor Assembly ® 5. Apply Panduit Thermal Print Head Cleaner to one of the cotton swabs. 6. The Platen is the rubber roller directly below the Print Head. It should be cleaned of any ribbon or label residue. -
Page 61: Replacing The Print Head
The print head on the TDP4*HY printers is a user-replaceable item. If it becomes damaged for any reason, it can be easily removed and replaced. Contact the Panduit ID Division for information on obtaining a new print head. The TDP4*HY is available with three different print heads with 203, 305 or 609 dpi (denoted by replacing * with a 2, 3 or 6 in fourth digit of part number). - Page 62 Scratching the surface will cause permanent and irreparable damage and is not covered by the warranty! 9. Align the thumb screw with the tapped hole in the new print head. 10. Re-secure the print head by tightening the screw. Page 4-5 PANDUIT TDP4*HY GMTDPH-MAN...
- Page 63 Section 4: Cleaning and Maintenance Notes Page 4-6 GMTDPH-MAN PANDUIT TDP4*HY...
-
Page 64: Section 5. Troubleshooting
The printer is ONLINE. c. The cable is not defective. There are other things that can cause this error message on your computer, but at this stage, a defective cable may be one of the reasons. Page 5-1 PANDUIT TDP4*HY GMTDPH-MAN... -
Page 65: Using The Rs232C Serial Interface
Serial Interface (PN WCL40451) to take advantage of the faster data transmission speeds. The older Serial Interface Modules will work, but at a reduced capability. 4. Check for obvious errors in the data stream. Is the data properly framed with the <ESC>A and <ESC>Z commands? Page 5-2 GMTDPH-MAN PANDUIT TDP4*HY... -
Page 66: Using The Universal Serial Bus (Usb) Interface
If the printer starts up OK but you cannot print, the problem could be one of the following: • There is a problem with the interface between the print server and the printer • There is a problem with the network connection or cabling. Page 5-3 PANDUIT TDP4*HY GMTDPH-MAN... - Page 67 NetWare polling is disabled by using the console command SET NETWARE RANGE 0. If you are not using NetWare, you can disable NetWare entirely with the command SET NETWARE DISABLED. 2. Check the individual protocol troubleshooting sections provided with the Ethernet Plug-In Interface Module for additional causes of intermittent printer problems. Page 5-4 GMTDPH-MAN PANDUIT TDP4*HY...
- Page 68 3. Download file too large. 3 Short CopyCard/Format Card Copy or 1. R/W error during copying. R/W Error Format Error 2. Card not installed properly. No Card Error 3. File too large. Mem Full Error Page 5-5 PANDUIT TDP4*HY GMTDPH-MAN...
- Page 69 Section 5: Troubleshooting Notes Page 5-6 GMTDPH-MAN PANDUIT TDP4*HY...
-
Page 70: Introduction
USB bus. Up to 127 peripherals can be connected to a single USB port. The interfaces available are a high speed (to 57.6K bps) serial interface, an Ethernet interface or an optional Universal Serial Bus (USB) interface. Page 6-1 PANDUIT TDP4*HY GMTDPH-MAN... -
Page 71: The Receive Buffer
X-On status if using X-On/X-Off), meaning the printer is ready to receive data. When the receive buffer is holding 2.0 MB of data (1 MB from being full), DTR will go “low” (or an X-Off is sent) indicating the printer can no longer receive data. This condition is called “Buffer Near Full.” Page 6-2 GMTDPH-MAN PANDUIT TDP4*HY... -
Page 72: Ieee1284 Parallel Interface
For this reason, an interface cable and host interface conforming to the IEEE1284 specification must be present to fully utilize the speed capabilities. This interface also operates bi-directionally and can report the status of the printer back to the host. Page 6-3 PANDUIT TDP4*HY GMTDPH-MAN... - Page 73 From Host FAULT AUTOFD To Host To Host Not Used Not used Not Used Logic Gnd Frame Ground Not Used +5V (Z=24K ohm) To Host SELECTIN From Host (1) Signals required for IEEE 1284 mode. Page 6-4 GMTDPH-MAN PANDUIT TDP4*HY...
-
Page 74: Rs232 Serial Interface
Connector DB-25S (Female) Cable DB-25P (Male), 50 ft. maximum length. For cable configuration, refer to Cable Requirements appropriate to the RS232C protocol chosen. Signal Levels High = +5V to +12V Low = -5V to -12V Page 6-5 PANDUIT TDP4*HY GMTDPH-MAN... - Page 75 It goes low when the printer is off-line, either manually or due to an error condition, and while printing in the Single Job Buffer mode. It will also go low when the data in the buffer reaches the Buffer Near Full level. Page 6-6 GMTDPH-MAN PANDUIT TDP4*HY...
- Page 76 The data streams for X-On/X-Off and Ready/Busy flow control are constructed in the same way as they are for Ready/Busy flow control. <ESC>A . . Job#1 . . <ESC>Z<ESC>A . . Job#n . . <ESC>Z Example: <ESC>A . . Job#1 . . <ESC>Z NOTE: All characters are in ASCII. Page 6-7 PANDUIT TDP4*HY GMTDPH-MAN...
-
Page 77: Universal Serial Bus (Usb) Interface
When Bi-Com 4 communications is selected, there is no busy signal from the printer. The host must request the complete status from the printer, including ready/busy. The host may request status in two different ways. Page 6-8 GMTDPH-MAN PANDUIT TDP4*HY... - Page 78 Upon receipt of a valid print job (<ESC>A . . . <ESC>Z), an ACK (06 hexadecimal) will be returned by the printer if there are no errors and a NAK (16 hexadecimal) if a printer error exists. Page 6-9 PANDUIT TDP4*HY GMTDPH-MAN...
- Page 79 DC1 (hexadecimal 11) command. Upon receipt of this command an ACK (06 hexadecimal) is returned if there are no errors and a NAK (16 hexadecimal) if a printer error exists. Note: To provide compatibility with older Panduit ®...
-
Page 80: Section 7. Optional Accessories
Instructions for installing the Memory Card Option are included with the installation kit. ERROR HANDLING Memory Card error conditions are indicated to the operator using a combination of the LCD panel, the ERROR LED on the front panel and the audible indicator. Page 7-1 PANDUIT TDP4*HY GMTDPH-MAN... -
Page 81: Plug-In Interface Modules
4. Place the new Interface Module in the slot and press inward firmly until it is properly seated. 5. Replace the two Interface Card Retaining Screws. 6. If the new Interface Module is for a serial interface, set DSW1 for the proper operation. 7. Connect the interface cable to the connector Page 7-2 GMTDPH-MAN PANDUIT TDP4*HY... -
Page 82: Cutter
As the labels are printed, they will be cut based on the the data supplied using the cutter command. Page 7-3 PANDUIT TDP4*HY GMTDPH-MAN... - Page 83 DSW3-2 in the ON positions). The Label Taken Sensor is adjusted at the factory for the optimal setting for most label material. However, the use of labels with a substantially different opacity may require that the threshold be adjusted. Page 7-4 GMTDPH-MAN PANDUIT TDP4*HY...
-
Page 84: Label Rewinder
To unwind for using with an applicator, first set the power switch OFF. Attach the lead edge of the labels from the rewind spindle to the applicator entry point. Select the WIND option on the rewinder, and when ready to begin, set the power switch to ON. Page 7-5 PANDUIT TDP4*HY GMTDPH-MAN... -
Page 85: Real Time Clock
It consists of a special clock chip that replaces the EPROM on the main pcb assembly. A qualified technician should perform the upgrade as it requires modifications to the main PCB assembly. Please call Panduit ® Technical Support if you need to add this option to an existing printer in the field. Page 7-6 GMTDPH-MAN PANDUIT TDP4*HY...
Need help?
Do you have a question about the TDP42HY and is the answer not in the manual?
Questions and answers