Hauff-Technik HSI 90 Assembly Instruction
Cable entry system
Hide thumbs
Also See for HSI 90:
- Installation instructions manual (22 pages) ,
- Installation instructions manual (32 pages)
Advertisement
Quick Links
Always. Reliable. Tight.
Assembly instruction
HSI 90 (cable entry system KES-M90)
Sleeve method KES-M 90-D/ -KVB/ -D 3/32(-D 6/20).
Any national regulations regarding the laying and backfi lling of pipework must be followed.
General information
• Pack the foundations and cable support well before laying the duct in order to prevent the system from sinking.
• The incorrect laying of cable or ducts and improper fi lling of the cable trench causes settlement, which can cause damage and leaks.
• KCable entries should only be opened just before fi tting with cables to avoid accidental damage during shell construction work.
• The entry must not be stressed mechanically by cables or pipes.
• Do not use solvent-based cleaning agents to clean the cable entries! (we recommend using Hauff cable cleaner KR M.T.X.).
• For further accessories and information see our website www.hauff-technik.de and our technical data sheets.
General processing advice
• Minimum installation temperature of the rubber sleeves up to + 5° C, preheat system if necessary.
• Duct connection must not be stressed with tractive and compressive forces.
• Rubber sleeves and spiral hose must not be greased.
• The end of the spiral hose must be cut to length at right angles, clean and free of sharp edges or burrs.
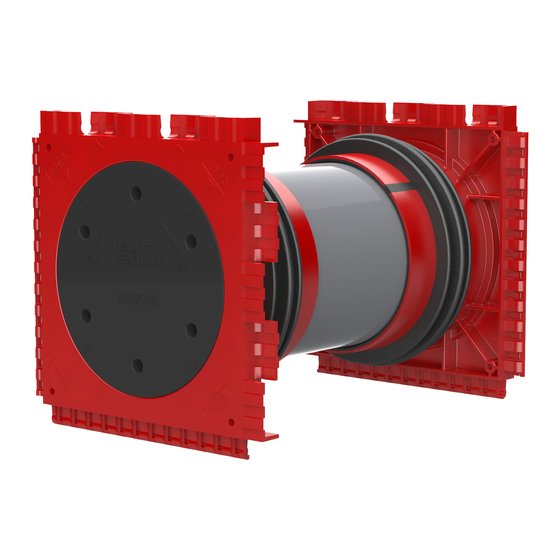
1
Open closing cover
2
Installing system cover
3
Preparation of variant -D
1.
Remove completely protective foil if applicable (after warming slightly). Open closing
cover with the SLS 6G fl exible head spanner (accessory) or with SLS 6G(D) (accessory)
if fi tted with perimeter insulation via the wrench receptacles with a twist to the left.
If necessary, clean out concrete residue from the wrench receptacles on the black
closing cover.
Insert the pre-assembled system cover with a slight twist into the bayonet of the wall
insert and screw in tight clockwise to limit stop (red union nut must not be tighte-
ned at this point).
The red union nut is then tightened clockwise by hand or with the SLS 6G(D) fl exible
Detail
head spanner until fl ush with the wall insert.
Then push the rubber sleeve onto the head nozzle of the system cover up to the red
unin nut (1.) and tighten the clamp using a A/F 13/5 Nm torque spanner. Then apply
a marking at the spiral hose at a distance of 8 cm. Insert the spiral hose into the rubber
8 cm
sleeve up to the limit stop (marking) (2.) and tighten the clamp using a A/F 13/5 Nm
torque spanner.
2.
Detail
Limit stop
Anschlag
• Do not knock the closing cover in with a hammer or sharp object.
• Before mounting the system cover in the wall insert, clean the interior of
dirt and check the sealing faces for damage.
Check fi nal position by matching the marker arrows on the wall insert with
the arrows on the system cover.
• Unneeded cable entries can be used as pressure-sealed back-up entries as
long as the Hauff quality seal on the closing cover is undamaged.
• We recommend fi tting existing open cable entries, which are to be used
as back-up entries, with new HSI 90-D closing covers and not to reuse
the removed or possibly damaged closing cover.
EN
www.hauff-technik.de
Advertisement

Related Manuals for Hauff-Technik HSI 90


Summary of Contents for Hauff-Technik HSI 90
- Page 1 • The entry must not be stressed mechanically by cables or pipes. • Do not use solvent-based cleaning agents to clean the cable entries! (we recommend using Hauff cable cleaner KR M.T.X.). • For further accessories and information see our website www.hauff-technik.de and our technical data sheets. General processing advice •...
- Page 2 Afterwards, the pre-shrunk warm or cold shrink sleeves are shrunk onto the individual Detail cables/pipes. 2 cm Anschlag Anschlag Anschlag Service telephone +49 7322 1333-0 Subject to change. Hauff-Technik GmbH & Co. KG Robert-Bosch-Straße 9 89568 Hermaringen, GERMANY Tel. +49 7322 1333-0 Fax +49 7322 1333-999 offi ce @ hauff-technik.de www.hauff-technik.de...
Need help?
Do you have a question about the HSI 90 and is the answer not in the manual?
Questions and answers