
Related Manuals for domi outdoor living LGMD1608


Summary of Contents for domi outdoor living LGMD1608
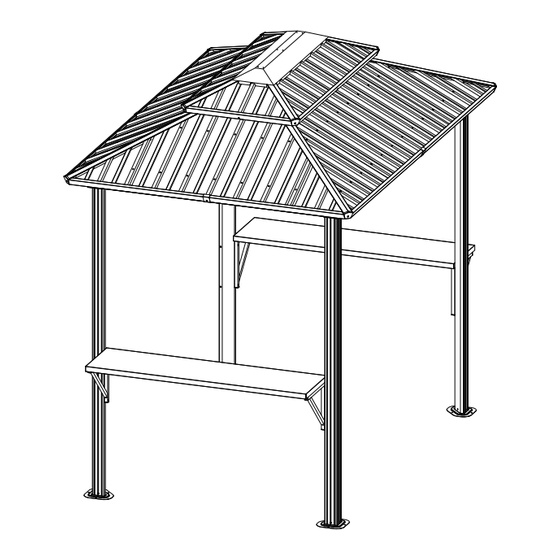
- Page 1 8'×6' Metal Grill Gazebo ASSEMBLY MANUAL MODEL#:LGMD1608 Missing part? Damaged? Contact us via email at domiservice01@outlook.com © Copyright 2022-2024 domi LLC. I All Rights Reserved.
- Page 3 U s e b o l t s t o s e c u r e t h e f r a me t o t h e g r o u n d t o a g a i n s t t h e s t r o n g w i n d . !...
- Page 6 Finishing Bar Post Post Finishing Bar Beam Selftapping screw Beam Finishing Bar Base Corner Cover Solidfying Bar Corner Roof Tube Middle Roof Tube Solidfying Bar Inside Roof Tabletop Support Cover Frame Outside Roof Tabletop Cover Solidfying Bar Fixing Bracket Solidfying Bar Solidfying Bar Fixing Bracket Solidfying Bar...
- Page 7 M5×10 Roof Panel Roof Panel Bolt M6×16 Bolt ST4.8×12 Roof Panel Bolt M6×25 Bolt Roof Panel Roof Panel M6×10 Bolt M6×28 Roof Panel Bolt and Nut M6×45 Roof Panel Roof Panel Bolt and Nut M6×28 Roof Panel Bolt Roof Panel Post Anchor Wrench Plastic Bracket...
- Page 8 M5×10 A x2 D x2 1# x6 ①: Post Assembly Instruction M5×10 A 1 x2 11# x D x2 1# x6...
- Page 9 B x2 C x2 ② : Beam Assembly Instruction ! Distinguish the position of post #A and # A1. 3# x32 A/A1...
- Page 10 ST4.8×12 4# x16 E x4 F x4 ③: Roof Tube Assembly Instruction...
- Page 11 M6×16 3# x8...
- Page 12 M6×16 3# x4 G x4...
- Page 13 M6×16 3# x8 4PCS (From bottom to top)
- Page 14 M6×16 R x2 U x4 3# x8 ①: Use 4 bolts #3 to install ②: Use 4 bolts #3 to install part #Q or #R to the middle part #Q and #R to corner roof tube #G. roof tube #F. Inside View...
- Page 15 M6×16 3# x3 3PCS Install the outside roof cover #I onto the inside roof cover #H. ④: Roof Panel Assembly Instruction...
- Page 16 AB3 x4 AB4 x4 AB x4 AB2 x2 AB1 x2 Z x2 Z1 x2 Z2 x2 AA x2...
- Page 17 M6×16 U x4 P x2 N x2 3# x8 Step 1: Insert roof panel #Z, Z1, Z2 into the frame, use bolt #3 to fix part #N to the middle roof tube. Repeat the above procedures to assemble the opposite side. Step 2: Insert roof panel #AA, use bolt #3 to fix part #P to the middle roof tube.
- Page 18 M6×16 U x4 P x2 N x2 3# x8...
- Page 19 M6×16 M6×10 K1 x2 K x2 J x2 J1 x2 6# x4 3# x4 Step 3 Step 1 Inside View Step 2 Step 2: Use bolt #6 to fix part #J and #J1 to the middle roof tube. Repeat the above procedures to assemble the opposite side.
- Page 20 AB x16 X x2 X2 x2 Y2 x2 AB x16 Y x2 Y1 x2...
- Page 21 Insert roof panel #Y, #Y1 and #Y2 into the frame. ! Please insert the spacer #W and fix with bolts as shown in the next page while install the roof panel.
- Page 22 M6×45 M6×25 M6×28 W x52 8# x16 5# x4 7# x32 ! Please insert the spacer #W and fix with bolts as shown in the next page while install the roof panel.
- Page 23 Insert roof panel #X, #X1, #X2 into the frame. ! Please insert the spacer #W and fix with bolts as shown in the next page while install the roof panel.
- Page 24 M6×45 M6×25 M6×28 W x52 8# x16 5# x4 7# x32 ! Please insert the spacer #W and fix with bolts as shown in the next page while install the roof panel.
- Page 25 M x2 L1 x2 M1 x2 L x2 U x4 V x4 3# x8 Step 2: Place part #M and #M1 onto the side of roof panel #X, #X1 and #X2, then use bolt #3 and fixing bracket #V to fix them. Repeat the above procedures to assemble the opposite side.
- Page 26 S x4 ⑤: Table Assembly Instruction M6×28 9# x8...
- Page 27 T x2 M6×28 9# x8...
- Page 28 10# x8 You can secure each base with 2 Post ancher to the soft ground as a temporary use. ! The ancher can not be used as expansion bolts which can stand against the strong wind.
- Page 29 R E S O P T C O M F O R T I N Y O N R O W N B A C K Y A R D A t d o m i o u t d o o r l i v i n g , w e b e l i e v e i n o u r p r o d u c t s . T h a t ’...
Need help?
Do you have a question about the LGMD1608 and is the answer not in the manual?
Questions and answers