Table of Contents
Advertisement
Quick Links
Advertisement
Table of Contents

Related Manuals for Connects2 Connects2Vision CAM-LR2-AD


Summary of Contents for Connects2 Connects2Vision CAM-LR2-AD
- Page 1 Rear View Camera Input and Video In Motion Application: Land Rover Evoque 2011>, Range Rover 2004 - 2013, Range Rover Vogue (L322) 2002 - 2012, Discovery 2012 - 2014, Freelander 2013 - 2017 For Touch Screen Nav Version 3 (Resistive Touch), 3.1 (Capacitive Touch) www.connects2.com...
- Page 2 Connects2 can not be held responsible for the installation of this product. Technical Support Connects2 want to provide a fast and suitable resolution should you encounter any technical issues. With this in mind, when contacting Connects2, try to provide as much Information as possible.
- Page 3 Dip 6 – CAN-bus termination resistor on the head-unit side Setting Dip2 to “ON” codes the factory rear-view camera input, which is located on the brown fakra male connector of the factory monitor. When reverse gear is engaged, the navigation will automatically switch to this input. www.connects2.com...
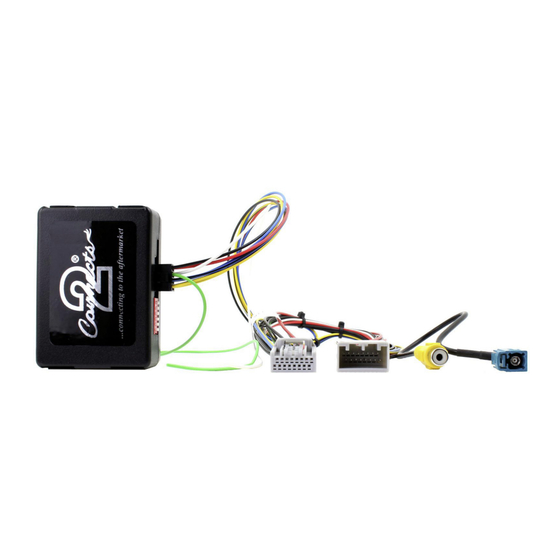
- Page 4 CAN-LOW – connection to the vehicle Pin 1 +12V Permanent Black Pin 5 Ground Green Pin 6 Activation of the video-in-motion function (+12V = TV-free activated) White Pin 2 Trigger output (+12V DC 500mA) Connection Schema Interface Supplied Adapter Harness www.connects2.com...
- Page 5 2. Transfer the female 16pin connector of vehicle harness from the rear of the factory head unit into the male 16pin connector of the harness. 3. Plug the female 16pin connector of the harness into the male 16pin connector on the rear of the factory navigation system. www.connects2.com...
- Page 6 1. Connect the female Fakra-connector of the supplied adapter to the male purple Fakra connector on the rear of the factory navigation monitor. 2. Connect the video RCA of the rear-view camera to the female RCA connector of the supplied adapter NB: Only compatible with NTSC-cameras. www.connects2.com...
- Page 7 Connect a switch to the green cable and connect the green cable to +12V ACC. ● +12V = Video in Motion is activated ● 0V = Video in Motuon is not activated Note: The loose white cable is not required and must be isolated. www.connects2.com...
- Page 8 NOTES www.connects2.com...
Need help?
Do you have a question about the Connects2Vision CAM-LR2-AD and is the answer not in the manual?
Questions and answers