Zehnder Rittling ComfoSpot 50 Manual
Hide thumbs
Also See for ComfoSpot 50:
- Operating and installation instructions (42 pages) ,
- Installation notes (16 pages) ,
- Installation instructions manual (14 pages)

Related Manuals for Zehnder Rittling ComfoSpot 50


Summary of Contents for Zehnder Rittling ComfoSpot 50
- Page 1 Decorative Radiators Comfortable indoor ventilation Heating and cooling ceiling systems Clean air solutions Zehnder ComfoSpot 50 User manual on operation and installation for operators and installers...
- Page 2 Legal regulations All rights reserved. This manual has been compiled with the utmost care. Nevertheless, the publisher accepts no liability for damage caused by missing or incorrect details in this manual. We reserve the right at any time and without previous notification to change the content of these instructions in part or as a whole.
-
Page 3: Table Of Contents
Contents Foreword and introduction ........................2 Notes on the user manual ........................2 Validity ..............................2 Target groups ............................2 Qualification of target group ........................2 Conformity .............................. 2 ... -
Page 4: Foreword And Introduction
The unit type series are hereinafter designated with the common product name, ComfoSpot 50. The subject of this user manual is the ComfoSpot 50 in series production. Accessories are only described to the extent necessary for appropriate operation of the unit. Please refer to the respective instructions for further information on accessory parts. -
Page 5: Introduction And Safety
Introduction and safety This manual contains information that must be observed for your personal safety and in order to prevent personal injury and damage to property. This information is highlighted in the form of warning notes, which are shown below according to the degree of risk. -
Page 6: Notes On Operation Of The Ventilation Unit
The external control panel and the connection hub are only suitable for use in indoor areas. Proper use The ComfoSpot 50 is intended for the ventilation of living rooms and spaces with a similar use. Any other use or any use beyond this is considered improper use. -
Page 7: Storage
Product description The ComfoSpot 50 is built to the current state of the art and the recognized safety regulations. The unit is subject to continuous improvement and development. This is why it is possible for your unit to deviate slightly from the description. -
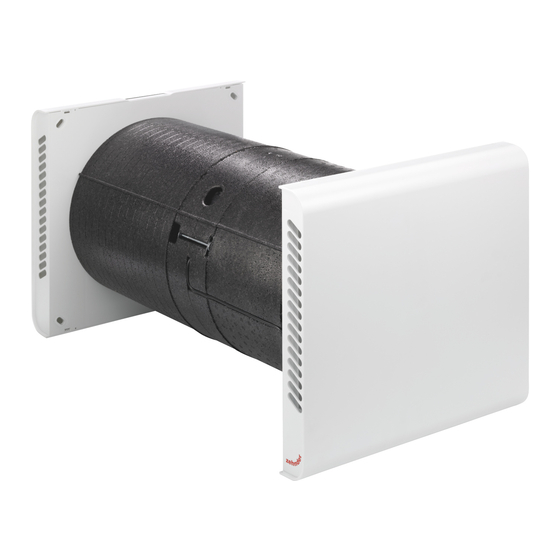
Page 8: Overview Of Assemblies
Frost protection The ComfoSpot 50 is equipped with an automatic frost protection function to prevent the thermal exchanger from icing up. In working condition, the control unit acting in frost protection mode is activated when required for the four manual fan speeds as well as in automatic mode. -
Page 9: Description Of The Operating Functions And Signals
The two (+) / (-) keys are used for setting the various fan speeds and operating modes. The ventilation stages and the Automatic operating mode are indicated with blue LEDs, and the service information with red LEDs. Symbol (+) / (-) buttons for selecting Symbol Symbol Filter maintenance... - Page 10 Icon Description Explanation Boost ventilation NOTE mode The boost ventilation function as temporarily activated fan speed 4 can LED1-4 light up only be activated with a configured DIP switch setting. After the boost ventilation time has elapsed, the unit will be transferred to the most recently selected fan speed.
-
Page 11: Options For Ventilation Operation
Error code LED1-4 delete the indication of the fault notification. Options for ventilation operation The ComfoSpot 50 can also be equipped with optional accessories for convenient operation and demand-controlled ventilation mode. NOTE Ventilation operation by means of optional accessories requires the installation and configuration of those accessory components. -
Page 12: Automatic Operation Via Sensor Module
Consequently, an optimized response is achieved, and mildew formation is prevented, which ultimately also leads to an increase in energy savings. The ventilation unit of the ComfoSpot 50 series with a sensor module is classified in energy efficiency class A. -
Page 13: Maintenance By The User
Maintenance by the user Maintenance work on the ventilation unit is limited to filter replacement and external cleaning as required. NOTE If the maintenance work is not carried out regularly, this will affect the functionality of the ventilation unit in the long run, in particular in the case of a failure to perform filter maintenance. - Page 14 4. Gripping the pulling tabs, pull the filter carefully out of the filter compartment. 5. Insert the filters into the respective filter compartments in accordance with their class. Filter compartment for extract air filter ISO Coarse Filter compartment for outdoor air filter ISO Coarse or ISO ePM10 6.
-
Page 15: Unit Maintenance
In the event of a fault message (indicated by the LED fault lighting up continuously), contact customer service. Information about the type of your ComfoSpot 50 can be found on the type label, which is located under the design cover of the unit. -
Page 16: Installation
General installation requirements The ComfoSpot 50 is intended exclusively for installation in an outside wall, where the side air passage openings must be located on the inner side, vertically and with the thumb wheel for shutter adjustment on the right side. -
Page 17: Installing The Ventilation Unit
Installing the ventilation unit DANGER Fatal voltages Disconnect all poles of the mains cable intended for connection to the ventilation unit from the power supply before carrying out installation and maintenance work. Proceed as follows for the installation of the unit: NOTE Optional accessories, such as sensor modules and wireless or wired operating modules, must be fitted into the unit before installation. -
Page 18: Relocating The Internal Control Panel
5. Align the unit with the side air intake grills of the bottom cover of the interior cover being vertical. Transfer the drill hole onto the wall (in conjunction with the round wall mounting pipe) or onto the EPP housing for the square wall mounting pipe. - Page 19 NOTE Pull the plug of the ribbon cable cautiously out of the post connection. 4. Undo and remove the two screws for fastening the control panel carrier, bring them onto the opposite side, and fasten the control panel carrier equally on the two screw-in mandrels. 5.
-
Page 20: Electrical Connections
Electrical connections WARNING The activities described in this chapter may only be carried out by skilled personnel with the following qualifications: Training on the installation and commissioning of electrical units. Training on electrical hazards and local safety regulations. Knowledge of the relevant standards and guidelines. Fatal voltages Fatal voltages Only a qualified electrician may carry out the electrical installation. -
Page 21: Parameterisation Of Boost Ventilation And Absent Operating Modes
Parameterisation of boost ventilation and absent operating modes As described in “3.1.6 Description of the operating functions and signals”, the boost ventilation and absent operation modes can be adjusted according to user-specific needs. NOTE Parameterisation must be carried out in the accessible status of the control board. Configuration of the boost ventilation mode The temporarily active fan speed 4 operates as the boost ventilation function. -
Page 22: Commissioning
2. Using the raised contours for the airflow, put the bottom cover of the outside wall panel onto the EPP housing, and fasten it on the four fixing points on the wall mounting pipe. NOTE Then screwing the bottom cover to the wall, the bottom cover of the outside wall panel must not bend! If necessary, undo the screws again so that the bottom cover of the outside wall panel is still fitted tightly to the façade, but this does not cause any deformation. -
Page 23: Specialist Maintenance
Instructions for proper disinfection can be found at www.core.life. In doing so, proceed as follows: 1. Disconnect the ComfoSpot 50 from the supply voltage. 2. Take the interior top cover off and remove the filter caps and filters (see chapter “3.3 Maintenance by the user“). -
Page 24: Visualization Of Fault Notifications
8. Proceed as follows when cleaning: NOTE Do not use aggressive or solvent-based cleaning agents. Immerse the enthalpy exchanger a few times in warm water of max. 40°C. Then rinse off the enthalpy exchanger thoroughly with warm tap water of max. 40°C. ... -
Page 25: Technical Specifications
Technical specifications General specifications Description / Value Heat exchanger type Enthalpy exchanger with polymer membrane Housing / Interior lining ABS plastic, UV-resistant; interior lining is made of expanded polypropylene (EPP) to provide heat and sound insulation Weight 6 kg Operating voltage 230 V AC (working voltage range 100 to 240 V AC) Mains frequency 50 to 60 Hz... -
Page 26: Dimensions
Dimensions ~155 ~150... -
Page 27: Terminal Scheme
Terminal scheme... - Page 28 Sales International Zehnder Group Deutschland GmbH Almweg 34 77933 Lahr Deutschland T +49 7821 586-392 F +49 7821 586-406 sales.international@zehndergroup.com www.international.zehnder-systems.com...
Need help?
Do you have a question about the ComfoSpot 50 and is the answer not in the manual?
Questions and answers