Zehnder Rittling ComfoSpot 50 Operating And Installation Instructions
Hide thumbs
Also See for ComfoSpot 50:
- Manual (28 pages) ,
- Installation notes (16 pages) ,
- Installation instructions manual (14 pages)

Related Manuals for Zehnder Rittling ComfoSpot 50


Summary of Contents for Zehnder Rittling ComfoSpot 50
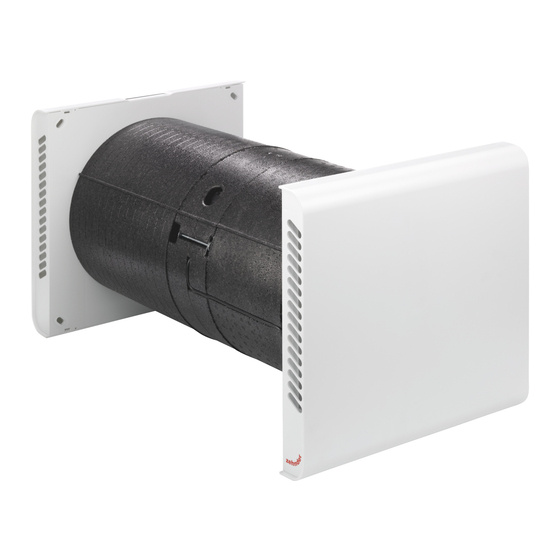
- Page 1 Decorative Radiators Comfortable indoor ventilation Heating and cooling ceiling systems Clean air solutions Zehnder ComfoSpot 50 Operating and installation instructions for user and installer...
- Page 2 Legal regulations All rights reserved. This manual has been compiled with the utmost care. Nevertheless, the publisher accepts no liability for damage caused by missing or incorrect details in this manual. We reserve the right at any time and without previous notification to change the content of these instructions in part or as a whole.
-
Page 3: Table Of Contents
Type label ..........................8 Frost protection ........................8 2.1.2.1 ComfoSpot 50 frost protection mode ..................9 Joint operation with fireplaces ....................9 Functionality of the internal and external control panel ............9 Operating functions and signalling from the control panel ............9 Automatic operating mode ..................... - Page 4 3.2.5.1 Configuration of Automatic operating mode ................26 3.2.5.2 Configuration of the boost ventilation mode ................26 3.2.5.3 Configuration of the Away mode .................... 26 Installing the outside wall panel ..................... 26 Maintenance and repair by the qualified personnel ............... 28 Inspection and cleaning of enthalpy exchanger ..............
-
Page 5: Preface
Introduction and safety The ComfoSpot 50 is built to the current state of the art and the recognized safety regulations. The unit is subject to continuous improvement and development. This is why it is possible for your unit to deviate slightly from the description. -
Page 6: Safety
Safety Always observe the safety regulations and installation conditions in the current operating manual. Failure to observe the safety regulations, installation conditions, instructions, warnings, and comments in this document can result in personal injury or damage to the unit. Safety regulations •... -
Page 7: Liability
The ComfoSpot 50 was developed and manufactured for the decentralized ventilation of living areas and functional rooms. Every other use is deemed as "improper use", and can lead to damaging the ComfoSpot 50, or to personal injury, for which the manufacturer cannot be held liable. The manufacturer shall not be liable for any kind of damage that can be attributed to the following causes: •... -
Page 8: Type Label
Frost protection The ComfoSpot 50 is equipped with an automatic frost protection control system, which prevents ice from forming in the heat exchanger at very low outdoor air temperatures. If needed, the frost protection mode is activated both in the four... -
Page 9: Comfospot 50 Frost Protection Mode
The external control panel has touch-sensitive buttons and responds to touching the buttons. The ComfoSpot 50 can be operated at the same time with the internal and the external control panel. The button assignments and the LED signalling in both control panels are identical in terms of functions. - Page 10 Automatic The Automatic function can only be activated with a sensor operating mode module. (AUTO) AUTO LED lights up Pressing the (+) button from the currently active FS4 transfers the unit to AUTO fan speed. AUTO fan speed is exited by pressing the (-) button, and the unit is transferred back to FS4.
-
Page 11: Automatic Operating Mode
Consequently, an optimized response is achieved and mildew formation is prevented, which ultimately also leads to an increase in energy savings. The ComfoSpot 50 ventilation unit with a sensor module is classified in energy efficiency class A. 2.3.1.1 Functional principle of HUMIDITY sensor The HUMIDITY sensor module is primarily supposed to be installed in units for the ventilation of rooms with an increased occurrence of humidity. -
Page 12: Functional Principle Of Co / Voc Sensor
Humidity control 10 20 30 40 50 60 70 80 90 100 Rel. humidity [%] Diagram 1: Factory setting characteristic curve for Automatic operating mode with humidity control 2.3.1.2 Functional principle of CO / VOC sensor The CO sensor module and the VOC sensor module are each combined with a humidity/temperature sensor. -
Page 13: Replacing The Unit Filters
Standby operating mode. In ComfoSpot 50, two high-quality original filters of the class G4 are installed by default. Retrofitting a pollen filter of the class F7 is possible. This is inserted into the lower filter compartment (outdoor air filter). The filters in the ComfoSpot 50 must be checked in accordance with the relevant notification on the control panel and, if needed, must be replaced. - Page 14 Insert the filters into the respective filter compartments in accordance with their class. Filter compartment for extract air filter (G4) Filter compartment for outdoor air filter (G4 or F7 Using the directional arrow of the filter label pointing to the centre of the unit, insert the new filters. An arrow marker for the direction of flow for the filter is engraved on the bottom cover of the interior cover next to the filter compartment in each respective case.
-
Page 15: Resetting The Filter Runtime
Disposal Discuss with your supplier what you should do with your ComfoSpot 50 at the end of its life cycle. If you cannot return your ventilation unit, do not dispose of it with the normal household waste, but rather contact your local authority for options to recycle components or to process materials in an environmentally-friendly way. -
Page 16: Installation Preparations
It must be adjusted flush with the level of the finished wall construction. The installation of the ComfoSpot 50 is only allowed in connection with the round wall mounting pipe or with the square wall mounting pipe! The square wall mounting pipe, intended in particular for new buildings, should be integrated in the outside wall construction in the course of the wall construction. - Page 17 Remove the interior cover from the bottom cover, whilst considering the explanations given in 2.4.1, section 2. Take off the cover for the electrical connection by undoing the yellow PVC nut. Spray silicone spray onto the interior of the wall mounting pipe, and insert the unit, together with the bottom cover of the interior cover, as far as it will go into the wall mounting pipe, whilst considering the position of the openings for the electrical connections.
-
Page 18: Electrical Connections
The vertical installation of the bottom cover of the outside wall panel requires the precise vertical positioning of the bottom cover of the interior cover! Pull the unit out of the wall mounting pipe again. Drill a drill hole, and install the dowel from the installation set or a different dowel suitable for the material. -
Page 19: Relocating The Internal Control Panel
Wires for unit connecting cable Wires for mains supply line Install the connections orderly and space saving so that the mounting of the plastic cover for the electric connections can be done without difficulty. Mount the plastic box for covering the electrical connection and fix it in place on the right-hand side using the yellow PVC nut and on the left-hand side using the designated screw for fixing the unit on the wall. - Page 20 Disconnect the ribbon cable from the board for the control panel, by pulling the ribbon cable's plug (gripping with two fingers) out of the socket located on the board. Meanwhile, hold the control panel tight in the area of the plug connection using two fingers on your other hand.
-
Page 21: Connecting The External Control Panel
Install the ribbon cable in the designated fixing points, taking care to produce a smooth overlapping in the vicinity of the 90° bends. Then snap the control panel onto the control panel carrier in the correct position. In case the unit cable is not yet connected, establish the electrical connection by means of the WAGO luminaire terminals, install and fix in place the plastic box for covering the electrical connection (see 3.2.4.1). - Page 22 Note down the colour of the wires in accordance with the assignment of the clamping points. This assignment for the colour coding must match up with the assignment of the clamping points on the external control panel! Enter the colour coding in the table below in order to have the assignment available so that it can be reproduced when the external control panel is removed.
-
Page 23: Connection To The External Control Panel
Install the connecting cable in the designated cable recess in the EPP housing. After pushing the unit into the wall mounting pipe, connect the plug-in connector part for the connecting cable with the plug-in connector part of the cable for the external control panel. 3.2.4.3.2 Connection to the external control panel Connect the cable to the spring-type terminals for the connection board of the external control panel as depicted. - Page 24 Remove the PVC cover of the control board at the side of the ribbon cable entry out of the slot on the EPP housing, and gripping the plug, cautiously pull the ribbon cable out of the UI X9 plug connection on the control board. Undo the four nuts used to fasten the bottom cover of the interior cover to the EPP housing from the threaded bolts, and remove the bottom cover including the electronic equipment cover.
- Page 25 Guide the sensor cable, together with the wire ends, from the inside to the outside through the cable guide of the EPP housing, and push the sensor cable into the cable recess. Connect the sensor cable to the clamping point SENSOR X8 on the control board. Watch out for the correct assignment of the wires in accordance with the assignment of the SENSOR X8 terminal! Colour coding for sensor cable...
-
Page 26: Parameterizable Operating Modes
Parameterizable operating modes 3.2.5.1 Configuration of Automatic operating mode The DIP switch MODE SW1 can be used to configure the Automatic operating mode for various functional principles. The use of the Bathroom function requires the release of the HUMIDITY sensor module (DIP switch no. 2 of MODE SW1 in ON position). - Page 27 Instructions for the square wall mounting pipe: Use a hammer to cautiously tap in the respective driven-in dowel into the four receiving holes in the EPP housing for the wall mounting pipe surface plan. Using the raised contours for the airflow, put the bottom cover of the outside wall panel onto the EPP housing, and fasten it on the four fixing points on the wall mounting pipe.
-
Page 28: Maintenance And Repair By The Qualified Personnel
Prior to intervening on the unit, make sure that there is no power in the mains supply line! Routine maintenance of the ComfoSpot 50 is easy to carry out and should be performed regularly to keep the unit operating hygienically flawlessly. Only a maintenance interval of 2 years must be adhered to when the filter is changed on a regular basis and if our original filters are used. - Page 29 Remove the PVC cover of the control board at the side of the ribbon cable entry out of the slot on the EPP housing, and gripping the plug, cautiously pull the ribbon cable out of the UI X9 plug connection on the control board. Should there be a connected up external control panel, disconnect the wires for the connecting cable from the BUS X7 terminal.
-
Page 30: Replacing The Fans
To change the fans, the unit must be completely pulled out of the wall. In doing so, proceed as follows: Disconnect the ComfoSpot 50 from the supply voltage. Perform steps 2. and 3. as per 3.3.1 to remove the fans. -
Page 31: Visualization Of Fault Notifications
Disconnect the plug connection of the connecting cable if the external control panel is connected. Pull the PVC cover for the control board at the side of the ribbon cable entry point out of the slot on the EPP housing. After disconnecting all cable connections, the control board can be removed from the fixation recess on the EPP housing. -
Page 32: Technical Description
Technical description General specifications Description / Value Heat exchanger type Enthalpy exchanger with polymer membrane ABS plastic, UV-resistant; interior lining is made of expanded Housing / Interior lining polypropylene (EPP) to provide heat and sound insulation Weight 6 kg Electrical connection 230 VAC, 50-60 Hz Max. -
Page 33: Dimensions
Dimensions ~155 ~150... -
Page 34: Terminal Scheme
Terminal scheme... -
Page 35: Appendices
Appendices Checklist A Maintenance work for users Maintenance work Enter date in quarter Change both filters in the HR unit (recommended filter replacement cycle: 90 days) Quarter Year 20... 20... 20... 20... 20... 20... 20... 20... 20... 20... Quarter Year 20... -
Page 36: Checklist B Maintenance Work For Qualified Personnel
Checklist B Maintenance work for qualified personnel Maintenance work Enter result − The listed maintenance work must be carried out in accordance with the components actually available. − Inspection of ventilation system in accordance with DIN 1946-6 Appendix E (normative) and Appendix F (informative) −... -
Page 37: Commissioning And Handover Protocol
Commissioning and handover protocol Customer data Name: First name: Tel.: Street: Zip code: City: Construction project: Unit type: Serial no.: Year of construction: Completeness Components Version Result - Design as planned yes / no Supply air duct - Cleaning option provided yes / no - Arrangement as planned yes / no... -
Page 38: Air Volume Protocol
Air volume protocol Customer data Name: First name: Tel.: Street: Zip code: City: Construction project: Unit type: Serial no.: Year of construction: Measurement data Measuring instrument used: Faults during measurement: Indoor temperature: Outdoor temperature: Filter status when measuring Outdoor Extract Building moisture clean... -
Page 39: Product Data Sheet
Product data sheet... -
Page 40: Product Label
Product label Depending on the application of the unit, there are various product labels for the ComfoSpot 50. The product label applicable for the ventilation system is based on the installation of the system and the model identifier from the product data sheet. -
Page 41: Conformity
Product designation: Decentralized heat recovery unit ComfoSpot 50 series Directive 2014/35/EU of the European Parliament and of the Council of 26 February 2014 on the harmonisation of the laws of the Member States relating to the making available on the market of electrical equipment designed for use within... - Page 42 Sales International Zehnder Group Deutschland GmbH Almweg 34 77933 Lahr Deutschland T +49 7821 586-392 F +49 7821 586-406 sales.international@zehndergroup.com www.international.zehnder-systems.com...
Need help?
Do you have a question about the ComfoSpot 50 and is the answer not in the manual?
Questions and answers