Table of Contents
Advertisement
Available languages
Available languages
Quick Links
Advertisement
Chapters
Table of Contents

Related Manuals for Resonance r07a


Summary of Contents for Resonance r07a
- Page 1 Screening Audiometer QUICK USER’S HANDBOOK 0 0 5 1...
- Page 2 Language added February 2018 New PSU added Jannuary 2019 In use - Instructions update M.R.S. s.r.l. is the manufacturer of the R07A Screening Audiometer. M.R.S. s.r.l. Via Cesare Battisti 134 24025 Gazzaniga (BG), Italy Tel.: +39 035 712091 Fax: +39 035 713966 e-mail: support@resonance-audiology.com...
- Page 3 Index ITALIANO ENGLISH TÜRKÇE DEUTSCH ESPAÑOL...
-
Page 4: Table Of Contents
1-Introduzione e campo di utilizzo ___________________________5 2-Descrizione _____________________________________________6 2.1 Avvertenze _____________________________________________6 2.2 Garanzia e manutenzione _________________________________7 2.3 Prima apertura e controllo dell’R07A ________________________8 2.4 Accessori _______________________________________________8 2.5 Connessione degli accessori _____________________________ 10 2.6 Sostituzione delle batterie _______________________________ 11 2.7 Simboli presenti sul dispositivo ___________________________ 12 3- Funzione di tasti e display ______________________________ 13 3.1 Accendere e spegnare il dispositivo ________________________ 13... -
Page 5: 1-Introduzione E Campo Di Utilizzo
Conservate accuratamente questo manuale in posto sicuro per future consultazioni. L’audiometro Screening R07A è stato progettato e realizzato per soddisfare e superare tutti i requi- siti di qualità e sicurezza, ed è certificato dal simbolo CE secondo la direttiva europea sui dispositivi medici. -
Page 6: 2-Descrizione
In caso l’R07A venga connesso ad altri dispositivi con una propria sorgente esterna di ali- mentazione, la conformità dell’intero sistema alla EN 60601-1 deve essere verificata sotto la responsabilità... -
Page 7: Garanzia E Manutenzione
RESONANCE garantisce che: • L’R07A è privo di difetti nei materiali e nella lavorazione, in condizioni di normale utilizzo e servizio, per un periodo di 36 mesi a partire dalla data di installazione del dispositivo presso il primo acquirente da parte di personale autorizzato. -
Page 8: Prima Apertura E Controllo Dell'r07A
Se il dispositivo ha subito danni durante il trasporto, il device deve essere controllato per identificare eventuali danni elettrici o meccanici. In caso siano rilevati danni al dispositivo, siete pregati di contattare il vostro rivenditore RESONANCE. Conservare tutto il packaging originale per usi futuri. - Page 9 Immagine Descrizione Standard / Optional Connettore ACR/ACL ● Cuffia DD45* (A-B) ACR/ACL ○ Cuffie ad inserzione IP30* (A-B) PAT RESP ● Pulsante Paziente* Alimentatore per uso medicale: Modello: MENB1010A0503(xyz) 5 VDC ○ (xyz) = B01 kit prese intercambiabili (xyz) = Q01 con cavo di alimentazione (xyz) = N01 con cavo di alimentazione In alternativa: Alimentatore per uso medicale:...
-
Page 10: Connessione Degli Accessori
2.5 Connessione degli accessori I connettori si trovano sul lato sinistro del dispositivo R07A. Connettere tutti gli accessori prima di accendere il dispositivo. Figura 1 – vista laterale R07A Riferimento Simbolo Funzione ACR (Red) Connettore per canale destro cuffia AC... -
Page 11: Sostituzione Delle Batterie
Figura 2 – vista inferiore R07A 2.6 Sostituzione delle batterie Rimuovere il coperchio dell’alloggiamento batterie posizionato nella parte inferiore del dispositivo. Rimuovere le batterie ed inserire quelle nuove rispettando la polarità come indicato nell’etichetta pre- sente nell’alloggiamento. Per evitare danni, inserire le batterie partendo dal polo positivo. -
Page 12: Simboli Presenti Sul Dispositivo
2.7 Simboli presenti sul dispositivo Fare riferimento alle istruzioni Fare riferimento al manuale per la connessione dei trasduttori e dell’alimentazione Dispositivo di Classe II (Il simbolo si riferisce all’alimentatore esterno per uso medicale con doppio isolamento) Parti applicate di tipo BF I rifiuti elettrici o elettronici possono contenere sostanze pericolose, perciò... -
Page 13: 3- Funzione Di Tasti E Display
Prima di accendere il dispositivo, assicurarsi che tutti gli accessori siano già collegati; non rimuoverli durante l’esecuzione dei test ma solamente a dispositivo spento. L’R07A si spegne automaticamente dopo 1, 2 o 5 minuti (oppure mai) secondo le impostazioni salvate. -
Page 14: Presentazione Toni Puri
3.2 Presentazione Toni Puri Per sottoporre il tono di stimolo al paziente, devono essere utilizzati i seguenti comandi: Signal: toccare il tasto a sfioramento Signal; è un tasto soft-touch non è quindi necessario premerlo. Level: ruotare la manopola sinistra (dB) per aumentare o diminuire il livello di intensità dello stimolo. Frequency: ruotare la manopola sinistra (Hz) per selezionare la frequenza. -
Page 15: Display
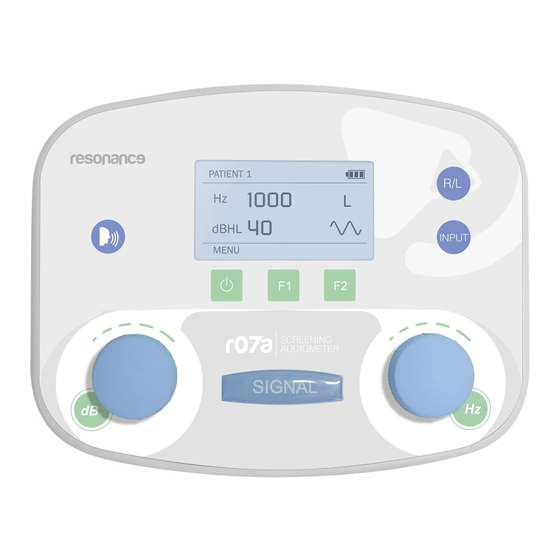
3.4 Display SIGNAL: un indicatore della presentazione dello stimolo è posizionato nell’angolo supe- riore destro del display. RESPONSE: quando si utilizza il pulsante paziente, una risposta è indicata al centro del display header. STATO DELLA BATTERIA: il livello della batteria è indicato nell’angolo superiore destro del display header. -
Page 16: 4-Esecuzione Dei Test
4. Esecuzione dei test 4.1 Audiometria Tonale (VA) L’audiometria tonale rappresenta il test di base per l’esame audiologico volto a valutare la funzionalità uditiva e a determinare la soglia uditiva. Il termine soglia uditiva identifica il livello di intensità minima percepita dal soggetto esaminato. -
Page 17: Test Hugson-Westlake Auto-Threshold (Va)
4.2 Auto-threshold Hugson-Westlake (VA) Il test, controllato dal pulsante paziente, secondo il metodo Hughson-Westlake, fornisce una versione modificata e abbreviata dello standard ISO 8253-1 per la registrazione automatica della soglia AC senza mascheramento. Questo test è utilizzato in particolare nell’audiometria industriale e nei programmi per la salvaguardia dell’udito. -
Page 18: 5-Menu
5. Menu In modalità test, per accedere al Menu del dispositivo premere il tasto ON/OFF. Per muoversi in alto o in basso all’interno del Menu, ruotare le manopole. Entrando in questo Menu è possibile impostare o selezionare: Paziente Setup Frequenze Calibrazione (solo per personale formato) Info 5.1 Paziente... -
Page 19: Setup Menu
“modalità risparmio batterie”. In questa modalità, la retroilluminazione del display è disattivata per risparmiare le batterie. Tutte le funzioni dell’R07A sono ancora attive, agendo su un tasto o soft key qualsiasi la retroilluminazione del display sarà automaticamente riattivata. Queste impostazioni sono attive solo quando il dispositivo è... -
Page 20: Frequenze
Premere CAMBIO per selezionare SI o NO, premere SALVA per confermare la selezione. 5.3 Frequenze Per accedere al menu Frequenze dell’R07A premere F2 o una delle due manopole. Sono disponibili 10 frequenze che possono essere attivate o disabilitate: 125, 250, 500, 750, 1500, 2000, 3000, 4000, 6000 e 8000 Hz. -
Page 21: 6-Manutenzione E Pulizia
Se l’R07A viene utilizzato con cuffie ad inserzione, mai inserire o utilizzare le cuffie ad inserzione senza sostituire il tip con uno nuovo fornito da RESONANCE. -
Page 22: Utilizzo Del Dispositivo
Il controllo annuale può essere effettuato solo da un distributore o da un centro servizi autorizzato da Resonance. M.R.S. non sarà responsabile per qualsiasi inosservanza della data di ispezione, in accordo con le disposizioni di legge che regolano i prodotti medicali. L’utilizzo di audiometri non calibrati o non controllati è... - Page 23 Frequenze disponibili e intensità massime: Intensità massime Frequenza 125 Hz 250 Hz 500 Hz 750 Hz 1 KHz 1.5 KHz 2 KHz 3 KHz 4 KHz 6 KHz 8 KHz DD45 IP30 Calibrazione Via Aerea: ISO 389-1/ANSI S3.6 (DD45) VA - Cuffie DD45 VA - Cuffie ad inserzione IP30 Riferimento di soglia equivalente secondo ISO Riferimento di soglia equivalente secondo ISO...
-
Page 24: 9-Compatibilità Eletromagnetica
EMC - Guida e dichiarazione del fabbricante - EMISSIONI elettromagnetiche L’audiometro R07A consente l’uso in ambiente elettromagnetico specificato sotto. Il cliente o l’utente dell’R07A deve assicurarsi che lo stesso sia usato in un ambiente dotato delle seguenti caratteristiche: Test di emissione Conformità... - Page 25 RF portatili e mo- irradiati bili non devono essere utiliz- IEC 61000-4-3 zate in vicinanza di qualsiasi parte dell’ L’R07A , inclusi i cavi. Distanza minima: d = 1,2√P 80 MHz to 800 MHz d = 2,3√P 800 MHz to 2,5 GHz...
- Page 26 RF fissi, un’indagine elettromagnetica locale deve essere considerata. Se l’intensità del campo misu- rata nel luogo in cui viene utilizzato l’R07A, supera il livello di conformità RF applicabile di cui sopra, l’ R07A dovrebbe essere osservato per verificarne il normale funzionamento. In caso di prestazioni ano- male, accorgimenti aggiuntivi potrebbe essere necessari, come un cambio di posizione o un diverso orientamento dell’R07A.
- Page 27 this page is intentionally left blank...
- Page 28 1-Introduction and intended use __________________________ 29 2-Description ___________________________________________ 30 2.1 Precautions ____________________________________________30 2.2 Warranty and maintenance ______________________________ 31 2.3 Unpacking and checking the R07A ________________________ 32 2.4 Accessories ___________________________________________ 32 2.5 Connecting the accessories ______________________________ 34 2.6 Batteries replacement __________________________________ 35 2.7 Symbols present on device ______________________________ 36...
-
Page 29: 1-Introduction And Intended Use
It is recommended that the device be operated within an ambient temperature range of 15 - 35 de- gree Celsius. The R07A Screening audiometer is designed to be a device for screening for hearing loss; in order to assess reliable audiometric results, some variables factors must be kept in mind as the may influence... -
Page 30: 2-Description
• The R07A is intended to be powered from batteries or from a medical CE power supply offered as an option. Using other supplies is not allowed. When used, position it so that the power plug can be easily disconnected. -
Page 31: Warranty And Maintenance
2.2 Warranty and maintenance RESONANCE warrants that: • The R07A is free from defects in material and workmanship under normal use and service for a period of 36 months from the date of device’s installation by authorized personnel to the first purchaser. •... -
Page 32: Unpacking And Checking The R07A
If the device has been damaged during transportation, the device should be checked for any electrical or mechanical defects. Please contact your RESONANCE dealer in case of any damage is identified. Keep all original packaging for future use. The identification label on the rear plate holds the serial number. This should be checked and written down for later service claims. - Page 33 Image Description Standard / Optional Plug ACR/ACL ● DD45 headphone* (A-B) ACR/ACL ○ IP30 insert headphone* (A-B) PAT RESP ● Patient pushbutton* Medical power supply: Model: MENB1010A0503(xyz) 5V DC ○ (xyz) = B01 changeable direct plug-in (xyz) = Q01 with power cord (xyz) = N01 with power cord As alternative: Medical CE approved power supply:...
-
Page 34: Connecting The Accessories
2.5 Connecting the accessories All the connections jacks can be found on the left side of the R07A. Please connect all the cables before powering on the device. Figure 1 – side view of the R07A Reference Symbol Function ACR (Red) -
Page 35: Batteries Replacement
Figure 2 – rear view of the R07A 2.6 Batteries replacement Remove the cover of the battery compartment located on the bottom shell. Remove the old batteries and insert the new ones, matching the polarity as detailed in the label present of the compartment. -
Page 36: Symbols Present On Device
2.7 Symbols present on device Refer to instruction Refer to manual for transducer and power supply connection Class II device. (Symbol refers to external medical power supply with double insulation) BF type applied parts Electric and electronic waste may contain hazardous substances and therefore has to be collected separately Conformity marks to RoHS directive Together with name and address indicates the manufacturer of the instrument... -
Page 37: 3-Function Of Buttons And Display
Before powering on the device, ensure that all the accessories are already plugged-in; do not remove them during test execution, power off the device before to disconnect the cables. The R07A can also power off automatically after 1, 2 or 5 minutes (or never) depending on the settings. -
Page 38: Pure Tone Presentation
3.2 Pure Tone presentation To send the tone stimulus to the patient, you must use these three commands: Signal: Touch the silent Signal switch; because it is a soft-touch switch, there is no need to press on it. Level: Rotate the left knob (dB) to increase or decrease the level of the stimulus. Frequency: Rotate the right knob (Hz) to select different frequencies. -
Page 39: Display
RESPONSE: When using the patient response switch, a response is indicated in the middle of the display header. BATTERY STATUS: The power status of the R07A is indicated in the top right corner of the display header. Empty:... -
Page 40: 4-Performing Tests
Threshold estimation can be done either for one ear and then for the other, for all tones, or on both sides for each tone. The R07A can specify the AC loss but cannot distinguish between abnormality in the conductive mechanism and sensorineural mechanism. -
Page 41: Hugson-Westlake Auto-Threshold Test (Air Conduction)
4.2 Hugson-Westlake Auto-threshold (AC) The test, controlled by the patient’s pushbutton according to the Hughson-Westlake method, pro- vides a modified and abbreviated version of the ISO 8253-1 standard for recording automatic AC threshold without masking. This test is especially used for industrial audiometry and hearing conservation programs. Hughson Westlake is an automatic pure tone test procedure. -
Page 42: 5-Menu
5. Menu To access the R07A Menu press ON/OFF switch when you are on the Test execution modality. To browse up or down in the Menu, rotate either knob. Entering this menu you can set or select: Patient Setup Frequencies... -
Page 43: Setup Menu
In this condition, the display backlight is switched off to save the battery power. All the functions of the R07A are still active, acting on any button or soft key the display backlight will automatically resume. These settings are active only when the device is powered with batteries; if plugged to external power supply LCD OFF is disabled and backlight is always active. -
Page 44: Frequencies
Press CHANGE to select YES or NO, press STORE to confirm your selection. 5.3 Frequencies To access the R07A Frequencies menu press F2 or one of the two knobs. 10 frequencies are available to enable or disable: 125, 250, 500, 750, 1500, 2000, 3000, 4000, 6000 and 8000 Hz. -
Page 45: 6-Care And Maintenance
In case of use R07A with insert earphones, never insert or in any way use the insert headset without a new clean non defect test tip supplied by RESONANCE. -
Page 46: Device Handling And Operation
As a manufacturer, we recommend to perform an annual inspection and calibration in order to ensure safety and quality of the measurement. The annual check-up can be performed only by RESONANCE distributor or authorised service center. M.R.S. will not be liable for any failure to comply with the specified inspection date, according to the Medical product law. - Page 47 Available frequencies and maximum Intensities: Maximum Intensities Frequency 125 Hz 250 Hz 500 Hz 750 Hz 1 KHz 1.5 KHz 2 KHz 3 KHz 4 KHz 6 KHz 8 KHz DD45 IP30 Calibration Air Conduction: ISO 389-1/ANSI S3.6 (DD45) AC-Headphone DD45 AC-Insert Phones IP30 Reference equivalent threshold according to ISO Reference equivalent threshold according to ISO...
-
Page 48: 9-Electromagnetic Compatibility
Guidance and manufacturer’s declaration - Electromagnetic EMISSION The R07A audiometer is intended for use in the electromagnetic environment specified below. The customer or the user of the R07A should assure that it is used in such an environment. Emission test... - Page 49 80 MHz to 2.7 GHz field should be used no closer to IEC 61000-4-3 any part of the R07A including cables. Recommended istance: d = 1,2√P 80 MHz to 800 MHz d = 2,3√P 800 MHz to 2,5 GHz...
- Page 50 To evaluate the electromagnetic environment due to fixed RF transmitters, a local electromagnetic investigation should be considered. If the measured field intensity in which the R07A will be used, is above the applicable conformity level of RF described above, the R07A should be under observation to verify normal function.
- Page 51 this page is intentionally left blank...
- Page 52 TÜRKÇE Içindekiler 1-Giriş ve Kullanım Amacı _________________________________ 53 2-Tanım ________________________________________________ 54 2.1 Uyarılar _______________________________________________54 2.2 Garanti ve Bakım ______________________________________ 55 2.3 Paketten çıkarma ve kontrol etme ________________________ 56 2.4 Aksesuarlar ___________________________________________ 56 2.5 Aksesuarları bağlamak __________________________________ 58 2.6 Pillerin değişimi _______________________________________ 59 2.7 Cihazın üzerindeki semboller ____________________________ 60 3-Butonların işlevi ve ekran _______________________________ 61 3.1 Cihazı...
-
Page 53: 1-Giriş Ve Kullanım Amacı
R07A Tarama Odyometresi istenen ve gerekli olan tüm kalite ve güvenlik mevzuatlarını kapsayacak içimde tasarlanıp üretildi. Medikal Yönetmelik için CE-sembolüyle sertifikalandırılmıştır. Tüm fonksiy- onlar yazılım ile kontrol edileilir ve daha sonra yükseltilebilir nitelikte basit ve kullnışlıdır. R07A Tarama Odyometresi odyolog, işitme uzmanı veya eğitimli kişilerce sessiz ortamda kullanılmalıdır. -
Page 54: 2-Tanım
Cihaza bir zarar gelmemesi veya bataryalardan bir akıntı olmaması için cihaz depoda beklerken bataryalar çıkarılmalıdır. • R07A’da özel sıvı koruması bulunmaz, cihaz sıvı temaslarına veya sıvıya daldırmalarda ciddi zarar görebilir. • Cihaz EMC gerekliliklerine uygun olmasına rağmen güçlü elektro manyetik alanlarda gereksiz ışınlara maruz kalmaması... -
Page 55: Garanti Ve Bakım
R07A Tamirinde ve serviste Sadece orjinal Resonance yedek parçaları, aksesuarlar, kablolar kullanılmalıdır. Cihazınızın doğru çalıştığından emin olmak için R07A odyometre yılda bir kez kontrol ediliip kalibra- syon edilmelidir.Standart bakım ve cihaz kalibrasyonu işlemleri, bir senelik aralıklarla düzenli olarak gerçekleştirilmelidir. Standart bakım işlemleri, transdüktör kablosunun durumunun, ana şebeke kay- nağı... -
Page 56: Paketten Çıkarma Ve Kontrol Etme
Eğer cihaz taşıma esnasında hasar görmüşse, elektriksel veya mekanik bir arızaya karşın kontrol edilmelidir. Bir hasar tespiti olduğunda lütfen Resonance satıcınızı haberdar ediniz. Gelecekteki kullanım için orjinal kutuyu atmayınız.Kutunun üstündeki seri no’yu bir yere not edin. Seri no daha sonraki servis adımları için kullanılacaktır. - Page 57 Image Tanım Standardt/ Opsiyonel Giriş ACR/ACL ● DD45 başlık* (A-B) ACR/ACL ○ IP30 insert headphone* (A-B) PAT RESP ● Hasta cevap butonu* Medikal güç kaynağı: Model: MENB1010A0503(xyz) 5 VDC ○ (xyz) = B01değişebilen direkt giriş (xyz) = Q01 güç kablosuyla (xyz) = N01 güç...
-
Page 58: Aksesuarları Bağlamak
2.5 Aksesuarları Bağlamak Tüm bağlantı jak girişleri R07A’nın sol tarafındadır. Cihazı çalıştırmadan önce tüm kabloları takınız. şekil 1 – R07A yandan görünüş Referans Sembol ACR (Kırmızı) AC sağ başlık için soket ACL (Mavi) AC sol başlık için soket Hasta cevap butonu Hasta cevap için soket... -
Page 59: Pillerin Değişimi
Resim 2 – R07A’nın arkadan görünümü 2.6 Batarya değişimi Alt kısımdaki pil bölmesinin üstündeki çıkartmayı çıkarın. Eski pilleri çıkarın ve yenilerini takın, pil bölmesinde gösterildiği şekilde takınız. Hasardan korumak için her pilin önce positif tarafını takınız. Daha fazla detay için resimlere göz atınız. -
Page 60: Cihazın Üzerindeki Semboller
2.7 Cihazın üstündeki semboller Açıklamaya bakınız Transüder ve güç kaynağı bağlantısı için manuele bakınız Class II cihaz. (Çift girişli medikal güç adaptörü sembolü) BF tip uygulama parçaları Electrik ve elektronik atıklar zararlı ileşenler içerebilir bu yüzden ayrı ayrı atılmalıdır RoHS yönergesi için uygunluk işaretleri Isimle birlikte adres üreticiyi gösterir Uygunluk işaretleri 93/42/CEE –bildirim gövdesi 0051 (IMQ) 0051... -
Page 61: 3-Butonların Işlevi Ve Ekran
“KAPANMA” mesajı ekrana gelene kadar bikaç saniye basılı tutunuz. Cihazı açmadan önce tüm aksesuarların takılı olduğundan emin olun, test esnasında akse- suarları cihazdan çıkarmayın, kabloları çıkarmadan önce cihazı kapatınız. R07A kullanılmadığında 1, 2 veya 5 (veya hiçbir zaman) dakika sonra otomatik olarak kapanır, bu özellik ayarlardan değiştirilebilir. -
Page 62: Pure Tone Açıklaması
3.2 Pure Tone Hastaya ton uyarımı göndermek için şu 3 komutu kullanmalısınız. Sinyal: Sessiz sinyal butonuna dokunun, dokunmatiktir sert basmanıza gerek yoktur. Seviye: Sol tekerleği (dB) seviyeyi artırmak veya azaltmak için döndürün. Frekans: Sağ tekerleği (Hz)frekansları değiştirmek için döndürün. Sadece aktif edilen frekanslar kullanılabilir. -
Page 63: Ekran
3.4 Ekran SIGNAL: Uyarı göstergesi ekranın sağ köşesinin üstünde yer alır. RESPONSE: Hasta cevap butonunu kullanırken gösterge ekranın üstünde orta kısımda yer alır. BATTERY STATUS: Güç göstergesi ekranın sağ üst köşesinin üstünde yer alır. Boş: Dolu: DC şarj oluyor: İkon cihazın güç kablosuyla veya bataryayla çalıştığına göre değişir. Pille çalıştığında pil ikonu pil gücüne göre değişir. -
Page 64: 4-Test Yapmak
çıkmasına yardım eder. Test pure tonlar kullanılarak hoparlörlerle (Hava yolu- AC) yapılır.Eşik tahmini önce bir kulağa sonra diğer kulağa veya her iki kulağa da her ton verilerek yapılır. R07A AC hava yolu kaybını gösterebilir fakat sensörinöral mekanizma ve iletim anormalliği arasında ayrım yapamaz. •... -
Page 65: Hugson-Westlake Autothreshold Test (Hava Yolu)
4.2 Hugson-Westlake Otomatik Eşik (AC) Hasta cevap butonuyla kontrol edilen HughSon-Westlake test metoduna göre modifiye edilmiş ve kısaltılmış ISO 8253-1 standart versiyonu sağlar ve maskesiz otomatik AC eşiğini verir. Bu test özellikle endüstri odyometrisi ve işitme konuşma programlarında kullanılır. Hughson Westlake otomatik bir pure tone test prosedürüdür. Eşik 3 sinyalin 2 sine doğru yanıt verme esasına göre otomatik olarak çalışır. -
Page 66: 5-Menü
5. Menü The R07A ‘nın Menüsüne girebilmek için Test yürütme sayfasındayken ON-OFF switch düğmesine basınız. Menüde gezinmek için tekerlekleri kullanabilirsiniz. Bu menüye girerek şunları seçebilirsiniz: Hasta Setup Frekanslar Kalibrasyon (sadece eğitimli personel) Hakkında 5.1 Hasta R07 Hasta Yönetimine girmek için önce Menü’ye girin daha sonra ilgili bölüme F2’ye veya tekerlekle- rden birine basarak seçiniz. -
Page 67: Setup Menüsü
5.2 Setup menüsü The R07A Setup menüsüne girmek için F2’ye veya herhangi bir tekerleğe basınız. Setup Menüsünde gezinmek için tekerleklekleri kullanabilirsiniz. BAŞLIK DEĞİŞTİRME’ye basarak farklı bir transüdör seçeilirsiniz. DD45 veya TDH seçebilirsiniz. Varsayılan transüdör DD45’dir. Yeni ayarı KAYDETMEK için KAYDET’e basınız veya ÇIKIŞ’a. Çıkarken ayarlar kaydedilmeyecektir. -
Page 68: Frekanslar
Bu fonksiyon cihazı varsayılan ayarlara geri döndürür.DEĞİŞTİR’e basarak EVET veya HAYIR’ı seçebilir- siniz,KAYDET’e basarak seçiminizi onaylayabilirsiniz. 5.3 Frekanslar R07A Frekanslar menüsüne girmek için F2 veya tekerleklerden irine basınız. 10 frekans mevcuttur: 125, 250, 500, 750, 1500, 2000, 3000, 4000, 6000 ve 8000 Hz. İstenilmeyen frekanslar devre dışı bırakılabilir. -
Page 69: 6-Bakım Ve Onarım
Uygun ir temizleme prosedürü için üreticinin önerileri takip edilmelidir. R07A’yı insert earphone ile kullanırsanız her zaman RESONANCE tarafından verilen temiz bir prob ile kullanmalısınız. Eğer cihazın yüzeyi veya parçaları kirlenmişse, hafif ıslatılmış nemli ir bir bez veya benzeri ile temizlen- melidir. -
Page 70: Cihazın Kullanımı
Üretici olarak tavsiyemiz, yıllık bakım ve kalibrasyon yaptırıp cihazın ölçüm güvenliğinden ve kalite- sinden emin olmalısınız. Yıllık check-up sadece RESONANCE distribütörü veya yetkili servis merkezi tarafından yapılmalıdır. Medikjal kanuna dayanarak M.R.S. Tarihe dayalı herhangi bir ihmal veya hatadan sorumluluk kabul etmez. - Page 71 Mevcut frekanslar ve maksimum seviyeleri: Maksimum Yoğunluklar Frekanslar 125 Hz 250 Hz 500 Hz 750 Hz 1 KHz 1.5 KHz 2 KHz 3 KHz 4 KHz 6 KHz 8 KHz DD45 IP30 Kalibrasyon Hava İletimi: ISO 389-1/ANSI S3.6 (DD45) AC-Başlık DD45 AC-Insert Phones IP30 Kupler ile ISO 389-1 IEC 60318-3 Force 4-5 N ile Kupler ile ISO 389-1 IEC 60318-3 Force 4-5 N ile...
-
Page 72: 9-Elektromanyetik Uyumluluk
IEC/EN 61000--3-2 Voltaj dalgalanmaları /titrek Uyumlu ışık emisyonu IEC 61000-3-3 Üreticinin yönerge ve açıklamaları – Elektromanyetik MUAFİYET R07A aşağıda listelenen elektromanyetik ortamlarda kullanılabilir . Kullanıcılar ve hastalar aşağıdaki karakteristiklerde bir ortam seçmelilerdir. Bağışıklık testi IEC 60601-1-2 Uygunluk Elektro manyetik ortam test seviyesi Elektrostatik deşarj... - Page 73 IEC 60601-1-2 Mobil ve mobil iletişim olduğu bozukluklar test seviyesi ekipmanları, kabloların dâhil IEC 61000-4-6 150 kHz - 80 MHz dâhil, R07A ’nin yakınlarında arası kullanılamaz. Ayrılma mesafesi danışma bölgesi d= 1,2√P Voltaj düşüşleri: 0% Un for 0.5 cycle IEC 60601-1-2 Ana şebeke kalitesi, tipik olarak...
- Page 74 Frekans aralığı 150 kHz - 80 MHz, alan yoğunluğu 3 V / m ‘nin altında olmalıdır. R07A için önerilen mesafe aralıkları R07A elektromanyetik ortam için önerilen RF aralıkları elektro manyettik ortamlarda RF parazitlen- melerini kontrol altında tutabilmek içindir. Hastalar veya kullanıcılar taşınabilir ve mobil RF vericisi te- min ederek elektro manyetik parazitlenmeleri minimum seviyeye indirebilirler ve aşağıda anlatıldığı...
- Page 75 this page is intentionally left blank...
- Page 76 1-Einleitung und Verwendung ____________________________ 77 2-Beschreibung _________________________________________ 78 2.1 Sicherheitshinweise ____________________________________ 78 2.2 Garantie und Wartung __________________________________ 79 2.3 Auspacken und Überprüfen des R07A _____________________ 80 2.4 Zubehörteile __________________________________________ 80 2.5 Anschließen des Zubehörs ______________________________ 82 2.6 Batterienwechsel ______________________________________ 83 2.7 Die Symbole auf dem Gerät ______________________________ 84...
-
Page 77: 1-Einleitung Und Verwendung
Es wird empfohlen das Gerät in einem Umgebungstemperaturbereich zwischen 15 – 35 Grad Celsius zu betreiben. Das R07A Screening Audiometer ist als Screeninggerät zur Feststellung von Hörverlusten entwickelt worden. Um zuverlässige Audiometriemessdaten zu erhalten, müssen einige Faktoren im Auge be- halten werden die die Testergebnisse unter Umständen beeinflussen oder verfälschen könnten wie:... -
Page 78: 2-Beschreibung
Tod oder zu schweren Verletzungen führen kann. BITTE BEACHTEN! Dieses Zeichen weist auf gefährliche Verhaltensweisen hin, die zu Kör- perverletzung führen könnten. Um die Sicherheit und die volle Funktion des R07A zu gewährleisten, ist es wichtig die folgenden Hinweise sorgfältig zu beachten. •... -
Page 79: Garantie Und Wartung
RESONANCE garantiert: • Das R07A im normalen Gebrauch und bei sachgemäßer Bedienung frei von Defekten in Material und Verarbeitung ist. Dies gilt bis zu einer Zeit von 36 Monaten, vom Datum der Geräteinstallation, durch autorisiertes Personal bei dem ersten Käufer. -
Page 80: Auspacken Und Überprüfen Des R07A
Wenn es Hinweise auf Beschädigungen durch den Transport des Gerätes geben sollte, muss das Gerät auf elektronische oder mechanische Defekte hin geprüft werden. Bitte nehmen sie Kontakt zu Ihrem RESONANCE Händler auf, falls Beschädigungen festgestellt worden sind. Bitte bewahren Sie die Originalverpackung für eine spätere Verwendung auf. - Page 81 Image Description Standard / Optional Plug ACR/ACL ● DD45 Kopfhörer* (A-B) ACR/ACL ○ IP30 Einsteckkopfhörer* (A-B) PAT RESP ● Patientenantworttaste* Medizinische Stromversorgung: Model: MENB1010A0503(xyz) 5 VDC (xyz) = B01 austauschbarer direkt ○ Kontaktstecker (xyz) = Q01 mit Anschlusskabel (xyz) = N01 mit Anschlusskabel As alternative: Medical CE approved power supply: Model: ME10A0503(xyz)
-
Page 82: Anschließen Des Zubehörs
2.5 Anschließen des Zubehörs Alle Anschlußbuchsen befinden sich auf der linken Seite des R07A. Schließen Sie alle Kabel an, bevor Sie das Gerät einschalten. Abb. 1 – Seitenansicht des R07A Referenz Symbol Funktion ACR (Red) Buchse für AC rechten Kopfhörerkanal ACL (Blue) Buchse für AC linken Kopfhörerkanal... -
Page 83: Batterienwechsel
Abb. 2 – Rückansicht des R07A 2.6 Batterienwechsel Entfernen Sie den Deckel des Batteriefaches an der Unterseite des Gerätes. Entfernen Sie die alten Batterien und legen Sie die neuen, entsprechend der Polarität, wie auf dem Etikett des vorhandenen Fachs beschrieben wird ein. -
Page 84: Die Symbole Auf Dem Gerät
2.7 Die Symbole auf dem Gerät Siehe Anleitung Für Wandler und Stromversorgung und -Verbindung siehe Handbuch Gerät der Klasse II (Symbol bezieht sich auf externe medizinische Stromversorgung mit doppelter Isolierung) Anwendungsteil Typ BF Elektro- und Elektronikaltgeräte können gefährliche Substanzen enthalten und müs- sen daher seperat entsorgt werden Prüfzeichen der RoHS Richtlinie Bezeichnet zusammen mit Name und Adresse den Hersteller des Gerätes... -
Page 85: 3-Funktionen Tasten Und Display
Bevor das Gerät eingeschaltet wird, stellen Sie sicher, daß alle Zubehörteile bereits eing- es-teckt sind, entfernen Sie sie nicht während der Tests, sondern nur bei ausgeschaltetem Gerät. Das R07A kann sich auch automatisch, nach 1, 2 oder 5 Minuten (oder nie), abhängig von der jeweili- gen Einstellung, ausschalten. -
Page 86: Reinton Präsentation
3.2 Reinton Präsentation Um den Stimulus zu präsentieren, nutzen Sie bitte fogende drei Befehle: Signalpräsentation: Berühren Sie den Schalter “Signalpräsentation”; es handelt sich um einen Soft- Touch-Schalter und daher besteht keine Notwendigkeit diesen zu drücken. Signalpegel: Drehen Sie den linken Knopf (dB) um den Pegel des Stimulus zu erhöhen oder zu ver- ringern. -
Page 87: Display
SIGNAL: Die Anzeige für Stimuluspräsentation erscheint an der oberen rechten Ecke auf dem Bildschrim. ANTWORT: Wenn die Patientenantworttaste aktiviert wird, wird die Antwort in der Mitte des Bildschirms angezeigt. BATTERIE STATUS: Der Energiestatus des R07A wird in der oberen rechten Ecke des Bildschirms an- gezeigt Leer: Voll: Stormversorgung: Das Symbol ändert sich, je nachdem ob das Gerät über eine externe Stromversorgung oder Batterien... -
Page 88: 4-Durchführen Von Tests
4. Durchführen von Tests 4.1 Reintonaudiometrie (Luftleitung) Reintonaudiometrie stellt den grundlegenden Test der audiometrischen Untersuchung dar, der da- rauf abzielt die auditorische Funktion zu bewerten und die Hörschwelle zu bestimmen. Der Begriff “Hörschwelle” gibt den kleinsten Pegel an, der von der Testperson wahrgenommen werden kann. Der Test wird durch die Präsentation von reinen Tönen, mit Hilfe der dazugehörigen Kopfhörer (Luft- leitung) durchgeführt. -
Page 89: Hugson-Westlake Autoschwellenwerttest (Luftleitung)
4.2 Automatische Hörschwellen- bestimmung (Luftleitung) Der Test, der nach der Hughson-Westlake Methode, durch die Patiententaste gesteuert wird, liefert eine modifizierte und gekürzte Version des ISO 8253-1 Standart für die Aufzeichnung von automa- tischen AC-Schwellentests, ohne Maskierung. Dieser Test wird speziell für die industrielle Audiometrie und Gehörschutzprogramme verwendet. Hughson Westlake ist ein automatisches Reinton Test-Verfahren. -
Page 90: 5-Menü
5. Menü Um auf das R07A Menü zuzugreifen drücken sie den Schalter ON/OFF, wenn sie im Test-Modus sind. Um sich im Menü nach oben oder nach unten zu bewegen, drehen sie den Regler. Wenn sie sich in diesem Menü befinden können sie folgendes wählen: •... -
Page 91: Setup Menü
In diesem Zustand ist die Hintergrundbeleuchtung ausgeschaltet, um den Akku zu schonen. Alle Funktionen des R07A sind noch aktiv; wird ein Knopf oder eine Softkey Taste bedient schaltet sich automatisch die Hintergrundbeleuchtung wieder ein. Diese Einstellungen sind nur aktiv, wenn das Gerät mit Batterien betrieben wird;... -
Page 92: Frequenzen
NO auszuwählen und drücken sie STORE um die Auswahl zu bestätigen. 5.3 Frequenzen Zum Zugriff auf das R07A Frequenz-Menü drücken sie F2 oder einen der beiden Knöpfe. 10 Frequenzen, die aktiviert oder deaktiviert warden können, stehen zur Verfügung 125, 250, 500, 750, 1500, 2000, 3000, 4000, 6000 und 8000 Hz. -
Page 93: 6-Pflege Und Wartung
Desinfektionsmittels ein. Individuelle Herstellerempfehlungen sollten beim Gebrauch des Desinfek- tionsmittels befolgt werden um für ein entsprechendes Maß an Hygiene zu sorgen. Im Fall der Nutzung eines R07A mit Einsteckhörern, stecken oder benutzen sie diese niemals ohne zuvor neue, saubere, nicht defekte Test-Spitzen zu verwenden, die von RESONNANCE mitgeliefert werden. -
Page 94: Gerätehandhabung Und Bedienung
Referenz Standard: EN 60645-1/ANSI S3.6, Type 4 Sicherheit: EN 60601-1 EMC: EN 60601-1-2 Das CE-Zeichen belegt, das RESONANCE die Anforderungen der Annex Medizinisches II der Medizinprodukte Richtlinie 93/42/EEC erfüllt. Die benannte Stelle CE-Kennzeichen IMQ, Identification No. 0051, hat das Qualitätssicherungssystem Eingänge: Medizinisch zugelassene Stromversorgung;... - Page 95 Verfügbare Frequenzen und maximale Pegel: Maximale Intensitäten Frequenz 125 Hz 250 Hz 500 Hz 750 Hz 1 KHz 1.5 KHz 2 KHz 3 KHz 4 KHz 6 KHz 8 KHz DD45 IP30 Kalibration Luftleitung: ISO 389-1/ANSI S3.6 (DD45) LH-Kopfhörer DD45 LH-Einsteckkopfhörer IP30 Äquivalente Bezugsschwelle nach ISO Äquivalente Bezugsschwelle nach ISO...
-
Page 96: 9-Elektromagnetische Verträglichkeit
Emissionen Konform IEC 61000-3-3 Herstellerangaben und Richtlinien – Elektromagnetische Störfestigkeit Das R07A kann in der unten angegebenen Umgebung genutzt werden. Die Nutzer des R07A Audio- meters müssen sich versichern, dieses in Umgebungen mit folgenden Bedingungen zu betreiben: Elektromagnetische Störfestigkeits- Teststufe Konformität... - Page 97 RF dür- fen nicht verwendet werden, Durchgeleitete wenn der Abstand zwischen Störungen ein- 3 Vrms IEC 60601-1-2 jedem Teil des R07A, inklusive schließlich HF-Felder 150 kHz to 80 MHz Teststufe Kabel, unterhalb IEC 61000-4-6 Empfohlener Ab- stand d = 1,2 P Spannungseinbrüche...
- Page 98 Feldintensität in dem das R07A verwendet werden wird, über dem jeweiligen Konformitätsniv- eau RF, wie oben beschrieben liegt, sollte das R07A unter genauer Beobachtung bedient werden, um seine normale Funktion zu überprüfen. Im Falle einer ungewöhnlichen Funktion kann besondere Aufmerksam- keit erforderlich sein, wie beispielsweise eine Änderung der Position oder Ausrichtung des R07A.
- Page 99 this page is intentionally left blank...
- Page 100 1-Introducción y uso previsto ____________________________ 101 2-Descripción __________________________________________ 102 2.1 Precauciones ________________________________________ 102 2.2 Garantía y mantenimiento ______________________________ 103 2.3 Desembalaje y comprobación del R07A ___________________ 104 2.4 Accesorios __________________________________________ 104 2.5 Conexión de los accesorios _____________________________ 106 2.6 Reemplazo de las baterías ______________________________ 107 2.7 Símbolos presentes en el dispositivo _____________________ 108...
-
Page 101: 1-Introducción Y Uso Previsto
Se recomienda que el dispositivo de ser operado dentro de un rango de temperatura ambiente de 15 a 35 grados Celsius. El audiómetro Screening R07A está diseñado para ser un dispositivo para la detección de la pérdida de la audición; con el fin de asegurar resultados confiables, algunos factores variables deben ser tenidos en cuenta como: Instalación de la sala de examen... -
Page 102: 2-Descripción
• No ponga el R07A cerca de una fuente de calor. Permitir una separación de al menos 20 cm. entre el panel posterior y la pared para asegurar una ventilación adecuada. •... -
Page 103: Garantía Y Mantenimiento
RESONANCE garantiza que: • El R07A está libre de defectos de material y mano de obra bajo condiciones normales de uso y servicio por un período de de 36 meses a partir de la fecha de instalación del dispositivo por personal autorizado al primer comprador. -
Page 104: Desembalaje Y Comprobación Del R07A
Póngase en contacto con su distribuidor RESONANCE en caso de que se identifique algún daño. Guarde todo el embalaje original para su uso futuro. - Page 105 Imagen Descripcion Standard / Opcional Plug ACR/ACL ● Fonos DD45* (A-B) ACR/ACL ○ Fonos de Inserción IP30* (A-B) PAT RESP ● Boton respuesta paciente* Fuente de Poder: Modelo: MENB1010A0503(xyz) 5 VDC ○ (xyz) = B01plug irectointercambiable (xyz) = Q01 con cable de poder (xyz) = N01 con cable de poder As alternative: Medical CE approved power supply:...
-
Page 106: Conexión De Los Accesorios
2.5 Conexión de los accesorios Todos los jacks de conexión se encuentran en el lado izquierdo del R07A. Por favor conecte todos los cables antes de encender el dispositivo. Figura 1 – vista lateral del R07A Referenciae Simbolo Función ACR (Red) -
Page 107: Reemplazo De Las Baterías
Figura 2 – vista de la parte inferior del R07A 2.6 Reemplazo de las baterías Remueva la cubierta del compartimiento de pilas ubicada en la parte inferior del dispositivo. Remueva las baterias antiguas e inserte las nuevas, hacienda coincidir la polaridad señalada en la etiqueta del compartimiento. -
Page 108: Símbolos Presentes En El Dispositivo
2.7 Símbolos presentes en el dispositivo Refiérase a la instrucción Refiérase al manual para la conexión del tranductor y la fuente de poder Dispositivo Clase II. (El símbolo se refiere al doble aislamiento de la fuente de poder.) Partes aplicadas del tipo BF Los residues electricos y electronicos pueden contener sustancias peligrosas y deben desecharse separadamente Conformidad con las orientaciones RoHS... -
Page 109: 3-Función De Botones Y Pantalla
Antes de encender el dispositivo, asegúrese de que todos los accesorios ya estén en- chu-fados, no los retire durante las pruebas, solo con el dispositivo apagado. El R07A también se puede apagar automáticamente después de 1, 2 o 5 minutos (o nunca) dependi- endo de los ajustes. -
Page 110: Presentación De Tonos Puros
3.2 Presentación de tonos puros Para enviar el estímulo de tono al paciente, debe utilizar estos tres comandos: Señal: Toque el interruptor de señal silencioso; como es Soft-Touch, no hay necesidad de presionarlo. Nivel: Gire el mando izquierdo (dB) para aumentar o disminuir el nivel del estímulo. Frecuencia: Gire el mando derecho (Hz) para seleccionar diferentes frecuencias. -
Page 111: Pantalla
RESPUESTA: Cuando se usa el botón de respuesta del paciente, la respuesta está indicada en el medio de la pantalla. STATUS de la BATERIA: La carga de la bateria del R07A está indicada en la esquina superior derecha. Sin Carga: Carga Completa: Cargándose:... -
Page 112: 4-Realizando Las Pruebas
El R07A puede especificar la pérdida de CA pero no puede distinguir entre la anomalía en el mecanis- mo conductor y el mecanismo neurosensorial. -
Page 113: Hugson-Westlake Auto-Umbral (Ac)
4.2 Hugson-Westlake Auto-umbral (AC) La prueba, controlada por el pulsador del paciente de acuerdo con el método Hughson-Westlake, proporciona una versión modificada y abreviada de la norma ISO 8253-1 para registrar el umbral CA automático sin enmascarar. Esta prueba se utiliza especialmente para audiometría industrial y programas de conservación audi- tiva. -
Page 114: 5-Menu
5. Menu Para acceder al menú R07A pulse el interruptor ON / OFF cuando esté en la modalidad de ejecución de prueba. Para desplazarse hacia arriba o hacia abajo en el menú, gire cualquiera de las perillas. Al entrar en este menú puede configurar o seleccionar:... -
Page 115: Setup Menu
5.2 Setup menu Para acceder al menú de configuración R07A pulse la tecla de función F2 o una de las dos perillas. Para desplazarse hacia arriba o hacia abajo en el menú de configuración, gire cualquiera de las perillas. AURICULARES Presione CHANGE para seleccionar a un transductor alternative: DD45, Fonos de Inserción o TDH39. -
Page 116: Frecuencias
SÍ o NO, pulse STORE para confirmar su selección. 5.3 Frecuencias Para acceder al menú de frecuencias R07A pulse F2 o uno de los dos mandos. 10 frecuencias están disponibles para activar o desactivar: 125, 250, 500, 750, 1500, 2000, 3000, 4000, 6000 y 8000 Hz. -
Page 117: 6-Cuidados Y Mantención
En caso de uso R07A con auriculares de inserción, nunca inserte ni utilice de ningún modo el auricular de inserción sin una nueva punta de prueba limpia, no defectuosa suministrada por RESONANCE. -
Page 118: Manejo Y Operación Del Equipo
Como fabricante, recomendamos realizar una inspección y calibración anual para garantizar la segu- ridad y la calidad de la medición. El chequeo anual sólo puede ser realizado por el distribuidor de RESONANCE o por un centro de servicio autorizado. M.R.S. No será responsable por cualquier incumplimiento de la fecha de inspección especificada, de acuerdo con la ley de productos médicos. - Page 119 Frecuencias disponibles e intensidades máximas. Intensidades Máximas Frequencia 125 Hz 250 Hz 500 Hz 750 Hz 1 KHz 1.5 KHz 2 KHz 3 KHz 4 KHz 6 KHz 8 KHz DD45 IP30 Calibracion Conducción aérea: ISO 389-1/ANSI S3.6 (DD45) AC-Transductor DD45 AC-Transductor de Inserción IP30 Umbral equivalente de referencia de acuerdo a Umbrla equivalente de referencia de acuerdo a...
-
Page 120: 9-Compatibilidad Electromagnética
EMC - Guida e dichiarazione del fabbricante - EMISSIONI elettromagnetiche L’R07A middle ear analyzer consente l’uso in ambiente elettromagnetico specificato sotto. Il cliente o l’utente dell’R07A deve assicurarsi che lo stesso sia usato in un ambiente dotato delle seguenti caratteristiche: Test di emissione Conformità... - Page 121 Test level nicazione RF portatili e mo- IEC 61000-4-6 bili non devono essere utiliz- zate in vicinanza di qualsiasi parte dell’ R07A A, inclusi i cavi. Distanza di separazione rac- comandata d = 1,2√P Cadute di tensione. 0% Un for 0.5 cycle IEC 60601-1-2 La qualità...
- Page 122 RF, debe considerarse una investigación electromagnética local. Si la intensidad de campo medida en la que se utilizará el R07A está por encima del nivel de conformidad aplicable de RF descrito anteriormente, el R07A debe estar bajo observación para verificar la función normal. En caso de una función anómala se puede requerir atención adicional, como cambiar la posición u orientación...
- Page 123 this page is intentionally left blank...
Need help?
Do you have a question about the r07a and is the answer not in the manual?
Questions and answers