Table of Contents
Advertisement
Quick Links
Advertisement
Table of Contents

Subscribe to Our Youtube Channel
Related Manuals for Cole Parmer P100


Summary of Contents for Cole Parmer P100
- Page 1 P100 Handheld pH Meter Instruction Manual...
-
Page 2: Table Of Contents
Table of Contents 1. Introduction ----------------------------------------------------------------------------------------------------------------------------- 2. Specifications ------------------------------------------------------------------------------------------------------------------------- 3. Instrument Description ------------------------------------------------------------------------------------------------------------- 3.1 LCD display---------------------------------------------------------------------------------------------------------------------- 3.2 Keypad functions --------------------------------------------------------------------------------------------------------------- 3.3 Meter sockets -------------------------------------------------------------------------------------------------------------------- 3.4 Reading stable display mode ---------------------------------------------------------------------------------------------- 3.5 Auto power-off --- ----------------------------------------------------------------------------------------------------------------- 4. pH measurement --------------------------------------------------------------------------------------------------------------------- 4.1. pH probe information--------------------------------------------------------------------------------------------------------- 4.2. -
Page 3: Introduction
1. Introduction Thank you for purchasing our P100 Handheld pH Meter. This meter is a perfect combination of the advanced electronic technology, sensor technology and software design, and is the most cost effective handheld electrochemical meter which is suitable for usage in industrial and mining enterprises, power plant, water treatment engineering, environmental protection industry, etc, especially suitable for application in field. -
Page 4: Specifications
2. Specifications 2.1 Technical Parameters: Technical Parameters Measuring Range (0.00 ~ 14.00)pH Resolution 0.1/0.01 pH Accuracy ±0.01 pH ±1digit Temperature (0 ~ 100)°C(Auto. or Manual) Compensation Range Measuring Range ±1000mV Resolution Accuracy ±0.1% FS ±1digit Measuring Range 0~100°C Temp. Resolution 0.1°C Accuracy ±0.5°C±1digit... -
Page 5: Instrument Description
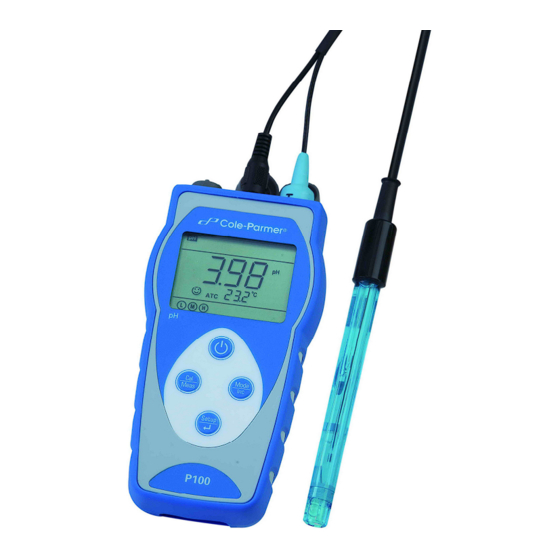
3. Instrument Description 3.1. LCD display: Diagram-1 LCD Display Screen ○ ○ 1 — Measuring mode icons 8 — Temperature value and prompts ○ ○ 2 — Measurements 9 — Temperature compensation state icons ○ 3 — Prompts ATC — automatic temperature compensation, ○... -
Page 6: Meter Sockets
3.2.1. Keypad operations: Short press ----- <1.5 seconds , Long press ----- >1.5 seconds. 3.2.2. Turn on the meter: Press to turn on the meter: LCD full display → display some parameters setting content→ display the last measuring mode before turning off 3.2.3. -
Page 7: Reading Stable Display Mode
3.4. Reading stable display mode When the measuring value is stable, smiley icon appears on LCD screen, see Diagram – 3. If the smiley icon does not appear or flash, please do not get readings or make calibration until the measuring value is stable. -
Page 8: Ph Measurement
4. pH measurement 4.1. pH probe information The meter is equipped with a 201T-F three-in-one combination pH probe, which has built-in temperature sensor to realize automatic temperature compensation. The BNC plug of the probe is connected to the pH socket while the RCA plug is connected to the temperature socket. When the probe is immersed in the solution, please stir the solution briefly to get rid of the air bulb and in this way, a stable measurement will be reached fast. -
Page 9: Ph Meter Calibration
4.2.3. Calibration intervals Calibration intervals depend on the sample, the probe performance, and the required accuracy. For high accuracy measurements (≤ ±0.02pH), the meter should be calibrated before taking a measurement. For general accuracy (≥±0.1pH), after one time calibration, the meter can be used for approximately one week or longer. -
Page 10: Customer-Defined Calibration
4.3.5. Take out pH probe, rinse it in pure water, allow it to dry, and submerge it in pH10.01 buffer solution. Stir the solution briefly and allow it to stay in the buffer solution until a stable reading is reached. The meter’s display will show scanning and locking process of calibration buffer solution at the bottom right of LCD. -
Page 11: Solution Measurement
4.5. Solution measurement 4.5.1. Rinse pH probe in pure water, allow it to dry, and submerge it in tested solution. Stir the solution briefly and allow it to stay in the tested solution until icon appears on LCD and a stable reading is reached. -
Page 12: Ph Probe Maintenance
4.5.3. pH isothermal measurement principle The closer the temperature of the sample solution to the calibration solution, the more accurate readings will be. Please be aware of this principle. 4.5.4. Restore to factory default setting For factory default setting, please refer to parameter setting P1.5 (clause 6.3). With this function, all calibration data is deleted and the meter will be calibrated to the theory value (pH value of zero electric potential is 7.00, the slope is 100%). -
Page 13: Mv Measurement
5. mV measurement 5.1. Press key, and switch the meter to mV measurement mode. Connect ORP probe (need purchase it separately) and dip it in sample solution, stir the solution briefly and allow it to stay in the solution until icon appears. -
Page 14: Parameter Setting
6. Parameter setting 6.1. Main menu In the measurement mode, press key to enter in P1.0, then press to switch to main menu: P1.0→P6.0. Please refer to chart – 6. P1.0: pH parameter setting menu, P6.0: Basic parameter setting menu. 6.2.Submenu 6.2.1. -
Page 15: Submenu Of Ph Parameter Setting
6.3. Submenu of pH parameter setting (press key to switch) P1.1 – Select pH standard solution (USA-NIS-CUS) 1. In P1.0 mode, press to enter in P1.1, refer to the left Diagram. 2. Press key, USA blinks, press key to select NIS→CUS. - Page 16 6.4. Basic parameter setting submenu P6.1. Select temperature unit (°C—°F). 1. In P6.0 mode, press key to enter in P6.1 mode, please refer to the left Diagram. 2. Press key, °C blinks, then press key to select °F→°C Press key to confirm. 3.
-
Page 17: Meter Kits
7. Meter Kits Include Quantity P100 pH meter 201T-F three-in-one pH probe AA Battery Screw driver Instruction manual Quick Manual... -
Page 18: Warranty
8. Warranty 8.1 For three years since the date of purchasing, under regular service condition, we warrant that the instrument (probe is not included) will be repaired, replaced parts or product free of charge if the meter doesn’t work well due to quality defects. 8.2 This warranty does not apply to defects resulting from incorrect usage, improper maintenance or repair. -
Page 19: Appendix I: Parameter Setting & Factory Default Setting
Appendix I: Parameter setting & Factory default setting Restore to Modes Prompts Parameter setting items Code & Abbr. Description factory default P1.1 Select pH buffer solution USA-NIST-CUS P1.4 Select resolution 0.01-0.1 0.01 P1.0 Restore to factory P1.5 No-Yes default setting Set reading stability Nor—Hi—Lo P1.6... -
Page 20: Appendix Ii: Code Symbol & Abbreviation Glossary
Appendix II: Code symbol & Abbreviation Glossary Code and Modes Prompts In English Description abbreviation P1.1 Standard buffers Standard buffer solution P1.2 Resolution Resolution P1.0 P1.5 Factory default setting Factory default setting Set up reading stability P1.6 Stability criteria criteria P6.1 P6.0 Basic parameters...
Need help?
Do you have a question about the P100 and is the answer not in the manual?
Questions and answers