Advertisement
Table of Contents
Quick Start EVK-JODY-W163
Setup
3
4
5
2a (SDIO 1.8 V) 2b (SDIO 3.3 V)
UBX-18071262 - R02
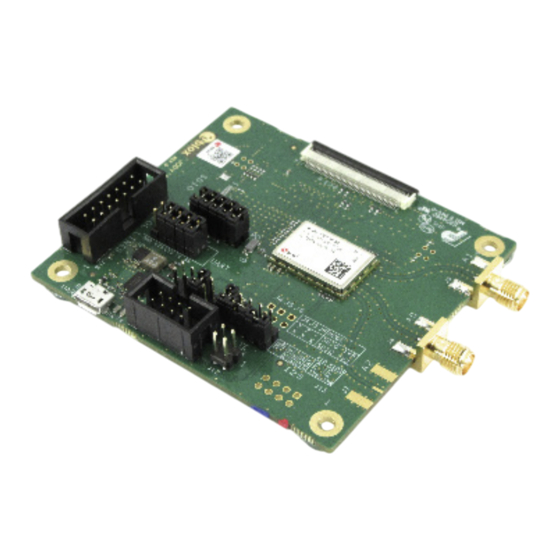
Download the EVK-JODY-W1 documentation
from www.u-blox.com/evk-downloads. Build
and install the Linux drivers and tools for the
JODY-W1 module as per the JODY-W1
System Integration Manual.
1. Connect the two antennas to the SMA
1
connectors, A0 and A1, on the EVK. If you
do not use the antennas, make sure that the
RF ports are properly terminated to a 50 Ω
load.
2. Select signal voltage for SDIO host interface
(2a or 2b) for Wi-Fi via jumper settings.
2
3. Use the flat cable with blue marking
pointing upwards to connect the SDIO
adapter to the connector on the evaluation
board and connect the adapter to the host
system.
4. The power LED is green.
5. Connect the Micro-USB to the host system for
Bluetooth communication.
Copyright © 2019, u-blox AG
Advertisement
Table of Contents

Related Manuals for Ublox EVK-JODY-W163


Summary of Contents for Ublox EVK-JODY-W163
- Page 1 Quick Start EVK-JODY-W163 Setup Download the EVK-JODY-W1 documentation from www.u-blox.com/evk-downloads. Build and install the Linux drivers and tools for the JODY-W1 module as per the JODY-W1 System Integration Manual. 1. Connect the two antennas to the SMA connectors, A0 and A1, on the EVK. If you do not use the antennas, make sure that the RF ports are properly terminated to a 50 Ω...
- Page 2 Interfaces Software The EVK-JODY-W163 provides an SDIO The Linux and Android drivers for PCIe and connector for Wi-Fi communication. The SDIO host interfaces and support tools for board can be powered through the host testing are distributed by Cypress under interface.
Need help?
Do you have a question about the EVK-JODY-W163 and is the answer not in the manual?
Questions and answers