Advertisement
Table of Contents
- 1 Package Contents
- 2 Lower Brace Assembly
- 3 Lower Braces to Screen Assembly
- 4 Upper ‘L’ Braces to Screen Assembly
- 5 Installing Additional Hardware into Existing Rack
- 6 Headknocker Accessory Rack Final Installation
- 7 Warranty Returns of Defective Product
- 8 Standard Returns of Unused Product
- Download this manual
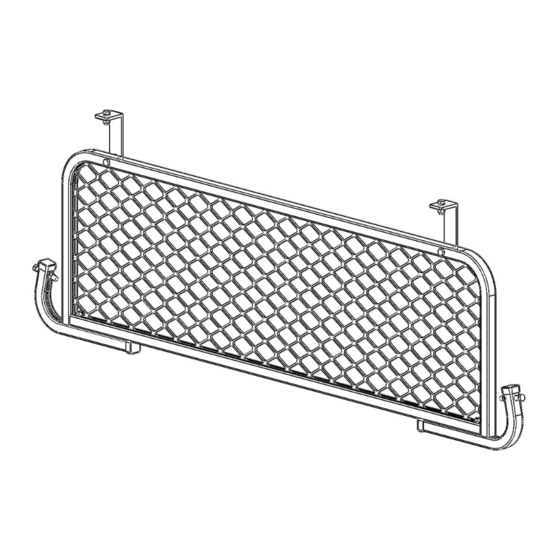
Package Contents:
PARTS
(1) SCREEN ASSEMBLY
(2) SCREEN 'L' MOUNTS
(2) LOWER SCREEN MOUNTS
Before you begin:
Remove all components from the shipping carton.
The rack should be assembled on a padded surface such as carpet to prevent scratching of aluminum surfaces. Remove bands securing
components together.
Read the instructions thoroughly to familiarize yourself with the assembly sequence.
Note that you DO NOT tighten any nuts and bolts until the completed rack is installed on the vehicle unless specified. This allows for minor
adjustments to the rack during the installation process.
Gather the following tools used to assemble and install the rack.
9/16" Socket or open end wrench
1/2" Socket or open end wrench
Pencil or marker
Tape measure
HAULER RACKS, INC.
st
7109 31
Avenue North
Minneapolis, MN 55427-2848
WWW.HAULERRACKS.COM
ALUMINUM HEADKNOCKER ACCESSORY RACK
HARDWARE KIT
(2) 3/8"-16 x 2-1/2" HEX BOLTS
(2) 3/8"-16 x 1-3/4" HEX BOLTS
(2) 3/8"-16 x 1" HEX BOLTS
(6) 3/8"-16 NUTS
(6) 3/8" SPLIT LOCK WASHERS
(2) 5/16"-18 x 1-1/2" HEX BOLTS
(2) 5/16"-18 NUTS
(2) 5/16" SPLIT LOCK WASHERS
(4) PLASTIC END CAPS
Page 1 of 5
P/N HKAS4-1 / HKAS5-1
Toll Free: 1-800-843-5445
Phone: 763-546-5620
Fax: 763-546-0933
Advertisement
Table of Contents

Related Manuals for Hauler Racks HKAS4-1


Summary of Contents for Hauler Racks HKAS4-1
- Page 1 ALUMINUM HEADKNOCKER ACCESSORY RACK P/N HKAS4-1 / HKAS5-1 Package Contents: HARDWARE KIT PARTS (2) 3/8”-16 x 2-1/2” HEX BOLTS (1) SCREEN ASSEMBLY (2) 3/8”-16 x 1-3/4” HEX BOLTS (2) SCREEN ‘L’ MOUNTS (2) 3/8”-16 x 1” HEX BOLTS (2) LOWER SCREEN MOUNTS (6) 3/8”-16 NUTS...
- Page 2 Align the 5/16”-18 x 1-1/2” bolt in the lower screen brace with the bolt hole on the bottom of the screen assembly. Loosely secure with 5/16” split lock washer and 5/16”-18 nut. Repeat for other lower screen brace. Page 2 of 5 HAULER RACKS, INC. Toll Free: 1-800-843-5445 7109 31...
- Page 3 Reinstall the bolts that were removed from the crossbar and leg that held the HD brace that were set aside. Install and bolt the bracket(s) which connect the leg to rail and/or crossbar. Reinstall the HD brace. Repeat for other side of rack. Page 3 of 5 HAULER RACKS, INC. Toll Free: 1-800-843-5445 7109 31 Avenue North Phone: 763-546-5620...
- Page 4 Center the Headknocker Accessory rack between the legs. Use a tape measure for best results. Continue around the rack and tighten all remaining nuts and bolts securely. Tighten until lock washers are flat but DO NOT OVERTIGHTEN! Page 4 of 5 HAULER RACKS, INC. Toll Free: 1-800-843-5445 7109 31 Avenue North...
- Page 5 The racks have been load tested for the racks capacity to hold loads when not on a vehicle. Hauler Racks, Inc. does not warranty load capacities. As the factory has no way of knowing if the product was properly assembled, installed, used according to instructions, or if loads were secured properly.
Need help?
Do you have a question about the HKAS4-1 and is the answer not in the manual?
Questions and answers