IFM Electronic efector 200 Operating Instructions Manual
Colour sensor odc
Hide thumbs
Also See for efector 200:
- Training manual (178 pages) ,
- Operating instructions manual (11 pages) ,
- Operating instructions (5 pages)

Related Manuals for IFM Electronic efector 200


Summary of Contents for IFM Electronic efector 200
- Page 1 Bedienungsanleitung Operating instructions Notice pour utilisateurs Farbsensor ODC Colour sensor ODC Détecteur de couleurs ODC OD5013 OD5014...
-
Page 2: Bestimmungsgemäße Verwendung
Bestimmungsgemäße Verwendung Der Farbsensor erfaßt über Lichtleiter berührungslos farbige Gegenstände und Materialien im Taster- oder Einwegbetrieb. Montage Montieren Sie den Lichtleiter so, daß das zu erfassende Objekt möglichst geringe Seiten- und Höhenbewegungen ausführt. Berücksichtigen Sie dabei die angegebe- ne Tastweite/Reichweite. Ziehen Sie die Überwurfmuttern mit der Hand fest (Überwurfmuttern liegen den jeweiligen Lichtleitern bei). -
Page 3: Bedien- Und Anzeigeelemente
Bedien- und Anzeigeelemente LED Betriebsanzeige Drehschalter Farbtoleranz Teach Taste Programmwahlschalter Out/OK Out1 Delay LED Funktionsanzeige Einstell- und Programmierhinweise Stellen Sie den Drehschalter Farbtoleranz (Tolerance) auf die gewünschte Farbauflö- sung. 1= geringer Toleranzbereich zur Erkennung auch geringer Farb- nuancen 3= Grundeinstellung Out/OK 5= großer Toleranzbereich Out1... - Page 4 Nach erfolgreichem Teach-In-Vorgang leuchtet die Funktionsanzeige (Out/OK). Blinkt sie, ist die Intensität zu hoch. Tasterbetrieb Neigen Sie dann den Tastkopf um 10...30° und wiederholen Sie den Teach-In-Vor- gang. Einwegbetrieb Vergrößern Sie den Abstand Tastkopf/ Objekt bzw. Tastkopf/Tastkopf. Leuchtet die Funktionsanzeige nicht, ist Out/OK Out1 die Intensität zu gering.
-
Page 5: Functions And Features
Functions and features The colour sensor detects coloured objects and materials without contact via fibre optics in diffuse-reflection or through-beam mode. Mounting Mount the fibre optic in a way that the object to be detected makes as little lateral and vertical movement as possible. Consider the specified range. Tighten the coupling nuts manually (the coupling nuts are supplied with the fibre optics). -
Page 6: Controls And Indicators
Controls and indicators LED operation display rotary switch colour tolerance teach button programming selector switch Out/OK Out1 Delay LED function display Setting and programming Set the rotary switch colour tolerance (Tolerance) to the requested colour resolu- tion. 1 = small tolerance range for detecting small colour shades 3 = basic setting 5 = large tolerance range... - Page 7 After a successful teach-in operation the function display (Out/OK) comes on. If it flashes, the intensity is too high. Diffuse-reflection mode Incline the sensing head by 10...30° and repeat the teach-in operation. Through-beam mode Increase the distance sensing head/object or sensing head/sensing head. If the function display is not lit, the inten- Out/OK sity is too low.
-
Page 8: Fonctionnement Et Caractéristiques
Fonctionnement et caractéristiques Le détecteur de couleurs détecte sans contact des objets et des matériaux colorés via des fibres optiques en mode réflexion directe ou barrages photoélectriques. Montage Montez la fibre optique de façon à ce que l'objet à détecter fasse le moins possible de mouvements latéraux et verticaux. - Page 9 Contrôles et indications LED indication disponibilité commutateur rotatif tolérance de couleurs bouton apprentissage commutateur sélecteur de programmation Out/OK Out1 Delay LED indication fonction Réglage et programmation Positionnez le commutateur rotatif pour la tolérance de couleurs (Tolerance) sur la résolution de la couleur souhaitée. 1 = faible portée de tolérance pour détecter de faibles nuances de couleur...
- Page 10 Après l'opération apprentissage réussie l'indication fonction (Out/OK) est allumée. Si elle clignote, l'intensité est trop grande. Système réflexion directe Inclinez la tête de détection de 10...30° et répétez l'opération apprentissage. Système barrage photoélectrique Agrandissez la distance tête de détec- tion/objet ou tête de détection/tête de détection.
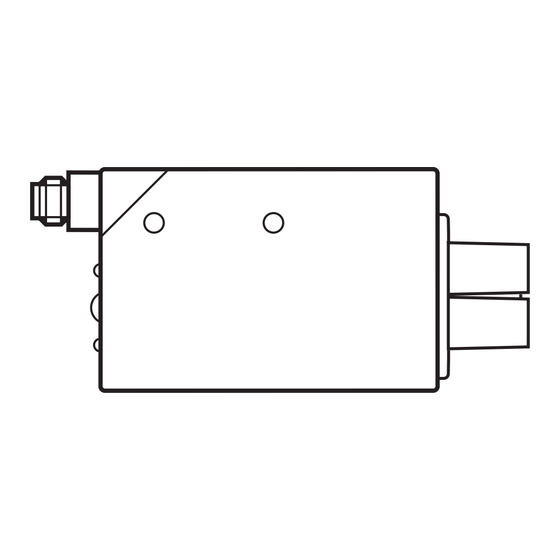
- Page 11 Abmessungen Scale drawing Schéma d’encombrement • • Anschluß Connection Raccordement • • Sensor mit einem Schaltausgang Sensor with one switching output Détecteur avec une sortie de commutation...
Need help?
Do you have a question about the efector 200 and is the answer not in the manual?
Questions and answers