Vega PLICSCOM Operating Instructions Manual
Display and adjustment module
Hide thumbs
Also See for PLICSCOM:
- Operating instructions manual (40 pages) ,
- Operating instructions manual (41 pages) ,
- Operating instructions manual (32 pages)
Table of Contents
Advertisement
Quick Links
Advertisement
Table of Contents

Related Manuals for Vega PLICSCOM


Summary of Contents for Vega PLICSCOM
- Page 1 Operating Instructions Display and adjustment module PLICSCOM Document ID: 36433...
-
Page 2: Table Of Contents
Sensor parameter adjustment ..................19 7 Maintenance and fault rectification Maintenance ........................20 Integrated battery (US version) ..................20 How to proceed if a repair is necessary ................20 Dismount Dismounting steps......................22 Disposal ......................... 22 Supplement Technical data ........................ 23 Dimensions ........................24 PLICSCOM •... - Page 3 Contents Safety instructions for Ex areas Take note of the Ex specific safety instructions for Ex applications. These instructions are attached as documents to each instrument with Ex approval and are part of the operating instructions manual. Editing status: 2016-02-04 PLICSCOM •...
-
Page 4: About This Document
The dot set in front indicates a list with no implied sequence. → Action This arrow indicates a single action. Sequence of actions Numbers set in front indicate successive steps in a procedure. Battery disposal This symbol indicates special information about the disposal of bat- teries and accumulators. PLICSCOM •... -
Page 5: For Your Safety
Arbi- trary conversions or modifications are explicitly forbidden. The safety approval markings and safety tips on the device must also be observed. CE conformity The device fulfills the legal requirements of the applicable EC guide- lines. By affixing the CE marking, we confirm successful testing of the product. PLICSCOM •... -
Page 6: Namur Recommendations
That is why we have introduced an environment management system with the goal of continuously improving company environmental pro- tection. The environment management system is certified according to DIN EN ISO 14001. Please help us fulfill this obligation by observing the environmental instructions in this manual: • Chapter "Packaging, transport and storage" • Chapter "Disposal" PLICSCOM •... -
Page 7: Product Description
Scope of delivery The scope of delivery encompasses: • Display and adjustment module • Magnetic pen (with Bluetooth version) • Documentation – This operating instructions manual – Supplementary instructions manual 31708 "Heating for display and adjustment module" (optional) PLICSCOM •... -
Page 8: Principle Of Operation
The respective scope of delivery results from the order specification. Principle of operation Application area The pluggable display and adjustment module PLICSCOM is used for measured value indication, adjustment, and diagnostics for the follow- ing instruments of the VEGA plics family: ®... - Page 9 Mounting in the external The external display and adjustment unit is another installation option. display and adjustment unit Fig. 5: Mounting the display and adjustment module in the external display and adjustment unit Installation position PLICSCOM •...
-
Page 10: Packaging, Transport And Storage
Unless otherwise indicated, the packages must be stored only under the following conditions: • Not in the open • Dry and dust free • Not exposed to corrosive media • Protected against solar radiation • Avoiding mechanical shock and vibration PLICSCOM •... - Page 11 3 Product description • Storage and transport temperature see chapter "Supplement - Storage and transport temperature Technical data - Ambient conditions" • Relative humidity 20 … 85 % PLICSCOM •...
-
Page 12: Prepare Setup
Disassembly is carried out in reverse order. The display and adjustment module is powered by the sensor, an ad- ditional connection is not necessary. Fig. 6: Installing the display and adjustment module in the electronics compart- ment of the single chamber housing PLICSCOM •... -
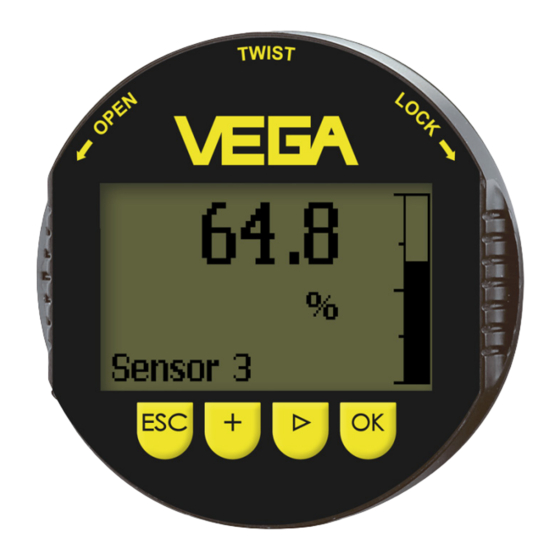
Page 13: Adjustment System
In the terminal compartment Note: If you intend to retrofit the instrument with a display and adjustment module for continuous measured value indication, a higher lid with an inspection glass is required. Adjustment system Fig. 8: Display and adjustment elements LC display Adjustment keys • Key functions [OK] key: PLICSCOM •... - Page 14 Fig. 9: Display and adjustment elements - With adjustment via magnetic pen LC display Magnetic pen Adjustment keys Bluetooth symbol Lid with inspection window PLICSCOM •...
- Page 15 5 s, the display returns to the main menu. The menu language is then switched over to "English". Approx. 60 minutes after the last pressing of a key, an automatic reset to measured value indication is triggered. Any values not confirmed with [OK] will not be saved. PLICSCOM •...
-
Page 16: Parallel Operation Of Display And Adjustment Modules
With the following hardware and software versions of the sensors, parallel operation of several display and adjustment modules is pos- sible: • Radar sensors with HW ≥ 2.0.0, SW ≥ 4.0.0 • Sensors with guided radar with HW ≥ 1.0.0, SW ≥ 1.1.0 • Pressure transmitter with HW ≥ 1.0.0, SW ≥ 1.1.0 With these instruments, the interfaces for the display and adjustment module and the external display and adjustment unit are separated: PLICSCOM •... - Page 17 "Adjustment blocked" appears. Simultaneous adjust- ment is thus impossible. Connection of more than one display and adjustment module on one interface, or a total of more than two display and adjustment modules, however, is not supported. PLICSCOM •...
-
Page 18: Set Up Bluetooth Connection
Operating system: Android 4.3 or newer • Bluetooth Smart ab 4.0 Download the app "VEGA Tools" from the Apple App Store or Google Play Store to your smartphone or tablet. Activate Bluetooth Make sure that the Bluetooth function of the display and adjustment module is activated. -
Page 19: Sensor Parameter Adjustment
The sensor adjustment menu is divided into two halves: On the left you can find the navigation section with the menus "Setup", "Display", "Diagnosis" and others. The selected menu item can be identified by the colour change and is displayed in the right half. Fig. 13: Example of an app view - Setup sensor adjustment Enter the requested parameters and confirm via the keyboard or the editing field. The message "Data are being written" is displayed. The parameter values are henceforth active in the sensor. PLICSCOM •... -
Page 20: Maintenance And Fault Rectification
By doing this you help us carry out the repair quickly and without hav- ing to call back for needed information. If a repair is necessary, please proceed as follows: • Print and fill out one form per instrument • Clean the instrument and pack it damage-proof PLICSCOM •... - Page 21 7 Maintenance and fault rectification • Attach the completed form and, if need be, also a safety data sheet outside on the packaging • Please contact the agency serving you to get the address for the return shipment. You can find the agency on our home page www.vega.com. PLICSCOM •...
-
Page 22: Dismount
Due to the very strict transport regulations for lithium-based batteries/accumulators, this is normally not a good idea because shipment is very expensive. Correct disposal avoids negative effects on humans and the environ- ment and ensures recycling of useful raw materials. PLICSCOM •... -
Page 23: Supplement
-40 … +80 °C (-40 … +176 °F) Voltage supply, sensor Operating voltage Ʋ PLICSCOM, standard see chapter "Technical data" of the respective sensor Ʋ PLICSCOM with Bluetooth function 2 V more than the min. operating voltage of the respec- tive sensor. PLICSCOM •... -
Page 24: Dimensions
9 Supplement Dimensions 45,1mm (1.78") 9,7mm (0.38") Fig. 15: Dimensions of display and adjustment module PLICSCOM •... - Page 25 Les lignes de produits VEGA sont globalement protégées par des droits de propriété intellec- tuelle. Pour plus d'informations, on pourra se référer au site www.vega.com. VEGA lineas de productos están protegidas por los derechos en el campo de la propiedad indus- trial. Para mayor información revise la pagina web www.vega.com.
- Page 26 Notes PLICSCOM •...
- Page 27 Notes PLICSCOM •...
- Page 28 Subject to change without prior notice © VEGA Grieshaber KG, Schiltach/Germany 2016 VEGA Grieshaber KG Phone +49 7836 50-0 Am Hohenstein 113...
Need help?
Do you have a question about the PLICSCOM and is the answer not in the manual?
Questions and answers