Advertisement
Quick Links
Advertisement

Related Manuals for BIGTREETECH EBB42 CAN


Summary of Contents for BIGTREETECH EBB42 CAN
- Page 1 BIGTREETECH BIGTREETECH EBB42 CAN V1.0 User Manual 1 / 19...
- Page 2 Ⅰ. Brief Instruction..........................4 1.1 Features ..........................4 1.2 Parameters ..........................5 1. External Dimensions: 40mm x 40mm. For further details please read: BIGTREETECH EBB36 CAN V1.0-SIZE.pdf ......................5 4. Input Voltage: DC12V-DC24V 9A ................... 5 5. Logic Voltage: DC 3.3V ......................5 6.
- Page 3 BIGTREETECH Revisions Version Statements Date 01.00 First Draft 2022/04/18 3 / 19...
- Page 4 BIGTREETECH Ⅰ. Brief Instruction BIGTREETECH EBB42 CAN V1.0 is a nozzle adapter board specially designed for the 42 extruder stepper motor, which is launched by the 3D printing team Shenzhen Big Tree Technology Co., Ltd. It can communicate via USB port, or CAN BUS, greatly simplifying wirings.
- Page 5 BIGTREETECH 1.2 Parameters 1. External Dimensions: 40mm x 40mm. For further details please read: BIGTREETECH EBB42 CAN V1.0-SIZE.pdf 2. Installation Dimensions: Hole spacing 31mm x 31mm, M3 screw hole x 4 3. Microprocessor: ARM Cortex-M0 STM32F072C8T6 48MHz 4. Input Voltage: DC12V-DC24V 9A 5.
- Page 6 BIGTREETECH 1.4 Size Diagram 6 / 19...
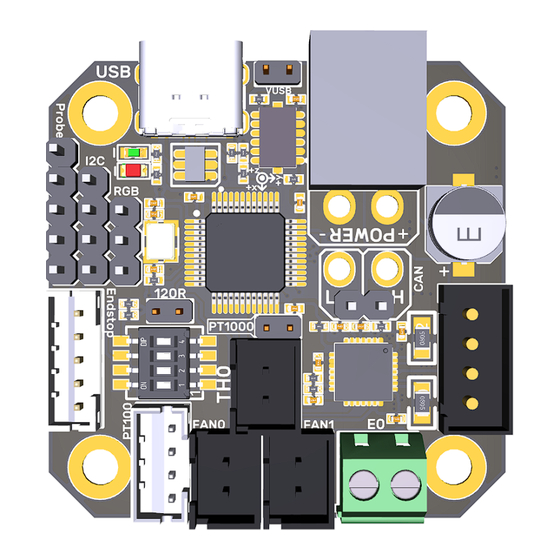
- Page 7 BIGTREETECH II. Peripheral interface 2.1 Pin 7 / 19...
-
Page 8: Usb Power Supply
BIGTREETECH III. Introduction of Interface 3.1 USB Power Supply D1 RGB light will be on when the control board is powers on, which shows supplying normal power. VUSB in the middle of the board is the selection terminal for power. Only when USB supplies power to the board, or the board supplies power through USB, users need to short circuit the VUSB by jump cap. - Page 9 BIGTREETECH Version with 31865: Select PT100/PT1000 by DIP switch, two-line or four-wire. Sensor Model Two lines PT100 Two linesPT1000 Four-wire PT100 Four-wire PT1000 9 / 19...
- Page 10 BIGTREETECH 3.3 Connection with BL-Touch 10 / 19...
- Page 11 BIGTREETECH 3.4 Connection with Filament Broke Detection 3.5 Connection with RGB 11 / 19...
- Page 12 BIGTREETECH IV. Klipper 4.1 Compile Firmware 1. After connecting to the Raspberry Pi via ssh, type the below sentences at the command line: cd ~/klipper/ make menuconfig Compile the firmware with the following configuration (if the following options are not available, please update the Klipper firmware source to the latest...
-
Page 13: Update Firmware
BIGTREETECH 4.2 Update Firmware Update firmware via Raspberry Pi (You can also update via STM32CubeProgrammer software after the board is plugged into the computer and entering DFU mode). 1. Press on the Boot button, then click on the Reset button to enter DFU mode. - Page 14 BIGTREETECH 2. Type lsusb in the ssh terminal command line to query the ID of the DFU device. 3. Type make flash FLASH_DEVICE=0483:df11 to download the firmware (Notice: Replace 0483:df11 with the actual ID of the DFU device queried in the previous step).
-
Page 15: Canbus Configuration
FLASH_DEVICE= /dev/serial/by-id/usb- Klipper_stm32f072xb_28002D001557434338313020-if00 to download the firmware(Notice: Replace /dev/serial/by-id/xxx with actual ID queried in the previous step) 4.3 CANBus Configuration 4.3.1 Use with BIGTREETECH U2C Module Type the following command sudo nano /etc/network/interfaces.d/can0 in the 15 / 19... - Page 16 Found canbus_uuid=0e0d81e4210c If Klipper operates normally and is connected to the device, then it won't report canbus_uuid, which is normal. 4.3.2 Use with BIGTREETECH RPI-CAN HAT Module Type and run the following command sudo nano /boot/config.txt, and added below contents on file config.txt.
- Page 17 BIGTREETECH module is normally connected. The normal response should be as below: [ 8.680446] CAN device driver interface [ 8.697558] mcp251x spi0.0 can0: MCP2515 successfully initialized. [ 9.482332] IPv6: ADDRCONF(NETDEV_CHANGE): can0: link becomes ready Type sudo nano /etc/network/interfaces.d/can0 on the ssh terminal and run the command.
- Page 18 2. Upload the board's configuration files to the Configuration files as shown below. 3. Add the board's configuration to the file“printer.cfg". [include sample-bigtreetech-ebb-canbus-v1.0.cfg] 4. Revise the ID number of the configuration files as the actual ID of the board ( Via USB serial or CANBus).
- Page 19 BIGTREETECH https://www.klipper3d.org/Overview.html V. Cautions 1. When the TH0 interface doesn't use PT1000, you can't insert the jump cap on it, otherwise 100K NTC won't be used as normal. 2. When using CAN communication, you need to see whether it is used as a terminal.
Need help?
Do you have a question about the EBB42 CAN and is the answer not in the manual?
Questions and answers