
Related Manuals for Epson TM-m50II


Summary of Contents for Epson TM-m50II
- Page 1 Product Overview Setup Advanced Usage Application Development Information Handling Appendix M00153100 Rev. A...
- Page 2 • Neither is any liability assumed for damages resulting from the use of the information contained herein. • Neither Seiko Epson Corporation nor its affiliates shall be liable to the purchaser of this product or third parties for damages, losses, costs, or expenses incurred by the purchaser or third parties as a result of: accident, misuse, or abuse of this product or unauthorized modifications, repairs, or alterations to this product, or (excluding the U.S.) failure to strictly comply with Seiko Epson Corporation’s operating and...
-
Page 3: For Safety
For Safety Key to Symbols The symbols in this manual are identified by their level of importance, as defined below. Read the following carefully before handling the product. You must follow warnings carefully to avoid serious bodily injury. WARNING Provides information that must be observed to prevent damage to the equipment or loss of data. •... -
Page 4: Cautions
• If water or other liquid spills into this equipment, do not continue to use it. Continued use may lead to fire. Unplug the power cord immediately and contact qualified service personnel. WARNING • Do not use aerosol sprayers containing flammable gas inside or around this product. Doing so may cause fire. -
Page 5: Open Source Software License
Open Source Software License This product uses open source software in addition to Epson proprietary software. For information of the open source software used in this product, see the following URL. http://xxx.xxx.xxx.xxx/PRESENTATION/ADVANCED/LICENSE/TOP For “xxx.xxx.xxx.xxx” in the above URL, input your printer’s IP address. -
Page 6: Manuals For This Product
In addition to the URL below, you can also access it from the QR code attached to the product itself. <https://www.epson-biz.com/?prd=tm-m50ii&inf=manual> Manuals viewed on computers TM-m50II Technical Reference Guide (this manual) Describes information necessary to set up this product, perform daily tasks, and develop your own system. -
Page 7: About This Manual
About this Manual Aim of the Manual This manual was created to provide information on development, design, and installation of POS systems and development and design of printer applications for developers. Manual Content The manual is made up of the following sections: Chapter 1 Product Overview Chapter 2... -
Page 8: Table Of Contents
Contents ■ For Safety..........................3 Key to Symbols.................................. 3 Warnings ..................................... 3 Cautions....................................4 ■ Caution Labels .........................4 ■ Restriction of Use ........................4 ■ Open Source Software License.....................5 ■ Manuals for This Product .......................6 ■ About this Manual ........................7 Aim of the Manual ................................7 Manual Content................................ - Page 9 ■ Printing Using Multiple Interfaces..................27 ■ Roll Paper Near-End Detection Function................. 28 Setup ....................... 29 ■ Flow of Setup ........................29 ■ Installing the Printer......................30 ■ Changing the Paper Width ....................31 ■ Connecting the Optional Wireless LAN Unit..............32 ■...
- Page 10 ■ Printing a Status Sheet......................71 ■ Resetting the Interface Settings ..................73 ■ TM-Intelligent Function ...................... 74 Server direct print ................................74 Status Notification .................................74 ■ Web Config ..........................75 How to Start Web Config.............................75 What can be Configured in Web Config ........................76 Application Development Information............
- Page 11 ■ Roll Paper Cover does not Open ..................96 ■ Cleaning the Printer......................97 Cleaning the Printer Case............................97 Cleaning the Thermal Head/Platen Roller......................97 ■ Preparing for Transport....................... 98 ■ When Using the Printer for a Self-Service Terminal............99 Appendix.......................100 ■ Product Specifications ...................... 100 Printing Specifications ..............................
-
Page 12: Product Overview
• Peripheral devices such as customer display, wireless LAN unit, external optional buzzer, and handy scanner can be connected. • A utility for iOS/Android™ (Epson TM Utility) for making printer settings is provided. Functions • Offers network connection check function. - Page 13 Chapter 1 Product Overview • Printing is possible through multiple built-in interfaces. See "Printing Using Multiple Interfaces" on page 27 for more details. • Printing of various types of bar codes, GS1-DataBar, and two-dimensional symbols (PDF417, QR code, MaxiCode, Composite Symbology, Aztec Code, DataMatrix) is supported. •...
-
Page 14: Product Configurations
"NFC Tag" on page 119. • There is no data rewriting function. • Use Epson ePOS SDK to build this function into your application. Included • 58 mm width roll paper guides • 80 mm width roll paper (for operation check) •... -
Page 15: Part Names And Functions
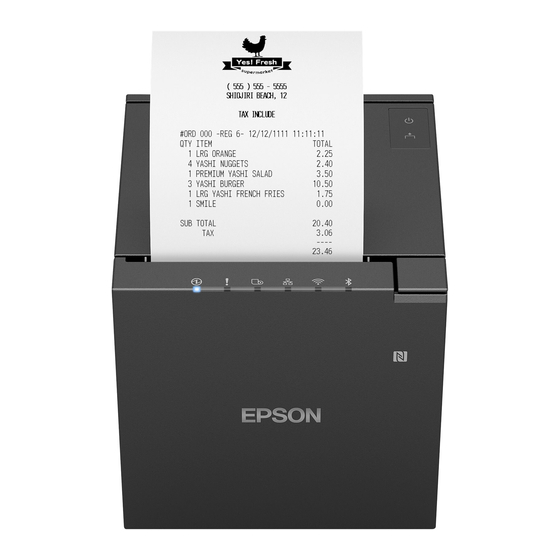
Chapter 1 Product Overview Part Names and Functions Body Roll paper cover Open this cover when loading or replacing roll paper. Panel LED These LEDs indicate the operating status of the printer. For details on LED, see"Panel LED" on page NFC Tag A mark is printed here to indicate the position of the NFC tag. -
Page 16: Panel Led
Chapter 1 Product Overview Panel LED Power LED • Lights when the power supply is on. • Off when the power supply is off. • Flashes during the network to start up, when waiting for power off, or updating firmware. During turn-off process (while the power LED is flashing), do not perform the following operations. -
Page 17: Connectors
Chapter 1 Product Overview Connectors All connectors are located on the lower rear of the printer. When connecting a cable, always check the shape of the connector and the cable end and insert the cable straight in. USB-A connector For connecting a peripheral device such as a wireless LAN unit, customer display, or handheld scanner. -
Page 18: Online And Offline
Chapter 1 Product Overview Online and Offline Online The printer is online and ready for normal printing unless there is a reason to go offline. Offline The printer automatically goes offline under the following conditions: • While the printer power is turning on/off •... -
Page 19: Status And Errors
Chapter 1 Product Overview Status and Errors The status of the printer is indicated by lit and flashing LEDs. You cannot print when an error has occurred. You cannot identify the error by the flashing patterns of the LEDs. Develop the application so that users can identify the error description and check the solutions. -
Page 20: Network Connection Status
Chapter 1 Product Overview *1: The Power LED flashing pattern is: lighting for 4960 ms followed by a pause for 160 ms. *2: The Error LED flashing pattern is: lighting for 160 ms followed by a pause for 2400 ms. The LED goes off after repeating the pattern for five seconds. -
Page 21: Error Status
Chapter 1 Product Overview Error Status There are three possible error types: automatically recoverable errors, recoverable errors, and unrecoverable errors. Automatically Recoverable Errors Error Description Recovery Head temperature error Head temperature exceeded the The printer recovers from the error when the head proper range. -
Page 22: Nv Memory (Non-Volatile Memory)
Graphics, such as shop logos to be printed on receipts, can be registered. To register your graphics data, use TM-m50II Utility or ESC/POS commands. You can check registered graphics data using TM-m50II Utility or by printing the data in the NV graphics information print mode. -
Page 23: Maintenance Counter
Chapter 1 Product Overview Maintenance Counter With this function, printer information, such as the number of lines printed, the number of autocuts, and printer operation time after the printer starts working, is automatically stored in printer's memory. You can read the counter information to use it for periodical checks or part replacement. -
Page 24: Simple Setup For Wireless Lan
Chapter 1 Product Overview Simple Setup for Wireless LAN The printer has "SimpleAP" mode that allows a device to directly connect to the printer without using an access point. This makes it easy to set up a printer to connect to a wireless LAN using the printer setting tool, without having to go through a network environment such as an access point. -
Page 25: About Simpleap (Wi-Fi Direct)
Chapter 1 Product Overview About SimpleAP (Wi-Fi Direct) • The printer acts as an access point in the SimpleAP mode and allows up to eight devices to connect to the printer. However, devices directly connected to the printer cannot communicate with each other through the printer. -
Page 26: Useful Functions For Smart Devices
By using the acquired information, the device can specify the printer to send a print job over a network. • Programming using Epson ePOS SDK is required to use these functions. These functions are created by combining NFC touch and QR code capturing operations and the target printer specifications using Printer Easy Select API. -
Page 27: Printing Using Multiple Interfaces
Chapter 1 Product Overview Printing Using Multiple Interfaces The printer offers multiple interfaces and allows you to use all of them without limitation. You can use this function to temporarily connect a smart device to a nearby printer and print. The printer provides each interface with an independent receive buffer and switches the active interface depending on the priority, while handling data in each receive buffer. -
Page 28: Roll Paper Near-End Detection Function
Chapter 1 Product Overview Roll Paper Near-End Detection Function This function allows the printer to detect that the roll paper is running low. Accurate detection of the roll paper near-end status is impossible because the shape of the core varies from one roll paper to another. Near-end detector (Used when ejecting paper upward) Near-end detector... -
Page 29: Setup
Chapter 2 Setup Setup This chapter describes setup and installation of the product and peripherals. Flow of Setup This chapter consists of the following sections along with the setup flow of the product and peripherals. Installing the Printer (page 30) Changing the Paper Width (page 31) Connecting the Optional Wireless LAN Unit (page 32) Connecting the Optional Customer Display (page 33) -
Page 30: Installing The Printer
Chapter 2 Setup Installing the Printer You can select whether to eject printed paper from the top side or from the front side. The paper ejection direction can be changed by switching the attachment position of the printer covers. The printer is shipped with the covers attached so that paper is ejected upward (from the top side). When you want to eject printed paper frontward (from the front side), see the following pages to switch the attachment position of the covers. -
Page 31: Changing The Paper Width
Chapter 2 Setup Changing the Paper Width You can change the paper width from 80 to 58 mm by installing the included 58 mm width roll paper guides. Follow the steps below to change the paper width. Once you change the paper width to 58 mm and print on 58 mm width roll paper, you cannot go back to 80 mm width. -
Page 32: Connecting The Optional Wireless Lan Unit
Chapter 2 Setup Connecting the Optional Wireless LAN Unit Using the optional wireless LAN unit (OT-WL06) allows you to connect the printer via Wi-Fi. For details, see the Technical Reference Guide for the optional wireless LAN unit. Depending on the installation conditions of the printer and the routing for cables connected to it, the status of the radio waves for the Wireless LAN unit may decline. -
Page 33: Connecting The Optional Customer Display
Chapter 2 Setup Connecting the Optional Customer Display You can connect the customer display (DM-D30/DM-D70) to this product, using USB connection. For more information, refer to the user’s manual for the customer display. Make sure the printer is turned off. Connect the USB cable from the customer display to the USB-A connector on the printer. -
Page 34: Connecting The Optional External Buzzer
Chapter 2 Setup Connecting the Optional External Buzzer When the optional external buzzer (model: OT-BZ20) is connected to the drawer kick connector of the printer, you can set the printer so that it beeps when you send commands, when an error occurs, when executed autocutting, and when detected paper end. -
Page 35: Connecting The Cash Drawer
Chapter 2 Setup Connecting the Cash Drawer • Do not connect both the optional external buzzer and the cash drawer to the printer at the same time by using a branched connector. • When the optional external buzzer is enabled with the memory switch (customized values) (see "Software Settings"... -
Page 36: Connecting The Drawer Kick Cable
Chapter 2 Setup Pin assignments Pin number Signal name Direction Frame GND Drawer kick drive signal 1 Output Drawer kick open/close signal Input +24 V Drawer kick drive signal 2 Output 6 5 4 3 2 1 Signal GND Connecting the drawer kick cable •... -
Page 37: Connecting To The Power Source
Chapter 2 Setup Connecting to the Power Source • Never insert the AC cable plug into a socket that does not meet the input voltage of the AC adapter. Doing so may result in damage to the printer. WARNING • Should a fault ever occur, immediately turn off the power to the printer and unplug the AC cable from the socket. - Page 38 Chapter 2 Setup Connect the DC cable of the AC adapter to the power supply connector. Insert the AC plug into a socket. Turn on the printer.
-
Page 39: Connecting The Printer To The Host Devices
Chapter 2 Setup Connecting the Printer to the Host Devices When connecting cables, check the shape of the connector of the cable and the shape of the connector on the printer before connecting them. Forcing a connector in the wrong orientation or with the wrong shape may cause malfunction or damage to the printer. - Page 40 Chapter 2 Setup Setup Procedure Follow the steps below to set up the printer. When shipped from the factory, the setting for obtaining an IP address is set to "Auto", so if there is a DHCP server, the printer waits for an IP address to be assigned. If there is no DHCP server, a fixed IP address (192.168.192.168) is set.
- Page 41 Chapter 2 Setup Start your web browser and enter the IP address of the printer in the address field. Example: http://192.168.192.168 At the time of initial setting, when accessing Web Config from a browser, an authentication warning message may be displayed. Select "Advanced Settings"...
-
Page 42: Wireless Lan Interface
Method2: Setup using Epson TM Utility Install Epson TM Utility on the device and follow the wizard to configure the wireless LAN settings. Epson TM Utility is an iOS/Android application that allows you to change printer settings and set up wireless connections. - Page 43 Chapter 2 Setup Setup using Web Config Necessary Items Prepare the following items. A device for the setup which has a web browser. When the printer is turned on during the following conditions, the SimpleAP mode is automatically activated and the "SimpleAP Start" sheet and guidance are printed. In this case, start the setup from step 4. •...
- Page 44 Chapter 2 Setup Scan the QR code on the "SimpleAP Start" sheet with the device for setup and connect it to the printer. The password is the serial number of the printer. The serial number is the last 10 digits of the SSID on the printed sheet.
- Page 45 Chapter 2 Setup Enter the password and select [OK] to log in to Web Config. The default password is as follows: Password label Password Attached on the product Printed on the label Not attached on the product Serial number (10-digit alphanumeric characters, case-sensitive) You can find the serial number by running the self-test or on the nameplate attached to the printer.
- Page 46 Chapter 2 Setup Setup using Epson TM Utility Epson TM Utility is a utility that can be downloaded on the App Store or Google Play. "Utilities" on page 82 for more information on features. Necessary Items Prepare the following items.
-
Page 47: Routing Cables In Various Directions
Chapter 2 Setup Routing Cables in Various Directions For both upward and frontward paper ejection, there are four slots (one each in rear center, right, left, and bottom) through which you can pass cables. ❏ Rear center ("Passing Cables through the Rear Center" on page ❏... -
Page 48: Passing Cables Through The Rear Center
Chapter 2 Setup Passing Cables through the Rear Center Remove the cable slot cover, and then pass cables through the slot. Passing Cables through the Left or Right With your fingers, fold the tab on the side you want to pass cables and remove it to make a slot. If the slot is jagged, smooth it out with nippers or a file to prevent the cables from being damaged. -
Page 49: Passing Cables Through The Bottom
Chapter 2 Setup Passing Cables through the Bottom If the desk or table on which the printer is to be installed has a hole through which cables can pass, it is best to pass the cables through the slot in the bottom of the printer. Rear cover Slot in the bottom of the printer Bottom cover... -
Page 50: Advanced Usage
• For the settings that can be set by the ESC/POS commands and how to set them, refer to the ESC/POS Command Reference. For more details, see "Application Development Information" on page Software Item \ Method Epson TM Utility TM-m50II Utility Setting Mode ✔ ✔ ✔... - Page 51 Chapter 3 Advanced Usage Software Item \ Method Epson TM Utility TM-m50II Utility Setting Mode ✔ ✔ ✔ Interface switch waiting time ✔ ✔ ✔ Main connection interface ✔ ✔ ✔ Auto Line Feed ✔ ✔ ✔ Error Signal Output ✔...
-
Page 52: Overview Of Each Function
(the motor sometimes stops). To avoid this, keep the print speed constant by setting it lower. • By using a setting tool such as TM-m50II Utility, the print speed can be selected from 17 levels (from the slowest level 1 to the fastest level 17). (Default setting: level 16) - Page 53 Chapter 3 Advanced Usage Automatic Paper Reduction Upper Margin • Enable • Disable (initial setting) Lower Margin • Enable • Disable (initial setting) Line space reduction rate • 25% • 50% • 75% • Not reduced (initial setting) Line feed reduction rate •...
- Page 54 ("Minimum Paper Length when Cutting" on page When using the TM-m50II Utility or Epson TM Utility, you can specify values in 0.5 mm increments. Character/Font Settings Default Character Code Page...
- Page 55 Chapter 3 Advanced Usage Embedded Font Replacement Font A Replacement • Does not replace (initial setting) • Font B • Special Font A • Special Font B Font B Replacement • Font A • Does not replace (initial setting) • Special Font A •...
- Page 56 Chapter 3 Advanced Usage • 57600 bps • 115200 bps (initial setting) Serial Interface Parity • None (initial setting) • Odd • Even Serial Interface Handshaking • DTR/DSR (initial setting) • XON/XOFF Serial Interface Data Bits • 7 bits • 8 bits (initial setting) USB Interface Settings Class •...
- Page 57 Chapter 3 Advanced Usage Main connection interface • Com (Serial) • Built-in USB (USB-B) • Ethernet/Wi-Fi • Auto (An interface that received data first) (initial setting) • None (No main connection I/F) • When using this printer with multiple interfaces, make sure the interface that is always con- nected to be set as the main connection.
- Page 58 Chapter 3 Advanced Usage Other Settings Column Emulation • 42/30 column mode (standard column mode) (initial setting) • 48/36 column mode Power Supply SW Setting You can turn the printer on and off by operating a breaker without using the power switch (power button). •...
- Page 59 Chapter 3 Advanced Usage Buzzer Control • For information about how to connect the optional external buzzer, see "Connecting the Optional External Buzzer" on page • When the optional external buzzer is enabled, a cash drawer cannot be used. Be sure to disable it when you use a cash drawer.
- Page 60 Chapter 3 Advanced Usage Batch rotate print (Upside Down) When the printer is installed so that the paper is ejected frontward, enable this function to print in an easy-to- view orientation. • Enable • Disable (initial setting) Method for canceling recoverable error •...
-
Page 61: Mac Address Confirmation
Chapter 3 Advanced Usage MAC Address Confirmation You can check the printer's MAC address using the following procedures. • Printing the status sheet • A printer self-test • Using a Web browser to confirm (Web Config function) -
Page 62: Setting/Check Modes
Chapter 3 Advanced Usage Setting/Check Modes As well as print mode, the following modes are also provided for making various printer settings and checking items. • Self-test mode • NV graphics information print mode • Receipt Enhancement information print mode •... - Page 63 Chapter 3 Advanced Usage In 1 and 2, the following guidances are printed, the Paper LED flashes, and instructs the user's operations. 1. Continuing self-test guidance 2. Mode selection guidance Mode Selection Modes 0: Exit and Reboot Printer 1: NV Graphics Information 2: Receipt Enhancement Information 3: Customize Value Settings 4: Restore Default Values...
-
Page 64: Self-Test Mode
Chapter 3 Advanced Usage Self-test Mode You can check the following items using the self-test. • Product name • Firmware version • Product serial number • Interface type • Condition for BUSY • Resident fonts • Thai characters print mode setting •... -
Page 65: Nv Graphics Information Print Mode
Chapter 3 Advanced Usage NV Graphics Information Print Mode Prints the following NV graphic information registered to the printers. • Capacity of the NV graphics • Used capacity of the NV graphics • Unused capacity of the NV graphics • Number of NV graphics that are registered •... -
Page 66: Software Setting Mode
Chapter 3 Advanced Usage Software Setting Mode Set the printer's memory switches and customized values. "Software Settings" on page 50 for information about available functions and settings and how to set them. You can also make the software settings using the ESC/POS commands. Follow the steps below. -
Page 67: Restore Default Values Mode
Chapter 3 Advanced Usage After briefly pressing the Feed button (less than one second) for the number of times shown in the print result, hold down the button for more than one second to select the setting items. The setting selected as the setting item, the current settings and initial settings are printed. Depending on the setting item, you may need to continue selecting the setting item before the settings are printed. -
Page 68: Interface Setup Mode
Chapter 3 Advanced Usage Briefly press the Feed button four times (less than one second), and then hold it down for at least one second to enter the Restore Default Values. The guidance is printed. Briefly press the Feed button once (less than one second), hold it down for at least one second. -
Page 69: Tm-Intelligent Settings Information Print Mode
Chapter 3 Advanced Usage TM-Intelligent Settings Information Print Mode This function allows you to print TM-Intelligent setting information currently registered in the printer. Follow the steps below. After running a self-test, hold down the Feed button for at least one second to enter the Mode selection. -
Page 70: Hexadecimal Dumping Mode
Chapter 3 Advanced Usage Hexadecimal Dumping Mode In hexadecimal dumping mode, data from the host device is printed in hexadecimal numbers and characters. By comparing the print outs and the program, you can check whether or not data is being sent to the printer correctly. -
Page 71: Printing A Status Sheet
Chapter 3 Advanced Usage Printing a Status Sheet Follow the steps below to check the interface settings. Note that if the Ethernet LED and Wi-Fi LED are flashing immediately after the printer is turned on, printing is not possible. • After the status sheet is printed, only the print settings of the mainly connected interface are retained. - Page 72 Chapter 3 Advanced Usage Press the Feed button briefly (less than one second) the number of times equal to the number indicated to the left of the status sheet you want to print, then hold down the button for at least one second. Printing of a status sheet will start.
-
Page 73: Resetting The Interface Settings
Chapter 3 Advanced Usage Resetting the Interface Settings Follow the steps below to restore the network settings to the factory default. The interface settings can also be initialized from the Interface Setup Mode. See "Interface Setup Mode" on page 68 for more details. -
Page 74: Tm-Intelligent Function
• Server direct print • Status Notification You can set each function in the Setup Utilities. For details on the setting method for Epson TM-m50II Utility for Windows, see the TM-m50II Utility User's Manual. You can also download a dedicated manual and sample programs from our website. -
Page 75: Web Config
Chapter 3 Advanced Usage Web Config Web Config is a printer's built-in web page that allows you to check and change printer settings on your browser. To use Web Config, you need to set your computer's IP address to the same segment as the printer. How to Start Web Config Start your web browser on a computer or smart device on the network and enter the IP address of the printer in the address field. -
Page 76: What Can Be Configured In Web Config
Chapter 3 Advanced Usage You can find the serial number by running the self-test or on the nameplate attached to the printer. Nameplate Password label To improve security, it is recommended to change the administrator password from the default pass- word. -
Page 77: Application Development Information
• Epson TM/BA Series Thermal Printer Driver ePOS-Print XML ePOS-Print XML is the Epson original control command system for POS printers defined in XML. With ePOS- Print XML commands, you can print in environments where HTTP communication is available and from OS applications. -
Page 78: Controlling The Cash Drawer
Register a cash drawer using the SetupPOS Utility, and control using the OpenDrawer method or the DirectIO function. For details, see the "EPSON OPOS ADK for .NET MANUAL Application Development Guide Cash Drawer (EPSON Standard)" and the "UnifiedPOS Specification". Epson ePOS SDK The output command for the drawer kick pulse and the status transmission command are provided in each SDK library. -
Page 79: Controlling The Optional External Buzzer
OPOS for .NET Register a POS printer using the SetupPOS Utility and control using the DirectIO function. For details, see the "EPSON OPOS ADK for .NET MANUAL Application Development Guide POSPrinter". Epson ePOS SDK The command for the buzzer function is provided in each SDK library. For details, see the user's manuals pro- vided with each SDK. -
Page 80: Software
Epson TM Print Assistant A native application that relays print data between an application and the TM printer. Epson TM Print Assistant allows you to develop a system that enables printing from a for Android Web application or a URL-scheme capable application such as FileMaker, on a smart device connected to the TM printer. -
Page 81: Drivers
In addition to ordinary Windows printer driver functions, this driver has controls Windows Printer Driver (APD) specific to POS. The Status API (Epson original DLL) that monitors printer status and sends ESC/POS commands is also attached to this driver. EPSON TM Virtual... -
Page 82: Utilities
TM printers for the first time, or when configuring multiple TM printers at the same time. Monitoring Tool Use to check a list of status for the Epson printers connected to the network. Windows You can also update certificates for multiple printers used for WPA-Enterprise in a batch. -
Page 83: Download
Chapter 4 Application Development Information Download You can obtain software and manuals from one of the following URLs. For customers in North America, go to the following web site: https://www.epson.com/support/ For customers in other countries and regions, go to the following web site: https://www.epson-biz.com/... -
Page 84: Precautions When Developing Applications
Chapter 4 Application Development Information Precautions when Developing Applications This section describes information that you should be aware of when developing systems and applications using this product. Power Button Settings This function allows you to disable turning the printer on and off with the power button. See "Software Settings"... -
Page 85: Minimum Paper Length When Cutting
Chapter 4 Application Development Information Minimum Paper Length when Cutting When printing short in the vertical direction of the paper, cut the paper at least 20 mm away from the previous cutting position. If the cut paper is too short, the top edge of the paper may get caught in the opening of the case during paper feeding, causing a paper jam. -
Page 86: Handling
Chapter 5 Handling Handling This chapter describes basic handling of the printer. Turning the Power On/Off Use the power button to turn the printer on or off. You can turn the printer on and off by operating the breaker without using the power button. For more details, see "Precautions when Developing Applications"... -
Page 87: Removing The Printer Covers
Chapter 5 Handling Removing the Printer Covers Follow the steps below to remove the printer covers. When Ejecting Paper Upward Remove the cable slot cover. Put your fingers on the rear cover as shown and then remove it. Put your fingers on the bottom cover as shown and then remove it. -
Page 88: When Ejecting Paper Frontward
Chapter 5 Handling When Ejecting Paper Frontward Remove the cable slot cover. Put your fingers on the rear cover as shown and then remove it. Put your fingers on the bottom cover as shown and then remove it. -
Page 89: Attaching The Printer Covers
Chapter 5 Handling Attaching the Printer Covers Depending on attachment positions of the rear and bottom covers, paper eject direction changes. Decide from which way to eject paper according to the installation location of the printer. Follow the steps below to attach the printer covers. When you pass power or interface cables through the left, right, or bottom of the printer, the cable slot cover will help keep the back of the printer flat and neat looking. -
Page 90: For Ejecting Paper Frontward
Chapter 5 Handling For Ejecting Paper Frontward Align the catches and attach the rear cover to the printer. Hook the catches into the rear cover and attach the bottom cover to the printer. -
Page 91: Installing Roll Paper
Chapter 5 Handling Installing Roll Paper Follow the steps below to install the roll paper. Make sure you use a specified roll paper type. When Ejecting Paper Upward Use the cover open lever to open the roll paper cover. Remove the used roll paper or roll paper core, if any. - Page 92 Chapter 5 Handling Install the roll paper in the correct direction. • Before installing the roll paper, take up any slack in the roll paper by pulling its leading edge. If you install a slack roll paper, a paper jam or print quality problems may occur. •...
-
Page 93: When Ejecting Paper Frontward
Chapter 5 Handling When Ejecting Paper Frontward Use the cover open lever to open the roll paper cover. Remove the used roll paper or roll paper core, if any. Install the roll paper in the correct direction. • Before installing the roll paper, take up any slack in the roll paper by pulling its leading edge. - Page 94 Chapter 5 Handling Pull out some paper, and close the roll paper cover. When the printer power is on, the roll paper is automatically cut.
-
Page 95: Removing Jammed Paper
Chapter 5 Handling Removing Jammed Paper Do not touch the thermal head and its surroundings. After printing, the thermal head and its surroundings can be very hot. CAUTION When a paper jam occurs, never pull out the paper forcibly. Follow the steps below if the roll paper is jammed. Turn off the printer Open the roll paper cover. -
Page 96: Roll Paper Cover Does Not Open
Chapter 5 Handling Roll Paper Cover does not Open When the roll paper cover does not open using the lever, restart the printer. -
Page 97: Cleaning The Printer
CAUTION Cleaning the Thermal Head/Platen Roller Epson recommends cleaning the thermal head to maintain receipt print quality. We recommend cleaning periodically (about once every 3 months). To clean the thermal head, use a cotton swab moistened with an alcohol solvent (ethanol or isopropyl alcohol). -
Page 98: Preparing For Transport
Chapter 5 Handling Preparing for Transport Follow the steps below to transport the printer. Turn off the printer. Confirm that the Power LED is off. Disconnect the AC cable from the socket. Remove the roll paper. Pack the printer in the orientation for upward paper ejection, maintaining the vertical direction. -
Page 99: When Using The Printer For A Self-Service Terminal
Chapter 5 Handling When Using the Printer for a Self-Service Terminal Precautionary measures should be taken at self-service terminals to prevent users from holding the paper or blocking the paper exit during printing, since touching the paper during printing or before the paper cut is completed may result in paper jams or auto-cut failure. -
Page 100: Appendix
Appendix Appendix Product Specifications Printing method Thermal line printing Printing direction Two directional with friction feed Paper feed speed 200 mm/s {5.9"/s} (continuous paper feeding with the Feed button) Cutting method Selectable between partial cut (leaving one point in the center uncut) and full cut. - Page 101 Appendix MTBF 360,000 hours MCBF 70 million lines Temperature/Humidity Operating: 5 to 45°C {41 to 113°F}, 10 to 90% RH Storage: -20 to 60°C {-4 to 140°F}, 10 to 90% RH Overall dimensions (W × D × H) Ejecting paper upward: 127 X 127 X 130 mm (5.0 × 5.0 × 5.1") Ejecting paper frontward: 127 X 128 X 129 mm (5.0 ×...
-
Page 102: Printing Specifications
500 mm/s {19.7"/s} Multi-tone graphics printing Up to 16 shades of gray (when printed on Epson specified paper) dpi: dots per inch *1: Initial setting *2: When the printer prints with the standard print density level at 25°C {77°F} and 24V. -
Page 103: Character Specifications
Appendix Character Specifications Character set 95 alphanumeric characters 128 extended graphics characters x 43 pages (includes user-defined pages) 18 international character sets Japanese 6,879 characters of JIS X0208-1990, 845 special characters 11,233 characters of JIS X0213:2004, One special character Simplified Chinese 28,553 characters of GB18030-2000 Traditional Chinese 13,502 characters of Big5... - Page 104 Appendix Character size 42/30 column mode Font A 1.41 × 3.39 mm {0.06 × 0.13"} (Standard column mode) (W × H) Font B 0.99 × 2.40 mm {0.04 × 0.09"} Special Font A 1.41 × 3.39 mm {0.06 × 0.13"} Special Font B 0.99 ×...
-
Page 105: Paper Specifications
Appendix Paper Specifications Paper width 58 mm Paper width 80 mm Paper types Specified thermal paper Form Roll paper Size Roll paper diameter 83 mm {3.27"} maximum Roll paper core Outside: 18 mm {0.71"} Roll width when taken up 58 + 0.5/-1.0 mm {2.28 + 0.02/-0.04"} 80 + 0.5/-1.0 mm {3.15 + 0.02/- 0.04"} Paper width 57.5 ±... -
Page 106: Printable Area
Appendix Printable Area For paper width 80 mm The maximum printable area of paper with a width of 79.5 ± 0.5 mm {3.13 ± 0.02"} is 72 ± 0.2 mm (512 dots), and the approximate space is 3.65 mm on both sides. 79.5 ±... -
Page 107: Printing And Cutting Positions
Appendix Printing and Cutting Positions Manualcutter position Approx. 21.0 mm {0.83"} Approx. 9.5 mm {0.37"} Autocutter position Center of the print dotline Paper feed direction • The values above may vary slightly as a result of paper slack or variations in the paper. Take this into account when setting the cutting position of the autocutter. -
Page 108: Environmental Conditions
Acoustic noise (operating) Approximately 53 dB (bystander position) Note: The values above are measured in the Epson evaluation condition. Acoustic noise differs depending on the paper used, printing contents, and the setting values, such as print speed or print density. -
Page 109: External Dimensions
Appendix External Dimensions When ejecting paper upward [Unit: mm]... - Page 110 Appendix When ejecting paper frontward [Unit: mm]...
- Page 111 Appendix When installing the printer in a housing Slot to pass cables M2.5 screw holes for wall mount brackets Slot to pass cables [Unit: mm]...
-
Page 112: Specifications Of Interface And Connector
Item Specifications Data transfer method Serial Synchronization Asynchronous Handshake Can be set using the commands, software settings mode, or TM-m50II Utility. • DTR/DSR control • XON/XOFF control Signal level MARK -3 to -15 V logic “1”/OFF SPACE +3 to +15 V logic “0”/ON Bit length Can be set using the commands, software settings mode, or TM-m50II Utility. - Page 113 Indicates that the printer is BUSY. The conditions under which the printer becomes BUSY can be set using the Epson TM Utility or the TM-m50II Utility. When XON/XOFF control is selected, the signal indicates that the printer is properly connected and ready to receive data from the host.
- Page 114 Appendix XON/XOFF When XON/XOFF control is selected, the printer transmits the XON or XOFF signals as follows. The timing of the transmission varies depending on the conditions configured as BUSY. Condition for BUSY Signal Printer status Receive buffer full/ Receive buffer full Offline When the printer goes online after it is turned on (or Transmit...
-
Page 115: Usb Interface
Appendix USB Interface The printer is equipped with the following USB interfaces. • USB-A connector • USB-B connector • Use a USB cable that complies with the USB 2.0 standard. Using a non-compliant cable may cause the printer to malfunction due to static electricity. •... -
Page 116: Network Interface
Vendor ID 04B8h Product ID 0202h 0E34h String Descriptor Manufacturer EPSON Product TM-m50II Serial number String based on the product serial number Network Interface For both Ethernet interface and Wi-Fi interface Support protocols Protocols Usage IP, ARP, ICMP, UDP, TCP... - Page 117 Appendix Printing communication protocol • LP, LPR: Transfers printing data • TCP Socket Port: Transfers printing data and printer status via bidirectional direct socket communication. LP, LPR • Max. simultaneous connections: • Number of connections for which printing is available: 1 (occupied until the connection is released.) •...
- Page 118 • WPA3-SAE Settings in SimpleAP mode (Factory default settings) Parameter Setting value SSID DIRECT-TM-m50II-"serial number" Passphrase Serial number ∗ In SimpleAP mode, DHCP Server is working and assign IP address to host automatically. Setting in Standard Mode These settings apply when the printer is initialized in the Interface Setup mode.
-
Page 119: Nfc Tag
Wi-Fi power saving function (Power Save). However, since the power saving function is disabled, the printer will consume more power. The setting can be changed using Web Config or TM-m50II Utility. NFC Tag... -
Page 120: Bluetooth Low Energy Technology Advertising
Dongle specifications Manufacturer: Laird Connectivity Model name: BT820 For setting methods and settings, see the TM-m50II Utility User's Manual. Procedure When you install the Bluetooth adapter, the printer is restarted and then the adapter is enabled. When you uninstall the Bluetooth adapter, the printer is restarted and then the adapter is disabled. -
Page 121: Changing The Bluetooth Low Energy Technology Advertising Packet
The method of changing settings via an HTTP Request is explained below. Digest authentication You need Digest authentication to communicate with the printer. The default ID and Password are ID: epson, Pass: serial number and are the same as the administrator for Network settings. - Page 122 Appendix Escape processing for configuration scripts When reading/writing a configuration script for a printer, the strings (content of the configuration script) being transmitted and received uses the following escape processing. However, escape is not performed for uXXXX (hexadecimal strings) such as Japanese. Table 2 Escape Processing Escape Description...
- Page 123 Appendix Response Table 5 Response Header Content-Type: application/json; charset=utf-8 Access-Control-Allow-Origin: * Access-Control-Allow-Methods: POST, GET, OPTIONS, HEADER Access-Control-Allow-Headers: Content-Type, Content-Length, Authorization X-Content-Type-Options: nosniff X-XSS-protection: 1; mode=block X-Frame-Options: deny Content-Security-Policy: default-src 'none' WWW-Authenticate: Digest realm="<IPaddr>", nonce="xxxxxxxxxxxxxxxxxxxxxxxxxxxxxxxxxxx", qop="auth" Table 6 Response Function GET Parameter Results Response Acquires the configuration script...
- Page 124 Appendix Response Status Response Body 404 Not Found "message": "Requested file not found" "detail": null "description" : null 400 Bad Request "message": "Invalid Parameter" "detail": null "description" : null Table 8 GET Response Body (Type=status) Response Status Response Body 200 OK "message": "Success", The HCI Version for the Bluetooth "detail": null,...
- Page 125 Appendix Writing the configuration script to the printer You can save a configuration script to the printer using the HTTP POST method. You can save the configuration script to volatile or non-volatile memory. When changing using a low frequency less than once an hour, you can save to non-volatile memory; however, when changing at a higher frequency, you need to save to volatile memory.
- Page 126 Appendix Function POST Parameters Results Response Updates the configuration Update successful 200 OK script in non-volatile “type” : “static”, memory “description”: “<The It has following header: string for the X-RateLimit-Limit: 1 configuration script that X-RateLimit-Remaining: 0 performed escape X-RateLimit-Reset: xx processing>”...
- Page 127 Appendix Table 11 POST Response Body Response Status Body 200 OK "message": "Success", "detail": null, "description" : < The string for the configuration script that performed escape processing > 400 Bad Request "message": "Invalid Parameter", "detail": “***”, (see Table 12) "description"...
- Page 128 Appendix Case Body No Type specified Or an invalid parameter has been "message": " Invalid Parameter ", specified "detail": “A parameter ‘type’ or ‘description’ is not specified”, "description" : null When detecting a string with invalid escape processing "message": " Invalid Parameter ", "detail": “Invalid parameter is found”, "description": null Table 13 500 Internal Server Error Details...
- Page 129 Appendix Starting and stopping Bluetooth low energy technology Advertising Format: cmd 0x08 0x000A n Function: Starting and stopping transmission of the Advertising packet. Parameter n Length Function 2 characters Advertising stop 2 characters Advertising start When specifying a start point, make sure you start Advertising using this command before "Bluetooth low energy technology Advertising Packet specifications"...
- Page 130 Appendix Bluetooth low energy technology Advertising Packet specifications Format: cmd 0x08 0x0008 d1 d2 … d32 Function: Sets the Data for the Bluetooth low energy technology Advertising packet. Specify all from d1 to d32. If these are not necessary, specify 00 for each one. Definition Length Default (iBeacon)
- Page 131 IP1: c0 IP2: A8 IP3: 64 IP4: c8 $MODEL_NO 1 byte ID value assigned to the 25h is used for the TM-m50II. printer model. 00: no use 01: reserve 25: TM-m50II $MACn 1 byte Value for #n in the MAC Available range: address.
-
Page 132: Character Code Tables
Appendix Character Code Tables Refer to the following URL regarding the character code table. https://www.epson-biz.com/pos/reference/charcode/... -
Page 133: Compatibility With Usb-A
Appendix Compatibility with USB-A Devices can be connected to the USB-A connector of the TM-m50II in the following ways. TM-m50II Direct connection Secondary connection Wireless LAN unit of OT-WL06 Extension cable of OT-WL06 OT-WL06 Barcode scanner DM-D30/DM-D70 DM-D30 OT-WL06 (f )
Need help?
Do you have a question about the TM-m50II and is the answer not in the manual?
Questions and answers