Lattice Semiconductor CrossLink-NX User Manual
Roi user tracking using vvml board demonstration
Hide thumbs
Also See for CrossLink-NX:
- User manual (58 pages) ,
- Quick start manual (15 pages) ,
- Quick start (2 pages)

Subscribe to Our Youtube Channel
Related Manuals for Lattice Semiconductor CrossLink-NX


Summary of Contents for Lattice Semiconductor CrossLink-NX
- Page 1 CrossLink-NX ROI User Tracking Using VVML Board Demonstration User Guide FPGA-UG-02158-1.0 June 2022...
- Page 2 The information provided in this document is proprietary to Lattice Semiconductor, and Lattice reserves the right to make any changes to the information in this document or to any products at any time without notice.
-
Page 3: Table Of Contents
Revision History .................................. 21 © 2022 Lattice Semiconductor Corp. All Lattice trademarks, registered trademarks, patents, and disclaimers are as listed at www.latticesemi.com/legal. All other brand or product names are trademarks or registered trademarks of their respective holders. The specifications and information herein are subject to change without notice. - Page 4 Figure 5.3. Running the Demo ............................18 © 2022 Lattice Semiconductor Corp. All Lattice trademarks, registered trademarks, patents, and disclaimers are as listed at www.latticesemi.com/legal. All other brand or product names are trademarks or registered trademarks of their respective holders. The specifications and information herein are subject to change without notice.
-
Page 5: Acronyms In This Document
Shoulder Surfing © 2022 Lattice Semiconductor Corp. All Lattice trademarks, registered trademarks, patents, and disclaimers are as listed at www.latticesemi.com/legal. All other brand or product names are trademarks or registered trademarks of their respective holders. The specifications and information herein are subject to change without notice. -
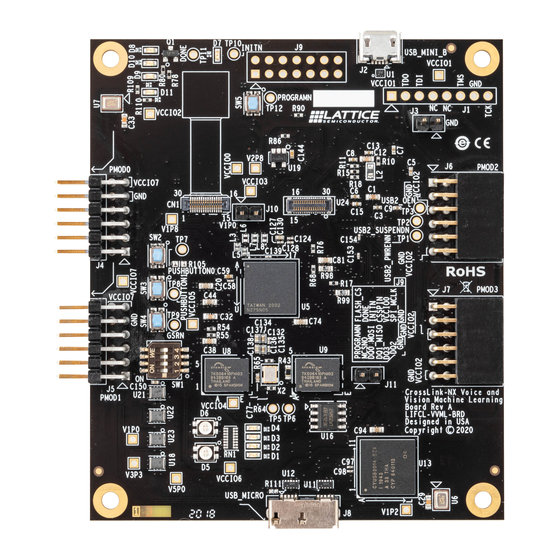
Page 6: Introduction
Figure 2.1. VVML Rev-B board - Top View © 2022 Lattice Semiconductor Corp. All Lattice trademarks, registered trademarks, patents, and disclaimers are as listed at www.latticesemi.com/legal. All other brand or product names are trademarks or registered trademarks of their respective holders. The specifications and information herein are subject to change without notice. -
Page 7: Demo Setup
3. AMCap: http://noeld.com/programs.asp?cat=video. © 2022 Lattice Semiconductor Corp. All Lattice trademarks, registered trademarks, patents, and disclaimers are as listed at www.latticesemi.com/legal. All other brand or product names are trademarks or registered trademarks of their respective holders. The specifications and information herein are subject to change without notice. -
Page 8: Programming The Demo
VVML Board. 2. Connect the USB3 port of the CrossLink-NX VVML Board (Rev B) to the PC using the USB3 cable. 3. Open the USB Control Centre application. The Cypress FX3 SDK should be installed. -
Page 9: Programming The Crosslink-Nx Voice And Vision Spi Flash
If the CrossLink-NX device is already programmed (either directly, or loaded from SPI Flash), follow this procedure first to erase the CrossLink-NX SRAM memory before re-programming the SPI Flash. If you are doing this, keep the board powered when reprogramming the SPI Flash (so it does not reload on reboot). -
Page 10: Figure 4.3. Lattice Radiant Programmer Default Screen
Figure 4.5. Lattice Radiant Programmer – Device Operation © 2022 Lattice Semiconductor Corp. All Lattice trademarks, registered trademarks, patents, and disclaimers are as listed at www.latticesemi.com/legal. All other brand or product names are trademarks or registered trademarks of their respective holders. The specifications and information herein are subject to change without notice. -
Page 11: Programming The Crosslink-Nx Voice And Vision Board
4.3.2. Programming the CrossLink-NX Voice and Vision Board To program the CrossLink-NX Voice and Vision SPI Flash: 1. Ensure that the CrossLink-NX Voice and Vision device SRAM is erased by performing the steps in the Erasing the CrossLink-NX Voice and Vision SRAM Prior to Reprogramming section. -
Page 12: Programming Sensai Firmware Binary To The Crosslink-Nx Voice And Vision Spi Flash
Figure 4.8. © 2022 Lattice Semiconductor Corp. All Lattice trademarks, registered trademarks, patents, and disclaimers are as listed at www.latticesemi.com/legal. All other brand or product names are trademarks or registered trademarks of their respective holders. The specifications and information herein are subject to change without notice. -
Page 13: Figure 4.8. Radiant Programmer - Selecting Device Properties Options For Crosslink-Nx Flashing
Figure 4.8. Radiant Programmer – Selecting Device Properties Options for CrossLink-NX Flashing Notes: • In Programming file, browse and select the CrossLink-NX sensAI firmware binary file after converting it to hex (*.mcs). • Click Load from File to update the Data file size (bytes) value. -
Page 14: Figure 4.9. Radiant Programmer - Output Console
Figure 4.10. © 2022 Lattice Semiconductor Corp. All Lattice trademarks, registered trademarks, patents, and disclaimers are as listed at www.latticesemi.com/legal. All other brand or product names are trademarks or registered trademarks of their respective holders. The specifications and information herein are subject to change without notice. -
Page 15: Figure 4.10. Radiant Programmer - Selecting Device Properties Options For Crosslink-Nx Flashing
Figure 4.10. Radiant Programmer – Selecting Device Properties Options for CrossLink-NX Flashing Notes: • In Programming file, browse and select the CrossLink-NX sensAI firmware binary file after converting it to hex (*.mcs). • Click Load from File to update the Data file size (bytes) value. -
Page 16: Figure 4.11. Radiant Programmer - Output Console
Figure 4.11. Radiant Programmer – Output Console © 2022 Lattice Semiconductor Corp. All Lattice trademarks, registered trademarks, patents, and disclaimers are as listed at www.latticesemi.com/legal. All other brand or product names are trademarks or registered trademarks of their respective holders. The specifications and information herein are subject to change without notice. -
Page 17: Running The Demo
Figure 5.1. Running the Demo © 2022 Lattice Semiconductor Corp. All Lattice trademarks, registered trademarks, patents, and disclaimers are as listed at www.latticesemi.com/legal. All other brand or product names are trademarks or registered trademarks of their respective holders. The specifications and information herein are subject to change without notice. -
Page 18: Figure 5.2. Running The Demo
Figure 5.3. Running the Demo © 2022 Lattice Semiconductor Corp. All Lattice trademarks, registered trademarks, patents, and disclaimers are as listed at www.latticesemi.com/legal. All other brand or product names are trademarks or registered trademarks of their respective holders. The specifications and information herein are subject to change without notice. -
Page 19: Ideal Conditions For Testing The Demo
© 2022 Lattice Semiconductor Corp. All Lattice trademarks, registered trademarks, patents, and disclaimers are as listed at www.latticesemi.com/legal. All other brand or product names are trademarks or registered trademarks of their respective holders. The specifications and information herein are subject to change without notice. -
Page 20: Technical Support Assistance
Submit a technical support case through www.latticesemi.com/techsupport. © 2022 Lattice Semiconductor Corp. All Lattice trademarks, registered trademarks, patents, and disclaimers are as listed at www.latticesemi.com/legal. All other brand or product names are trademarks or registered trademarks of their respective holders. The specifications and information herein are subject to change without notice. -
Page 21: Revision History
Initial release. © 2022 Lattice Semiconductor Corp. All Lattice trademarks, registered trademarks, patents, and disclaimers are as listed at www.latticesemi.com/legal. All other brand or product names are trademarks or registered trademarks of their respective holders. The specifications and information herein are subject to change without notice. - Page 22 www.latticesemi.com...
Need help?
Do you have a question about the CrossLink-NX and is the answer not in the manual?
Questions and answers