4IPNET EAP210 Quick Installation Manual
Hide thumbs
Also See for EAP210:
- User manual (166 pages) ,
- Quick installation manual (15 pages) ,
- User manual (20 pages)
Advertisement
Quick Links
Advertisement

Related Manuals for 4IPNET EAP210


Summary of Contents for 4IPNET EAP210
- Page 1 EAP210 or OWL530 Handbook...
-
Page 2: Copyright Notice
Copyright Notice This document is protected by USA copyright laws and other laws. Besides, the document is the property of 4IPNET, INC. You may not copy, reproduce, distribute, publish, display, perform, or modify any part of this publication in any form or by any means without prior written permission from 4IPNET, INC. -
Page 3: Fcc Caution
This transmitter must not be co-located or operating in conjunction with any other antenna or transmitter. Operations in the 5.15-5.25GHz band are restricted to indoor usage only. Copyright © 4IPNET, INC. All rights reserved. - Page 4 RF and related rule knowledge. The general user shall not attempt to install or change the setting. 2. Installation location 4ipnet OWL530 shall be installed at a location where the radiating antenna can be kept 20 cm from nearby person in normal operation condition to meet regulatory RF exposure requirement. 3. External antenna Use only the antennas which have been approved by the applicant.
- Page 5 This declaration is only valid for configurations (combinations of software, firmware, and hardware) provided and supported by 4ipnet Inc. The use of software or firmware not provided and supported by 4ipnet Inc. may result in the equipment no longer being compliant with the regulatory requirements.
-
Page 6: Package Contents
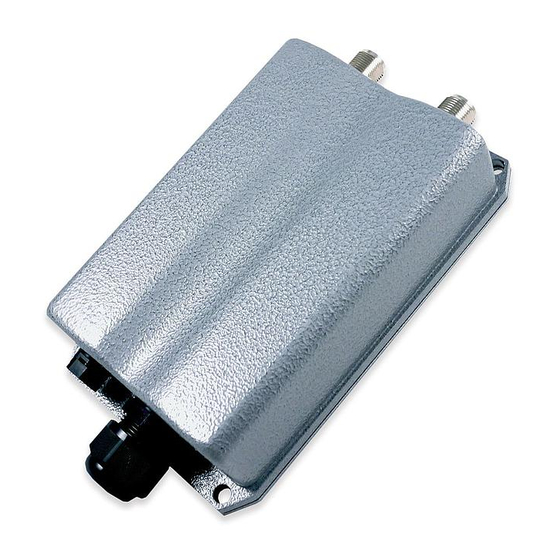
EAP210 or OWL530 Enterprise Access Point ENGLISH Preface Package Contents 1. 4ipnet OWL530 x 1 or EAP210 x 1 4ipnet EAP210 or OWL530 is a high-end 2. Quick Installation Guide (QIG) x 1 802.11a/b/g/n 2.4GHz/ 5GHz MIMO Selectable Dual 3. CD-ROM (with User’s Manual and QIG) - Page 7 Quick Installation Guide EAP210 or OWL530 Enterprise Access Point ENGLISH Hardware Overview of EAP210 Front Panel Figure 1 EAP210 Front Panel Rear Panel 1 (1) 1 (2) Figure 2 EAP210 Rear Panel - 2 -...
- Page 8 LED (Green) OFF LED (Green) OFF 7 Console Port To access EAP210 via the console interface Right-Side Panel On the right side of the panel there is a Kensington slot. Admin can also fill it with a rubber plug. - 3 -...
- Page 9 For detaching the RJ45 connector from the PoE Port Pole Mount Kit Includes two U-shaped bolts, 8 hex nuts and 8 split washers Ground Wire For ground connection as mentioned in 2 Hardware overview of OWL530 OWL530 - 4 - Copyright © 4IPNET, INC. All rights reserved.
- Page 10 Insert the RJ45 cable through the outer opening of cap (C) Insert the RJ45 connector and wrap (A) around the Ethernet cable through the slit between the connector and cap (C) - 5 - Copyright © 4IPNET, INC. All rights reserved.
- Page 11 Quick Installation Guide EAP210 or OWL530 Enterprise Access Point ENGLISH Wrap (B) around (A) through the slit on (B) Insert Parts (A) and (B) together into the PoE Port - 6 - Copyright © 4IPNET, INC. All rights reserved.
- Page 12 Screw nuts onto the U-shaped bolts and insert bolts through the split washers. Step 2. Align the front of OWL530 with the pole and insert the U-shaped bolts into the 4 holes on the corners of the OWL530. - 7 - Copyright © 4IPNET, INC. All rights reserved.
- Page 13 Quick Installation Guide EAP210 or OWL530 Enterprise Access Point ENGLISH Step 3. Secure the OWL530 by screwing on the nuts after the inserting the washers for all four corners. - 8 - Copyright © 4IPNET, INC. All rights reserved.
- Page 14 EAP210 or OWL530 Enterprise Access Point ENGLISH Basic setting of EAP210 or OWL530 4ipnet EAP210 or OWL530 supports web-based configuration. It is required to follow the respective installation procedures provided to properly set up the desired mode for this system. ...
- Page 15 System Login The system manager Login Page will then appear. Enter “admin” in the User name field and “admin” in the Password field, and then click Login to log in. - 10 - Copyright © 4IPNET, INC. All rights reserved.
- Page 16 Enterprise Access Point ENGLISH Step 4: Login Success After a successful login to EAP210 or OWL530, a System Overview page of web management interface will appear, To logout, simply click on the Logout button at the upper right hand corner of the interface.
- Page 17 Ensure the Operating Mode is currently in AP mode. Click on the Status button and then select the System Overview tab. The Operating Mode is at the System section on the System Overview page. - 12 - Copyright © 4IPNET, INC. All rights reserved.
- Page 18 Quick Installation Guide EAP210 or OWL530 Enterprise Access Point ENGLISH - 13 - Copyright © 4IPNET, INC. All rights reserved.
- Page 19 Click on the Utilities button and then select the Password tab. Enter a new password in the New Password field and retype it in the Re-enter New Password field. Click SAVE to save the changes. - 14 - Copyright © 4IPNET, INC. All rights reserved.
- Page 20 Click on the System button and then select the Network Interface tab. Click the Static radio button and enter the related information in the fields marked with red asterisks. Click SAVE to save the settings. - 15 - Copyright © 4IPNET, INC. All rights reserved.
- Page 21 ESSID: Enter respective ESSID for each VAP in the ESSID field or use the default. ESSID (Extended Service Set Identifier) is a unique identifier used for networking devices to get associated with th AP. Click SAVE to save the settings. - 16 - Copyright © 4IPNET, INC. All rights reserved.
- Page 22 Click SAVE to save all settings configured so far; all updated settings will take effect upon reboot. Congratulations! The EAP210 or OWL530 is now successfully configured. After OWL530's network configuration completes, please remember to change the IP Address of your PC Connection Properties back to its original settings in order to ensure that your PC functions properly in its real network environments.
Need help?
Do you have a question about the EAP210 and is the answer not in the manual?
Questions and answers