Advertisement
Quick Links
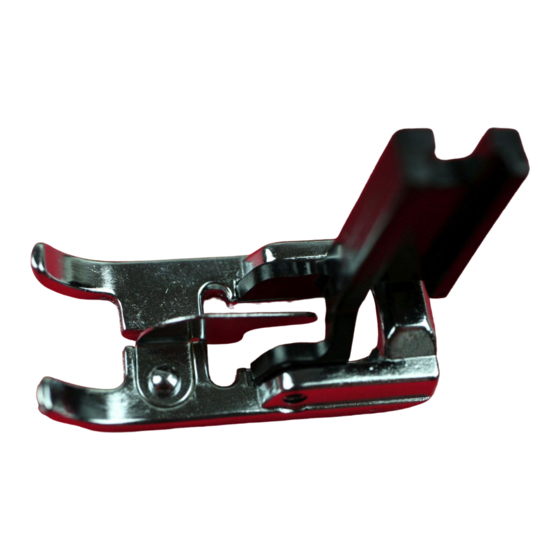
FRINGE / LOOPING FOOT
Ref: 200-050-104
The metal extension in the middle of this foot
raises the thread up off fabric surface – both
functional as well as decorative. Create tailor
tacks to transfer markings from pattern to fabric.
Create fringe, hair, chenille effects, etc.
Caution
Make sure to press the Lockout key when
replacing the foot or attaching a binder.
For models without the Lockout key, turn the
power switch off when attaching and detaching
the foot and binder.
Please refer to your machine's instruction
manual for accessory attachment and removal
information.
Machine Settings:
• Zigzag (center needle position)
• Stitch width 5.0 or wider
• Stitch length 3.0 or longer
• Insert a needle appropriate for fabric
• Fringe / looping foot
• All purpose thread for both needle and bobbin
• Thread tension – 2-4
Tailor Tacks
Lower feed dog. Place paper pattern and both
fabric layers under foot wherever there is a mark
that needs transferring. Lower presser foot. Sew
a few stitches in place. Remove paper pattern.
Pull fabrics apart and cut threads between layers.
Raise feed dog when sewing is completed.
Fringe
1.
Use a washable marker to draw design
on fabric right side. Place stabilizer under
fabric and sew over design line. Press or
use transparent tape to lay fringe to right
(or left) side.
2.
Remove fringe/looping foot and attaches
satin stitch foot (F). Select straight stitch
– stitch length 2.0. Sew on edge of fringe.
Remove excess stabilizer and transparent
tape.
Elna International Corp. SA / 02.02.2022
PIED POUR BOUCLES OU FRANGES
Réf: 200-050-104
L'extension de métal située au milieu du pied
permet de lever le fil en l'écartant du tissu pour
obtenir des effets fonctionnels ou décoratifs (des
franges, des cheveux ou un aspect chenille...
etc.). Effectuer des points de bâti pour transférer
les repères du patron au tissu.
Attention
Appuyez sur le bouton de verrouillage lorsque
vous remplacez le pied ou fixez un dispositif.
Pour les modèles de machines sans bouton de
verrouillage, coupez le contact lorsque vous
retirez ou fixez un accessoire.
Référez-vous au manuel d'instruction de votre
machine à coudre pour toutes les informations
concernant la fixation et le changement d'un
accessoire.
Préparer la machine:
• Zigzag (position aiguille au centre)
• Largeur de point 5.0 ou plus
• Longueur de point 3.0 ou plus
• Insérer l'aiguille qui convient au type de tissu
• Pied à franges / boucles
• Fil tous usages pour l'aiguille et la canette
• Tension du fil entre 2-4
Couture points de bati
Baisser la griffe de transport. Poser le patron
papier, et les deux couches de tissu sous le pied,
à l'emplacement indiqué pour un transfert. Baisser
le pied. Coudre quelques points. Retirer le patron
papier. Séparer les tissus afin de pouvoir enlever
les fils situés entre les deux épaisseurs. Lever la
griffe quand la couture est terminée.
Franges
1.
Utiliser un marqueur lavable pour dessiner
le modèle sur l'endroit du tissu. Placer
l'entoilage sous le tissu, et coudre en
suivant les lignes prévues pour le modèle.
Disposer les franges à droite ou à gauche
à l'aide de scotch transparent ou d'un fer à
repasser.
2.
Enlever le pied à franges/boucles et fixer le
pied point de bourdon (F). Sélectionner le
point droit – longueur de point 2.0. Coudre
sur le bord des franges. Enlever l'excédent
d'entoilage et le scotch.
Advertisement

Related Manuals for ELNA 200-050-104


Summary of Contents for ELNA 200-050-104
- Page 1 Enlever le pied à franges/boucles et fixer le tape. pied point de bourdon (F). Sélectionner le point droit – longueur de point 2.0. Coudre sur le bord des franges. Enlever l’excédent d’entoilage et le scotch. Elna International Corp. SA / 02.02.2022...
- Page 2 (F). Seleccione la puntada recta; longitud de Geradstich wählen - Stichlänge 2.0. An der puntada 2,0. Cosa en el extremo del fleco. Kante der Fransen nähen. Das Klebeband Retire el exceso de estabilizador y la cinta entfernen. transparente. Elna International Corp. SA / 02.02.2022...
Need help?
Do you have a question about the 200-050-104 and is the answer not in the manual?
Questions and answers