Advertisement
Quick Links
Advertisement

Subscribe to Our Youtube Channel
Related Manuals for NCR Datalogic DSM0422


Summary of Contents for NCR Datalogic DSM0422
- Page 1 Kit Instructions Datalogic DSM0422 Scanner (R1.0 and R1.1) 7709-K535 Issue A...
- Page 2 NCR, therefore, reserves the right to change specifications without prior notice. All features, functions, and operations described herein may not be marketed by NCR in all parts of the world. In some instances, photographs are of equipment prototypes. Software screen images are representative, and in some cases, may not match a customer’s installed software exactly.
- Page 3 Revision Record Issue Date Remarks Jul 2020 First Issue...
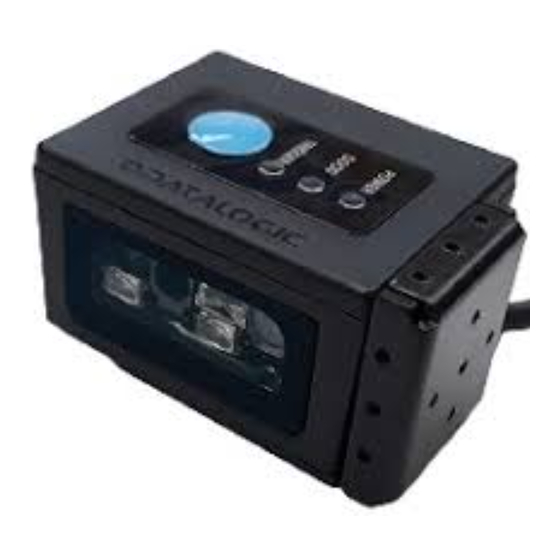
- Page 5 Datalogic DSM0422 Scanner (R1.0 and R1.1) This publication provides procedures for upgrading the NCR SelfServ™ 90 (7709) Kiosk R1.0 and R1.1 Imaging Scanner from Honeywell N5680 to Datalogic DSM0422.
-
Page 6: Kit Contents
Datalogic DSM0422 Scanner (R1.0 and R1.1) Kit Contents Part Number Description 497-0528578 Kit - Datalogic DSM0422 Scanner, R1.1 006-8627900 Scanner, Datalogic DSM0422, Wide Angle, Built-in 500mm USB Cable 497-0528546 Bracket, Imager, 7709 009-0007087 Serrated Nut, M4, Self Locking (2 pcs) 006-8622599 Screw, M2x4mm, Phil, Pan, Blk Oxide, Nylock (2 pcs) 006-8612124 M2 Lock Washer (2 pcs) 006-8615143 Cable Tie, 142 mm x 3.6 mm 006-1070679 Plastic Bag Zip Closure 4 x 6... - Page 7 Datalogic DSM0422 Scanner (R1.0 and R1.1) NCR 7709 R1.0 Installation Procedure Warning: Disconnect the AC power cord before disassembling the Terminal. 1. Shutdown and power off the terminal. Disconnect the Kiosk AC Power Cable from the outlet. 2. To open the kiosk, insert the key into the lock at the back of the kiosk, turn the key clockwise, and carefully open the front of the kiosk.
- Page 8 Datalogic DSM0422 Scanner (R1.0 and R1.1) 3. Remove the Honeywell N5680 Imaging Scanner assembly from the kiosk. a. Disconnect the Imaging Scanner Cable from the motherboard, and cut off the cable ties along its route. b. Remove the two nuts that secure the Imaging Scanner assembly to the kiosk and then remove the assembly from the studs.
- Page 9 Mount the Imaging Scanner onto the Imager bracket and secure with washers and screws. Note: For NCR 7709 R1.0 units, use the bottom mounting holes of the Imager bracket. b. Mount the Imaging Scanner assembly over the Imager Shield and secure the...
- Page 10 Datalogic DSM0422 Scanner (R1.0 and R1.1) c. Connect the Imaging Scanner cable to the USB B port of the motherboard and use a cable tie to secure the cable to the cable management slot shown in the following image.
- Page 11 Datalogic DSM0422 Scanner (R1.0 and R1.1) NCR 7709 R1.1 Installation Procedure Warning: Disconnect the AC power cord before disassembling the Terminal. 1. Shutdown and power off the terminal. Disconnect the Kiosk AC Power Cable from the outlet. 2. To open the kiosk, insert the key into the lock at the back of the kiosk, turn the key clockwise, and carefully open the front of the kiosk.
- Page 12 Datalogic DSM0422 Scanner (R1.0 and R1.1) 3. Remove the Honeywell N5680 Imaging Scanner assembly from the kiosk. a. Disconnect the Imaging Scanner Cable from the motherboard, and cut off the cable ties along its route. b. Remove the two nuts that secure the Imaging Scanner assembly to the kiosk and then remove the assembly from the studs.
- Page 13 Mount the Imaging Scanner onto the Imager bracket and secure with washers and screws. Note: For NCR 7709 R1.1 units, use the top mounting holes of the Imager bracket. b. Mount the Imaging Scanner assembly over the Imager Shield and secure the...
- Page 14 Datalogic DSM0422 Scanner (R1.0 and R1.1) c. Connect the Imaging Scanner cable to the USB B port of the motherboard and use a cable tie to secure the cable to the cable management slot shown in the following image.
Need help?
Do you have a question about the Datalogic DSM0422 and is the answer not in the manual?
Questions and answers