Table of Contents
Advertisement
Quick Links
t II
I
u1a de lnstalaci6n m / Guia de lnstala�ao m
Model/ Modelo/ Modelo: ML 100
Lock Body/ Esdandar de la Cerradura / Tipo de mecan ica:
European 5050 mortise/ Mortaja 5050 de Esdandar Europeo /
Mecanica padrao europeu 5050
Version / Version / Versao: 1.0
English / Espanol / Portugues
ti
m
1
2
3
4
5
6
7
8
9
*
0
#
Advertisement
Chapters
Table of Contents

Related Manuals for ZKTeco ML100


Summary of Contents for ZKTeco ML100
- Page 1 t II u1a de lnstalaci6n m / Guia de lnstala�ao m Model/ Modelo/ Modelo: ML 100 Lock Body/ Esdandar de la Cerradura / Tipo de mecan ica: European 5050 mortise/ Mortaja 5050 de Esdandar Europeo / Mecanica padrao europeu 5050 Version / Version / Versao: 1.0 English / Espanol / Portugues...
- Page 2 Important Notes/ Notas lmportantes / Anota�oes lmportantes 1. Please read this Installation Guide carefully and contact the Customer Care for any installation queries. 2. It is recommended that installation must be carried out by a professional technician to prevent any potential service charges that can occur due to incorrect installation.
-
Page 3: Table Of Contents
Table of Contents/ Tabla de Contenido / fndice What's in the Box / Contenido de la Caja Conteudo da Embalagem ........................1 Installation Diagram / Diagrama de lnstalaci6n / Diagrama de lnstalai;ao ...................... 2 Installation Procedure / Pasos de lnstalaci6n / Procedimento de lnstalai;ao ....................3 1. -
Page 4: What's In The Box / Contenido De La Caja Conteudo Da Embalagem
What's in the Box/ Contenido de la Caja / Conteudo da Embalagem '''' �� � � Strike plate and Box/ Plug/ Outdoor Unit/ Indoor Unit/ Mortise/ Placa Metalica y Keys/ IC Cards Studs/ Screw A/ Taquetes/ Tap6n / TornilloA/ Unidad Exterior/ Unidad Interior/ Mortaja / Contrachapa / Llaves /... -
Page 5: Installation Diagram / Diagrama De Lnstalaci6N / Diagrama De Lnstalai;Ao
Installation Diagram/ Diagrama de lnstalaci6n / Diagrama de lnstala�ao Batteries/ Baterfas / Pilhas -- -- Screw7/ C:::_- - - - TornilloB/ -- - - Parafuso B Battery Cover/ Cobertura Para las Baterfas / Tampa das pilhas - - - Spindle/ - - - Perno/ Chaveta... -
Page 6: Installation Procedure / Pasos De Lnstalaci6N / Procedimento De Lnstalai;Ao
Installation Procedure/ Pasos de lnstalaci6n / Procedimento de lnstala�ao Door Properties / Propiedades de las Puertas / Propriedades da porta Measure the thickness of the door / Mid a el grosor de la puerta / Medida da espessura da porta: Measurethethickness ofthe door and selectthe appropriateSpindle length. - Page 7 Adjust the direction of the latch (if necessary) Adjust the direction of the handle (if necessary) as follows: I as follows: I Ajuste la direcci6n del pestillo (Si es necesario): / Cambie la direcci6n de la manija (si es necesario):/ Ajuste a dire�ao da trinco (se necessario): Mude a dire�ao da ma�aneta (se necessario): Push the reversing block in upward direction./...
-
Page 8: Drilling Holes On The Door Taladrar Agujeros En La Puerta / Furai;Ao Da Porta
Installation of the Mortise/ Drilling Holes on the Door/ Taladrar agujeros en la puerta / lnstalaci6n de la Mortaja/ Fura�ao da porta lnstala�ao do mecanismo Place the installation template at the preferred handle height.I Put the Mortise into the hole that has been drilled, and Coloque la plantilla de instalaci6n a la altura deseada de la manija./ secure the Mortise with Screw A./ Coloque o gabarito de instalac;ao na altura desejada da mac;aneta. -
Page 9: Installation Of The Studs And The Outdoor Unit/ Lnstalaci6N De Lostaquetes Y La Unidad Exterior/ Lnstalando Os Pi Nos E A Unidade Extern A
Installation of the Studs and the Outdoor unit/ � Installation of the Indoor unit/ lnstalaci6n de losTaquetes y la Unidad Exterior/ lnstalaci6n de la Unidad Interior/ lnstalando os pi nos e a Unidade Extern a lnstala�ao da Unidade lnterna Putthe spindle and the studs on the rear oft he outdoor unit./ A. -
Page 10: Installation Of The Strike Plate And The Box / Lnstalaci6N De La Placa Metalica Y La Contrachapa / Lnstalai;Ao Do Batente E Caixa
Installation of the Batteries and the Cover/ Installation of the Strike Plate and the Box/ lnstalaci6n de las baterfas y la tapa / I nstalaci6n de la placa meta Ii cay la contrachapa / lnstala�ao da pilhas e da tam pa lnstala�ao do batente e caixa A. -
Page 11: Test The Lock By Using The Mechanical Key / Pruebe La Cerradura Usando La I Lave Mecanica / Teste A Fechadura Usando A Chave Mecanica.8
Test the Lock by using the Mechanical Key/ B. Align the Strike Plate and the Box with the drilled holes and secure them with Screw A./ Pruebe la cerradura usando la llave mecanica / Ali nee la placa metalica y la contrachapa con los Teste a fechadura usando a chave mecanica. - Page 12 anual de Usuario m / anual do Usuario m Model/ Modelo/ Modelo: ML 100 Version / Version / Versao: 1.0 English / Espanol / Portugues...
- Page 13 Important Notes/ Notas lmportantes / Anota�oes lmportantes 1. Please read this User Manual carefully or contact the Customer Care for any queries. 2. The device requires four alkaline AA batteries (not included). Non-alkaline and rechargeable batteries ARE NOT RECOMMENDED. 3. Do not remove the batteries from the lock during operation. 4 .
- Page 14 Too low/ Too close to the edge/ Vertical/ Demasiado baja / Demasiado cerca del borde / Verticalmente / Muito baixo Muito perto da borda Vertical Please use the correct method when pressing your fingers onto the fingerprint reader for registration and identification. Our Note: company will assume no liability for recognition issues that may result from incorrect usage of the product.
- Page 15 Table of Contents/ Tabla de Contenido / fndice Product Overview / Vista del Producto / Visio g eral do produto ....................1 De f initions / De f iniciones / De f inic;oes ............................2 HowtoUse / C6moUtilizar / Comousar ............................3 1.
-
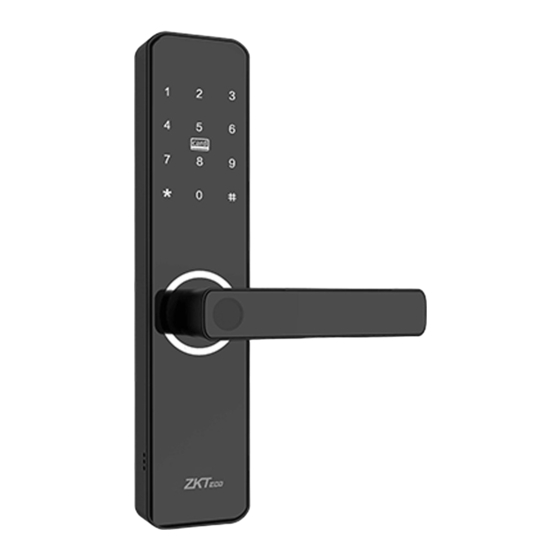
Page 16: Product Overview / Vista Del Producto / Visio G Eral Do Produto
Product Overview /Vista del Producto /Visao geral do produto Slot/ Cover baterfas Battery Tapa baterfas Battery Keypad & Card Touch Area/ Area de de las Teclado y area de detecci6n la tarjeta / :_;! Pilhas Tampa da bateria Teclado e area de cartao de Reinicio Reset Button/ o------;... -
Page 17: De F Initions / De F Iniciones / De F Inic;Oes
Definitions/ Definiciones / Defini�oes • Note: Each user can register one fingerprint, password or a card. • All the registered user data will be deleted and restored to the factory settings. Initialization: • User Roles: The lock can be controlled by two user roles: Administrator and User. The Administrator has access to the menu and can open the door. -
Page 18: Howtouse / C6Moutilizar / Comousar
• usuario pode registrar uma impressao digital, uma sen ha ou um cartao. Nota:Cada • os dados do usuario registrado serao exclufdos e restaurados para as con?gurac;oes defabrica. lnicializa�ao:Todos • fechadura foi projetada para duas func;6es de usuario, Administrador e Usuario. 0 grupo Administrador tem Fun�oes do usuario:A permissao para entrar no menu e abrir a porta, o grupo Usuario a pen as tern permissao para abrir a porta. -
Page 19: Register The First Administrator / Registro Del Primer Administrador / Registrando O Primeiro Administrador
3. Register the First Administrator / Registro del primer administrador / Registrando o primeiro administrador: Activate the Lock. / Toque el teclado para activar la cerradura. / Toque no teclado para ativar a fechadura. 2) To access the menu, press* and# and type the administrator's default password, "123456". / Para acceder al menu, presione las teclas * y # y ingrese la contrasena predeterminada del administrador "123456". - Page 20 Add Administrator/ Register a New Rngerprint/Password/Card to Continue / Registrar Admin / R@gistre una nueva huella digital / contraseria/tarjeta p,ara Register FingerprinWassword/Card / Registrar Admin continuar / Registrar Huellei/Contrasefia/Tarjeta / Registre uma nc,.,a impressao digital/senha/cart!o para Add Usor / Registrar lmpressao digital / Senha/Cartao Add Normal User/ continuar Registrar Usuario Normal/...
-
Page 21: Pair Thelockwithap P / Conectar La Cer Raduraalaapl Icac I6N / Parean Doafechadura Como O Apl Icat Ivo
5. Pair thelockwithAp p / Conectar la cer raduraalaapl icac i6n / Parean doafechadura como o apl icat ivo: Search the"ZSmart" App in Apple App Store or Google Play Store and download the App to your mobile phone. Open the"ZSmart" App and log in with your account. -
Page 22: Basic Operations / Operaciones Biisicas / Operac;Oes Biisicas
Basic Operations/ Operaciones Basicas / Opera�oes Basicas Unlock the Door with a Fingerprint / Desbloquee la puerta con huella digital / Abrindo a porta com impressao digital: Press registered fingerprint on Rotate the handle down to open / sensor I fingerprint Gire la hacia... -
Page 23: Unlocking The Door With The Ic Card / Desbloquee La Puerta Con Tarjeta Ic / Abrindo A Porta Com Cartao Ic
Unlock the Door with the IC Card/ Desbloquee la puerta con tarjeta IC/ Abrindo a porta com cartao IC: keypad Attach the card on the Rotate the handle down to open / registrada el area manija abajo Deslice la Gire la hacia para de det1�cc1<'. - Page 24 Warning This device complies with Part 15 of the FCC Rules. Operation is subject to the following two conditions: (1) This device may not cause harmful interference, and (2) this device must accept any interference received, including interference that may cause undesired operation.
Need help?
Do you have a question about the ML100 and is the answer not in the manual?
Questions and answers